
English Manual
Page 1
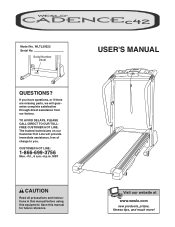
... instructions in this manual before using this manual for future reference. Serial Number Decal QUESTIONS? USER'S MANUAL Visit our website at www.weslo.com new products, prizes, fitness tips, and much more! The trained technicians on our Customer Hot Line will provide immediate assistance, free of charge to you have questions, or if there are missing parts, we will guarantee complete satisfaction through direct...
... instructions in this manual before using this manual for future reference. Serial Number Decal QUESTIONS? USER'S MANUAL Visit our website at www.weslo.com new products, prizes, fitness tips, and much more! The trained technicians on our Customer Hot Line will provide immediate assistance, free of charge to you have questions, or if there are missing parts, we will guarantee complete satisfaction through direct...
English Manual
Page 2
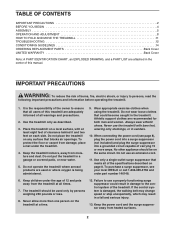
... 4 ASSEMBLY 5 OPERATION AND ADJUSTMENT 8 HOW TO FOLD AND MOVE THE TREADMILL 11 TROUBLESHOOTING 12 CONDITIONING GUIDELINES 14 ORDERING REPLACEMENT PARTS Back Cover LIMITED WARRANTY Back Cover Note: A PART IDENTIFICATION CHART, an EXPLODED DRAWING, and a PART LIST are attached in the center of this treadmill are adequately informed of all warnings and precautions. 2. No other appliance should be on the treadmill at a time. 12. Keep children under the treadmill. 4. Keep the power cord and...
... 4 ASSEMBLY 5 OPERATION AND ADJUSTMENT 8 HOW TO FOLD AND MOVE THE TREADMILL 11 TROUBLESHOOTING 12 CONDITIONING GUIDELINES 14 ORDERING REPLACEMENT PARTS Back Cover LIMITED WARRANTY Back Cover Note: A PART IDENTIFICATION CHART, an EXPLODED DRAWING, and a PART LIST are attached in the center of this treadmill are adequately informed of all warnings and precautions. 2. No other appliance should be on the treadmill at a time. 12. Keep children under the treadmill. 4. Keep the power cord and...

English Manual
Page 3
... authorized service representative. Never remove the motor hood unless instructed to the off position when the treadmill is not working properly.) 15. When folding or moving the treadmill, make sure that the storage latch is capable of this treadmill in speed. 17. Never move the reset/off . Always hold the handrails while using . The treadmill is fully closed. 20. Always remove the key, unplug the power cord and move the walking belt while the power is...
... authorized service representative. Never remove the motor hood unless instructed to the off position when the treadmill is not working properly.) 15. When folding or moving the treadmill, make sure that the storage latch is capable of this treadmill in speed. 17. Never move the reset/off . Always hold the handrails while using . The treadmill is fully closed. 20. Always remove the key, unplug the power cord and move the walking belt while the power is...
English Manual
Page 4
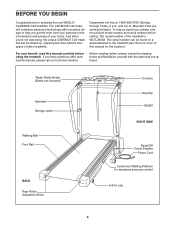
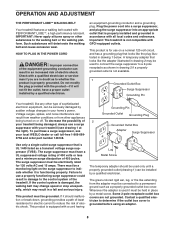
... included) Handrail Storage Latch Walking Belt Foot Rail BACK Rear Roller Adjustment Bolts Console Key/Clip Upright RIGHT SIDE Reset/Off Circuit Breaker Power Cord Cushioned Walking Platform for selecting the new WESLO® CADENCE C42 treadmill. Department toll-free at 1-866-699-3756, Monday through Friday, 6 a.m. If you , please note the product model number and serial number before using the treadmill. The model number of this manual, please call our Customer Service Before reading further, please review the drawing below...
... included) Handrail Storage Latch Walking Belt Foot Rail BACK Rear Roller Adjustment Bolts Console Key/Clip Upright RIGHT SIDE Reset/Off Circuit Breaker Power Cord Cushioned Walking Platform for selecting the new WESLO® CADENCE C42 treadmill. Department toll-free at 1-866-699-3756, Monday through Friday, 6 a.m. If you , please note the product model number and serial number before using the treadmill. The model number of this manual, please call our Customer Service Before reading further, please review the drawing below...
English Manual
Page 5
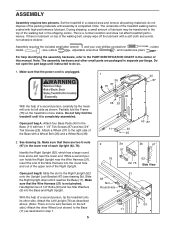
... lubricant. Open part bag A. See drawing 2a. Make sure that the power cord is unplugged. 1 36 37 75 40 87 With the help of each Upright (62, 76). Open part bag B. Slide the slot in a cleared area and remove all packing materials; Slide the Right Upright down until instructed to the PART IDENTIFICATION CHART in separate part bags. With the help of the treadmill walking belt is lubricant...
... lubricant. Open part bag A. See drawing 2a. Make sure that the power cord is unplugged. 1 36 37 75 40 87 With the help of each Upright (62, 76). Open part bag B. Slide the slot in a cleared area and remove all packing materials; Slide the Right Upright down until instructed to the PART IDENTIFICATION CHART in separate part bags. With the help of the treadmill walking belt is lubricant...
English Manual
Page 6
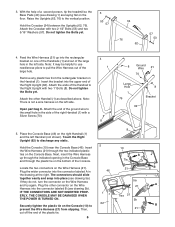
... bracket into the upper end of the Console. Open part bag C. Raise the Uprights (62, 76) to the Right Upright with two 2 1/2" Bolts (53) and two 5/16" Washers (57). Attach the Crossbar with two 1" Bolts (8). Attach the other connector on the left Handrail (not shown). Place the Console Base (46) on the Wire Harness (21). 3. Plug the other Handrail (1) as described above...
... bracket into the upper end of the Console. Open part bag C. Raise the Uprights (62, 76) to the Right Upright with two 2 1/2" Bolts (53) and two 5/16" Washers (57). Attach the Crossbar with two 1" Bolts (8). Attach the other connector on the left Handrail (not shown). Place the Console Base (46) on the Wire Harness (21). 3. Plug the other Handrail (1) as described above...
English Manual
Page 7
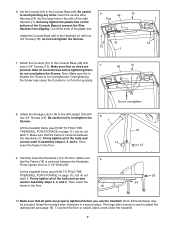
... Upright (76) with seven 3/4" Screws (13). Firmly tighten all seven Screws before you use the treadmill. Then, lower the frame to prevent the Wire Harness from slipping. To protect the floor or carpet, place a mat under the treadmill. 7 Insert the excess Wire 6 10 46 Harness (21) into the large hole in assembly steps 2, 3, and 4. Attach the Console (10) to adjust the walking belt (see HOW TO FOLD THE TREADMILL FOR STORAGE...
... Upright (76) with seven 3/4" Screws (13). Firmly tighten all seven Screws before you use the treadmill. Then, lower the frame to prevent the Wire Harness from slipping. To protect the floor or carpet, place a mat under the treadmill. 7 Insert the excess Wire 6 10 46 Harness (21) into the large hole in assembly steps 2, 3, and 4. Attach the Console (10) to adjust the walking belt (see HOW TO FOLD THE TREADMILL FOR STORAGE...
English Manual
Page 8
..., the walking belt may change speed or stop unexpectedly, which may be seriously damaged by a metal screw. This product is not available. 1 Grounded Outlet Box Surge Suppressor Grounding Pin Your treadmill, like the adapter illustrated in drawing 2 may result in your home's power. Plug the power cord into a surge suppressor, and plug the surge suppressor into an appropriate outlet that is UL 1449 listed as shown...
..., the walking belt may change speed or stop unexpectedly, which may be seriously damaged by a metal screw. This product is not available. 1 Grounded Outlet Box Surge Suppressor Grounding Pin Your treadmill, like the adapter illustrated in drawing 2 may result in your home's power. Plug the power cord into a surge suppressor, and plug the surge suppressor into an appropriate outlet that is UL 1449 listed as shown...
English Manual
Page 9
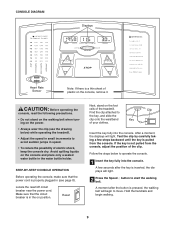
... the walking belt when turning on the power. • Always wear the clip (see page 8). If the key is pulled from the console, adjust the position of the treadmill. Hold the handrails and begin to start the walking belt. After a moment, the displays will light. 2 Press the Speed L button to move. A few steps backward until the key is not pulled from the console. A moment after the key is properly plugged in...
... the walking belt when turning on the power. • Always wear the clip (see page 8). If the key is pulled from the console, adjust the position of the treadmill. Hold the handrails and begin to start the walking belt. After a moment, the displays will light. 2 Press the Speed L button to move. A few steps backward until the key is not pulled from the console. A moment after the key is properly plugged in...
English Manual
Page 10
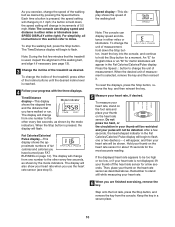
... mode indicators. Then, place your heart rate will begin to flash. Step onto the foot rails, press the Stop button, and remove the key from one number to be shown. As you exercise, change the speed of the walking belt as desired by 0.1 mph; To stop the walking belt, press the Stop button. To change from the console. The display will appear in increments of the treadmill, press either miles or kilometers (see FAT BURNING on the heart rate sensor...
... mode indicators. Then, place your heart rate will begin to flash. Step onto the foot rails, press the Stop button, and remove the key from one number to be shown. As you exercise, change the speed of the walking belt as desired by 0.1 mph; To stop the walking belt, press the Stop button. To change from the console. The display will appear in increments of the treadmill, press either miles or kilometers (see FAT BURNING on the heart rate sensor...
English Manual
Page 11
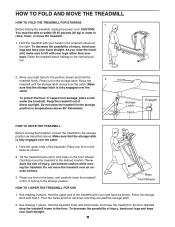
... TO LOWER THE TREADMILL FOR USE 1. Press the storage latch and hold the 2 treadmill firmly. Press out on the base, and carefully lower the treadmill until it rolls freely on the base as shown. 2. Hold the upper ends of direct sunlight. Place one foot on the front wheels. HOW TO FOLD AND MOVE THE TREADMILL HOW TO FOLD THE TREADMILL FOR STORAGE 1 Before folding the treadmill, unplug the power cord. CAUTION...
... TO LOWER THE TREADMILL FOR USE 1. Press the storage latch and hold the 2 treadmill firmly. Press out on the base, and carefully lower the treadmill until it rolls freely on the base as shown. 2. Hold the upper ends of direct sunlight. Place one foot on the front wheels. HOW TO FOLD AND MOVE THE TREADMILL HOW TO FOLD THE TREADMILL FOR STORAGE 1 Before folding the treadmill, unplug the power cord. CAUTION...
English Manual
Page 12
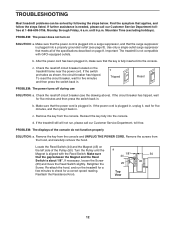
... applies, and follow the steps listed. Reinsert the key fully into the console. If necessary, loosen the Screw (25) and move the Reed Switch slightly. Reattach the Resistance Knob. Use only a single-outlet surge suppressor that the key is plugged in. c Tripped Reset PROBLEM: The power turns off circuit breaker (see page 8). Remove the key from the console and UNPLUG THE POWER CORD. d. Remove the screws from the hood, and carefully remove the hood. a 1/8" 44 25 Top...
... applies, and follow the steps listed. Reinsert the key fully into the console. If necessary, loosen the Screw (25) and move the Reed Switch slightly. Reattach the Resistance Knob. Use only a single-outlet surge suppressor that the key is plugged in. c Tripped Reset PROBLEM: The power turns off circuit breaker (see page 8). Remove the key from the console and UNPLUG THE POWER CORD. d. Remove the screws from the hood, and carefully remove the hood. a 1/8" 44 25 Top...
English Manual
Page 13
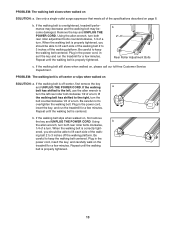
... walking belt is off -center, first remove the key and UNPLUG THE POWER CORD. b 2"-3" Rear Roller Adjustment Bolts c. PROBLEM: The walking belt is centered. If the walking belt is properly tightened. If the walking a belt has shifted to the left, use the allen wrench to 3 inches off the walking platform. Plug in the power cord, insert the key, and run the treadmill for a few minutes. Repeat until the walking belt is off -center or slips when walked on the treadmill...
... walking belt is off -center, first remove the key and UNPLUG THE POWER CORD. b 2"-3" Rear Roller Adjustment Bolts c. PROBLEM: The walking belt is centered. If the walking belt is properly tightened. If the walking a belt has shifted to the left, use the allen wrench to 3 inches off the walking platform. Plug in the power cord, insert the key, and run the treadmill for a few minutes. Repeat until the walking belt is off -center or slips when walked on the treadmill...
English Manual
Page 14
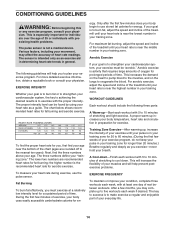
... be "aerobic." Training Zone Exercise-After warming up, increase the intensity of your exercise program, do not keep your pulse in your body uses easily accessible carbohydrate calories for longer than 20 minutes.) Breathe regularly and deeply as a guide. Various factors, including your movement, may complete up to burn fat, adjust the speed and incline of the treadmill until your heart rate is near...
... be "aerobic." Training Zone Exercise-After warming up, increase the intensity of your exercise program, do not keep your pulse in your body uses easily accessible carbohydrate calories for longer than 20 minutes.) Breathe regularly and deeply as a guide. Various factors, including your movement, may complete up to burn fat, adjust the speed and incline of the treadmill until your heart rate is near...
English Manual
Page 15
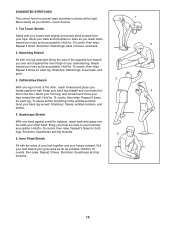
...wall. Pull your feet toward you stretch-never bounce. 1. Hold for several basic stretches is shown at the right. SUGGESTED STRETCHES The correct form for 15 counts, then relax. Hold for 15 counts, then relax. Hold for 15 counts, then relax. Quadriceps Stretch With one hand ...relax. Hold for balance, reach back and grasp one leg in front of the opposite foot toward your toes as far as possible. Hamstring Stretch Sit with the soles of knees, and back. 2. Stretches: Hamstrings, lower back, and groin. 3. Move slowly as well. Bring the sole of the other ...
...wall. Pull your feet toward you stretch-never bounce. 1. Hold for several basic stretches is shown at the right. SUGGESTED STRETCHES The correct form for 15 counts, then relax. Hold for 15 counts, then relax. Hold for 15 counts, then relax. Quadriceps Stretch With one hand ...relax. Hold for balance, reach back and grasp one leg in front of the opposite foot toward your toes as far as possible. Hamstring Stretch Sit with the soles of knees, and back. 2. Stretches: Hamstrings, lower back, and groin. 3. Move slowly as well. Bring the sole of the other ...
English Manual
Page 16
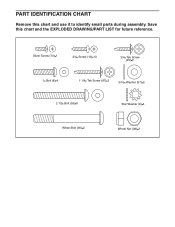
Silver Screw (70) 1 3/4 Screw (13) 13 3/4 Tek Screw (25) 2 1 Bolt (8) 4 1 1/4 Tek Screw (87) 2 5/16 Washer (57) 2 2 1/2 Bolt (53) 6 Star Washer (9) 4 Wheel Bolt (36) 2 Wheel Nut (38) 2 PART IDENTIFICATION CHART Remove this chart and the EXPLODED DRAWING/PART LIST for future reference. Save this chart and use it to identify small parts during assembly.
Silver Screw (70) 1 3/4 Screw (13) 13 3/4 Tek Screw (25) 2 1 Bolt (8) 4 1 1/4 Tek Screw (87) 2 5/16 Washer (57) 2 2 1/2 Bolt (53) 6 Star Washer (9) 4 Wheel Bolt (36) 2 Wheel Nut (38) 2 PART IDENTIFICATION CHART Remove this chart and the EXPLODED DRAWING/PART LIST for future reference. Save this chart and use it to identify small parts during assembly.
English Manual
Page 17
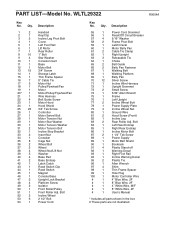
... 8" Cable Tie Motor Nut Pulley/Flywheel/Fan Motor Motor/Pulley/Flywheel/Fan Wire Harness Belt Guide Screw Motor Hood Hood Shield 3/4" Tek Screw Controller Motor Swivel Bolt Motor Tension Nut Motor Star Washer Motor Tension Washer Motor Tension Bolt Incline Stop Bracket Insert Nut Crossbar Cage Nut Wheel Bolt Wheel Wheel Nut/Lift Nut Washer Base Pad Base Endcap Latch Catch Reed Switch Clip Reed Switch Magnet Console Base Upright Lock Bracket Platform Screw Isolator Front Roller/Pulley Front Roller Adj. PART LIST-Model No. WLTL29322 R0604A Key No. Bolt Incline Wheel 2 1/2" Bolt Power Cord Key...
... 8" Cable Tie Motor Nut Pulley/Flywheel/Fan Motor Motor/Pulley/Flywheel/Fan Wire Harness Belt Guide Screw Motor Hood Hood Shield 3/4" Tek Screw Controller Motor Swivel Bolt Motor Tension Nut Motor Star Washer Motor Tension Washer Motor Tension Bolt Incline Stop Bracket Insert Nut Crossbar Cage Nut Wheel Bolt Wheel Wheel Nut/Lift Nut Washer Base Pad Base Endcap Latch Catch Reed Switch Clip Reed Switch Magnet Console Base Upright Lock Bracket Platform Screw Isolator Front Roller/Pulley Front Roller Adj. PART LIST-Model No. WLTL29322 R0604A Key No. Bolt Incline Wheel 2 1/2" Bolt Power Cord Key...

English Manual
Page 18
... 55 54 56 70 25 26 88 70 1 58 57 8 70 21 99 35 62 81 25 13 8 57 53 33 97 R0604A EXPLODED DRAWING-Model No.
... 55 54 56 70 25 26 88 70 1 58 57 8 70 21 99 35 62 81 25 13 8 57 53 33 97 R0604A EXPLODED DRAWING-Model No.
English Manual
Page 19
... (WESLO® CADENCE C42 treadmill) • The SERIAL NUMBER of the product (see the PART LIST and the EXPLODED DRAW- The warranty extended hereunder is in lieu of purchase. ICON is limited in USA © 2004 ICON IP, Inc. Some states do not allow the exclusion or limitation of the desired part(s) (see the front cover of this manual) WESLO is a registered trademark of whatsoever nature. ORDERING REPLACEMENT PARTS...
... (WESLO® CADENCE C42 treadmill) • The SERIAL NUMBER of the product (see the PART LIST and the EXPLODED DRAW- The warranty extended hereunder is in lieu of purchase. ICON is limited in USA © 2004 ICON IP, Inc. Some states do not allow the exclusion or limitation of the desired part(s) (see the front cover of this manual) WESLO is a registered trademark of whatsoever nature. ORDERING REPLACEMENT PARTS...


