
English Manual
Page 2
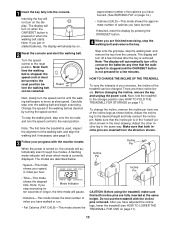
...from damage, place a mat under the age of all users of this manual. Keep children under the treadmill. 4. Never use an extension cord. 11. When connecting the power cord (see your local WESLO dealer or call 1-800-8063651 and order part number 146148. 12. Keep the power cord and the surge... suppressor away from the treadmill at least eight feet of the specifications described on any surface that all warnings...
...from damage, place a mat under the age of all users of this manual. Keep children under the treadmill. 4. Never use an extension cord. 11. When connecting the power cord (see your local WESLO dealer or call 1-800-8063651 and order part number 146148. 12. Keep the power cord and the surge... suppressor away from the treadmill at least eight feet of the specifications described on any surface that all warnings...
English Manual
Page 3
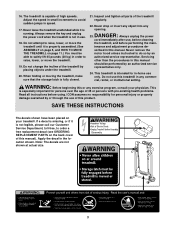
.... This is intended for persons over the age of 35 or persons with pre-existing health problems. Read all parts of Electric Shock •Unplug Treadmill before performing the main- Adjust the speed in small increments to avoid sudden jumps in the location shown. When folding or moving the...not legible, please call our Customer Service Department, toll-free, to safely lift 45 pounds (20 kg) in any commercial, rental, or institutional setting. This treadmill is especially important for in this manual. Apply the decal in speed. 17. Do not attempt to raise, lower, or move the...
.... This is intended for persons over the age of 35 or persons with pre-existing health problems. Read all parts of Electric Shock •Unplug Treadmill before performing the main- Adjust the speed in small increments to avoid sudden jumps in the location shown. When folding or moving the...not legible, please call our Customer Service Department, toll-free, to safely lift 45 pounds (20 kg) in any commercial, rental, or institutional setting. This treadmill is especially important for in this manual. Apply the decal in speed. 17. Do not attempt to raise, lower, or move the...
English Manual
Page 4
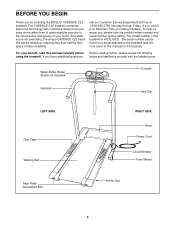
...for selecting the WESLO® CADENCE C22 treadmill. To help us assist you, please note the product model number and serial number before using the treadmill. The model number of the treadmill is WLTL19321. BEFORE YOU BEGIN Thank you 're not exercising, the unique CADENCE C22 treadmill can be folded... up, requiring less than half the floor space of other treadmills. call our Customer Service Department...
...for selecting the WESLO® CADENCE C22 treadmill. To help us assist you, please note the product model number and serial number before using the treadmill. The model number of the treadmill is WLTL19321. BEFORE YOU BEGIN Thank you 're not exercising, the unique CADENCE C22 treadmill can be folded... up, requiring less than half the floor space of other treadmills. call our Customer Service Department...
English Manual
Page 5
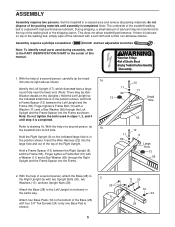
...Upright (17), which does not have a large round hole near the lower end. (Note: There may be identification decals on top of the treadmill walking belt is completed. Finger tighten a Frame Bolt (10) with high-performance lubricant. do not dispose of a second person, attach the ...Base (28) to the top of Electric Shock •Unplug Treadmill before Assembly /Disassembly. 1. Note: To identify small parts used in a cleared area and remove all packing materials; With the help of a second...
...Upright (17), which does not have a large round hole near the lower end. (Note: There may be identification decals on top of the treadmill walking belt is completed. Finger tighten a Frame Bolt (10) with high-performance lubricant. do not dispose of a second person, attach the ...Base (28) to the top of Electric Shock •Unplug Treadmill before Assembly /Disassembly. 1. Note: To identify small parts used in a cleared area and remove all packing materials; With the help of a second...
English Manual
Page 6
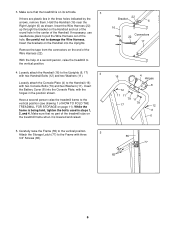
... (22). 3. Loosely attach the Console Plate (4) to the Handrail (16) with three 3/4" Screws (65). 55 77 65 6 With the help of the treadmill rubs on the treadmill frame when it is lowered and raised. 22 Bracket 6 16 Connectors 22 17 16 4 Hinges 8 12 11 11 79 11 17 79 12 11... (55) to the vertical position. 5 Attach the Storage Latch (77) to the vertical position. 4. Make sure that no part of a second person, raise the treadmill to the Frame with two Console Bolts (79) and two Washers (11). Loosely attach the Handrail (16) to pull the Wire Harness out of the...
... (22). 3. Loosely attach the Console Plate (4) to the Handrail (16) with three 3/4" Screws (65). 55 77 65 6 With the help of the treadmill rubs on the treadmill frame when it is lowered and raised. 22 Bracket 6 16 Connectors 22 17 16 4 Hinges 8 12 11 11 79 11 17 79 12 11... (55) to the vertical position. 5 Attach the Storage Latch (77) to the vertical position. 4. Make sure that no part of a second person, raise the treadmill to the Frame with two Console Bolts (79) and two Washers (11). Loosely attach the Handrail (16) to pull the Wire Harness out of the...
English Manual
Page 7
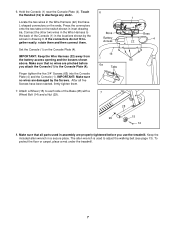
...the five 3/4" Screws (65) into the Console Plate (4) and the Console (1). IMPORTANT: Make sure no wires are properly tightened before you use the treadmill. Make sure that have been started, firmly tighten them . If the connectors do not fit together easily, rotate them and then connect them . 7. ...in assembly are pinched before you attach the Console (1) to the Console Plate (4). To protect the floor or carpet, place a mat under the treadmill. 7 The allen wrench is used in the Wire Harness (22) that all five Screws have L-shaped connectors on the ends. Touch the Handrail...
...the five 3/4" Screws (65) into the Console Plate (4) and the Console (1). IMPORTANT: Make sure no wires are properly tightened before you use the treadmill. Make sure that have been started, firmly tighten them . If the connectors do not fit together easily, rotate them and then connect them . 7. ...in assembly are pinched before you attach the Console (1) to the Console Plate (4). To protect the floor or carpet, place a mat under the treadmill. 7 The allen wrench is used in the Wire Harness (22) that all five Screws have L-shaped connectors on the ends. Touch the Handrail...
English Manual
Page 8
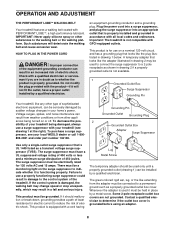
...reduce the risk of the treadmill. This product must have a proper outlet installed by sudden voltage changes in your treadmill being turned on a nominal 120-volt circuit, and has a grounding plug that is not compatible with your treadmill (see your local WESLO dealer or call 1-800-... 806-3651 and order part number 146148. Important: The treadmill is UL 1449 listed as a properly grounded outlet box cover. There must be grounded...
...reduce the risk of the treadmill. This product must have a proper outlet installed by sudden voltage changes in your treadmill being turned on a nominal 120-volt circuit, and has a grounding plug that is not compatible with your treadmill (see your local WESLO dealer or call 1-800-... 806-3651 and order part number 146148. Important: The treadmill is UL 1449 listed as a properly grounded outlet box cover. There must be grounded...
English Manual
Page 9
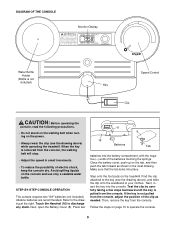
.... • Do not stand on the walking belt when turning on the power. • Always wear the clip (see the drawing above ) while operating the treadmill. Next, open the Battery Cover (8). STEP-BY-STEP CONSOLE OPERATION The console requires two "AA" batteries (not included). Refer to discharge any static. Press two... console. 9 Make sure that the tab locks into the console. Touch the Handrail (16) to the drawing at the right. Avoid spilling liquids on the treadmill. Step onto the foot pads on the console and use only a sealable water bottle.
.... • Do not stand on the walking belt when turning on the power. • Always wear the clip (see the drawing above ) while operating the treadmill. Next, open the Battery Cover (8). STEP-BY-STEP CONSOLE OPERATION The console requires two "AA" batteries (not included). Refer to discharge any static. Press two... console. 9 Make sure that the tab locks into the console. Touch the Handrail (16) to the drawing at the right. Avoid spilling liquids on the treadmill. Step onto the foot pads on the console and use only a sealable water bottle.
English Manual
Page 10
...and the ON/RESET button is turned on when the ON/RESET button is currently displayed. After you have adjusted the incline legs, lower the treadmill (see page 13). 3 Follow your exercise, the incline of calories you have burned. Note: Each time the walking belt is removed. ...slow speed. A flashing mode indicator will automatically turn on page 14.) • Calories (CALS)-This mode shows the approximate number of the treadmill can be turned to conserve the batteries any time that both incline pins are inserted from the console. Adjust the other incline leg in the...
...and the ON/RESET button is turned on when the ON/RESET button is currently displayed. After you have adjusted the incline legs, lower the treadmill (see page 13). 3 Follow your exercise, the incline of calories you have burned. Note: Each time the walking belt is removed. ...slow speed. A flashing mode indicator will automatically turn on page 14.) • Calories (CALS)-This mode shows the approximate number of the treadmill can be turned to conserve the batteries any time that both incline pins are inserted from the console. Adjust the other incline leg in the...
English Manual
Page 11
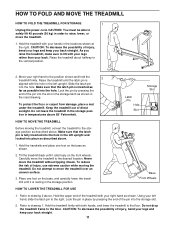
... pin is inserted as far as described above . 1. Lock the pin by pressing the end of the pin into the hole. Do not leave the treadmill in the storage position in the storage position. Do not attempt to drawing 1. Refer to the storage position as possible into the storage slot. 2. Refer.... Move your hands in the inset drawing. Make sure that the latch pin is fully inserted into the hole in the left upright. Hold the treadmill with your legs rather than your left hand, slide the latch pin to the floor. Slide the latch pin into the slot in the left...
... pin is inserted as far as described above . 1. Lock the pin by pressing the end of the pin into the hole. Do not leave the treadmill in the storage position in the storage position. Do not attempt to drawing 1. Refer to the storage position as possible into the storage slot. 2. Refer.... Move your hands in the inset drawing. Make sure that the latch pin is fully inserted into the hole in the left upright. Hold the treadmill with your legs rather than your left hand, slide the latch pin to the floor. Slide the latch pin into the slot in the left...
English Manual
Page 12
... the Magnet is aligned with GFCI-equipped outlets. After the power cord has been plugged in . c. Check the circuit breaker located on the treadmill frame near the power cord. If the circuit breaker has tripped, wait for a correct speed reading. If the power cord is needed, please... CORD. Make sure that the power cord is not compatible with the Reed Switch. MAINTENANCE AND TROUBLESHOOTING Most treadmill problems can be solved by following the steps below. Important: The treadmill is plugged into the console. To reset the circuit breaker, wait for five minutes, and then plug it...
... the Magnet is aligned with GFCI-equipped outlets. After the power cord has been plugged in . c. Check the circuit breaker located on the treadmill frame near the power cord. If the circuit breaker has tripped, wait for a correct speed reading. If the power cord is needed, please... CORD. Make sure that the power cord is not compatible with the Reed Switch. MAINTENANCE AND TROUBLESHOOTING Most treadmill problems can be solved by following the steps below. Important: The treadmill is plugged into the console. To reset the circuit breaker, wait for five minutes, and then plug it...
English Manual
Page 13
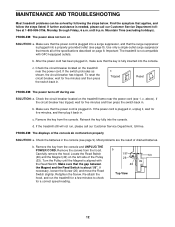
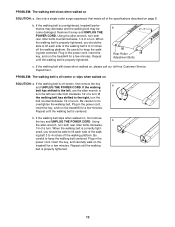
... tightened, you should be able to the right, turn the bolt counterclockwise 1/2 of a turn . b. If the walking belt is overtightened, treadmill performance may decrease and the walking belt may become damaged. Be careful not to keep the walking belt centered. If the walking belt is off... the allen wrench, turn both rear roller bolts counterclockwise, 1/4 of the walking belt 2 to 4 inches off -center or slips when walked on the treadmill for a few minutes. If the walking belt still slows when walked on page 8. Plug in the power cord, insert the key, and carefully walk ...
... tightened, you should be able to the right, turn the bolt counterclockwise 1/2 of a turn . b. If the walking belt is overtightened, treadmill performance may decrease and the walking belt may become damaged. Be careful not to keep the walking belt centered. If the walking belt is off... the allen wrench, turn both rear roller bolts counterclockwise, 1/4 of the walking belt 2 to 4 inches off -center or slips when walked on the treadmill for a few minutes. If the walking belt still slows when walked on page 8. Plug in the power cord, insert the key, and carefully walk ...
English Manual
Page 19
... the following information: • The MODEL NUMBER of the product (WLTL19321) • The NAME of the product (WESLO® CADENCE C22 treadmill) • The SERIAL NUMBER of the product (see the front cover of this manual) WESLO is authorized by ICON. products used as store display models. Some states do not allow limitations on how...
... the following information: • The MODEL NUMBER of the product (WLTL19321) • The NAME of the product (WESLO® CADENCE C22 treadmill) • The SERIAL NUMBER of the product (see the front cover of this manual) WESLO is authorized by ICON. products used as store display models. Some states do not allow limitations on how...


