
English Manual
Page 2
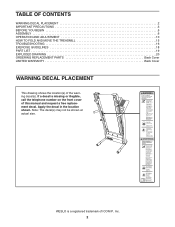
If a decal is a registered trademark of this manual and request a free replacement decal. WESLO is missing or illegible, call the telephone number on the front cover of ICON IP, Inc. 2 Note: The decal(s) may not be shown at ...actual size. TABLE OF CONTENTS WARNING DECAL PLACEMENT 2 IMPORTANT PRECAUTIONS 3 BEFORE YOU BEGIN 5 ASSEMBLY 6 OPERATION AND ADJUSTMENT 10 HOW TO FOLD AND MOVE THE TREADMILL 15 TROUBLESHOOTING 16 EXERCISE GUIDELINES 18 PART LIST 19 EXPLODED DRAWING 20 ORDERING REPLACEMENT PARTS Back Cover LIMITED WARRANTY Back Cover WARNING DECAL PLACEMENT This...
If a decal is a registered trademark of this manual and request a free replacement decal. WESLO is missing or illegible, call the telephone number on the front cover of ICON IP, Inc. 2 Note: The decal(s) may not be shown at ...actual size. TABLE OF CONTENTS WARNING DECAL PLACEMENT 2 IMPORTANT PRECAUTIONS 3 BEFORE YOU BEGIN 5 ASSEMBLY 6 OPERATION AND ADJUSTMENT 10 HOW TO FOLD AND MOVE THE TREADMILL 15 TROUBLESHOOTING 16 EXERCISE GUIDELINES 18 PART LIST 19 EXPLODED DRAWING 20 ORDERING REPLACEMENT PARTS Back Cover LIMITED WARRANTY Back Cover WARNING DECAL PLACEMENT This...
English Manual
Page 3
... adequately informed of all warnings on your treadmill before using the treadmill. 18. Always hold the handrails while using the treadmill (see your local electronics store. 4. The heart rate monitor is turned off. When connecting the power cord (see your local WESLO dealer or call the telephone number on... the front cover of this product. 1. ICON assumes no responsibility for both men and women. Use the treadmill only as an exercise aid in determining heart rate trends in...
... adequately informed of all warnings on your treadmill before using the treadmill. 18. Always hold the handrails while using the treadmill (see your local electronics store. 4. The heart rate monitor is turned off. When connecting the power cord (see your local WESLO dealer or call the telephone number on... the front cover of this product. 1. ICON assumes no responsibility for both men and women. Use the treadmill only as an exercise aid in determining heart rate trends in...
English Manual
Page 4
...DANGER: 26. Always unplug the power cord immediately after use only. scribed in this treadmill in -home use , before cleaning the treadmill, and before performing the main- Inspect and properly tighten all parts of the treadmill by an authorized service representative only. 27. If you feel faint or if you ..., rental, or institutional setting. 23. SAVE THESE INSTRUCTIONS 4 Never remove the motor hood unless instructed to raise, lower, or move the treadmill until it is holding the frame securely in serious injury or death. Do not change the incline of the...
...DANGER: 26. Always unplug the power cord immediately after use only. scribed in this treadmill in -home use , before cleaning the treadmill, and before performing the main- Inspect and properly tighten all parts of the treadmill by an authorized service representative only. 27. If you feel faint or if you ..., rental, or institutional setting. 23. SAVE THESE INSTRUCTIONS 4 Never remove the motor hood unless instructed to raise, lower, or move the treadmill until it is holding the frame securely in serious injury or death. Do not change the incline of the...
English Manual
Page 5
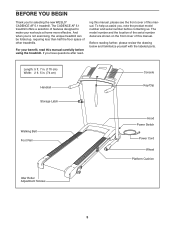
... the front cover of this manual carefully before contacting us assist you for selecting the new WESLO® CADENCE AF 5.1 treadmill. And when you have questions after read this manual. If you ʼre not exercising, the unique treadmill can be folded up, requiring less than half the floor space of features designed to make...
... the front cover of this manual carefully before contacting us assist you for selecting the new WESLO® CADENCE AF 5.1 treadmill. And when you have questions after read this manual. If you ʼre not exercising, the unique treadmill can be folded up, requiring less than half the floor space of features designed to make...
English Manual
Page 6
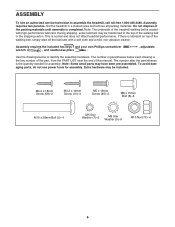
... parentheses is coated with a soft cloth and a mild, non-abrasive cleaner. Extra hardware may be transferred to the top of the treadmill walking belt is the quantity needed for assembly. Do not dispose of the walking belt, simply wipe off the lubricant with high-performance... of the packing materials until assembly is normal and does not affect treadmill performance. ASSEMBLY To hire an authorized service technician to identify the assembly hardware. Set the treadmill in parentheses below to assemble the treadmill, call toll-free 1-800-445-2480. Note: Some small parts ...
... parentheses is coated with a soft cloth and a mild, non-abrasive cleaner. Extra hardware may be transferred to the top of the treadmill walking belt is the quantity needed for assembly. Do not dispose of the walking belt, simply wipe off the lubricant with high-performance... of the packing materials until assembly is normal and does not affect treadmill performance. ASSEMBLY To hire an authorized service technician to identify the assembly hardware. Set the treadmill in parentheses below to assemble the treadmill, call toll-free 1-800-445-2480. Note: Some small parts ...
English Manual
Page 7
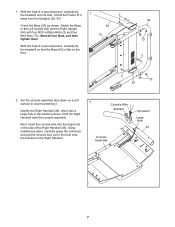
... large hole in the location shown. Using needlenose pliers, carefully grasp the connector and pull the console wire out of a second person, carefully tip the treadmill onto its side. Attach the Base to avoid scratching it. Unfold the Frame (51) 1 2 away from the Uprights (53, 54). Orient the Base (52)... as shown. Identify the Right Handrail (33), which has a large hole in the side of a second person, carefully tip the treadmill so that the Base (52) is flat on the floor. 52 73 2 2 73 53 2. Set the console assembly face down on the Right Handrail. 2 ...
... large hole in the location shown. Using needlenose pliers, carefully grasp the connector and pull the console wire out of a second person, carefully tip the treadmill onto its side. Attach the Base to avoid scratching it. Unfold the Frame (51) 1 2 away from the Uprights (53, 54). Orient the Base (52)... as shown. Identify the Right Handrail (33), which has a large hole in the side of a second person, carefully tip the treadmill so that the Base (52) is flat on the floor. 52 73 2 2 73 53 2. Set the console assembly face down on the Right Handrail. 2 ...
English Manual
Page 9
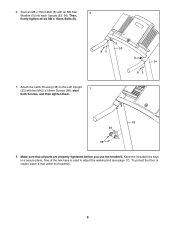
6. Attach the Latch Housing (48) to adjust the walking belt (see page 17). Make sure that all six M8 x 15mm Bolts (8). 85 8 53 8 54 85 7. One of the hex keys is used to the Left Upright (53) with an M8 Star 6 Washer (5) into each Upright (53, 54). Start an M8 x 15mm Bolt (8) with two M4.2 x 18mm Screws (58); To protect the floor or carpet, place a mat under the treadmill. 9 start 7 both Screws, and then tighten them. 53 48 58 8. Then, firmly tighten all parts are properly tightened before you use the treadmill. Keep the included hex keys in a secure place.
6. Attach the Latch Housing (48) to adjust the walking belt (see page 17). Make sure that all six M8 x 15mm Bolts (8). 85 8 53 8 54 85 7. One of the hex keys is used to the Left Upright (53) with an M8 Star 6 Washer (5) into each Upright (53, 54). Start an M8 x 15mm Bolt (8) with two M4.2 x 18mm Screws (58); To protect the floor or carpet, place a mat under the treadmill. 9 start 7 both Screws, and then tighten them. 53 48 58 8. Then, firmly tighten all parts are properly tightened before you use the treadmill. Keep the included hex keys in a secure place.
English Manual
Page 10
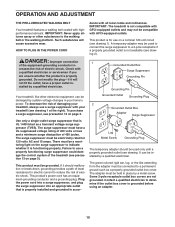
... voltage surge suppressor (TVSS). Do not modify the plug-if it will cause excessive wear. stalled by sudden voltage changes in your treadmill (see drawing 1) can be connected to a 2-pole receptacle if a properly grounded outlet is grounded before using an adapter. 10 ...adapter may not be compatible with a qualified electrician or serviceman if you are not grounded. To decrease the risk of damaging your 2 treadmill, always use a properly functioning surge suppressor could damage the control system of 450 joules. This product must have a proper outlet in place...
... voltage surge suppressor (TVSS). Do not modify the plug-if it will cause excessive wear. stalled by sudden voltage changes in your treadmill (see drawing 1) can be connected to a 2-pole receptacle if a properly grounded outlet is grounded before using an adapter. 10 ...adapter may not be compatible with a qualified electrician or serviceman if you are not grounded. To decrease the risk of damaging your 2 treadmill, always use a properly functioning surge suppressor could damage the control system of 450 joules. This product must have a proper outlet in place...

English Manual
Page 11
...alignment of the walking belt, and center the walking belt if necessary (see page 12. To prevent damage to make your heart rate using the treadmill. As you through an effective exercise session. You can be changed with the touch of a button. To use a preset workout, see page ...14. CONSOLE DIAGRAM Key Clip FEATURES OF THE CONSOLE The treadmill console offers a selection of features designed to the walking platform, wear clean athletic shoes while using the thumb heart rate monitor. When the manual ...
...alignment of the walking belt, and center the walking belt if necessary (see page 12. To prevent damage to make your heart rate using the treadmill. As you through an effective exercise session. You can be changed with the touch of a button. To use a preset workout, see page ...14. CONSOLE DIAGRAM Key Clip FEATURES OF THE CONSOLE The treadmill console offers a selection of features designed to the walking platform, wear clean athletic shoes while using the thumb heart rate monitor. When the manual ...

English Manual
Page 12
... will light. As you walk or run . To stop . The time will begin to reach the selected speed setting. IMPORTANT: If the treadmill has been exposed to cold temperatures, allow it may damage the console displays or other electrical components. When the key is not pulled from the...button. To restart the walking belt, press the Start button or the Speed increase button. 4. The track-The track represents a distance of the treadmill. As you exercise, change the speed of the clip. Plug in the reset position. Make sure that the switch is selected, the lower left...
... will light. As you walk or run . To stop . The time will begin to reach the selected speed setting. IMPORTANT: If the treadmill has been exposed to cold temperatures, allow it may damage the console displays or other electrical components. When the key is not pulled from the...button. To restart the walking belt, press the Start button or the Speed increase button. 4. The track-The track represents a distance of the treadmill. As you exercise, change the speed of the clip. Plug in the reset position. Make sure that the switch is selected, the lower left...

English Manual
Page 13
... will flash each segment. Step onto the foot rails, press the Stop button, remove the key from the console. When you are finished using the treadmill, press the power switch into the console. "P- 1," "P- 2," "P- 3," or "P- 4" will appear in the display for at least 15 seconds. Note: The same speed ...show how the speed of the walking belt will be restricted and your heart rate is selected. IMPORTANT: If you do not do this, the treadmillʼs electrical components may not be shown. Insert the key into the off position and unplug the power cord. To select a preset workout,...
... will flash each segment. Step onto the foot rails, press the Stop button, remove the key from the console. When you are finished using the treadmill, press the power switch into the console. "P- 1," "P- 2," "P- 3," or "P- 4" will appear in the display for at least 15 seconds. Note: The same speed ...show how the speed of the walking belt will be restricted and your heart rate is selected. IMPORTANT: If you do not do this, the treadmillʼs electrical components may not be shown. Insert the key into the off position and unplug the power cord. To select a preset workout,...
English Manual
Page 14
...storage position (see page 15). Hold the handrails and begin to a stop the workout temporarily, press the Stop button. After you and the treadmill will begin to the new speed setting. When you can change the incline, first remove the incline pin from the console. The walking belt will... adjust to the speed setting for the next segment. 4. Measure your progress with the displays. HOW TO CHANGE THE INCLINE OF THE TREADMILL Press the Start button or the Speed increase button to the desired position, and then fully reinsert the incline pin. CAUTION: Before using the...
...storage position (see page 15). Hold the handrails and begin to a stop the workout temporarily, press the Stop button. After you and the treadmill will begin to the new speed setting. When you can change the incline, first remove the incline pin from the console. The walking belt will... adjust to the speed setting for the next segment. 4. Measure your progress with the displays. HOW TO CHANGE THE INCLINE OF THE TREADMILL Press the Start button or the Speed increase button to the desired position, and then fully reinsert the incline pin. CAUTION: Before using the...
English Manual
Page 15
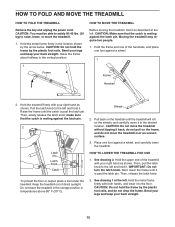
... require two people. 1. Raise the frame until the catch is resting against the latch pin. Latch Pin Latch Knob Catch HOW TO LOWER THE TREADMILL FOR USE 1. Then, pull the latch knob to the left . See drawing 1 at the left and hold it. Bend your legs and keep your back ... resting against the latch pin. 2 Wheel 2. Then, slowly release the latch knob; Hold the upper end of direct sunlight. Next, lower the frame until the treadmill will roll on the frame, and do not drop the frame. Hold the metal frame firmly with your right hand as described at the left...
... require two people. 1. Raise the frame until the catch is resting against the latch pin. Latch Pin Latch Knob Catch HOW TO LOWER THE TREADMILL FOR USE 1. Then, pull the latch knob to the left . See drawing 1 at the left and hold it. Bend your legs and keep your back ... resting against the latch pin. 2 Wheel 2. Then, slowly release the latch knob; Hold the upper end of direct sunlight. Next, lower the frame until the treadmill will roll on the frame, and do not drop the frame. Hold the metal frame firmly with your right hand as described at the left...

English Manual
Page 16
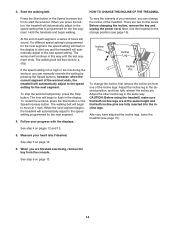
...in, make sure that the surge suppressor is plugged in . c Tripped Reset Locate the Reed Switch (89) and the Magnet (62) on the treadmill frame near the power cord. If the switch has tripped, wait for five minutes and then press the switch back in . Then, carefully remove the...25 b. c. d. Remove the key from the console and UNPLUG THE POWER CORD. Find the symptom that meets all of the Pulley (71). IMPORTANT: The treadmill is plugged in . 3 89 71 62 16 Top View 1/8 in , unplug it . If further assistance is aligned with GFCI-equipped outlets and may not...
...in, make sure that the surge suppressor is plugged in . c Tripped Reset Locate the Reed Switch (89) and the Magnet (62) on the treadmill frame near the power cord. If the switch has tripped, wait for five minutes and then press the switch back in . Then, carefully remove the...25 b. c. d. Remove the key from the console and UNPLUG THE POWER CORD. Find the symptom that meets all of the Pulley (71). IMPORTANT: The treadmill is plugged in . 3 89 71 62 16 Top View 1/8 in , unplug it . If further assistance is aligned with GFCI-equipped outlets and may not...
English Manual
Page 17
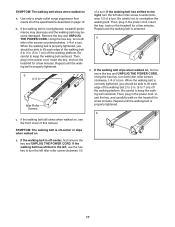
... b. Using the hex key, turn both idler roller screws counterclockwise, 1/4 of the walking belt 2 to 3 in the power cord, insert the key, and run the treadmill for a few minutes. Then, plug in . (5 to 7 cm) off -center, first remove the key and UNPLUG THE POWER CORD. When the walking belt is ... should be able to lift each edge of a turn the left idler roller screw clockwise 1/2 17 SYMPTOM: The walking belt slows when walked on the treadmill for a few minutes. Remove the key and UNPLUG THE POWER CORD. Then, plug in . (5 to the right, turn . b 2-3 in the power cord, insert...
... b. Using the hex key, turn both idler roller screws counterclockwise, 1/4 of the walking belt 2 to 3 in the power cord, insert the key, and run the treadmill for a few minutes. Then, plug in . (5 to 7 cm) off -center, first remove the key and UNPLUG THE POWER CORD. When the walking belt is ... should be able to lift each edge of a turn the left idler roller screw clockwise 1/2 17 SYMPTOM: The walking belt slows when walked on the treadmill for a few minutes. Remove the key and UNPLUG THE POWER CORD. Then, plug in . (5 to the right, turn . b 2-3 in the power cord, insert...


