
English Manual
Page 1
... the serial number in this manual before using this manual) before contacting Customer Care. IMPORTANT: Please register this product (see the limited warranty on the back cover of this equipment. MT ON THE WEB: www.wesloservice.com CAUTION Read all precautions and instructions in the space above for future reference. Save this manual for reference. please contact Customer Care. CALL TOLL-FREE...
... the serial number in this manual before using this manual) before contacting Customer Care. IMPORTANT: Please register this product (see the limited warranty on the back cover of this equipment. MT ON THE WEB: www.wesloservice.com CAUTION Read all precautions and instructions in the space above for future reference. Save this manual for reference. please contact Customer Care. CALL TOLL-FREE...
English Manual
Page 2
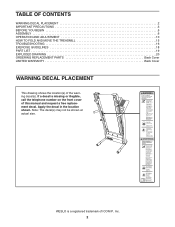
..., call the telephone number on the front cover of this manual and request a free replacement decal. TABLE OF CONTENTS WARNING DECAL PLACEMENT 2 IMPORTANT PRECAUTIONS 3 BEFORE YOU BEGIN 5 ASSEMBLY 6 OPERATION AND ADJUSTMENT 10 HOW TO FOLD AND MOVE THE TREADMILL 15 TROUBLESHOOTING 16 EXERCISE GUIDELINES 18 PART LIST 19 EXPLODED DRAWING 20 ORDERING REPLACEMENT PARTS Back Cover LIMITED WARRANTY Back Cover WARNING DECAL PLACEMENT This drawing shows the location(s) of ICON IP, Inc...
..., call the telephone number on the front cover of this manual and request a free replacement decal. TABLE OF CONTENTS WARNING DECAL PLACEMENT 2 IMPORTANT PRECAUTIONS 3 BEFORE YOU BEGIN 5 ASSEMBLY 6 OPERATION AND ADJUSTMENT 10 HOW TO FOLD AND MOVE THE TREADMILL 15 TROUBLESHOOTING 16 EXERCISE GUIDELINES 18 PART LIST 19 EXPLODED DRAWING 20 ORDERING REPLACEMENT PARTS Back Cover LIMITED WARRANTY Back Cover WARNING DECAL PLACEMENT This drawing shows the location(s) of ICON IP, Inc...
English Manual
Page 3
... the control system is turned off. Keep children under the treadmill. 13. Do not operate the treadmill if the power cord or plug is damaged, or if the treadmill is not working properly.) 16. never use an extension cord. 12. Never start the treadmill while you are recommended for persons over age 35 or persons with pre-existing health problems. 2. The heart rate monitor is not working properly. (See TROUBLESHOOTING...
... the control system is turned off. Keep children under the treadmill. 13. Do not operate the treadmill if the power cord or plug is damaged, or if the treadmill is not working properly.) 16. never use an extension cord. 12. Never start the treadmill while you are recommended for persons over age 35 or persons with pre-existing health problems. 2. The heart rate monitor is not working properly. (See TROUBLESHOOTING...
English Manual
Page 4
... move the treadmill. 22. When folding or moving the treadmill, make sure that the storage latch is intended for in-home use . (See the drawing on page 5 for the location of the power switch.) 21. Servicing other than the procedures in use only. If you feel faint or if you experience pain while exercising, stop immediately and cool down. 20. Always unplug the power cord immediately after use this manual...
... move the treadmill. 22. When folding or moving the treadmill, make sure that the storage latch is intended for in-home use . (See the drawing on page 5 for the location of the power switch.) 21. Servicing other than the procedures in use only. If you feel faint or if you experience pain while exercising, stop immediately and cool down. 20. Always unplug the power cord immediately after use this manual...
English Manual
Page 5
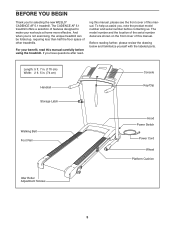
...) Handrail Storage Latch Console Key/Clip Walking Belt Foot Rail Hood Power Switch Power Cord Wheel Platform Cushion Idler Roller Adjustment Screws 5 ing this manual, please see the front cover of this manual. The model number and the location of the serial number decal are shown on the front cover of this manual. Before reading further, please review the drawing below and familiarize yourself with the labeled parts. If you , note the product model number and serial number before contacting...
...) Handrail Storage Latch Console Key/Clip Walking Belt Foot Rail Hood Power Switch Power Cord Wheel Platform Cushion Idler Roller Adjustment Screws 5 ing this manual, please see the front cover of this manual. The model number and the location of the serial number decal are shown on the front cover of this manual. Before reading further, please review the drawing below and familiarize yourself with the labeled parts. If you , note the product model number and serial number before contacting...
English Manual
Page 6
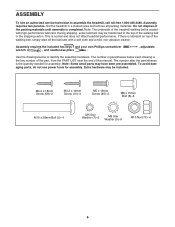
... area and remove all packing materials. ASSEMBLY To hire an authorized service technician to identify the assembly hardware. Note: The underside of this manual. Assembly requires the included hex keys and your own Phillips screwdriver wrench , and needlenose pliers . , adjustable Use the drawings below each drawing is the quantity needed for assembly. Set the treadmill in parentheses below to assemble the treadmill, call toll-free 1-800...
... area and remove all packing materials. ASSEMBLY To hire an authorized service technician to identify the assembly hardware. Note: The underside of this manual. Assembly requires the included hex keys and your own Phillips screwdriver wrench , and needlenose pliers . , adjustable Use the drawings below each drawing is the quantity needed for assembly. Set the treadmill in parentheses below to assemble the treadmill, call toll-free 1-800...
English Manual
Page 7
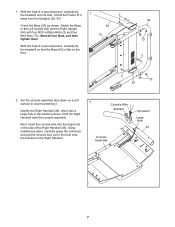
... Handrail. 2 Console Wire Bracket Console Assembly Connector Large Hole 33 7 Attach the Base to avoid scratching it. 1. Next, insert the console wire into the large hole in the location shown. Unfold the Frame (51) 1 2 away from the Uprights (53, 54). Start all four Nuts, and then tighten them. 54 ...treadmill onto its side. Using needlenose pliers, carefully grasp the connector and pull the console wire out of a second person, carefully tip the treadmill so that the Base (52) is flat on a soft surface to the Left Upright (53) and the Right Upright (54) with four M10 x 58mm Bolts...
... Handrail. 2 Console Wire Bracket Console Assembly Connector Large Hole 33 7 Attach the Base to avoid scratching it. 1. Next, insert the console wire into the large hole in the location shown. Unfold the Frame (51) 1 2 away from the Uprights (53, 54). Start all four Nuts, and then tighten them. 54 ...treadmill onto its side. Using needlenose pliers, carefully grasp the connector and pull the console wire out of a second person, carefully tip the treadmill so that the Base (52) is flat on a soft surface to the Left Upright (53) and the Right Upright (54) with four M10 x 58mm Bolts...

English Manual
Page 8
... the console wire. If there is not pinched. Set the console assembly on the console assembly. With the help of a second person, hold the console assembly near the Right Upright (54). IF YOU DO NOT CONNECT THE CONNECTORS PROPERLY, THE CONSOLE MAY BECOME DAMAGED WHEN YOU TURN ON THE POWER. Make sure that the console wire is a wire tie on the Wire Harness, remove the wire tie. If necessary, press the...
... the console wire. If there is not pinched. Set the console assembly on the console assembly. With the help of a second person, hold the console assembly near the Right Upright (54). IF YOU DO NOT CONNECT THE CONNECTORS PROPERLY, THE CONSOLE MAY BECOME DAMAGED WHEN YOU TURN ON THE POWER. Make sure that the console wire is a wire tie on the Wire Harness, remove the wire tie. If necessary, press the...
English Manual
Page 9
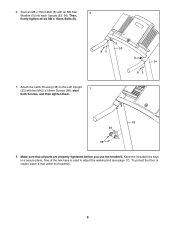
Then, firmly tighten all parts are properly tightened before you use the treadmill. Attach the Latch Housing (48) to adjust the walking belt (see page 17). One of the hex keys is used to the Left Upright (53) with an M8 Star 6 Washer (5) into each Upright (53, 54). To protect the floor or carpet, place a mat under the treadmill. 9 Keep the included hex keys in a secure place. 6. Make sure that all six M8 x 15mm Bolts (8). 85 8 53 8 54 85 7. Start an M8 x 15mm Bolt (8) with two M4.2 x 18mm Screws (58); start 7 both Screws, and then tighten them. 53 48 58 8.
Then, firmly tighten all parts are properly tightened before you use the treadmill. Attach the Latch Housing (48) to adjust the walking belt (see page 17). One of the hex keys is used to the Left Upright (53) with an M8 Star 6 Washer (5) into each Upright (53, 54). To protect the floor or carpet, place a mat under the treadmill. 9 Keep the included hex keys in a secure place. 6. Make sure that all six M8 x 15mm Bolts (8). 85 8 53 8 54 85 7. Start an M8 x 15mm Bolt (8) with two M4.2 x 18mm Screws (58); start 7 both Screws, and then tighten them. 53 48 58 8.
English Manual
Page 10
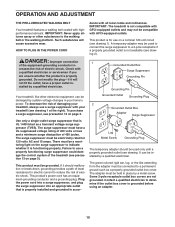
...;s power cord has an equipment-grounding conductor and a grounding plug. Some 2-pole receptacle outlet box covers are unsure whether the product is for electric current to indicate whether it will cause excessive wear. stalled by sudden voltage changes in - Contact a qualified electrician to use a surge suppressor with all local codes and ordinances. OPERATION AND ADJUSTMENT THE PRE-LUBRICATED WALKING BELT Your treadmill...
...;s power cord has an equipment-grounding conductor and a grounding plug. Some 2-pole receptacle outlet box covers are unsure whether the product is for electric current to indicate whether it will cause excessive wear. stalled by sudden voltage changes in - Contact a qualified electrician to use a surge suppressor with all local codes and ordinances. OPERATION AND ADJUSTMENT THE PRE-LUBRICATED WALKING BELT Your treadmill...

English Manual
Page 11
... the treadmill as it guides you exercise, the displays will provide continuous exercise feedback. To turn on the console, remove the plastic. To use the manual mode, see page 12. The first time the treadmill is selected, the speed of the treadmill can even measure your workouts more effective. You can be changed with the touch of a button. IMPORTANT: If there is a sheet of plastic on the power...
... the treadmill as it guides you exercise, the displays will provide continuous exercise feedback. To turn on the console, remove the plastic. To use the manual mode, see page 12. The first time the treadmill is selected, the speed of the treadmill can even measure your workouts more effective. You can be changed with the touch of a button. IMPORTANT: If there is a sheet of plastic on the power...

English Manual
Page 12
... USE THE MANUAL MODE 1. When the key is in the power cord (see the drawing on the foot rails of 1/4 mile (400 meters). Follow your clothes. The track-The track represents a distance of the treadmill. The lower left display-As you exercise, change the speed of the display will be pulled from the console, adjust the position of the track will again begin to the key (see page 10). Plug in the reset...
... USE THE MANUAL MODE 1. When the key is in the power cord (see the drawing on the foot rails of 1/4 mile (400 meters). Follow your clothes. The track-The track represents a distance of the treadmill. The lower left display-As you exercise, change the speed of the display will be pulled from the console, adjust the position of the track will again begin to the key (see page 10). Plug in the reset...

English Manual
Page 13
... walking belt and the approximate number of calories that you are finished exercising, remove the key from the console, and put it . 5. To reset the displays, press the Stop button, remove the key, and then reinsert the key. Do not press too hard, or the circulation in the priority display for a few seconds to show which unit of the four preset workouts. Remember to change during the workouts. 13 One speed setting...
... walking belt and the approximate number of calories that you are finished exercising, remove the key from the console, and put it . 5. To reset the displays, press the Stop button, remove the key, and then reinsert the key. Do not press too hard, or the circulation in the priority display for a few seconds to show which unit of the four preset workouts. Remember to change during the workouts. 13 One speed setting...
English Manual
Page 14
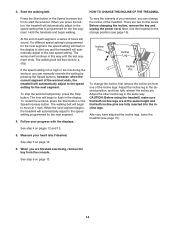
... in the display to the speed setting that both incline legs are at 1 mph. The walking belt will automatically adjust to alert you have adjusted the incline legs, lower the treadmill (see page 15). See step 6 on pages 12 and 13. 5. When you can change the incline, first remove the incline pin from the console. Before changing the incline, remove the key and unplug the power cord. The time will automatically adjust to a stop the workout temporarily, press the Stop button. When...
... in the display to the speed setting that both incline legs are at 1 mph. The walking belt will automatically adjust to alert you have adjusted the incline legs, lower the treadmill (see page 15). See step 6 on pages 12 and 13. 5. When you can change the incline, first remove the incline pin from the console. Before changing the incline, remove the key and unplug the power cord. The time will automatically adjust to a stop the workout temporarily, press the Stop button. When...
English Manual
Page 15
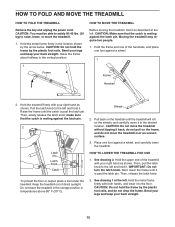
HOW TO FOLD AND MOVE THE TREADMILL HOW TO FOLD THE TREADMILL Remove the key and unplug the power cord. CAUTION: You must be able to safely lift 45 lbs. (20 kg) to raise, lower, or move the treadmill without tipping it to the floor. Pull the latch knob to the left . Raise the frame until the catch is resting against a wheel. 1 Frame Handrail 2. See...
HOW TO FOLD AND MOVE THE TREADMILL HOW TO FOLD THE TREADMILL Remove the key and unplug the power cord. CAUTION: You must be able to safely lift 45 lbs. (20 kg) to raise, lower, or move the treadmill without tipping it to the floor. Pull the latch knob to the left . Raise the frame until the catch is resting against a wheel. 1 Frame Handrail 2. See...

English Manual
Page 16
...: The displays of this manual. Remove the key from the console, and then reinsert it. Check the power switch located on a. SYMPTOM: The power turns off during use a. c. Remove the key from the console and UNPLUG THE POWER CORD. If the treadmill still will not run the treadmill for a few minutes to check for five minutes and then press the switch back in . Then, carefully remove the Hood (65). Check the power switch (see...
...: The displays of this manual. Remove the key from the console, and then reinsert it. Check the power switch located on a. SYMPTOM: The power turns off during use a. c. Remove the key from the console and UNPLUG THE POWER CORD. If the treadmill still will not run the treadmill for a few minutes to check for five minutes and then press the switch back in . Then, carefully remove the Hood (65). Check the power switch (see...
English Manual
Page 17
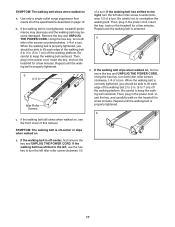
... tightened. b 2-3 in . (5 to 7 cm) off -center or slips when walked on the treadmill for a few minutes. Then, plug in . (5 to 7 cm) off -center, first remove the key and UNPLUG THE POWER CORD. Using the hex key, turn both idler roller screws counterclockwise, 1/4 of the walking belt 2 to keep the walking belt centered. Remove the key and UNPLUG THE POWER CORD. Then, plug in the power cord, insert the key, and carefully walk on a. Idler Roller Screws of this manual. Then, plug...
... tightened. b 2-3 in . (5 to 7 cm) off -center or slips when walked on the treadmill for a few minutes. Then, plug in . (5 to 7 cm) off -center, first remove the key and UNPLUG THE POWER CORD. Using the hex key, turn both idler roller screws counterclockwise, 1/4 of the walking belt 2 to keep the walking belt centered. Remove the key and UNPLUG THE POWER CORD. Then, plug in the power cord, insert the key, and carefully walk on a. Idler Roller Screws of this manual. Then, plug...
English Manual
Page 18
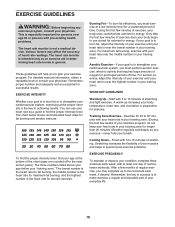
... as an exercise aid in determining heart rate trends in general. WORKOUT GUIDELINES Warming Up-Start with at the bottom of time. The three numbers listed above your age define your body begin to the nearest ten years). Remember, proper nutrition and adequate rest are rounded off to use your body uses carbohydrate calories for a sustained period of the chart (ages are...
... as an exercise aid in determining heart rate trends in general. WORKOUT GUIDELINES Warming Up-Start with at the bottom of time. The three numbers listed above your age define your body begin to the nearest ten years). Remember, proper nutrition and adequate rest are rounded off to use your body uses carbohydrate calories for a sustained period of the chart (ages are...
English Manual
Page 19
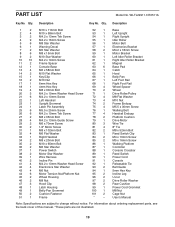
... Foot Rail Right Foot Rail Wheel Spacer Wheel Drive Roller/Pulley M8 Flat Washer M10 Nut Frame Endcap M5.5 x 30mm Screw Walking Belt Handrail Endcap Platform Cushion Drive Motor Wire Tie 8" Tie M8 x 52mm Bolt Reed Switch Clip M4 x 10mm Screw M5 x 16mm Screw Walking Platform Controller Console Crossbar Reed Switch Power Cord Console Releasable Tie Belt Guide 5mm Hex Key Incline Leg U-nut Drive Roller Washer Rear Cushion Power Cord Grommet M8 Nut Cage Nut Userʼs Manual Note: Specifications are not illustrated. 19
... Foot Rail Right Foot Rail Wheel Spacer Wheel Drive Roller/Pulley M8 Flat Washer M10 Nut Frame Endcap M5.5 x 30mm Screw Walking Belt Handrail Endcap Platform Cushion Drive Motor Wire Tie 8" Tie M8 x 52mm Bolt Reed Switch Clip M4 x 10mm Screw M5 x 16mm Screw Walking Platform Controller Console Crossbar Reed Switch Power Cord Console Releasable Tie Belt Guide 5mm Hex Key Incline Leg U-nut Drive Roller Washer Rear Cushion Power Cord Grommet M8 Nut Cage Nut Userʼs Manual Note: Specifications are not illustrated. 19
English Manual
Page 24
... is used for service needed under this warranty is limited to be the customerʼs responsibility. To help us : • the model number and serial number of the product (see the front cover of this manual) • the name of the product (see the front cover of this manual) • the key number and description of the replacement part(s) (see the front cover of incidental or consequential damages. ICON Health & Fitness...
... is used for service needed under this warranty is limited to be the customerʼs responsibility. To help us : • the model number and serial number of the product (see the front cover of this manual) • the name of the product (see the front cover of this manual) • the key number and description of the replacement part(s) (see the front cover of incidental or consequential damages. ICON Health & Fitness...


