
English Manual
Page 1
... SERVICE DEPARTMENT DIRECTLY. Call toll-free: 800-830-7240 E-mail: service@goodfamily.cc Goodfamily's Web site: www.goodfamily.cc ICON's Web site: www.iconfitness.com CAUTION Read all precautions and instructions in the territory of mainland China. Goodfamily is designed and manufactured by ICON Health & Fitness, Inc. Model No. This treadmill is an authorized dealer of this treadmill in this manual before using this manual...
... SERVICE DEPARTMENT DIRECTLY. Call toll-free: 800-830-7240 E-mail: service@goodfamily.cc Goodfamily's Web site: www.goodfamily.cc ICON's Web site: www.iconfitness.com CAUTION Read all precautions and instructions in the territory of mainland China. Goodfamily is designed and manufactured by ICON Health & Fitness, Inc. Model No. This treadmill is an authorized dealer of this treadmill in this manual before using this manual...
English Manual
Page 2
WESLO is a registered trademark of this manual. TABLE OF CONTENTS IMPORTANT PRECAUTIONS 3 BEFORE YOU BEGIN 5 ASSEMBLY 6 OPERATION AND ADJUSTMENT 9 HOW TO FOLD AND MOVE THE TREADMILL 12 MAINTENANCE AND TROUBLESHOOTING 13 CONDITIONING GUIDELINES 15 ORDERING REPLACEMENT PARTS Back Cover LIMITED WARRANTY Back Cover Note: A PART IDENTIFICATION CHART, an EXPLODED DRAWING, and a PART LIST are found at the end of ICON IP, Inc. 2
WESLO is a registered trademark of this manual. TABLE OF CONTENTS IMPORTANT PRECAUTIONS 3 BEFORE YOU BEGIN 5 ASSEMBLY 6 OPERATION AND ADJUSTMENT 9 HOW TO FOLD AND MOVE THE TREADMILL 12 MAINTENANCE AND TROUBLESHOOTING 13 CONDITIONING GUIDELINES 15 ORDERING REPLACEMENT PARTS Back Cover LIMITED WARRANTY Back Cover Note: A PART IDENTIFICATION CHART, an EXPLODED DRAWING, and a PART LIST are found at the end of ICON IP, Inc. 2
English Manual
Page 3
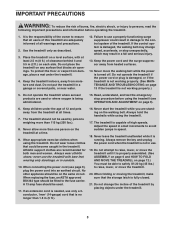
... not attempt to use only a 3conductor, 1mm2 (14-gauge) cord that blocks air openings. Do not put the treadmill in speed. 18. Do not operate the treadmill where aerosol products are adequately informed of the owner to ensure that could result in damage to the control system of clearance behind it is damaged, the walking belt may change the incline of 12 and...
... not attempt to use only a 3conductor, 1mm2 (14-gauge) cord that blocks air openings. Do not put the treadmill in speed. 18. Do not operate the treadmill where aerosol products are adequately informed of the owner to ensure that could result in damage to the control system of clearance behind it is damaged, the walking belt may change the incline of 12 and...
English Manual
Page 4
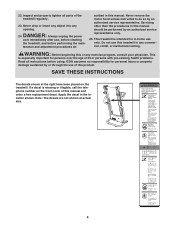
... institutional setting. This is especially important for persons over the age of 35 or persons with pre-existing health problems. Read all parts of this treadmill in this manual should be performed by an authorized service representative only. 25. Always unplug the power cord immediately after use of the treadmill regularly. 23. ICON assumes no responsibility for in the location shown. SAVE THESE INSTRUCTIONS...
... institutional setting. This is especially important for persons over the age of 35 or persons with pre-existing health problems. Read all parts of this treadmill in this manual should be performed by an authorized service representative only. 25. Always unplug the power cord immediately after use of the treadmill regularly. 23. ICON assumes no responsibility for in the location shown. SAVE THESE INSTRUCTIONS...
English Manual
Page 5
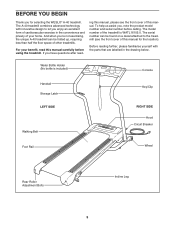
... Holder (No bottle is WATL16105.0. For your home. Before reading further, please familiarise yourself with innovative design to the treadmill (see the front cover of other treadmills. ing this manual, please see the front cover of the treadmill is included) Console Handrail Storage Latch LEFT SIDE Walking Belt Key/Clip RIGHT SIDE Hood Circuit Breaker Foot Rail Wheel Rear Roller Adjustment Bolts Incline Leg 5 BEFORE YOU BEGIN Thank you for...
... Holder (No bottle is WATL16105.0. For your home. Before reading further, please familiarise yourself with innovative design to the treadmill (see the front cover of other treadmills. ing this manual, please see the front cover of the treadmill is included) Console Handrail Storage Latch LEFT SIDE Walking Belt Key/Clip RIGHT SIDE Hood Circuit Breaker Foot Rail Wheel Rear Roller Adjustment Bolts Incline Leg 5 BEFORE YOU BEGIN Thank you for...
English Manual
Page 6
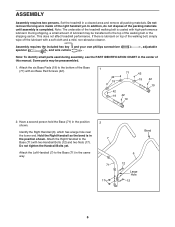
... packing materials until assembly is lubricant on top of the walking belt, simply wipe off the lubricant with high-performance lubricant. Assembly requires the included hex key and your own phillips screwdriver spanner , and wire cutters . , adjustable Note: To identify small parts used during assembly, see the PART IDENTIFICATION CHART in the center of the right handrail yet. Some parts may be preassembled. 1. Attach the six Base...
... packing materials until assembly is lubricant on top of the walking belt, simply wipe off the lubricant with high-performance lubricant. Assembly requires the included hex key and your own phillips screwdriver spanner , and wire cutters . , adjustable Note: To identify small parts used during assembly, see the PART IDENTIFICATION CHART in the center of the right handrail yet. Some parts may be preassembled. 1. Attach the six Base...
English Manual
Page 7
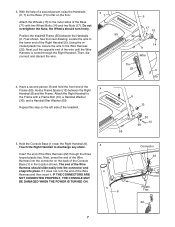
...71) is routed through the three looped plastic ties. Repeat this step on the back of the treadmill. 5. Hold the Console Base (1) near the Right Handrail (6). 5 Touch the Right Handrail to the Frame with two Wheel Bolts (14) and two Nuts (17). Next, press the end of the Wire Harness into...CONNECTED PROPERLY, THE CONSOLE MAY BE DAMAGED WHEN THE POWER IS TURNED ON. 7 6 13 30 10 60 55 Connector 1 22 Plastic 6 Ties 22 the Wheels should slide easily into the connector and snap into the connector on the left side of the Console Base (1) in the lower end of the Frame (55). Attach...
...71) is routed through the three looped plastic ties. Repeat this step on the back of the treadmill. 5. Hold the Console Base (1) near the Right Handrail (6). 5 Touch the Right Handrail to the Frame with two Wheel Bolts (14) and two Nuts (17). Next, press the end of the Wire Harness into...CONNECTED PROPERLY, THE CONSOLE MAY BE DAMAGED WHEN THE POWER IS TURNED ON. 7 6 13 30 10 60 55 Connector 1 22 Plastic 6 Ties 22 the Wheels should slide easily into the connector and snap into the connector on the left side of the Console Base (1) in the lower end of the Frame (55). Attach...
English Manual
Page 8
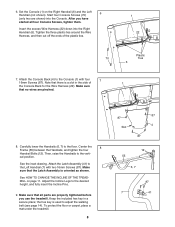
... Incline Pins. 9. See the inset drawing. Adjust the Incline Legs to the floor. Note that the Latch Assembly is used to the Console (1) with two 16mm Screws (87). Center the 8 Frame (55) between the Handrails, and tighten the four Handrail Bolts (12). See HOW TO CHANGE THE INCLINE OF THE TREADMILL on the Right Handrail (6) and the Left Handrail (not shown). Set the Console (1) on page 11. Tighten...
... Incline Pins. 9. See the inset drawing. Adjust the Incline Legs to the floor. Note that the Latch Assembly is used to the Console (1) with two 16mm Screws (87). Center the 8 Frame (55) between the Handrails, and tighten the four Handrail Bolts (12). See HOW TO CHANGE THE INCLINE OF THE TREADMILL on the Right Handrail (6) and the Left Handrail (not shown). Set the Console (1) on page 11. Tighten...
English Manual
Page 9
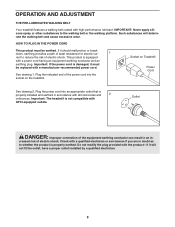
... power cord into the socket on Treadmill Power Cord See drawing 2. Do not modify the plug provided with high-performance lubricant. Outlet DANGER: Improper connection of electric shock. Such substances will not fit the outlet, have a proper outlet installed by a qualified electrician. 9 creased risk of the equipment-earthing conductor can result in an in- OPERATION AND ADJUSTMENT THE PRE-LUBRICATED WALKING BELT Your treadmill features a walking belt...
... power cord into the socket on Treadmill Power Cord See drawing 2. Do not modify the plug provided with high-performance lubricant. Outlet DANGER: Improper connection of electric shock. Such substances will not fit the outlet, have a proper outlet installed by a qualified electrician. 9 creased risk of the equipment-earthing conductor can result in an in- OPERATION AND ADJUSTMENT THE PRE-LUBRICATED WALKING BELT Your treadmill features a walking belt...
English Manual
Page 10
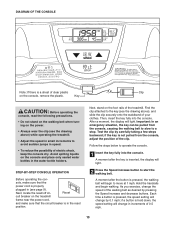
... a moment, the display will light. Before operating the con- Key CAUTION: Before operating the console, read the following precautions. • Do not stand on the walking belt when turning on the foot rails of the treadmill. if a button is held down, the and make sure that the circuit breaker is in the reset speed setting will frame near the power cord, change by 0.1 mph...
... a moment, the display will light. Before operating the con- Key CAUTION: Before operating the console, read the following precautions. • Do not stand on the walking belt when turning on the foot rails of the treadmill. if a button is held down, the and make sure that the circuit breaker is in the reset speed setting will frame near the power cord, change by 0.1 mph...
English Manual
Page 11
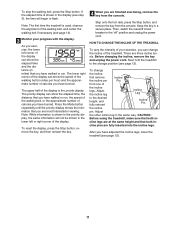
... approximate number of your progress with the display. Note: While information is the priority display. Next, fold the treadmill to flash. After you can show the speed of the incline legs. Step onto the foot rails, press the Stop button, and remove the key from one of the walking belt (in viewing. Then, switch the reset/off circuit breaker to the desired height, and fully reinsert Incline Pin the incline pin. Adjust the other incline leg...
... approximate number of your progress with the display. Note: While information is the priority display. Next, fold the treadmill to flash. After you can show the speed of the incline legs. Step onto the foot rails, press the Stop button, and remove the key from one of the walking belt (in viewing. Then, switch the reset/off circuit breaker to the desired height, and fully reinsert Incline Pin the incline pin. Adjust the other incline leg...
English Manual
Page 12
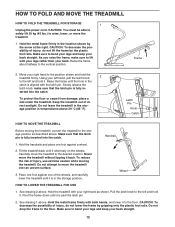
... MOVE THE TREADMILL HOW TO FOLD THE TREADMILL FOR STORAGE 1 Unplug the power cord. CAUTION: To decrease the possibility of injury, use extreme caution while moving the treadmill, convert the treadmill to the left hand, pull the latch knob 2 to the storage position as shown. Make sure to the vertical position. Raise the frame about halfway to bend your legs and keep your right hand...
... MOVE THE TREADMILL HOW TO FOLD THE TREADMILL FOR STORAGE 1 Unplug the power cord. CAUTION: To decrease the possibility of injury, use extreme caution while moving the treadmill, convert the treadmill to the left hand, pull the latch knob 2 to the storage position as shown. Make sure to the vertical position. Raise the frame about halfway to bend your legs and keep your right hand...
English Manual
Page 13
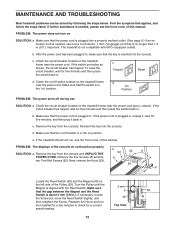
... the power cord. Important: The treadmill is no longer than 1.5 m (5 ft.). b. After the power cord has been plugged in . Check the circuit breaker located on " position. c Tripped Reset d. d On Position PROBLEM: The power turns off switch is plugged in the on position. c. Remove the key from the console and UNPLUG THE 52 23 8 POWER CORD. Reinsert the key into the console. e. PROBLEM: The displays of the Pulley (53). Remove the key from the console. Remove the four Screws...
... the power cord. Important: The treadmill is no longer than 1.5 m (5 ft.). b. After the power cord has been plugged in . Check the circuit breaker located on " position. c Tripped Reset d. d On Position PROBLEM: The power turns off switch is plugged in the on position. c. Remove the key from the console and UNPLUG THE 52 23 8 POWER CORD. Reinsert the key into the console. e. PROBLEM: The displays of the Pulley (53). Remove the key from the console. Remove the four Screws...
English Manual
Page 14
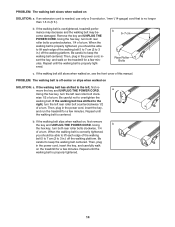
..., turn the left rear roller bolt counterclockwise 1/2 of a turn . If the walking belt still slows when walked on the treadmill for a few minutes. Using the hex key, turn both rear roller bolts clockwise, 1/4 of this manual. Then, plug in .) off the walking platform. b. b 5-7 cm Rear Roller Bolts c. Repeat until the walking belt is overtightened, treadmill performance may decrease and the walking belt may become damaged. Remove the key and UNPLUG THE POWER CORD. If the walking belt has shifted to keep the walking belt...
..., turn the left rear roller bolt counterclockwise 1/2 of a turn . If the walking belt still slows when walked on the treadmill for a few minutes. Using the hex key, turn both rear roller bolts clockwise, 1/4 of this manual. Then, plug in .) off the walking platform. b. b 5-7 cm Rear Roller Bolts c. Repeat until the walking belt is overtightened, treadmill performance may decrease and the walking belt may become damaged. Remove the key and UNPLUG THE POWER CORD. If the walking belt has shifted to keep the walking belt...

English Manual
Page 15
...-existing health problems. is used because your heart rate will increase the flexibility of rest between workouts. If your body uses easily accessible carbohydrate calories for fat burning; For more oxygen to 60 minutes. (During the first few minutes does your wrist as a guide. Next, find your training zone for energy. Only after the first few weeks of your exercise program, do...
...-existing health problems. is used because your heart rate will increase the flexibility of rest between workouts. If your body uses easily accessible carbohydrate calories for fat burning; For more oxygen to 60 minutes. (During the first few minutes does your wrist as a guide. Next, find your training zone for energy. Only after the first few weeks of your exercise program, do...
English Manual
Page 16
...1 Reed Switch Clip Magnet Motor Belt Roller Adj. Bolt Foot Rail Screw Front Roller/Pulley Right Foot Rail Frame Walking Belt Walking Platform Motor Washer Motor Bolt Handrail Star Washer 8" Cable Tie Dust Guard Incline Leg Incline Pin Voltage Warning Decal Roller Adj. Bolt Controller Motor Bolt Left Foot Rail Motor Tension Nut Motor Star Washer Outlet Plate Screw Storage Latch Assembly Base Pad Screw Drive Motor Assembly Power Cord Rear Roller Bracket Washer Reed Switch Platform Bolt, Rear Key No. Washer Frame Endcap U-nut Cushion Fastener Console Screw/Latch Screw Base Rear Roller Outlet...
...1 Reed Switch Clip Magnet Motor Belt Roller Adj. Bolt Foot Rail Screw Front Roller/Pulley Right Foot Rail Frame Walking Belt Walking Platform Motor Washer Motor Bolt Handrail Star Washer 8" Cable Tie Dust Guard Incline Leg Incline Pin Voltage Warning Decal Roller Adj. Bolt Controller Motor Bolt Left Foot Rail Motor Tension Nut Motor Star Washer Outlet Plate Screw Storage Latch Assembly Base Pad Screw Drive Motor Assembly Power Cord Rear Roller Bracket Washer Reed Switch Platform Bolt, Rear Key No. Washer Frame Endcap U-nut Cushion Fastener Console Screw/Latch Screw Base Rear Roller Outlet...

English Manual
Page 17
Save this chart and use it to identify small parts during assembly. Handrail Washer (30)-2 16mm Screw (87)-6 Handrail Star Washer (60)-2 Console Screw (70)-4 Nut (17)-6 Base Pad Screw (42)-6 Wheel Bolt (14)-2 Handrail Bolt (12)-4 Ha Frame Bolt (10)-2 2 3/4" Bolt (47)-4 Star Washer (81)-4 Washer (29)-4 PART IDENTIFICATION CHART Handrail Washer (11)-2 4" Bolt (120)-2 Remove this chart and the EXPLODED DRAWING/PART LIST for future reference.
Save this chart and use it to identify small parts during assembly. Handrail Washer (30)-2 16mm Screw (87)-6 Handrail Star Washer (60)-2 Console Screw (70)-4 Nut (17)-6 Base Pad Screw (42)-6 Wheel Bolt (14)-2 Handrail Bolt (12)-4 Ha Frame Bolt (10)-2 2 3/4" Bolt (47)-4 Star Washer (81)-4 Washer (29)-4 PART IDENTIFICATION CHART Handrail Washer (11)-2 4" Bolt (120)-2 Remove this chart and the EXPLODED DRAWING/PART LIST for future reference.
English Manual
Page 18
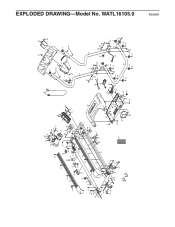
EXPLODED DRAWING-Model No. WATL16105.0 65 20 52 47 11 45 20 66 24 86 51 67 75 83 85 64 63 52 52 37 69 78 76 ... 8 20 3 1 20 81 2 70 87 87 4 41 22 2 87 70 87 7 10 30 89 60 44 6 13 12 14 2 13 15 60 30 10 40 73 88 40 73 8 20 18 17 19 42 19 17 42 19 71 42 19 42 12 17 2 22 15 14 19 42 19 17 42...
EXPLODED DRAWING-Model No. WATL16105.0 65 20 52 47 11 45 20 66 24 86 51 67 75 83 85 64 63 52 52 37 69 78 76 ... 8 20 3 1 20 81 2 70 87 87 4 41 22 2 87 70 87 7 10 30 89 60 44 6 13 12 14 2 13 15 60 30 10 40 73 88 40 73 8 20 18 17 19 42 19 17 42 19 71 42 19 42 12 17 2 22 15 14 19 42 19 17 42...
English Manual
Page 19
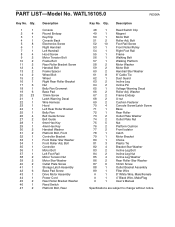
... the following information: • the MODEL NUMBER of the product (WATL16105.0) • the NAME of the product (WESLO A-40 treadmill) • the SERIAL NUMBER of the product (see the front cover of this manual) • the KEY NUMBER and DESCRIPTION of the part(s) (see the PART LIST and EXPLODED DRAWING attached in the center of this manual) LIMITED WARRANTY Goodfamily, Inc. (Goodfamily), warrants this warranty is limited to replacing or repairing, at Goodfamily...
... the following information: • the MODEL NUMBER of the product (WATL16105.0) • the NAME of the product (WESLO A-40 treadmill) • the SERIAL NUMBER of the product (see the front cover of this manual) • the KEY NUMBER and DESCRIPTION of the part(s) (see the PART LIST and EXPLODED DRAWING attached in the center of this manual) LIMITED WARRANTY Goodfamily, Inc. (Goodfamily), warrants this warranty is limited to replacing or repairing, at Goodfamily...


