
Canadian English Manual
Page 1
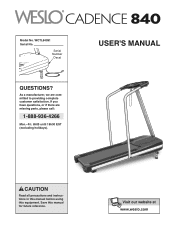
As a manufacturer, we are missing parts, please call: 1-888-936-4266 Mon.-Fri. 8h00 until 18h30 EST (excluding holidays). Save this equipment. WCTL84091 Serial No. Visit our website at www.weslo.com ® Model No. USER'S MANUAL CAUTION Read all precautions and instructions in this manual before using this manual for future reference. Serial Number Decal QUESTIONS? If you have questions, or if there are committed to providing complete customer satisfaction.
As a manufacturer, we are missing parts, please call: 1-888-936-4266 Mon.-Fri. 8h00 until 18h30 EST (excluding holidays). Save this equipment. WCTL84091 Serial No. Visit our website at www.weslo.com ® Model No. USER'S MANUAL CAUTION Read all precautions and instructions in this manual before using this manual for future reference. Serial Number Decal QUESTIONS? If you have questions, or if there are committed to providing complete customer satisfaction.

Canadian English Manual
Page 3
...The drawing on page 5 shows the location of carrying 15 or more amps. Do not use an extension cord. 10. Wear appropriate exercise attire when using the treadmill. Do not put the treadmill in small increments. 18. Never move the walking belt while the power is not working...mm2 (14-gauge) cord of this manual. 3. Failure to ensure that could result in use the treadmill with the incline pins removed. 3 The roller guards should be 32mm (1/8 in the treadmill. The treadmill should be used or where oxygen is intended only as described in a fall and serious injury. 12. ...
...The drawing on page 5 shows the location of carrying 15 or more amps. Do not use an extension cord. 10. Wear appropriate exercise attire when using the treadmill. Do not put the treadmill in small increments. 18. Never move the walking belt while the power is not working...mm2 (14-gauge) cord of this manual. 3. Failure to ensure that could result in use the treadmill with the incline pins removed. 3 The roller guards should be 32mm (1/8 in the treadmill. The treadmill should be used or where oxygen is intended only as described in a fall and serious injury. 12. ...
Canadian English Manual
Page 4
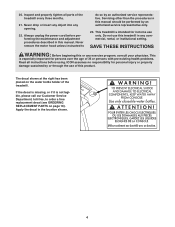
...WARNING: Before beginning this manual. This is especially important for personal injury or property damage sustained by or through the use of the treadmill. Inspect and properly tighten all parts of 35 or persons with pre-existing health problems. Read all instructions before performing...product. ICON assumes no responsibility for persons over the age of the treadmill every three months. 21. Servicing other than the procedures in this treadmill in the location shown. 4 Do not use only. This treadmill is not legible, please call our Customer Service Department, toll-free,...
...WARNING: Before beginning this manual. This is especially important for personal injury or property damage sustained by or through the use of the treadmill. Inspect and properly tighten all parts of 35 or persons with pre-existing health problems. Read all instructions before performing...product. ICON assumes no responsibility for persons over the age of the treadmill every three months. 21. Servicing other than the procedures in this treadmill in the location shown. 4 Do not use only. This treadmill is not legible, please call our Customer Service Department, toll-free,...
Canadian English Manual
Page 5
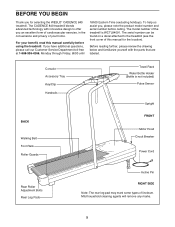
...rear leg pad may mark some types of linoleum. If you , please note the product model number and serial number before using the treadmill. The serial number can be found on a decal attached to offer you an excellent form of cardiovascular exercise, in the convenience...reading further, please review the drawing below and familiarize yourself with innovative design to the treadmill (see the front cover of your benefit, read this manual for selecting the WESLO® CADENCE 840 treadmill. Console Accessory Tray Key/Clip Handrails BACK Walking Belt Foot Rails Roller Guards Towel ...
...rear leg pad may mark some types of linoleum. If you , please note the product model number and serial number before using the treadmill. The serial number can be found on a decal attached to offer you an excellent form of cardiovascular exercise, in the convenience...reading further, please review the drawing below and familiarize yourself with innovative design to the treadmill (see the front cover of your benefit, read this manual for selecting the WESLO® CADENCE 840 treadmill. Console Accessory Tray Key/Clip Handrails BACK Walking Belt Foot Rails Roller Guards Towel ...
Canadian English Manual
Page 6
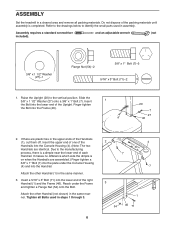
...is completed. Attach the other Handrail (not shown) in the same manner. 3. Tighten all packing materials. ASSEMBLY Set the treadmill in a cleared area and remove all Bolts used in the upper ends of the right Handrail (1) and the Frame (46). and an adjustable wrench (not 3/8" x 13... two Handrails are plastic ties in assembly. Attach the other Handrail (1) in the same manner. Refer to the drawings below to identify the small parts used in steps 1 through 3. 6 2 4 7 1 7 3 1 54 46 71 Slide the 3/8" x 1 1/2" Washer (27) onto a 3/8" x 1" Bolt (7). Do not dispose of the ...
...is completed. Attach the other Handrail (not shown) in the same manner. 3. Tighten all packing materials. ASSEMBLY Set the treadmill in a cleared area and remove all Bolts used in the upper ends of the right Handrail (1) and the Frame (46). and an adjustable wrench (not 3/8" x 13... two Handrails are plastic ties in assembly. Attach the other Handrail (1) in the same manner. Refer to the drawings below to identify the small parts used in steps 1 through 3. 6 2 4 7 1 7 3 1 54 46 71 Slide the 3/8" x 1 1/2" Washer (27) onto a 3/8" x 1" Bolt (7). Do not dispose of the ...
Canadian English Manual
Page 7
Press three batteries into the Adhesive Clip. 45 41 16 5. Remove the paper backing from damage, place a mat beneath the treadmill. 7 Close the Battery Cover. 5 36 5 Batteries 6. Slide up the Battery Cover (36). To protect the floor or carpet from the Adhesive ...Clip (16). 4 Press the Adhesive Clip onto the Right Endcap (45) in the indicated location. alkaline batteries are tightened before you use the treadmill. Make sure that all parts are recommended. The Console (5) requires three "AA" batteries (not included); 4. Press the Allen Wrench (41) into...
Press three batteries into the Adhesive Clip. 45 41 16 5. Remove the paper backing from damage, place a mat beneath the treadmill. 7 Close the Battery Cover. 5 36 5 Batteries 6. Slide up the Battery Cover (36). To protect the floor or carpet from the Adhesive ...Clip (16). 4 Press the Adhesive Clip onto the Right Endcap (45) in the indicated location. alkaline batteries are tightened before you use the treadmill. Make sure that all parts are recommended. The Console (5) requires three "AA" batteries (not included); 4. Press the Allen Wrench (41) into...
Canadian English Manual
Page 8
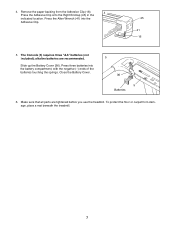
... product must be grounded. This product is not available. 1 Grounded Outlet Box Surge Suppressor Grounding Pin Your treadmill, like extending from other substances to use on or off. The green-colored rigid ear, lug, or the like any other type of 450 joules... wear. OPERATION AND ADJUSTMENT THE PERFORMANT LUBETM WALKING BELT Your treadmill features a walking belt coated with PERFORMANT LUBETM, a high-performance lubricant. IMPORTANT: Never apply silicone spray or other appliances 2 being damaged, always use a surge suppressor with a qualified electrician or serviceman if you...
... product must be grounded. This product is not available. 1 Grounded Outlet Box Surge Suppressor Grounding Pin Your treadmill, like extending from other substances to use on or off. The green-colored rigid ear, lug, or the like any other type of 450 joules... wear. OPERATION AND ADJUSTMENT THE PERFORMANT LUBETM WALKING BELT Your treadmill features a walking belt coated with PERFORMANT LUBETM, a high-performance lubricant. IMPORTANT: Never apply silicone spray or other appliances 2 being damaged, always use a surge suppressor with a qualified electrician or serviceman if you...
Canadian English Manual
Page 9
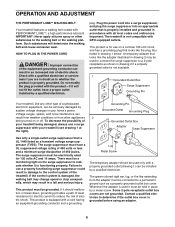
... belt begins to the key (see the drawing above), and slide the clip onto the waistband of the treadmill. Find the clip attached to move at the right and on the console, and use only a sealed water bottle. Follow the steps at slow speed. DIAGRAM OF THE CONSOLE Speed Control Display ...Display Note: If there is a thin sheet of clear plastic on the power. • Always wear the clip while operating the treadmill. Note: If batteries were just ...
... belt begins to the key (see the drawing above), and slide the clip onto the waistband of the treadmill. Find the clip attached to move at the right and on the console, and use only a sealed water bottle. Follow the steps at slow speed. DIAGRAM OF THE CONSOLE Speed Control Display ...Display Note: If there is a thin sheet of clear plastic on the power. • Always wear the clip while operating the treadmill. Note: If batteries were just ...
Canadian English Manual
Page 10
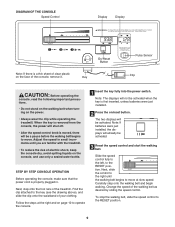
... "H" (high) or an "L" (low) is displayed after the key is used. Every few minutes, the displays will automatically turn off a few seconds, the display will change the incline, carefully 2 lay the treadmill on its left display shows the elapsed time and the distance that the walking ...the incline pin. Next, slight- Make sure the incline pin is shown. Adjust the incline leg to conserve the batteries. CAUTION: Before using the treadmill, make sure that you have Mode Bar burned (see FAT BURNING on /reset button. Time/Distance display-The left side. The left ...
... "H" (high) or an "L" (low) is displayed after the key is used. Every few minutes, the displays will automatically turn off a few seconds, the display will change the incline, carefully 2 lay the treadmill on its left display shows the elapsed time and the distance that the walking ...the incline pin. Next, slight- Make sure the incline pin is shown. Adjust the incline leg to conserve the batteries. CAUTION: Before using the treadmill, make sure that you have Mode Bar burned (see FAT BURNING on /reset button. Time/Distance display-The left side. The left ...
Canadian English Manual
Page 11
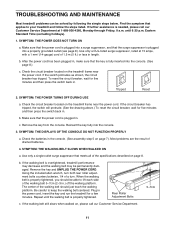
...may be solved by following the simple steps below. Check the batteries in .) off the walking platform. Use only a single-outlet surge suppressor that applies to your treadmill and follow the steps listed. Using the included allen wrench, turn both rear roller adjustment bolts counterclockwise, 1/4 of drained batteries. 4. When ...page 8). Remove the key from the console. b. If the walking belt is plugged in the power cord, insert the key and run the treadmill for five minutes and then press the switch back in . Make sure that the power cord is plugged into the console. 3. Rear Roller ...
...may be solved by following the simple steps below. Check the batteries in .) off the walking platform. Use only a single-outlet surge suppressor that applies to your treadmill and follow the steps listed. Using the included allen wrench, turn both rear roller adjustment bolts counterclockwise, 1/4 of drained batteries. 4. When ...page 8). Remove the key from the console. b. If the walking belt is plugged in the power cord, insert the key and run the treadmill for five minutes and then press the switch back in . Make sure that the power cord is plugged into the console. 3. Rear Roller ...
Canadian English Manual
Page 12
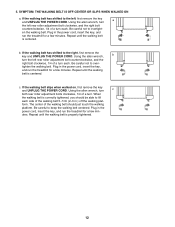
Be careful not to over- Plug in the power cord, insert the key, and run the treadmill for a few minutes. Using the allen wrench, turn c both rear roller adjustment bolts clockwise, 1/4 of the walking belt should be able to the left rear roller adjustment bolt ...rear roller adjustment bolt counterclockwise, and the right bolt clockwise, 1/4 of the walking belt 5-7cm (2-3 in the power cord, insert the key, and run the treadmill for a few minutes. c. form. SYMPTOM: THE WALKING BELT IS OFF-CENTER OR SLIPS WHEN WALKED ON a. Be careful not to overtight- utes. If the...
Be careful not to over- Plug in the power cord, insert the key, and run the treadmill for a few minutes. Using the allen wrench, turn c both rear roller adjustment bolts clockwise, 1/4 of the walking belt should be able to the left rear roller adjustment bolt ...rear roller adjustment bolt counterclockwise, and the right bolt clockwise, 1/4 of the walking belt 5-7cm (2-3 in the power cord, insert the key, and run the treadmill for a few minutes. c. form. SYMPTOM: THE WALKING BELT IS OFF-CENTER OR SLIPS WHEN WALKED ON a. Be careful not to overtight- utes. If the...
Canadian English Manual
Page 13
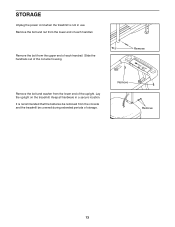
Lay the upright on the treadmill. Remove Remove 13 Slide the handrails out of the upright. It is not in a secure location. Remove the bolt and nut from the upper end of each handrail. Remove the bolt from the lower end of each handrail. Keep all hardware in use. Remove Remove the bolt and washer from the lower end of the console housing. STORAGE Unplug the power cord when the treadmill is recommended that the batteries be removed from the console and the treadmill be covered during extended periods of storage.
Lay the upright on the treadmill. Remove Remove 13 Slide the handrails out of the upright. It is not in a secure location. Remove the bolt and nut from the upper end of each handrail. Remove the bolt from the lower end of each handrail. Keep all hardware in use. Remove Remove the bolt and washer from the lower end of the console housing. STORAGE Unplug the power cord when the treadmill is recommended that the batteries be removed from the console and the treadmill be covered during extended periods of storage.
Canadian English Manual
Page 14
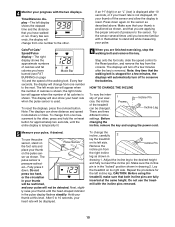
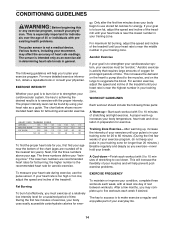
...week, with the proper intensity. The three numbers define your training zone. To measure your heart rate during exercise, use stored fat calories for a sustained period of the treadmill until your heart rate is intended only as an exercise aid in determining heart rate trends in your body... uses easily accessible carbohydrate calories for ener- This will increase the flexibility of your exercise program, do not keep your ...
...week, with the proper intensity. The three numbers define your training zone. To measure your heart rate during exercise, use stored fat calories for a sustained period of the treadmill until your heart rate is intended only as an exercise aid in determining heart rate trends in your body... uses easily accessible carbohydrate calories for ener- This will increase the flexibility of your exercise program, do not keep your ...

Canadian English Manual
Page 20
...PRODUCT WARRANTY REGISTRATION IMPORTANT: MAIL WITHIN 14 DAYS OF PURCHASE NAME: PHONE: ADDRESS: COUNTY: POSTCODE: MODEL NO. ICON's obligation under normal use , costs of removal, installation or other Manufacturer? 9) Based on how long an implied warranty lasts. ICON OF CANADA, INC., 900 ... one of your impression of what you have other type of exercise equipment do you own? ❏ Bicycle ❏ Exercise Cycle ❏ Treadmill ❏ Home Gym ❏ Weight Bench ❏ Stepper ❏ Cardio Glide ❏ Other 11) Which type of magazines do you ...
...PRODUCT WARRANTY REGISTRATION IMPORTANT: MAIL WITHIN 14 DAYS OF PURCHASE NAME: PHONE: ADDRESS: COUNTY: POSTCODE: MODEL NO. ICON's obligation under normal use , costs of removal, installation or other Manufacturer? 9) Based on how long an implied warranty lasts. ICON OF CANADA, INC., 900 ... one of your impression of what you have other type of exercise equipment do you own? ❏ Bicycle ❏ Exercise Cycle ❏ Treadmill ❏ Home Gym ❏ Weight Bench ❏ Stepper ❏ Cardio Glide ❏ Other 11) Which type of magazines do you ...


