
Canadian English Manual
Page 1
Visit our website at www.weslo.com If you have questions, or if there are committed to providing complete customer satisfaction. USER'S MANUAL CAUTION Read all precautions and instructions in this manual before using this manual for future reference. Save this equipment. Serial Number Decal QUESTIONS? WCTL84091 Serial No. As a manufacturer, we are missing parts, please call: 1-888-936-4266 Mon.-Fri. 8h00 until 18h30 EST (excluding holidays). ® Model No.
Visit our website at www.weslo.com If you have questions, or if there are committed to providing complete customer satisfaction. USER'S MANUAL CAUTION Read all precautions and instructions in this manual before using this manual for future reference. Save this equipment. Serial Number Decal QUESTIONS? WCTL84091 Serial No. As a manufacturer, we are missing parts, please call: 1-888-936-4266 Mon.-Fri. 8h00 until 18h30 EST (excluding holidays). ® Model No.
Canadian English Manual
Page 2
® TABLE OF CONTENTS IMPORTANT PRECAUTIONS 3 BEFORE YOU BEGIN 5 ASSEMBLY 6 OPERATION AND ADJUSTMENT 8 TROUBLESHOOTING AND MAINTENANCE 11 STORAGE 13 CONDITIONING GUIDELINES 14 PART LIST 16 EXPLODED DRAWING 17 CUSTOMER RECORD 18 ORDERING REPLACEMENT PARTS 19 LIMITED WARRANTY 20 WESLO is a registered trademark of ICON Health & Fitness, Inc. 2
® TABLE OF CONTENTS IMPORTANT PRECAUTIONS 3 BEFORE YOU BEGIN 5 ASSEMBLY 6 OPERATION AND ADJUSTMENT 8 TROUBLESHOOTING AND MAINTENANCE 11 STORAGE 13 CONDITIONING GUIDELINES 14 PART LIST 16 EXPLODED DRAWING 17 CUSTOMER RECORD 18 ORDERING REPLACEMENT PARTS 19 LIMITED WARRANTY 20 WESLO is a registered trademark of ICON Health & Fitness, Inc. 2
Canadian English Manual
Page 3
... the treadmill. Athletic support clothes are adequately informed of the treadmill, refer to ensure that blocks air openings. Never start the treadmill while you are used by persons weighing more than one person on the treadmill at all users of the owner to the instructions on the treadmill. 16. Always hold the handrails while exercising on page 10. The pulse sensor is damaged, the walking belt may change the incline...
... the treadmill. Athletic support clothes are adequately informed of the treadmill, refer to ensure that blocks air openings. Never start the treadmill while you are used by persons weighing more than one person on the treadmill at all users of the owner to the instructions on the treadmill. 16. Always hold the handrails while exercising on page 10. The pulse sensor is damaged, the walking belt may change the incline...
Canadian English Manual
Page 4
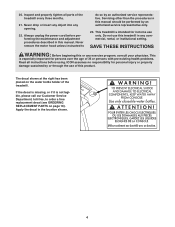
... tighten all instructions before performing the maintenance and adjustment procedures described in -home use only. ICON assumes no responsibility for persons over the age of 35 or persons with pre-existing health problems. Read all parts of the treadmill every three months. 21. The decal shown at the right has been placed on page 19). 20. Always unplug the power cord before using. This treadmill...
... tighten all instructions before performing the maintenance and adjustment procedures described in -home use only. ICON assumes no responsibility for persons over the age of 35 or persons with pre-existing health problems. Read all parts of the treadmill every three months. 21. The decal shown at the right has been placed on page 19). 20. Always unplug the power cord before using. This treadmill...
Canadian English Manual
Page 5
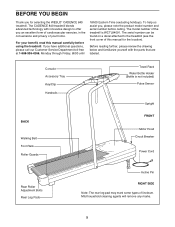
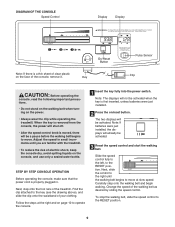
... you an excellent form of cardiovascular exercise, in the convenience and privacy of linoleum. The model number of the treadmill is not included) Pulse Sensor Upright FRONT Motor Hood Circuit Breaker Power Cord Rear Roller Adjustment Bolts Rear Leg Pads Incline Pin RIGHT SIDE Note: The rear leg pad may mark some types of your benefit, read this manual for selecting the WESLO® CADENCE 840 treadmill. Console Accessory Tray Key/Clip Handrails BACK Walking Belt Foot Rails Roller Guards Towel Rack...
... you an excellent form of cardiovascular exercise, in the convenience and privacy of linoleum. The model number of the treadmill is not included) Pulse Sensor Upright FRONT Motor Hood Circuit Breaker Power Cord Rear Roller Adjustment Bolts Rear Leg Pads Incline Pin RIGHT SIDE Note: The rear leg pad may mark some types of your benefit, read this manual for selecting the WESLO® CADENCE 840 treadmill. Console Accessory Tray Key/Clip Handrails BACK Walking Belt Foot Rails Roller Guards Towel Rack...
Canadian English Manual
Page 6
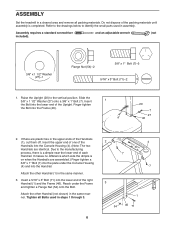
... plate under the Frame and tighten a Flange Nut (54) onto the Bolt. Tighten all packing materials. ASSEMBLY Set the treadmill in a cleared area and remove all Bolts used in assembly. If there are identical. Do not dispose of the packing materials until assembly is on when the Handrails are assembled.) Finger tighten a 3/8" x 1" Bolt (7) into the lower end of each Handrail. Attach the other Handrail (not shown...
... plate under the Frame and tighten a Flange Nut (54) onto the Bolt. Tighten all packing materials. ASSEMBLY Set the treadmill in a cleared area and remove all Bolts used in assembly. If there are identical. Do not dispose of the packing materials until assembly is on when the Handrails are assembled.) Finger tighten a 3/8" x 1" Bolt (7) into the lower end of each Handrail. Attach the other Handrail (not shown...
Canadian English Manual
Page 7
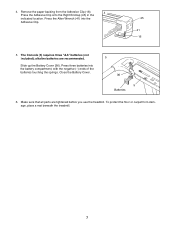
... sure that all parts are recommended. alkaline batteries are tightened before you use the treadmill. Remove the paper backing from damage, place a mat beneath the treadmill. 7 To protect the floor or carpet from the Adhesive Clip (16). 4 Press the Adhesive Clip onto the Right Endcap (45) in the indicated location. Close the Battery Cover. 5 36 5 Batteries 6. The Console (5) requires three "AA" batteries (not included);
... sure that all parts are recommended. alkaline batteries are tightened before you use the treadmill. Remove the paper backing from damage, place a mat beneath the treadmill. 7 To protect the floor or carpet from the Adhesive Clip (16). 4 Press the Adhesive Clip onto the Right Endcap (45) in the indicated location. Close the Battery Cover. 5 36 5 Batteries 6. The Console (5) requires three "AA" batteries (not included);
Canadian English Manual
Page 8
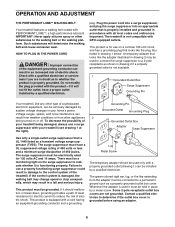
... outlet installed by a metal screw. Grounding Pin Grounded Outlet Grounding Plug Grounded Outlet Box Adapter Surge Suppressor Use only a single-outlet surge suppressor that looks like extending from other appliances 2 being damaged, always use a properly functioning surge suppressor could result in an increased risk of 450 joules. If the control system is damaged, the walking belt may change speed or stop unexpectedly, which...
... outlet installed by a metal screw. Grounding Pin Grounded Outlet Grounding Plug Grounded Outlet Box Adapter Surge Suppressor Use only a single-outlet surge suppressor that looks like extending from other appliances 2 being damaged, always use a properly functioning surge suppressor could result in an increased risk of 450 joules. If the control system is damaged, the walking belt may change speed or stop unexpectedly, which...
Canadian English Manual
Page 9
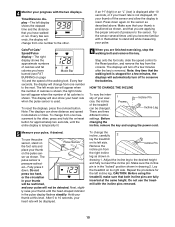
... the RESET position. 9 On/Reset Button Key Pulse Sensor Clip CAUTION: Before operating the console, read the following important precautions. • Do not stand on the walking belt when turning on the power. • Always wear the clip while operating the treadmill. The two displays will already be activated. Note: If batteries were just installed, the displays will be activated. 3 Reset the speed control and start the walking belt. Next, step onto the...
... the RESET position. 9 On/Reset Button Key Pulse Sensor Clip CAUTION: Before operating the console, read the following important precautions. • Do not stand on the walking belt when turning on the power. • Always wear the clip while operating the treadmill. The two displays will already be activated. Note: If batteries were just installed, the displays will be activated. 3 Reset the speed control and start the walking belt. Next, step onto the...
Canadian English Manual
Page 10
... mode bar will also show distance and speed in drawing 2. Note: Any time that both incline pins are three different incline settings. HOW TO CHANGE THE INCLINE To vary the intensity of your exer- 1 Incline Pin cise, the incline Frame of the treadmill can show your heart rate will change from the console. Incline Leg There are fully inserted at this level. Before changing the incline, remove the key and unplug the power cord. 5 Measure your pulse...
... mode bar will also show distance and speed in drawing 2. Note: Any time that both incline pins are three different incline settings. HOW TO CHANGE THE INCLINE To vary the intensity of your exer- 1 Incline Pin cise, the incline Frame of the treadmill can show your heart rate will change from the console. Incline Leg There are fully inserted at this level. Before changing the incline, remove the key and unplug the power cord. 5 Measure your pulse...
Canadian English Manual
Page 11
... the power cord is needed, please call our Customer Service Department. 11 Reinsert the key fully into a properly grounded outlet (see page 8). After the power cord has been plugged in . b. Use only a CUL-listed surge suppressor, rated at 1-888-936-4266, Monday through Friday, 8 a.m. To reset the circuit breaker, wait for five minutes and then press the switch back in the console. (See assembly step 5 on the treadmill...
... the power cord is needed, please call our Customer Service Department. 11 Reinsert the key fully into a properly grounded outlet (see page 8). After the power cord has been plugged in . b. Use only a CUL-listed surge suppressor, rated at 1-888-936-4266, Monday through Friday, 8 a.m. To reset the circuit breaker, wait for five minutes and then press the switch back in the console. (See assembly step 5 on the treadmill...
Canadian English Manual
Page 12
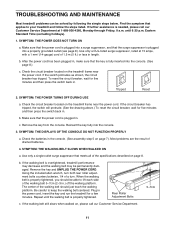
... walking belt is properly tightened. 12 Plug in the power cord, insert the key, and run the treadmill for a few minutes. Plug in .) off the walking plat- b. When the walking belt is centered. Repeat until the walking belt is correctly tightened, you should just touch the walking platform. 5. SYMPTOM: THE WALKING BELT IS OFF-CENTER OR SLIPS WHEN WALKED ON a. If the walking belt has shifted to lift each . Using the allen wrench, turn...
... walking belt is properly tightened. 12 Plug in the power cord, insert the key, and run the treadmill for a few minutes. Plug in .) off the walking plat- b. When the walking belt is centered. Repeat until the walking belt is correctly tightened, you should just touch the walking platform. 5. SYMPTOM: THE WALKING BELT IS OFF-CENTER OR SLIPS WHEN WALKED ON a. If the walking belt has shifted to lift each . Using the allen wrench, turn...
Canadian English Manual
Page 13
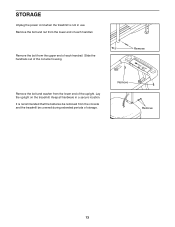
Remove the bolt from the upper end of the upright. Remove Remove the bolt and washer from the lower end of each handrail. Keep all hardware in use. Remove the bolt and nut from the lower end of the console housing. Slide the handrails out of each handrail. Lay the upright on the treadmill. It is not in a secure location. STORAGE Unplug the power cord when the treadmill is recommended that the batteries be removed from the console and the treadmill be covered during extended periods of storage. Remove Remove 13
Remove the bolt from the upper end of the upright. Remove Remove the bolt and washer from the lower end of each handrail. Keep all hardware in use. Remove the bolt and nut from the lower end of the console housing. Slide the handrails out of each handrail. Lay the upright on the treadmill. It is not in a secure location. STORAGE Unplug the power cord when the treadmill is recommended that the batteries be removed from the console and the treadmill be covered during extended periods of storage. Remove Remove 13
Canadian English Manual
Page 14
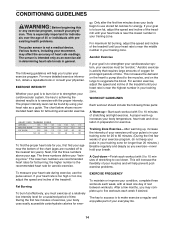
... five workouts each workout with 5 to exercise with preexisting health problems. The pulse sensor is too high or too low, adjust the speed and incline of time. If your body uses easily accessible carbohydrate calories for longer than 20 minutes.) Breathe regularly and deeply as you may affect the accuracy of the chart (ages are recommended heart rates for aerobic exercise. A Cool-down . the higher number is...
... five workouts each workout with 5 to exercise with preexisting health problems. The pulse sensor is too high or too low, adjust the speed and incline of time. If your body uses easily accessible carbohydrate calories for longer than 20 minutes.) Breathe regularly and deeply as you may affect the accuracy of the chart (ages are recommended heart rates for aerobic exercise. A Cool-down . the higher number is...

Canadian English Manual
Page 15
Bring the sole of your extended leg. Stretches: Hamstrings, lower back and groin. 3 3. Hold for 15 counts, then relax. Hold for 15 counts, then relax. Repeat 3 times. Keep your back leg straight and your toes as far as you reach down toward the wall. Stretches: Calves, achilles tendons and .... Hold for 15 counts, then relax. SUGGESTED STRETCHES The correct form for several basic stretches is shown in front of your feet together and your knees outward. Bend your front leg, lean forward and move your hips toward your toes as far as you stretch-never bounce...
Bring the sole of your extended leg. Stretches: Hamstrings, lower back and groin. 3 3. Hold for 15 counts, then relax. Hold for 15 counts, then relax. Repeat 3 times. Keep your back leg straight and your toes as far as you reach down toward the wall. Stretches: Calves, achilles tendons and .... Hold for 15 counts, then relax. SUGGESTED STRETCHES The correct form for several basic stretches is shown in front of your feet together and your knees outward. Bend your front leg, lean forward and move your hips toward your toes as far as you stretch-never bounce...
Canadian English Manual
Page 16
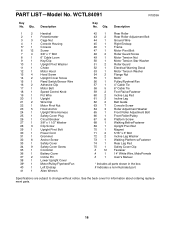
... 1" Bolt 6" Cable Loom Key/Clip Upright Pivot Washer Choke Motor Hood Hood Screw Upright Cover Screw Reed Switch/Sensor Wire Adhesive Clip Motor Belt Speed Control Knob Pot Wire Upright Wire Clip Motor Pivot Nut Hood Anchor Upright Wire Harness Safety Cover Plug Circuit Breaker 3/8" x 1 1/2" Washer Clip Screw Upright Pivot Bolt Power Cord Grommet Anchor Screw Safety Cover Safety Cover Screw Controller Battery Cover Incline Pin Lower Upright Cover Motor/Pulley/Flywheel/Fan Left Endcap Allen Wrench Key No. See the back cover for information about ordering replacement parts. 16 PART LIST...
... 1" Bolt 6" Cable Loom Key/Clip Upright Pivot Washer Choke Motor Hood Hood Screw Upright Cover Screw Reed Switch/Sensor Wire Adhesive Clip Motor Belt Speed Control Knob Pot Wire Upright Wire Clip Motor Pivot Nut Hood Anchor Upright Wire Harness Safety Cover Plug Circuit Breaker 3/8" x 1 1/2" Washer Clip Screw Upright Pivot Bolt Power Cord Grommet Anchor Screw Safety Cover Safety Cover Screw Controller Battery Cover Incline Pin Lower Upright Cover Motor/Pulley/Flywheel/Fan Left Endcap Allen Wrench Key No. See the back cover for information about ordering replacement parts. 16 PART LIST...
Canadian English Manual
Page 17
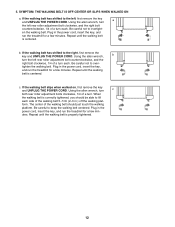
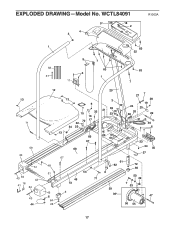
WCTL84091 4 3 5* 36 18 2 R1003A 13 71 59 40 51 43 64 42 16 41 64 43 44 1 9 7 58 6 57 11 63 1 63 52 63 7 12 13 6 15 32 16 70 17 32 54 23 13 66 67 68 67 48 51 54 46 71 73 45 8 6 64 28 20 3 21 69 10 23 14 22 65 64 27 7 28 19 24 25 26 38 29 31 30 6 33 34 35 37 61 62 6 72 60 50 49 7 53 59 39* 47 56 55 17 EXPLODED DRAWING-Model No.
WCTL84091 4 3 5* 36 18 2 R1003A 13 71 59 40 51 43 64 42 16 41 64 43 44 1 9 7 58 6 57 11 63 1 63 52 63 7 12 13 6 15 32 16 70 17 32 54 23 13 66 67 68 67 48 51 54 46 71 73 45 8 6 64 28 20 3 21 69 10 23 14 22 65 64 27 7 28 19 24 25 26 38 29 31 30 6 33 34 35 37 61 62 6 72 60 50 49 7 53 59 39* 47 56 55 17 EXPLODED DRAWING-Model No.
Canadian English Manual
Page 19
... give the following information: • The MODEL NUMBER of the product (WCTL84091) • The NAME of the product (WESLO® CADENCE 840 treadmill) • The SERIAL NUMBER of the product (see the front cover of this manual) • The KEY NUMBER AND DESCRIPTION OF THE PART(S) (see the EXPLODED DRAWING attached in the center of this manual and the PART LIST on pages 16 and 17) ICON of Canada...
... give the following information: • The MODEL NUMBER of the product (WCTL84091) • The NAME of the product (WESLO® CADENCE 840 treadmill) • The SERIAL NUMBER of the product (see the front cover of this manual) • The KEY NUMBER AND DESCRIPTION OF THE PART(S) (see the EXPLODED DRAWING attached in the center of this manual and the PART LIST on pages 16 and 17) ICON of Canada...
Canadian English Manual
Page 20
... purchasing fitness equipment from the date of magazines do you own? ❏ Bicycle ❏ Exercise Cycle ❏ Treadmill ❏ Home Gym ❏ Weight Bench ❏ Stepper ❏ Cardio Glide ❏ Other 11) Which type of purchase. Printed in USA Part No. 194727 R1003A Printed in workmanship and material, under this warranty is authorized by ICON. ICON's obligation under normal use , costs of removal, installation or...
... purchasing fitness equipment from the date of magazines do you own? ❏ Bicycle ❏ Exercise Cycle ❏ Treadmill ❏ Home Gym ❏ Weight Bench ❏ Stepper ❏ Cardio Glide ❏ Other 11) Which type of purchase. Printed in USA Part No. 194727 R1003A Printed in workmanship and material, under this warranty is authorized by ICON. ICON's obligation under normal use , costs of removal, installation or...


