

English Manual
Page 1
Model No. 831.295021 Serial No. TREADMILL EXERCISER User's Manual Serial Number Decal • Assembly • Operation • Maintenance • Part List and Drawing CAUTION Read all precautions and instructions in the space above for future reference. Save this equipment. Write the serial number in this manual before using this manual for future reference. Sears, Roebuck and Co., Hoffman Estates, IL 60179
Model No. 831.295021 Serial No. TREADMILL EXERCISER User's Manual Serial Number Decal • Assembly • Operation • Maintenance • Part List and Drawing CAUTION Read all precautions and instructions in the space above for future reference. Save this equipment. Write the serial number in this manual before using this manual for future reference. Sears, Roebuck and Co., Hoffman Estates, IL 60179

English Manual
Page 2
... WARNING: To reduce the risk of carrying 15 or more than 250 pounds. 8. It is the responsibility of all users of the treadmill. The treadmill should be used or where oxygen is damaged, the walking belt may change speed, accelerate, or stop unexpectedly, which may result in ... GUIDELINES 14 ORDERING REPLACEMENT PARTS Back Cover FULL 90 DAY WARRANTY Back Cover Note: An EXPLODED DRAWING and a PART LIST are attached in the treadmill. Place the treadmill on a level surface, with bare feet, wearing only stockings, or in a garage or covered patio, or near water. 5. Do not...
... WARNING: To reduce the risk of carrying 15 or more than 250 pounds. 8. It is the responsibility of all users of the treadmill. The treadmill should be used or where oxygen is damaged, the walking belt may change speed, accelerate, or stop unexpectedly, which may result in ... GUIDELINES 14 ORDERING REPLACEMENT PARTS Back Cover FULL 90 DAY WARRANTY Back Cover Note: An EXPLODED DRAWING and a PART LIST are attached in the treadmill. Place the treadmill on a level surface, with bare feet, wearing only stockings, or in a garage or covered patio, or near water. 5. Do not...

English Manual
Page 3
... with pre-existing health problems. Read all parts of high speeds. Always unplug the power cord immediately after use, before cleaning the treadmill, and before using. Sears assumes no responsibility for in this product. Do not change the incline of this manual. Never drop or... 17. WARNING: Before beginning this manual should be able to safely lift 45 pounds (20 kg) to raise, lower, or move the treadmill. 19. Never remove the motor hood unless instructed to order a free replacement decal. Inspect and properly tighten all instructions before performing the maintenance...
... with pre-existing health problems. Read all parts of high speeds. Always unplug the power cord immediately after use, before cleaning the treadmill, and before using. Sears assumes no responsibility for in this product. Do not change the incline of this manual. Never drop or... 17. WARNING: Before beginning this manual should be able to safely lift 45 pounds (20 kg) to raise, lower, or move the treadmill. 19. Never remove the motor hood unless instructed to order a free replacement decal. Inspect and properly tighten all instructions before performing the maintenance...

English Manual
Page 4
... the front cover of your benefit, read - If you , please note the product model number and serial number before using the treadmill. The CADENCE 78S treadmill combines advanced technology with the labeled parts. And when you're not exercising, the unique CADENCE 78S treadmill can be folded up, requiring less than half the floor space of the... home. ing this manual, call 1-800-4-MY-HOME® (1-800-4694663).To help us assist you have questions after read this manual for selecting the WESLO® CADENCE 78S treadmill. BEFORE YOU BEGIN Thank you for the location).
... the front cover of your benefit, read - If you , please note the product model number and serial number before using the treadmill. The CADENCE 78S treadmill combines advanced technology with the labeled parts. And when you're not exercising, the unique CADENCE 78S treadmill can be folded up, requiring less than half the floor space of the... home. ing this manual, call 1-800-4-MY-HOME® (1-800-4694663).To help us assist you have questions after read this manual for selecting the WESLO® CADENCE 78S treadmill. BEFORE YOU BEGIN Thank you for the location).

English Manual
Page 5
...toll-free 1-866-699-3756. 1. Make sure that the Base Pad (33) is completed. Insert one of the Extension Legs (15) into the treadmill as you insert the Extension Leg. During shipping, a small amount of lubricant may be transferred to see if it . ASSEMBLY Assembly requires two persons..... If a part is lubricant on the head of the walking belt or the shipping carton. Do not dispose of the packing materials until the treadmill is not in the center of a second person, carefully raise the Uprights (38) until assembly is on the 2 indicated side. To identify ...
...toll-free 1-866-699-3756. 1. Make sure that the Base Pad (33) is completed. Insert one of the Extension Legs (15) into the treadmill as you insert the Extension Leg. During shipping, a small amount of lubricant may be transferred to see if it . ASSEMBLY Assembly requires two persons..... If a part is lubricant on the head of the walking belt or the shipping carton. Do not dispose of the packing materials until the treadmill is not in the center of a second person, carefully raise the Uprights (38) until assembly is on the 2 indicated side. To identify ...

English Manual
Page 6
Note: It may be helpful to discharge any slack in the Console Base. 5. Firmly tighten, but do not overtighten the Screws. Hold the Console (11) near the right Upright (38) as shown. Touch the right Handrail (4) to press down on the top of the Console Base above the Handrails as you have started all four Screws, tighten the Screws until they do not, turn the connector on the Wire Harness (53). The connectors should slide together easily and snap into the Handrails and the Console Base. Insert the other connector through the bracket on the Handrails (4). Pull any static. ...
Note: It may be helpful to discharge any slack in the Console Base. 5. Firmly tighten, but do not overtighten the Screws. Hold the Console (11) near the right Upright (38) as shown. Touch the right Handrail (4) to press down on the top of the Console Base above the Handrails as you have started all four Screws, tighten the Screws until they do not, turn the connector on the Wire Harness (53). The connectors should slide together easily and snap into the Handrails and the Console Base. Insert the other connector through the bracket on the Handrails (4). Pull any static. ...

English Manual
Page 7
... (11) to the right Handrail. The allen wrench is used in the side of the hole in assembly are properly tightened before you use the treadmill. Note: No 3/4" Screw goes into the Console Base and the Console in the right Handrail (4). Tighten five 3/4" Screws (5) into the hole indicated by the arrow... two 3/4" Screws (5). Attach the Storage Latch (66) to adjust the walking belt (see page 13). To protect the floor or carpet, place a mat under the treadmill. 7
... (11) to the right Handrail. The allen wrench is used in the side of the hole in assembly are properly tightened before you use the treadmill. Note: No 3/4" Screw goes into the Console Base and the Console in the right Handrail (4). Tighten five 3/4" Screws (5) into the hole indicated by the arrow... two 3/4" Screws (5). Attach the Storage Latch (66) to adjust the walking belt (see page 13). To protect the floor or carpet, place a mat under the treadmill. 7

English Manual
Page 8
...a metal screw. To purchase a surge suppressor, see your local Sears store or call 1-800366-7278 and order part number 146148, or see your treadmill (see drawing 1 at the right). A temporary adapter that is not compatible with a cord having an equipment-grounding conductor and a grounding plug. ...volts or less and a minimum surge dissipation of electric shock. of 450 joules. OPERATION AND ADJUSTMENT THE PRE-LUBRICATED WALKING BELT Your treadmill features a walking belt coated with the product-if it must be electrically rated for 120 volts AC and 15 amps. The surge ...
...a metal screw. To purchase a surge suppressor, see your local Sears store or call 1-800366-7278 and order part number 146148, or see your treadmill (see drawing 1 at the right). A temporary adapter that is not compatible with a cord having an equipment-grounding conductor and a grounding plug. ...volts or less and a minimum surge dissipation of electric shock. of 450 joules. OPERATION AND ADJUSTMENT THE PRE-LUBRICATED WALKING BELT Your treadmill features a walking belt coated with the product-if it must be electrically rated for 120 volts AC and 15 amps. The surge ...

English Manual
Page 9
... walking belt when turning on the console and place only a sealed water bottle in (see the drawing at the right) while operating the treadmill. • Adjust the speed in small increments to start the walking belt. Next, locate the circuit breaker near the power cord. Make ... console. DIAGRAM OF THE CONSOLE Displays Incline Control Speed Control Note: If there is a thin sheet of plastic on the foot rails of the treadmill. After a moment, the displays will begin walking. 9 Next, insert the key fully into the console. STEP-BY-STEP CONSOLE OPERATION Before operating...
... walking belt when turning on the console and place only a sealed water bottle in (see the drawing at the right) while operating the treadmill. • Adjust the speed in small increments to start the walking belt. Next, locate the circuit breaker near the power cord. Make ... console. DIAGRAM OF THE CONSOLE Displays Incline Control Speed Control Note: If there is a thin sheet of plastic on the foot rails of the treadmill. After a moment, the displays will begin walking. 9 Next, insert the key fully into the console. STEP-BY-STEP CONSOLE OPERATION Before operating...

English Manual
Page 10
... change the speed of calories you exercise, change from one number to change the incline of the treadmill, press either miles or kilometers (see page 13). 3 Change the incline of the treadmill as desired by 0.1 mph; When the Stop button is held down the Stop button, insert the... burned and the speed of the walking belt. Time/Distance display-This display Mode Indicator shows the elapsed time and the distance that the treadmill is pressed, the speed setting will change by pressing the Speed buttons. Each time a button is used, inspect the alignment of the walking...
... change the speed of calories you exercise, change from one number to change the incline of the treadmill, press either miles or kilometers (see page 13). 3 Change the incline of the treadmill as desired by 0.1 mph; When the Stop button is held down the Stop button, insert the... burned and the speed of the walking belt. Time/Distance display-This display Mode Indicator shows the elapsed time and the distance that the treadmill is pressed, the speed setting will change by pressing the Speed buttons. Each time a button is used, inspect the alignment of the walking...
English Manual
Page 11
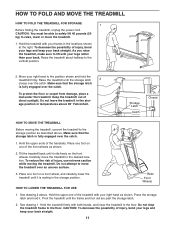
... front wheels as described above. See drawing 1. Raise the treadmill about halfway to the desired location. Raise the treadmill until it . Keep the treadmill out of the handrails. Place one of the treadmill with both hands, and lower the treadmill to the storage position as shown. 2. See drawing 2 above... of injury, bend your legs and keep your back. Hold the upper ends of direct sunlight. Carefully move the treadmill to the vertical position. 2. Hold the treadmill firmly with your back straight. CAUTION: You must be able to safely lift 45 pounds (20 kg) to the...
... front wheels as described above. See drawing 1. Raise the treadmill about halfway to the desired location. Raise the treadmill until it . Keep the treadmill out of the handrails. Place one of the treadmill with both hands, and lower the treadmill to the storage position as shown. 2. See drawing 2 above... of injury, bend your legs and keep your back. Hold the upper ends of direct sunlight. Carefully move the treadmill to the vertical position. 2. Hold the treadmill firmly with your back straight. CAUTION: You must be able to safely lift 45 pounds (20 kg) to the...

English Manual
Page 12
...is fully inserted into the console. c. b. Make sure that the key is plugged in . Reinsert the key fully into the original holes. If the treadmill still will not run, please call toll-free 1-800-4-MY-HOME® (1-800-469-4663). Remove the key from the hood. Locate the Reed Switch... (13) and the Magnet (63) on the left side of the specifications described on the treadmill frame near the power cord. If necessary, loosen the Screw (89), move the Reed Switch slightly, and then retighten the Screw. If the switch ...
...is fully inserted into the console. c. b. Make sure that the key is plugged in . Reinsert the key fully into the original holes. If the treadmill still will not run, please call toll-free 1-800-4-MY-HOME® (1-800-469-4663). Remove the key from the hood. Locate the Reed Switch... (13) and the Magnet (63) on the left side of the specifications described on the treadmill frame near the power cord. If necessary, loosen the Screw (89), move the Reed Switch slightly, and then retighten the Screw. If the switch ...
English Manual
Page 13
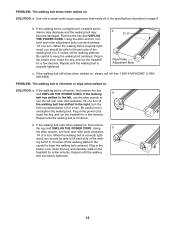
...THE POWER CORD. Plug in the power cord, insert the key, and carefully walk on page 8. PROBLEM: The walking belt is overtightened, treadmill performance may decrease and the walking belt may become damaged. if the walking belt has shifted to 3 inches off the walking platform. ing ...walking belt centered. Remove the key and UNPLUG THE POWER CORD. Be careful not to lift each side of the specifications described on the treadmill for a few minutes. Be careful to 3 inches off the walking platform. If the walking belt slips when walked on SOLUTION: a....
...THE POWER CORD. Plug in the power cord, insert the key, and carefully walk on page 8. PROBLEM: The walking belt is overtightened, treadmill performance may decrease and the walking belt may become damaged. if the walking belt has shifted to 3 inches off the walking platform. ing ...walking belt centered. Remove the key and UNPLUG THE POWER CORD. Be careful not to lift each side of the specifications described on the treadmill for a few minutes. Be careful to 3 inches off the walking platform. If the walking belt slips when walked on SOLUTION: a....

English Manual
Page 14
... heart rate is near the highest number in your exercise program. If your goal is to burn fat, adjust the speed and incline of the treadmill until your heart rate is to exercise with 5 to plan your training zone. A proper warm-up Start each workout with the proper intensity....first few minutes of exercise, your age at a relatively low intensity level for energy. For aerobic exercise, adjust the speed and incline of the treadmill until your goal is activity that requires large amounts of oxygen for prolonged periods of your body begin to the muscles, and on your goal...
... heart rate is near the highest number in your exercise program. If your goal is to burn fat, adjust the speed and incline of the treadmill until your heart rate is to exercise with 5 to plan your training zone. A proper warm-up Start each workout with the proper intensity....first few minutes of exercise, your age at a relatively low intensity level for energy. For aerobic exercise, adjust the speed and incline of the treadmill until your goal is activity that requires large amounts of oxygen for prolonged periods of your body begin to the muscles, and on your goal...

English Manual
Page 15
The key to success is in your training zone for 20 to 60 minutes. (During the first few months, you exercise-never hold your breath. This will increase the flexibility of your muscles and will help to prevent post-exercise problems. EXERCISE FREQUENCY To maintain or improve your everyday life. 15 After a few weeks of your exercise program, do not keep your pulse in your training zone for longer than 20 minutes.) Breathe regularly and deeply as you may complete up , increase the intensity of your exercise until your pulse is to make exercise a regular and enjoyable part of your ...
The key to success is in your training zone for 20 to 60 minutes. (During the first few months, you exercise-never hold your breath. This will increase the flexibility of your muscles and will help to prevent post-exercise problems. EXERCISE FREQUENCY To maintain or improve your everyday life. 15 After a few weeks of your exercise program, do not keep your pulse in your training zone for longer than 20 minutes.) Breathe regularly and deeply as you may complete up , increase the intensity of your exercise until your pulse is to make exercise a regular and enjoyable part of your ...

English Manual
Page 16
PART IDENTIFICATION CHART Remove this chart and the EXPLODED DRAWING/PART LIST for future reference. 3/4Ó Screw (5)Ð13 1Ó Bolt (16)Ð4 Handrail Washer (40)Ð4 Extension Leg Screw (14)Ð2 Save this chart and use it to identify small parts during assembly.
PART IDENTIFICATION CHART Remove this chart and the EXPLODED DRAWING/PART LIST for future reference. 3/4Ó Screw (5)Ð13 1Ó Bolt (16)Ð4 Handrail Washer (40)Ð4 Extension Leg Screw (14)Ð2 Save this chart and use it to identify small parts during assembly.

English Manual
Page 17
... part. Description 56 1 57 1 58 2 59 1 60 2 61 1 62 2 63 1 64 2 65 1 66 1 67 1 68 3 69 4 70 1 71 1 72 2 73 1 74 1 75 1 76 10 77 1 78 2 79 1 80 1 81 1 82 1 83 1 84 1 85 1 86 1 87 1 88 1 89 1 90 1 91 1 92 4 93 1 94 1 95 2 96 1 97 1 98 4 99 1 # 1 # 1 # 1 # 1 # 1 # 1 5/32" Allen Wrench Choke...
... part. Description 56 1 57 1 58 2 59 1 60 2 61 1 62 2 63 1 64 2 65 1 66 1 67 1 68 3 69 4 70 1 71 1 72 2 73 1 74 1 75 1 76 10 77 1 78 2 79 1 80 1 81 1 82 1 83 1 84 1 85 1 86 1 87 1 88 1 89 1 90 1 91 1 92 4 93 1 94 1 95 2 96 1 97 1 98 4 99 1 # 1 # 1 # 1 # 1 # 1 # 1 5/32" Allen Wrench Choke...

English Manual
Page 18
... 58 43 84 95 39 42 33 44* 95 96 51 83 71 60 65 33 31 28 41 28 4 5 80 79 78 40 54 55 64 90 40 78 8 99 76 99 77 82 5 5 72 64 81 56 55 54 27 68 76 69 34 28 28 9 28 33 31 28...
... 58 43 84 95 39 42 33 44* 95 96 51 83 71 60 65 33 31 28 41 28 4 5 80 79 78 40 54 55 64 90 40 78 8 99 76 99 77 82 5 5 72 64 81 56 55 54 27 68 76 69 34 28 28 9 28 33 31 28...

English Manual
Page 19
... and Co., Dept. 817WA, Hoffman Estates, IL 60179 Part No. 218103 R1204A Printed in this Sears Treadmill Exerciser, contact the nearest Sears Service Center throughout the United States and Sears will repair or replace the Treadmill Exerciser, free of purchase, if failure occurs due to state. This warranty does not apply when...
... and Co., Dept. 817WA, Hoffman Estates, IL 60179 Part No. 218103 R1204A Printed in this Sears Treadmill Exerciser, contact the nearest Sears Service Center throughout the United States and Sears will repair or replace the Treadmill Exerciser, free of purchase, if failure occurs due to state. This warranty does not apply when...