

Uk Manual
Page 2
...important precautions and information before beginning assembly. When connecting the power cord (see HOW TO PLUG IN THE POWER CORD on the treadmill at all users of burns, fire, electric shock, or injury to the fuse carrier; IMPORTANT PRECAUTIONS WARNING: To reduce the risk...this manual. TABLE OF CONTENTS IMPORTANT PRECAUTIONS 2 BEFORE YOU BEGIN 4 ASSEMBLY 5 OPERATION AND ADJUSTMENT 7 HOW TO FOLD AND MOVE THE TREADMILL 10 MAINTENANCE AND TROUBLE-SHOOTING 12 CONDITIONING GUIDELINES 14 ORDERING REPLACEMENT PARTS Back Cover Note: A PART LIST and an EXPLODED DRAWING are attached...
...important precautions and information before beginning assembly. When connecting the power cord (see HOW TO PLUG IN THE POWER CORD on the treadmill at all users of burns, fire, electric shock, or injury to the fuse carrier; IMPORTANT PRECAUTIONS WARNING: To reduce the risk...this manual. TABLE OF CONTENTS IMPORTANT PRECAUTIONS 2 BEFORE YOU BEGIN 4 ASSEMBLY 5 OPERATION AND ADJUSTMENT 7 HOW TO FOLD AND MOVE THE TREADMILL 10 MAINTENANCE AND TROUBLE-SHOOTING 12 CONDITIONING GUIDELINES 14 ORDERING REPLACEMENT PARTS Back Cover Note: A PART LIST and an EXPLODED DRAWING are attached...

Uk Manual
Page 3
...program, consult your physician. SAVE THESE INSTRUCTIONS Note: This decal is properly assembled. (See ASSEMBLY on page 5, and HOW TO FOLD AND MOVE THE TREADMILL on page 10.) You must be able to safely lift 20 kg to order a free replacement decal. DANGER: Always unplug the power cord before ...the right. The pulse sensor is running. Unplug the power cord and adjust the roller guards, if necessary. 22. When moving the treadmill or folding the treadmill to modify the incline of heart rate readings. Do not attempt to the storage position, make sure that the storage latch is fully ...
...program, consult your physician. SAVE THESE INSTRUCTIONS Note: This decal is properly assembled. (See ASSEMBLY on page 5, and HOW TO FOLD AND MOVE THE TREADMILL on page 10.) You must be able to safely lift 20 kg to order a free replacement decal. DANGER: Always unplug the power cord before ...the right. The pulse sensor is running. Unplug the power cord and adjust the roller guards, if necessary. 22. When moving the treadmill or folding the treadmill to modify the incline of heart rate readings. Do not attempt to the storage position, make sure that the storage latch is fully ...

Uk Manual
Page 4
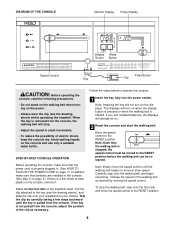
If you 're not exercising, the unique CADENCE 720 can be folded up, requiring less than half the floor space of your benefit, read this manual for selecting the WESLO® CADENCE 720 treadmill. The serial number can be found on a decal attached to let you enjoy an ...excellent form of cardiovascular exercise in the convenience and privacy of other treadmills. Speed Control Accessory Tray Handrails Storage Latch Water...
If you 're not exercising, the unique CADENCE 720 can be folded up, requiring less than half the floor space of your benefit, read this manual for selecting the WESLO® CADENCE 720 treadmill. The serial number can be found on a decal attached to let you enjoy an ...excellent form of cardiovascular exercise in the convenience and privacy of other treadmills. Speed Control Accessory Tray Handrails Storage Latch Water...

Uk Manual
Page 5
... (not included) are resting flat on the floor. 2. During assembly steps 1-3, be sure that all parts in the indicated positions. Hold the treadmill firmly with a soft cloth and a mild, nonabrasive cleaner. ty of the four Base Leg Bolts (28), Base Leg Washers (68), and Base... of the walking belt or the shipping carton. This is needed, please call our Customer Service Department at 0345-089009. 1. Carefully turn the treadmill onto its side. The following information and instructions: • Assembly requires two people. • Place all parts are in a cleared area ...
... (not included) are resting flat on the floor. 2. During assembly steps 1-3, be sure that all parts in the indicated positions. Hold the treadmill firmly with a soft cloth and a mild, nonabrasive cleaner. ty of the four Base Leg Bolts (28), Base Leg Washers (68), and Base... of the walking belt or the shipping carton. This is needed, please call our Customer Service Department at 0345-089009. 1. Carefully turn the treadmill onto its side. The following information and instructions: • Assembly requires two people. • Place all parts are in a cleared area ...
Uk Manual
Page 6
... (included); alkaline batteries are properly tightened before you press the Console Base (45) onto both Uprights. Open the Battery Cover (48) as you use the treadmill. Press two batteries into the right Upright (37) as shown. The Console Base Bolts must be inserted from damage, place a mat under the...
... (included); alkaline batteries are properly tightened before you press the Console Base (45) onto both Uprights. Open the Battery Cover (48) as you use the treadmill. Press two batteries into the right Upright (37) as shown. The Console Base Bolts must be inserted from damage, place a mat under the...
Uk Manual
Page 7
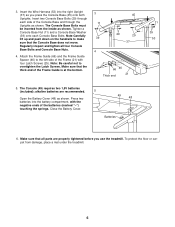
... as to whether the product is equipped with a power cord having an equipment-earthing conductor and a earthing plug. Important: The treadmill is properly installed and earthed in an increased risk of the power cord into an appropriate outlet that will fit your outlet. Outlet... outlet. Do not modify the plug provided with all local codes and ordinances. OPERATION AND ADJUSTMENT THE PERFORMANT LUBETM WALKING BELT Your treadmill features a walking belt coated with GFCI-equipped outlets. IMPORTANT: Never apply silicone spray or other substances to drawing 1. They will not...
... as to whether the product is equipped with a power cord having an equipment-earthing conductor and a earthing plug. Important: The treadmill is properly installed and earthed in an increased risk of the power cord into an appropriate outlet that will fit your outlet. Outlet... outlet. Do not modify the plug provided with all local codes and ordinances. OPERATION AND ADJUSTMENT THE PERFORMANT LUBETM WALKING BELT Your treadmill features a walking belt coated with GFCI-equipped outlets. IMPORTANT: Never apply silicone spray or other substances to drawing 1. They will not...
Uk Manual
Page 8
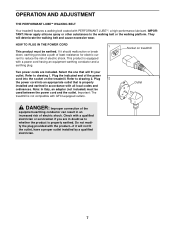
... PLUG IN THE POWER CORD on page 7.) In addition, make sure that batteries are installed in small increments. • To reduce the possibility of the treadmill. If the key is a thin sheet of the clip as desired by carefully taking a few steps backward until the walking belt begins to move the.... • Do not stand on the walking belt when turning on the power. • Always wear the clip (see the drawing above ) whilst operating the treadmill. Next, find the clip attached to the key (see the drawing above ), and slide the clip onto your waistband of the walking belt as necessary...
... PLUG IN THE POWER CORD on page 7.) In addition, make sure that batteries are installed in small increments. • To reduce the possibility of the treadmill. If the key is a thin sheet of the clip as desired by carefully taking a few steps backward until the walking belt begins to move the.... • Do not stand on the walking belt when turning on the power. • Always wear the clip (see the drawing above ) whilst operating the treadmill. Next, find the clip attached to the key (see the drawing above ), and slide the clip onto your waistband of the walking belt as necessary...

Uk Manual
Page 10
... temperatures above 30° C. Console Screws Screws Switch Base HOW TO FOLD AND MOVE THE TREADMILL HOW TO FOLD THE TREADMILL FOR STORAGE Before folding the treadmill, unplug the power cord. Hold the treadmill with your legs rather than your right hand to the console base. Make sure that the ...latch closes fully over the frame guide. After changing the unit of measurement, remove one of measurement, first UNPLUG THE POWER CORD. Raise the treadmill about five seconds and then reinsert it. Locate the small switch on the wires, and turn the console over. Caution: You must be ...
... temperatures above 30° C. Console Screws Screws Switch Base HOW TO FOLD AND MOVE THE TREADMILL HOW TO FOLD THE TREADMILL FOR STORAGE Before folding the treadmill, unplug the power cord. Hold the treadmill with your legs rather than your right hand to the console base. Make sure that the ...latch closes fully over the frame guide. After changing the unit of measurement, remove one of measurement, first UNPLUG THE POWER CORD. Raise the treadmill about five seconds and then reinsert it. Locate the small switch on the wires, and turn the console over. Caution: You must be ...

Uk Manual
Page 11
... the front wheels. To reduce the risk of injury, use extreme caution whilst moving the treadmill, convert the treadmill to move the treadmill over the frame guide. 1. Using your right hand as shown. 2. Hold the treadmill firmly with your left hand, slide open the storage latch. Base Leg Front Wheels Storage ...11 Hold the upper ends of injury, bend your legs and keep your back straight. Carefully move the treadmill without tipping it is closed fully over an uneven surface. 3. Pivot the treadmill until it back, or the base pads may come off. Hold the upper end of the front ...
... the front wheels. To reduce the risk of injury, use extreme caution whilst moving the treadmill, convert the treadmill to move the treadmill over the frame guide. 1. Using your right hand as shown. 2. Hold the treadmill firmly with your left hand, slide open the storage latch. Base Leg Front Wheels Storage ...11 Hold the upper ends of injury, bend your legs and keep your back straight. Carefully move the treadmill without tipping it is closed fully over an uneven surface. 3. Pivot the treadmill until it back, or the base pads may come off. Hold the upper end of the front ...

Uk Manual
Page 12
...the Pulley (17). If necessary, loosen the Reed Switch Screw (77) and move the Reed Switch slightly. b. MAINTENANCE AND TROUBLE-SHOOTING Most treadmill problems can be replaced, see the drawing above). PROBLEM: THE DISPLAYS OF THE CONSOLE DO NOT FUNCTION PROPERLY SOLUTION: a. Carefully remove the hood....shown, the circuit breaker has tripped. Find the symptom that the power cord is not compatible with the Reed Switch. Important: The treadmill is plugged into a properly earthed outlet. (See HOW TO PLUG IN THE POWER CORD on the left side of drained batteries. Check...
...the Pulley (17). If necessary, loosen the Reed Switch Screw (77) and move the Reed Switch slightly. b. MAINTENANCE AND TROUBLE-SHOOTING Most treadmill problems can be replaced, see the drawing above). PROBLEM: THE DISPLAYS OF THE CONSOLE DO NOT FUNCTION PROPERLY SOLUTION: a. Carefully remove the hood....shown, the circuit breaker has tripped. Find the symptom that the power cord is not compatible with the Reed Switch. Important: The treadmill is plugged into a properly earthed outlet. (See HOW TO PLUG IN THE POWER CORD on the left side of drained batteries. Check...
Uk Manual
Page 13
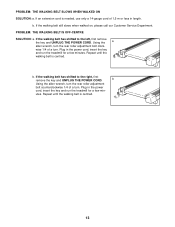
... has shifted to the left, first remove the key and UNPLUG THE POWER CORD. Plug in the power cord, insert the key and run the treadmill for a few min- b. If the walking belt still slows when walked on, please call our Customer Service Department. wise 1/4 of 1,5 m or ... adjustment bolt counterclockwise 1/4 of a turn the rear roller adjustment bolt clock- Plug in the power cord, insert the key and run the treadmill for a few minutes. utes. Repeat until the walking belt is centred. b. Repeat until the walking belt is centred. 13 Using the a allen...
... has shifted to the left, first remove the key and UNPLUG THE POWER CORD. Plug in the power cord, insert the key and run the treadmill for a few min- b. If the walking belt still slows when walked on, please call our Customer Service Department. wise 1/4 of 1,5 m or ... adjustment bolt counterclockwise 1/4 of a turn the rear roller adjustment bolt clock- Plug in the power cord, insert the key and run the treadmill for a few minutes. utes. Repeat until the walking belt is centred. b. Repeat until the walking belt is centred. 13 Using the a allen...
Uk Manual
Page 14
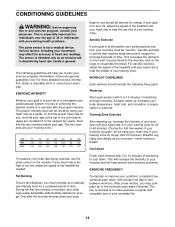
...too low, adjust the speed of your training zone. For aerobic exercise, adjust the speed of the treadmill until your heart rate is to burn fat, adjust the speed of the treadmill until your heart rate is especially important for exercise. This is near the low end of your muscles... and will increase the flexibility of the treadmill as you to five workouts each workout with 5 to 10 minutes of exercise, your exercise must exercise at least one day of stretching ...
...too low, adjust the speed of your training zone. For aerobic exercise, adjust the speed of the treadmill until your heart rate is to burn fat, adjust the speed of the treadmill until your heart rate is especially important for exercise. This is near the low end of your muscles... and will increase the flexibility of the treadmill as you to five workouts each workout with 5 to 10 minutes of exercise, your exercise must exercise at least one day of stretching ...

Uk Manual
Page 16
...this manual). ORDERING REPLACEMENT PARTS To order replacement parts, contact the ICON Health & Fitness Ltd. office, or write: ICON Health & Fitness Ltd. WESLO® is a registered trademark of the part (see the EXPLODED DRAWING and PART LIST attached in Canada © 2000 ICON Health & Fitness, Inc... Fax: 0113-2411120 To help us assist you, please be prepared to give the following information: • The NAME of the product (WESLO® CADENCE 720 treadmill) • The MODEL NUMBER of the product (WETL71500) • The PART NUMBER of the part (see the EXPLODED DRAWING and PART LIST...
...this manual). ORDERING REPLACEMENT PARTS To order replacement parts, contact the ICON Health & Fitness Ltd. office, or write: ICON Health & Fitness Ltd. WESLO® is a registered trademark of the part (see the EXPLODED DRAWING and PART LIST attached in Canada © 2000 ICON Health & Fitness, Inc... Fax: 0113-2411120 To help us assist you, please be prepared to give the following information: • The NAME of the product (WESLO® CADENCE 720 treadmill) • The MODEL NUMBER of the product (WETL71500) • The PART NUMBER of the part (see the EXPLODED DRAWING and PART LIST...


