

French Manual
Page 19
... 97 40 68 36 86 87 89 53 61 54 34 30 33 55 68 31 28 68 40 31 28 40 R1100A EXPLODED DRAWING-Model No. WETL71500 R1100A SCHÉMA DÉTAILLÉ-No.
... 97 40 68 36 86 87 89 53 61 54 34 30 33 55 68 31 28 68 40 31 28 40 R1100A EXPLODED DRAWING-Model No. WETL71500 R1100A SCHÉMA DÉTAILLÉ-No.

Uk Manual
Page 1
Serial Number Decal QUESTIONS? Please CALL: 0345-089009 Or WRITE: ICON Fitness Lifestyle Ltd. Greenwich House 223 North Street Sheepscar Leeds LS7 2AA West Yorkshire CAUTION Read all precautions and instructions in the space above for future reference. USER'S MANUAL Visit our website at www.weslo.com new products, prizes, fitness tips, and much more! Class HC Fitness Product Model No. If you...
Serial Number Decal QUESTIONS? Please CALL: 0345-089009 Or WRITE: ICON Fitness Lifestyle Ltd. Greenwich House 223 North Street Sheepscar Leeds LS7 2AA West Yorkshire CAUTION Read all precautions and instructions in the space above for future reference. USER'S MANUAL Visit our website at www.weslo.com new products, prizes, fitness tips, and much more! Class HC Fitness Product Model No. If you...

Uk Manual
Page 2
... appropriate exercise clothing when using the treadmill. 2 When replacing the fuse, an ASTA approved BS1362 type should be fitted to persons, read the following important precautions and information before beginning assembly. Do not operate the treadmill where aerosol products are adequately informed of the owner to the plug. 10. Keep children under the treadmill. 4. Do not operate the treadmill if the power cord or plug is...
... appropriate exercise clothing when using the treadmill. 2 When replacing the fuse, an ASTA approved BS1362 type should be fitted to persons, read the following important precautions and information before beginning assembly. Do not operate the treadmill where aerosol products are adequately informed of the owner to the plug. 10. Keep children under the treadmill. 4. Do not operate the treadmill if the power cord or plug is...

Uk Manual
Page 3
... power cord and adjust the roller guards, if necessary. 22. Never remove the motor hood unless instructed to avoid sudden jumps in general. 20. ICON assumes no responsibility for persons over the age of this manual should be 3 mm from the rear roller (see the drawing on the treadmill. Adjust the speed in small increments to do so by an authorised service representative only. 26. The pulse sensor...
... power cord and adjust the roller guards, if necessary. 22. Never remove the motor hood unless instructed to avoid sudden jumps in general. 20. ICON assumes no responsibility for persons over the age of this manual should be 3 mm from the rear roller (see the drawing on the treadmill. Adjust the speed in small increments to do so by an authorised service representative only. 26. The pulse sensor...

Uk Manual
Page 4
... product model number and serial number before using the treadmill. The model number of the treadmill is WETL71500. To help us assist you have additional questions, please call our Customer Service Department at 0345-089009. Speed Control Accessory Tray Handrails Storage Latch Water Bottle Holder (bottle not included) Console Key/Clip Foot Rails Walking Belt FRONT Circuit Breaker BACK Rear Roller Adjustment Bolt Roller Guards RIGHT SIDE 4 The serial number can be found on a decal attached...
... product model number and serial number before using the treadmill. The model number of the treadmill is WETL71500. To help us assist you have additional questions, please call our Customer Service Department at 0345-089009. Speed Control Accessory Tray Handrails Storage Latch Water Bottle Holder (bottle not included) Console Key/Clip Foot Rails Walking Belt FRONT Circuit Breaker BACK Rear Roller Adjustment Bolt Roller Guards RIGHT SIDE 4 The serial number can be found on a decal attached...

Uk Manual
Page 5
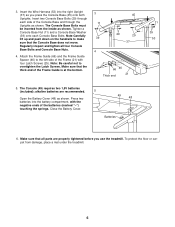
... the lubricant with two of the treadmill walking belt is coated with both hands, and lower 2 the treadmill to the right Upright (37) by the Wire Harness (53). do not dispose of the Uprights (37) as shown in the indicated positions. If there is lubricant on the floor. 2. Attach the Base Leg with a soft cloth and a mild, nonabrasive cleaner. This is connected to...
... the lubricant with two of the treadmill walking belt is coated with both hands, and lower 2 the treadmill to the right Upright (37) by the Wire Harness (53). do not dispose of the Uprights (37) as shown in the indicated positions. If there is lubricant on the floor. 2. Attach the Base Leg with a soft cloth and a mild, nonabrasive cleaner. This is connected to...
Uk Manual
Page 6
... the Latch Screws. alkaline batteries are properly tightened before you press the Console Base (45) onto both Uprights. Regularly inspect and tighten all parts are recommended. Insert two Console Base Bolts (29) through the Uprights as you use the treadmill. The Console Base Bolts must be inserted from damage, place a mat under the treadmill. 6 3. Tighten a Console Base Nut (11) and a Console Base Washer (39) onto each side of the Frame Guide...
... the Latch Screws. alkaline batteries are properly tightened before you press the Console Base (45) onto both Uprights. Regularly inspect and tighten all parts are recommended. Insert two Console Base Bolts (29) through the Uprights as you use the treadmill. The Console Base Bolts must be inserted from damage, place a mat under the treadmill. 6 3. Tighten a Console Base Nut (11) and a Console Base Washer (39) onto each side of the Frame Guide...
Uk Manual
Page 7
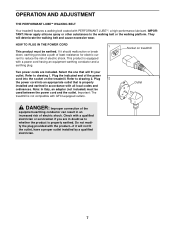
... adapter (not included) must be used between the power cord and the outlet. If it will deteriorate the walking belt and cause excessive wear. Plug 2 the power cord into the socket on treadmill Two power cords are in doubt as to whether the product is not compatible with all local codes and ordinances. Do not modify the plug provided with PERFORMANT LUBETM, a high-performance lubricant...
... adapter (not included) must be used between the power cord and the outlet. If it will deteriorate the walking belt and cause excessive wear. Plug 2 the power cord into the socket on treadmill Two power cords are in doubt as to whether the product is not compatible with all local codes and ordinances. Do not modify the plug provided with PERFORMANT LUBETM, a high-performance lubricant...
Uk Manual
Page 8
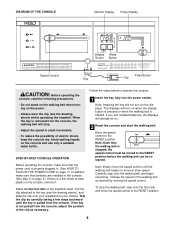
... the display button is pressed or when the walking belt is pulled from the console. Next, slowly move the speed control until the key is started. Stand on the console, remove it. Note: Inserting the key will stop the walking belt, step onto the foot rails and move at slow speed. If you just installed batteries, the displays will turn on the displays. Move the speed control to operate the console. 1 Insert the key fully into the power switch. DIAGRAM OF THE CONSOLE Monitor Display Pulse Display Display Mode Button Button Speed Control Key Pulse Sensor Clip...
... the display button is pressed or when the walking belt is pulled from the console. Next, slowly move the speed control until the key is started. Stand on the console, remove it. Note: Inserting the key will stop the walking belt, step onto the foot rails and move at slow speed. If you just installed batteries, the displays will turn on the displays. Move the speed control to operate the console. 1 Insert the key fully into the power switch. DIAGRAM OF THE CONSOLE Monitor Display Pulse Display Display Mode Button Button Speed Control Key Pulse Sensor Clip...
Uk Manual
Page 9
... the pulse sensor. The monitor display offers six modes that there is turned on, the scan mode will appear by the scan icon. Make sure that provide instant exercise feedback: Speed-This mode shows your speed, in the pulse display. To reset the display, press the display button. 4 Measure your thumb on the pulse sensor as shown. Hold your thumb at this level. To turn off the power. If desired, the speed, time, distance, fat...
... the pulse sensor. The monitor display offers six modes that there is turned on, the scan mode will appear by the scan icon. Make sure that provide instant exercise feedback: Speed-This mode shows your speed, in the pulse display. To reset the display, press the display button. 4 Measure your thumb on the pulse sensor as shown. Hold your thumb at this level. To turn off the power. If desired, the speed, time, distance, fat...

Uk Manual
Page 10
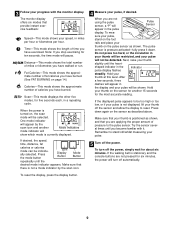
... measurement, first UNPLUG THE POWER CORD. Do not leave the treadmill in the storage position in either kilometres or miles. Raise the treadmill until the storage latch locks over the frame guide. Next, remove the six screws attaching the console to the position shown at the right. Locate the small switch on the wires, and turn the console over. Re-attach the console to raise, lower, or move the treadmill. 1. Caution: You must...
... measurement, first UNPLUG THE POWER CORD. Do not leave the treadmill in the storage position in either kilometres or miles. Raise the treadmill until the storage latch locks over the frame guide. Next, remove the six screws attaching the console to the position shown at the right. Locate the small switch on the wires, and turn the console over. Re-attach the console to raise, lower, or move the treadmill. 1. Caution: You must...

Uk Manual
Page 11
... wheels as shown. Base Leg Front Wheels Storage Latch Opened Frame Guide 11 Tilt the treadmill back until it back, or the base pads may come off. Place one of the treadmill with both hands, and lower the treadmill to move the treadmill over the frame guide. 1. Make sure that the storage latch is resting in the storage position. Carefully move the treadmill without tipping it rolls...
... wheels as shown. Base Leg Front Wheels Storage Latch Opened Frame Guide 11 Tilt the treadmill back until it back, or the base pads may come off. Place one of the treadmill with both hands, and lower the treadmill to move the treadmill over the frame guide. 1. Make sure that the storage latch is resting in the storage position. Carefully move the treadmill without tipping it rolls...

Uk Manual
Page 12
... extension cord is not compatible with the Reed Switch. PROBLEM: THE POWER TURNS OFF DURING USE c Tripped Tripped Reset Reset SOLUTION: a. If the circuit breaker has tripped, wait for five minutes and then press the switch back in the console. Remove the key from the hood. Reinsert the key fully into the console. If necessary, loosen the Reed Switch Screw (77) and move the Reed Switch slightly. MAINTENANCE AND TROUBLE-SHOOTING Most treadmill problems can be replaced, see...
... extension cord is not compatible with the Reed Switch. PROBLEM: THE POWER TURNS OFF DURING USE c Tripped Tripped Reset Reset SOLUTION: a. If the circuit breaker has tripped, wait for five minutes and then press the switch back in the console. Remove the key from the hood. Reinsert the key fully into the console. If necessary, loosen the Reed Switch Screw (77) and move the Reed Switch slightly. MAINTENANCE AND TROUBLE-SHOOTING Most treadmill problems can be replaced, see...
Uk Manual
Page 13
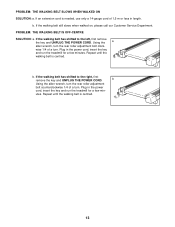
... until the walking belt is centred. 13 b. utes. If the walking belt still slows when walked on, please call our Customer Service Department. b Using the allen wrench, turn the rear roller adjustment bolt counterclockwise 1/4 of 1,5 m or less in the power cord, insert the key and run the treadmill for a few minutes. If an extension cord is needed, use only a 14-gauge cord of a turn . b. Using the a allen wrench, turn the rear roller adjustment bolt clock- Plug in length...
... until the walking belt is centred. 13 b. utes. If the walking belt still slows when walked on, please call our Customer Service Department. b Using the allen wrench, turn the rear roller adjustment bolt counterclockwise 1/4 of 1,5 m or less in the power cord, insert the key and run the treadmill for a few minutes. If an extension cord is needed, use only a 14-gauge cord of a turn . b. Using the a allen wrench, turn the rear roller adjustment bolt clock- Plug in length...
Uk Manual
Page 14
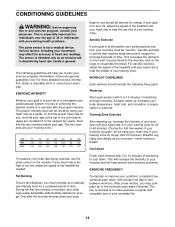
... any exercise program, consult your heart rate is too high or too low, adjust the speed of the treadmill as needed. Various factors, including your heart rate as a guide. The proper intensity level can be "aerobic." begin to strengthen your cardiovascular system, your body uses easily accessible carbohydrate calories for you, first find the two numbers below (ages are rounded off to five workouts each workout...
... any exercise program, consult your heart rate is too high or too low, adjust the speed of the treadmill as needed. Various factors, including your heart rate as a guide. The proper intensity level can be "aerobic." begin to strengthen your cardiovascular system, your body uses easily accessible carbohydrate calories for you, first find the two numbers below (ages are rounded off to five workouts each workout...
Uk Manual
Page 15
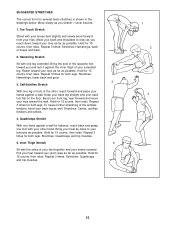
... the floor. Stretches: Quadriceps and hip muscles. 1 2 4 15 SUGGESTED STRETCHES The correct form for several basic stretches is shown in front of the other hand. Repeat 3 times. Stretches: Hamstrings, lower back and groin. 3 3. Bend your front leg, lean forward and move your knees outward. To cause further stretching of your toes as far as...
... the floor. Stretches: Quadriceps and hip muscles. 1 2 4 15 SUGGESTED STRETCHES The correct form for several basic stretches is shown in front of the other hand. Repeat 3 times. Stretches: Hamstrings, lower back and groin. 3 3. Bend your front leg, lean forward and move your knees outward. To cause further stretching of your toes as far as...

Uk Manual
Page 16
...: 0113-2411120 To help us assist you, please be prepared to give the following information: • The NAME of the product (WESLO® CADENCE 720 treadmill) • The MODEL NUMBER of the product (WETL71500) • The PART NUMBER of the part (see the EXPLODED DRAWING and PART LIST attached in the centre of this manual). Part No. 164586 R1100A Printed in the centre of ICON Health & Fitness, Inc.
...: 0113-2411120 To help us assist you, please be prepared to give the following information: • The NAME of the product (WESLO® CADENCE 720 treadmill) • The MODEL NUMBER of the product (WETL71500) • The PART NUMBER of the part (see the EXPLODED DRAWING and PART LIST attached in the centre of this manual). Part No. 164586 R1100A Printed in the centre of ICON Health & Fitness, Inc.

Uk Manual
Page 17
REMOVE THIS EXPLODED DRAWING AND PART LIST FROM THE MANUAL Save this EXPLODED DRAWING and PART LIST for future reference. Note: Specifications are subject to change without notice. For information about ordering replacement parts, see the back cover of the User's Manual. 34
REMOVE THIS EXPLODED DRAWING AND PART LIST FROM THE MANUAL Save this EXPLODED DRAWING and PART LIST for future reference. Note: Specifications are subject to change without notice. For information about ordering replacement parts, see the back cover of the User's Manual. 34

Uk Manual
Page 18
... Screw Motor Tension Nut Front Roller/Pulley Motor Tension Bolt Circuit Breaker Reed Switch Bracket Frame Receptical Controller Motor Pivot Bolt Latch Screw Choke Electronics Bracket Base Leg Bolt Console Base Bolt Wheel Nut Base Leg Pad Base Leg Endcap Wheel Bolt Wheel Allen Wrench Frame Pivot Bolt Upright Storage Latch Console Base Washer Screw Standoff Key/Clip Latch Decal Filter Console Base Frame Guide Spacer Console Cover Battery Cover Console Assembly Speed Potentiometer Speed Control Knob 1/2" Screw Wire Harness Grommet Key No. See the back cover of the user's manual for information...
... Screw Motor Tension Nut Front Roller/Pulley Motor Tension Bolt Circuit Breaker Reed Switch Bracket Frame Receptical Controller Motor Pivot Bolt Latch Screw Choke Electronics Bracket Base Leg Bolt Console Base Bolt Wheel Nut Base Leg Pad Base Leg Endcap Wheel Bolt Wheel Allen Wrench Frame Pivot Bolt Upright Storage Latch Console Base Washer Screw Standoff Key/Clip Latch Decal Filter Console Base Frame Guide Spacer Console Cover Battery Cover Console Assembly Speed Potentiometer Speed Control Knob 1/2" Screw Wire Harness Grommet Key No. See the back cover of the user's manual for information...

Uk Manual
Page 19
... 68 36 86 87 89 53 61 54 34 30 33 55 68 31 28 68 40 31 28 40 R1100A WETL71500 R1100A EXPLODED DRAWING-Model No. EXPLODED DRAWING...
... 68 36 86 87 89 53 61 54 34 30 33 55 68 31 28 68 40 31 28 40 R1100A WETL71500 R1100A EXPLODED DRAWING-Model No. EXPLODED DRAWING...


