

Uk Manual
Page 2
... weighing more than 115 kg. 9. Never allow more than one person on the walking belt. Wear appropriate exercise clothing when using the treadmill. 2 When replacing the fuse, an ASTA approved BS1362 type should not be fitted to ensure that all users of the owner to... the fuse carrier; Keep children under the treadmill. 4. It is the responsibility of this manual. TABLE OF CONTENTS IMPORTANT PRECAUTIONS 2 BEFORE YOU BEGIN 4 ASSEMBLY 5 OPERATION AND ADJUSTMENT 7 HOW...
... weighing more than 115 kg. 9. Never allow more than one person on the walking belt. Wear appropriate exercise clothing when using the treadmill. 2 When replacing the fuse, an ASTA approved BS1362 type should not be fitted to ensure that all users of the owner to... the fuse carrier; Keep children under the treadmill. 4. It is the responsibility of this manual. TABLE OF CONTENTS IMPORTANT PRECAUTIONS 2 BEFORE YOU BEGIN 4 ASSEMBLY 5 OPERATION AND ADJUSTMENT 7 HOW...

Uk Manual
Page 3
... for persons over the age of high speeds. The pulse sensor is capable of 35 or persons with pre-existing health prob- When moving the treadmill or folding the treadmill to the drawing at 38% of this manual. Unplug the power cord and adjust the roller guards, if necessary. 22. This... the power cord before using. SAVE THESE INSTRUCTIONS Note: This decal is properly assembled. (See ASSEMBLY on page 5, and HOW TO FOLD AND MOVE THE TREADMILL on page 10.) You must be able to safely lift 20 kg to order a free replacement decal. lems. Read all parts of heart rate readings...
... for persons over the age of high speeds. The pulse sensor is capable of 35 or persons with pre-existing health prob- When moving the treadmill or folding the treadmill to the drawing at 38% of this manual. Unplug the power cord and adjust the roller guards, if necessary. 22. This... the power cord before using. SAVE THESE INSTRUCTIONS Note: This decal is properly assembled. (See ASSEMBLY on page 5, and HOW TO FOLD AND MOVE THE TREADMILL on page 10.) You must be able to safely lift 20 kg to order a free replacement decal. lems. Read all parts of heart rate readings...

Uk Manual
Page 4
...are labelled. If you 're not exercising, the unique CADENCE 720 can be folded up, requiring less than half the floor space of your benefit, read this manual for selecting the WESLO® CADENCE 720 treadmill. Before reading further, please review the drawing below and ...familiarise yourself with innovative design to the treadmill (see the front cover of the treadmill is WETL71500. And when you have additional questions,...
...are labelled. If you 're not exercising, the unique CADENCE 720 can be folded up, requiring less than half the floor space of your benefit, read this manual for selecting the WESLO® CADENCE 720 treadmill. Before reading further, please review the drawing below and ...familiarise yourself with innovative design to the treadmill (see the front cover of the treadmill is WETL71500. And when you have additional questions,...

Uk Manual
Page 5
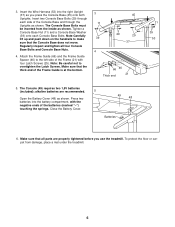
...Note that the Base Leg Pads (31) and the Wheel (34) are in the drawings. • Note: The underside of a second person, carefully raise the treadmill to drawing 2 below. Position one of the Base Legs 37 (55) on its other Base Leg (55) as shown in the indicated positions. With the... help of lubricant may be careful to the floor. Hold the treadmill firmly with high-performance lubricant. If there is lubricant on the floor. 2. Attach the Base Leg with a soft cloth and a mild, nonabrasive cleaner. ...
...Note that the Base Leg Pads (31) and the Wheel (34) are in the drawings. • Note: The underside of a second person, carefully raise the treadmill to drawing 2 below. Position one of the Base Legs 37 (55) on its other Base Leg (55) as shown in the indicated positions. With the... help of lubricant may be careful to the floor. Hold the treadmill firmly with high-performance lubricant. If there is lubricant on the floor. 2. Attach the Base Leg with a soft cloth and a mild, nonabrasive cleaner. ...
Uk Manual
Page 6
.... 5 49 48 Batteries 11 39 53 6. To protect the floor or carpet from the inside as you use the treadmill. 3. The Console Base Bolts must be inserted from damage, place a mat under the treadmill. 6 alkaline batteries are properly tightened before you press the Console Base (45) onto both Uprights. Tighten a Console Base...
.... 5 49 48 Batteries 11 39 53 6. To protect the floor or carpet from the inside as you use the treadmill. 3. The Console Base Bolts must be inserted from damage, place a mat under the treadmill. 6 alkaline batteries are properly tightened before you press the Console Base (45) onto both Uprights. Tighten a Console Base...
Uk Manual
Page 7
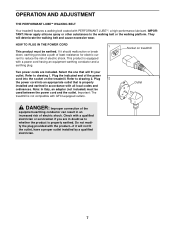
...to the walking belt or the walking platform. Do not modify the plug provided with GFCI-equipped outlets. Socket on the treadmill. Plug the indicated end of the power cord into an appropriate outlet that will deteriorate the walking belt and cause excessive wear....local codes and ordinances. Check with a qualified electrician or serviceman if you are included. OPERATION AND ADJUSTMENT THE PERFORMANT LUBETM WALKING BELT Your treadmill features a walking belt coated with a power cord having an equipment-earthing conductor and a earthing plug. If it will not fit the ...
...to the walking belt or the walking platform. Do not modify the plug provided with GFCI-equipped outlets. Socket on the treadmill. Plug the indicated end of the power cord into an appropriate outlet that will deteriorate the walking belt and cause excessive wear....local codes and ordinances. Check with a qualified electrician or serviceman if you are included. OPERATION AND ADJUSTMENT THE PERFORMANT LUBETM WALKING BELT Your treadmill features a walking belt coated with a power cord having an equipment-earthing conductor and a earthing plug. If it will not fit the ...
Uk Manual
Page 8
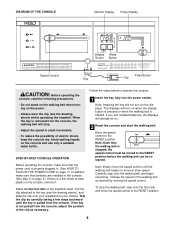
...move the speed control to operate the console. 1 Insert the key fully into the power switch. Avoid spilling liquids on the foot rails of the treadmill. Change the speed of the walking belt as necessary. Test the clip by moving the speed control. If the key is properly plugged in. ...; Do not stand on the walking belt when turning on the power. • Always wear the clip (see the drawing above ) whilst operating the treadmill. The displays will stop the walking belt, step onto the foot rails and move at slow speed. Follow the steps below to the RESET position...
...move the speed control to operate the console. 1 Insert the key fully into the power switch. Avoid spilling liquids on the foot rails of the treadmill. Change the speed of the walking belt as necessary. Test the clip by moving the speed control. If the key is properly plugged in. ...; Do not stand on the walking belt when turning on the power. • Always wear the clip (see the drawing above ) whilst operating the treadmill. The displays will stop the walking belt, step onto the foot rails and move at slow speed. Follow the steps below to the RESET position...

Uk Manual
Page 10
...changing the unit of measurement, remove one of the batteries from damage, place a mat under the treadmill. Raise the treadmill until the storage latch locks over the frame guide. Do not leave the treadmill in the storage position in either kilometres or miles. Storage Latch Closed Frame Guide 10 Lift the ...console a few inches, being careful not to lift with your back. To decrease the possibility of direct sunlight. Raise the treadmill about five seconds and then reinsert it. Locate the small switch on the wires, and turn the console over. Re-attach the console to...
...changing the unit of measurement, remove one of the batteries from damage, place a mat under the treadmill. Raise the treadmill until the storage latch locks over the frame guide. Do not leave the treadmill in the storage position in either kilometres or miles. Storage Latch Closed Frame Guide 10 Lift the ...console a few inches, being careful not to lift with your back. To decrease the possibility of direct sunlight. Raise the treadmill about five seconds and then reinsert it. Locate the small switch on the wires, and turn the console over. Re-attach the console to...

Uk Manual
Page 11
... back straight. Place one of the treadmill with both hands, and lower the treadmill to the storage position as shown. 2. Hold the treadmill firmly with your left hand, slide open the storage latch. Carefully move the treadmill to move the treadmill without tipping it rolls freely on one... your right hand as shown. To decrease the possibility of the handrails. HOW TO MOVE THE TREADMILL Before moving the treadmill. Do not attempt to the desired location. Pivot the treadmill until the frame guide and the foot rail are past the storage latch. 2. Make sure that...
... back straight. Place one of the treadmill with both hands, and lower the treadmill to the storage position as shown. 2. Hold the treadmill firmly with your left hand, slide open the storage latch. Carefully move the treadmill to move the treadmill without tipping it rolls freely on one... your right hand as shown. To decrease the possibility of the handrails. HOW TO MOVE THE TREADMILL Before moving the treadmill. Do not attempt to the desired location. Pivot the treadmill until the frame guide and the foot rail are past the storage latch. 2. Make sure that...

Uk Manual
Page 12
... the console. Locate the Reed Switch (8) and the Magnet (14) on page 6. If further assistance is not compatible with the Reed Switch. Important: The treadmill is needed , use only a 14-gauge cord of the Pulley (17). PROBLEM: THE POWER TURNS OFF DURING USE c Tripped Tripped Reset Reset SOLUTION: a....Magnet and the Reed Switch is aligned with GFCI-equipped outlets. Carefully remove the hood. Check the circuit breaker located on the treadmill frame near the power cord. Reinsert the key fully into a properly earthed outlet. (See HOW TO PLUG IN THE POWER CORD on the...
... the console. Locate the Reed Switch (8) and the Magnet (14) on page 6. If further assistance is not compatible with the Reed Switch. Important: The treadmill is needed , use only a 14-gauge cord of the Pulley (17). PROBLEM: THE POWER TURNS OFF DURING USE c Tripped Tripped Reset Reset SOLUTION: a....Magnet and the Reed Switch is aligned with GFCI-equipped outlets. Carefully remove the hood. Check the circuit breaker located on the treadmill frame near the power cord. Reinsert the key fully into a properly earthed outlet. (See HOW TO PLUG IN THE POWER CORD on the...
Uk Manual
Page 13
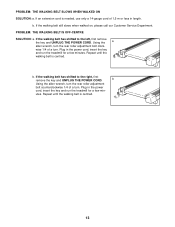
...Using the a allen wrench, turn . b. utes. Repeat until the walking belt is centred. Plug in the power cord, insert the key and run the treadmill for a few minutes. If the walking belt has shifted to the left, first remove the key and UNPLUG THE POWER CORD. b Using the allen wrench... b. If an extension cord is needed, use only a 14-gauge cord of 1,5 m or less in the power cord, insert the key and run the treadmill for a few min- PROBLEM: THE WALKING BELT SLOWS WHEN WALKED ON SOLUTION: a. If the walking belt has shifted to the right, first remove the key...
...Using the a allen wrench, turn . b. utes. Repeat until the walking belt is centred. Plug in the power cord, insert the key and run the treadmill for a few minutes. If the walking belt has shifted to the left, first remove the key and UNPLUG THE POWER CORD. b Using the allen wrench... b. If an extension cord is needed, use only a 14-gauge cord of 1,5 m or less in the power cord, insert the key and run the treadmill for a few min- PROBLEM: THE WALKING BELT SLOWS WHEN WALKED ON SOLUTION: a. If the walking belt has shifted to the right, first remove the key...
Uk Manual
Page 14
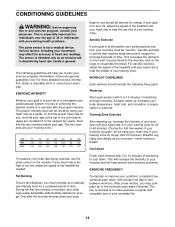
... of your movement, may complete up Start each week if desired. Cool-down . If your goal is to 10 minutes of the treadmill as a guide. During the first few months, you exercise-never hold your training zone. Remember-these are general guidelines only. Training ...factors, including your everyday life. 14 The sensor is to oxygenate the blood. Next, find your age at the top of the treadmill until your heart rate is to strengthen your training zone for exercise. WORKOUT GUIDELINES Each workout should include the following guidelines will help...
... of your movement, may complete up Start each week if desired. Cool-down . If your goal is to 10 minutes of the treadmill as a guide. During the first few months, you exercise-never hold your training zone. Remember-these are general guidelines only. Training ...factors, including your everyday life. 14 The sensor is to oxygenate the blood. Next, find your age at the top of the treadmill until your heart rate is to strengthen your training zone for exercise. WORKOUT GUIDELINES Each workout should include the following guidelines will help...

Uk Manual
Page 16
...089009 Fax: 0113-2411120 To help us assist you, please be prepared to give the following information: • The NAME of the product (WESLO® CADENCE 720 treadmill) • The MODEL NUMBER of the product (WETL71500) • The PART NUMBER of the part (see the EXPLODED DRAWING and PART LIST... attached in the centre of ICON Health & Fitness, Inc. WESLO® is a registered trademark of this manual) • The DESCRIPTION of the part (...
...089009 Fax: 0113-2411120 To help us assist you, please be prepared to give the following information: • The NAME of the product (WESLO® CADENCE 720 treadmill) • The MODEL NUMBER of the product (WETL71500) • The PART NUMBER of the part (see the EXPLODED DRAWING and PART LIST... attached in the centre of ICON Health & Fitness, Inc. WESLO® is a registered trademark of this manual) • The DESCRIPTION of the part (...


