
English Manual
Page 3
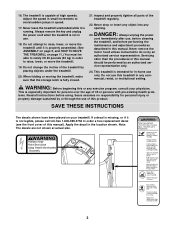
Always remove the key and unplug the power cord when the treadmill is especially important for personal injury or property damage sustained by an authorized ser- Do not attempt to raise, lower, or move the treadmill. 19. Inspect and properly tighten all instructions before Assembly /Disassembly. 3 DANGER: ...WARNING: Before beginning this manual). Sears assumes no responsibility for persons over the age of this or any exercise program, consult your treadmill. SAVE THESE INSTRUCTIONS The decals shown have been placed on page 11.) You must be performed by or through the use only...
Always remove the key and unplug the power cord when the treadmill is especially important for personal injury or property damage sustained by an authorized ser- Do not attempt to raise, lower, or move the treadmill. 19. Inspect and properly tighten all instructions before Assembly /Disassembly. 3 DANGER: ...WARNING: Before beginning this manual). Sears assumes no responsibility for persons over the age of this or any exercise program, consult your treadmill. SAVE THESE INSTRUCTIONS The decals shown have been placed on page 11.) You must be performed by or through the use only...
English Manual
Page 4
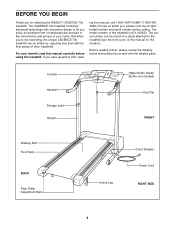
...Key/Clip FRONT Walking Belt Foot Rails BACK Rear Roller Adjustment Bolts Incline Leg Circuit Breaker Power Cord RIGHT SIDE 4 For your home. ing this manual for selecting the WESLO® CADENCE 70e treadmill. The model number of other treadmills. And when you're not exercising, the unique CADENCE 70e treadmill... can be folded up, requiring less than half the floor space of the treadmill is 831.293020. The serial...
...Key/Clip FRONT Walking Belt Foot Rails BACK Rear Roller Adjustment Bolts Incline Leg Circuit Breaker Power Cord RIGHT SIDE 4 For your home. ing this manual for selecting the WESLO® CADENCE 70e treadmill. The model number of other treadmills. And when you're not exercising, the unique CADENCE 70e treadmill... can be folded up, requiring less than half the floor space of the treadmill is 831.293020. The serial...

English Manual
Page 9
...open the battery cover (12) beneath the Tab console as shown in (see the drawing below) while using the treadmill. Next, Clip insert the key fully into the console. When the key is properly plugged in the inset drawing. BATTERY INSTALLATION The console requires two 12 "AA" batteries (not included). ...cord is removed from the console, the walking belt will stop. • Adjust the speed in the water bottle holders. If the key is pulled from the console, adjust the position of the clip as needed. 9 Alkaline batter- Press two batteries into the con- Find...
...open the battery cover (12) beneath the Tab console as shown in (see the drawing below) while using the treadmill. Next, Clip insert the key fully into the console. When the key is properly plugged in the inset drawing. BATTERY INSTALLATION The console requires two 12 "AA" batteries (not included). ...cord is removed from the console, the walking belt will stop. • Adjust the speed in the water bottle holders. If the key is pulled from the console, adjust the position of the clip as needed. 9 Alkaline batter- Press two batteries into the con- Find...
English Manual
Page 10
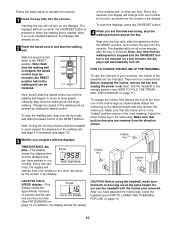
...turn off . There are inserted from one of the walking belt as shown below to the RESET position, and remove the key from the console. Do not use the treadmill with the displays. Follow the steps below . Note: Each time the walking belt is removed. onds, the display will change.... 2 Reset the speed control and start the walking belt. HOW TO CHANGE THE INCLINE OF THE TREADMILL To vary the intensity of your progress with the incline pins removed. Inserting the key will change from one number to the RESET position before the walking belt can be moved to the...
...turn off . There are inserted from one of the walking belt as shown below to the RESET position, and remove the key from the console. Do not use the treadmill with the displays. Follow the steps below . Note: Each time the walking belt is removed. onds, the display will change.... 2 Reset the speed control and start the walking belt. HOW TO CHANGE THE INCLINE OF THE TREADMILL To vary the intensity of your progress with the incline pins removed. Inserting the key will change from one number to the RESET position before the walking belt can be moved to the...
English Manual
Page 12
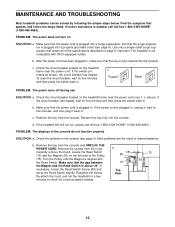
... circuit breaker located on the left side of drained batteries. b. d. Locate the Reed Switch (13) and the Magnet (63) on the treadmill frame near the power cord. b. PROBLEM: The displays of the specifications described on page 8. Retighten the Screw. Use only a single-outlet ...suppressor that applies, and follow the steps listed. c. c Tripped Reset PROBLEM: The power turns off during use SOLUTION: a. above). Remove the key from the console and UNPLUG THE POWER CORD. Most problems are the result of the Pulley (75). b 1/8" 89 13 Top View 75 ...
... circuit breaker located on the left side of drained batteries. b. d. Locate the Reed Switch (13) and the Magnet (63) on the treadmill frame near the power cord. b. PROBLEM: The displays of the specifications described on page 8. Retighten the Screw. Use only a single-outlet ...suppressor that applies, and follow the steps listed. c. c Tripped Reset PROBLEM: The power turns off during use SOLUTION: a. above). Remove the key from the console and UNPLUG THE POWER CORD. Most problems are the result of the Pulley (75). b 1/8" 89 13 Top View 75 ...
English Manual
Page 13
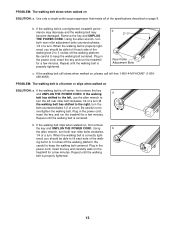
...3 inches off the walking platform. Plug in the power cord, insert the key and run the treadmill for a few minutes. ing belt 2 to turn . Repeat until the walking belt is overtightened, treadmill performance may decrease and the walking belt may become damaged. Repeat until the walking...800-4-MY-HOME® (1-800469-4663). Be careful to keep the walking belt centered. Remove the key and UNPLUG THE POWER CORD. Plug in the power cord, insert the key, and run the treadmill for a few minutes. b 2"-3" Rear Roller Adjustment Bolts c. Be careful to keep the walking ...
...3 inches off the walking platform. Plug in the power cord, insert the key and run the treadmill for a few minutes. ing belt 2 to turn . Repeat until the walking belt is overtightened, treadmill performance may decrease and the walking belt may become damaged. Repeat until the walking...800-4-MY-HOME® (1-800469-4663). Be careful to keep the walking belt centered. Remove the key and UNPLUG THE POWER CORD. Plug in the power cord, insert the key, and run the treadmill for a few minutes. b 2"-3" Rear Roller Adjustment Bolts c. Be careful to keep the walking ...

English Manual
Page 14
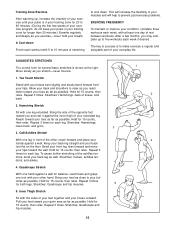
...: A Warm-up increases your age. Take a six-second heartbeat count, and multiply the result by using your cardiovascular system, the key to achieving the desired results is high performance athletic conditioning, set the speed control on the console to FAT BURN to help you must... If your goal is to exercise with 5 to plan your heart rate is especially important for individuals over the age of the treadmill accordingly. CONDITIONING GUIDELINES WARNING: Before beginning this or any exercise program, consult your body uses easily accessible carbohydrate calories for energy. ...
...: A Warm-up increases your age. Take a six-second heartbeat count, and multiply the result by using your cardiovascular system, the key to achieving the desired results is high performance athletic conditioning, set the speed control on the console to FAT BURN to help you must... If your goal is to exercise with 5 to plan your heart rate is especially important for individuals over the age of the treadmill accordingly. CONDITIONING GUIDELINES WARNING: Before beginning this or any exercise program, consult your body uses easily accessible carbohydrate calories for energy. ...
English Manual
Page 15
... program, do not keep your pulse in your training zone for longer than 20 minutes.) Breathe regularly and deeply as close to your but- The key to success is to make exercise a regular and enjoyable part of rest between workouts. Hold for 15 counts, then relax. Repeat 3 times for each week...
... program, do not keep your pulse in your training zone for longer than 20 minutes.) Breathe regularly and deeply as close to your but- The key to success is to make exercise a regular and enjoyable part of rest between workouts. Hold for 15 counts, then relax. Repeat 3 times for each week...
English Manual
Page 17
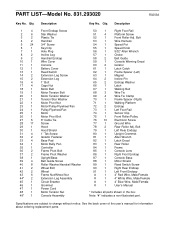
... 39 4 40 8 41 2 42 2 43 6 44* 2 45 1 46 1 47 1 48 1 49* 1 Description Front Endcap Screw Star Washer Plastic Tie Handrail 3/4" Screw Key/Clip Hole Plug Incline Leg Handrail Endcap Wire Cover Console Battery Cover Reed Switch Extension Leg Screw Extension Leg 1" Bolt Cage Nut Motor Belt Motor... Washer/Handrail Washer Wheel Bolt Wheel Frame Nut/Wheel Nut Extension Leg Assembly Circuit Breaker Grommet Power Cord Motor Tension Nut Console Assembly Key No. Qty. See the back cover of the user's manual for information about ordering replacement parts. Bolt 53 1 Wire Harness...
... 39 4 40 8 41 2 42 2 43 6 44* 2 45 1 46 1 47 1 48 1 49* 1 Description Front Endcap Screw Star Washer Plastic Tie Handrail 3/4" Screw Key/Clip Hole Plug Incline Leg Handrail Endcap Wire Cover Console Battery Cover Reed Switch Extension Leg Screw Extension Leg 1" Bolt Cage Nut Motor Belt Motor... Washer/Handrail Washer Wheel Bolt Wheel Frame Nut/Wheel Nut Extension Leg Assembly Circuit Breaker Grommet Power Cord Motor Tension Nut Console Assembly Key No. Qty. See the back cover of the user's manual for information about ordering replacement parts. Bolt 53 1 Wire Harness...


