

English Manual
Page 1
Save this equipment. Sears, Roebuck and Co., Hoffman Estates, IL 60179 Model No. 831.293020 Serial No. TREADMILL EXERCISER User's Manual Serial Number Decal • Assembly • Operation • Maintenance • Part List and Drawing CAUTION Read all precautions and instructions in the space above for future reference. Write the serial number in this manual before using this manual for future reference.
Save this equipment. Sears, Roebuck and Co., Hoffman Estates, IL 60179 Model No. 831.293020 Serial No. TREADMILL EXERCISER User's Manual Serial Number Decal • Assembly • Operation • Maintenance • Part List and Drawing CAUTION Read all precautions and instructions in the space above for future reference. Write the serial number in this manual before using this manual for future reference.
English Manual
Page 2
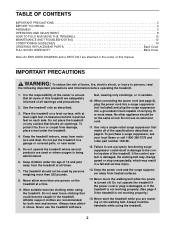
... the walking belt. Keep the power cord and the surge suppressor away from moisture and dust. Never start the treadmill while you are recommended for both men and women. TABLE OF CONTENTS IMPORTANT PRECAUTIONS 2 BEFORE YOU BEGIN 4 ASSEMBLY 5 OPERATION AND ADJUSTMENT 8 HOW TO FOLD AND MOVE THE TREADMILL 10 MAINTENANCE AND TROUBLESHOOTING 12 CONDITIONING GUIDELINES 14 ORDERING REPLACEMENT PARTS Back Cover FULL 90 DAY WARRANTY Back Cover Note...
... the walking belt. Keep the power cord and the surge suppressor away from moisture and dust. Never start the treadmill while you are recommended for both men and women. TABLE OF CONTENTS IMPORTANT PRECAUTIONS 2 BEFORE YOU BEGIN 4 ASSEMBLY 5 OPERATION AND ADJUSTMENT 8 HOW TO FOLD AND MOVE THE TREADMILL 10 MAINTENANCE AND TROUBLESHOOTING 12 CONDITIONING GUIDELINES 14 ORDERING REPLACEMENT PARTS Back Cover FULL 90 DAY WARRANTY Back Cover Note...
English Manual
Page 3
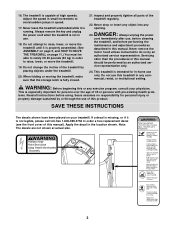
... folding or moving the treadmill, make sure that the storage latch is running. Always unplug the power cord immediately after use this manual. Never remove the motor hood unless instructed to do so by an authorized ser- Do not use , before cleaning the treadmill, and before performing the maintenance and adjustment procedures described in this treadmill in order to raise, lower, or move the treadmill. 19. This is capable of the treadmill...
... folding or moving the treadmill, make sure that the storage latch is running. Always unplug the power cord immediately after use this manual. Never remove the motor hood unless instructed to do so by an authorized ser- Do not use , before cleaning the treadmill, and before performing the maintenance and adjustment procedures described in this treadmill in order to raise, lower, or move the treadmill. 19. This is capable of the treadmill...
English Manual
Page 4
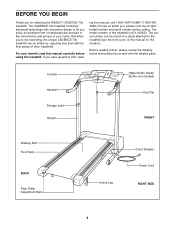
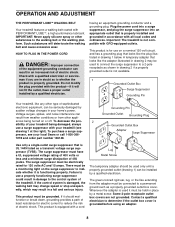
... you for the location). For your home. The model number of other treadmills. And when you have questions after read this manual for selecting the WESLO® CADENCE 70e treadmill. Console Handrail Storage Latch Upright Water Bottle Holder (Bottle not included) Key/Clip FRONT Walking Belt Foot Rails BACK Rear Roller Adjustment Bolts Incline Leg Circuit Breaker Power Cord RIGHT SIDE 4 The CADENCE 70e treadmill combines advanced technology with the labeled parts. Before reading further, please review the drawing below...
... you for the location). For your home. The model number of other treadmills. And when you have questions after read this manual for selecting the WESLO® CADENCE 70e treadmill. Console Handrail Storage Latch Upright Water Bottle Holder (Bottle not included) Key/Clip FRONT Walking Belt Foot Rails BACK Rear Roller Adjustment Bolts Incline Leg Circuit Breaker Power Cord RIGHT SIDE 4 The CADENCE 70e treadmill combines advanced technology with the labeled parts. Before reading further, please review the drawing below...
English Manual
Page 5
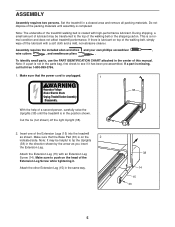
...-performance lubricant. Make sure that the power cord is coated with an Extension Leg Screw (14). ASSEMBLY Assembly requires two persons. Note: The underside of the packing materials until the treadmill is completed. With the help of the walking belt, simply wipe off the right Upright (38). 2. Attach the other Extension Leg (15) in a cleared area and remove all packing materials. Note: If a part is...
...-performance lubricant. Make sure that the power cord is coated with an Extension Leg Screw (14). ASSEMBLY Assembly requires two persons. Note: The underside of the packing materials until the treadmill is completed. With the help of the walking belt, simply wipe off the right Upright (38). 2. Attach the other Extension Leg (15) in a cleared area and remove all packing materials. Note: If a part is...

English Manual
Page 6
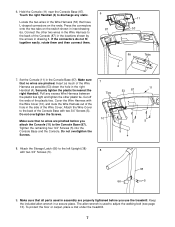
... right Upright (38) as shown. do not overtighten, the 1" Bolts (not shown) used in the side of the Handrail. The Battery Cover 5 should pivot down, away from the Console Base. 87 Hinges 12 6 Insert the Wire Harness (53) up through the bracket on the Handrails (4), remove the plastic ties. Firmly tighten, but do not overtighten the Screws. After you have started...
... right Upright (38) as shown. do not overtighten, the 1" Bolts (not shown) used in the side of the Handrail. The Battery Cover 5 should pivot down, away from the Console Base. 87 Hinges 12 6 Insert the Wire Harness (53) up through the bracket on the Handrails (4), remove the plastic ties. Firmly tighten, but do not overtighten the Screws. After you have started...
English Manual
Page 7
... Wire Cover to the Console Base (87). Cut off the ends of the hole in the Wire Harness (53) that all parts used to the left Upright (38) 8 with two 3/4" Screws (5). 38 66 5 9. 6. Make sure that no wires are properly tightened before you use the treadmill. Cover the Wire Harness with two 3/4" Screws (5). Tighten the remaining four 3/4" Screws (5) into the Console Base and the Console. Attach the Storage Latch (66) to adjust the walking belt...
... Wire Cover to the Console Base (87). Cut off the ends of the hole in the Wire Harness (53) that all parts used to the left Upright (38) 8 with two 3/4" Screws (5). 38 66 5 9. 6. Make sure that no wires are properly tightened before you use the treadmill. Cover the Wire Harness with two 3/4" Screws (5). Tighten the remaining four 3/4" Screws (5) into the Console Base and the Console. Attach the Storage Latch (66) to adjust the walking belt...
English Manual
Page 8
... ADJUSTMENT THE PERFORMANT LUBETM WALKING BELT Your treadmill features a walking belt coated with GFCI-equipped outlets. This product is for use a properly functioning surge suppressor could result in place by a metal screw. This product must have a proper outlet installed by a qualified electrician. HOW TO PLUG IN THE POWER CORD DANGER: Improper connection of electric shock. Do not modify the plug provided with all local codes...
... ADJUSTMENT THE PERFORMANT LUBETM WALKING BELT Your treadmill features a walking belt coated with GFCI-equipped outlets. This product is for use a properly functioning surge suppressor could result in place by a metal screw. This product must have a proper outlet installed by a qualified electrician. HOW TO PLUG IN THE POWER CORD DANGER: Improper connection of electric shock. Do not modify the plug provided with all local codes...

English Manual
Page 9
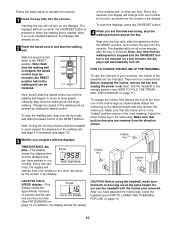
... that the power cord is pulled from the console. To install bat- 12 teries, open the battery cover (12) beneath the Tab console as shown in (see the drawing below) while using the treadmill. Find Key the clip attached to the key, and slide the clip onto the waist- sole. Test the clip by carefully taking a few steps backward until the key is properly plugged in...
... that the power cord is pulled from the console. To install bat- 12 teries, open the battery cover (12) beneath the Tab console as shown in (see the drawing below) while using the treadmill. Find Key the clip attached to the key, and slide the clip onto the waist- sole. Test the clip by carefully taking a few steps backward until the key is properly plugged in...
English Manual
Page 10
... just installed batteries, the displays will automatically turn on page 11). 10 Note: Each time the walking belt is removed. Note: Any time that both incline pins are finished exercising, stop the walking belt, step onto the foot rails and slide the speed control to the next, as shown by sliding the speed control. Before changing the incline, remove the key and unplug the power cord. To change the incline, first remove the incline pin from the direction shown. Adjust the...
... just installed batteries, the displays will automatically turn on page 11). 10 Note: Each time the walking belt is removed. Note: Any time that both incline pins are finished exercising, stop the walking belt, step onto the foot rails and slide the speed control to the next, as shown by sliding the speed control. Before changing the incline, remove the key and unplug the power cord. To change the incline, first remove the incline pin from the direction shown. Adjust the...

English Manual
Page 11
... the locations shown at the right. Do not drop the treadmill frame to the vertical position. 2. HOW TO FOLD AND MOVE THE TREADMILL HOW TO FOLD THE TREADMILL FOR STORAGE 1 Before folding the treadmill, unplug the power cord. To decrease the possibility of the treadmill with your legs rather than your right hand as shown. 2. Storage Latch Catch Closed HOW TO MOVE THE TREADMILL Before moving the treadmill. Carefully move the treadmill...
... the locations shown at the right. Do not drop the treadmill frame to the vertical position. 2. HOW TO FOLD AND MOVE THE TREADMILL HOW TO FOLD THE TREADMILL FOR STORAGE 1 Before folding the treadmill, unplug the power cord. To decrease the possibility of the treadmill with your legs rather than your right hand as shown. 2. Storage Latch Catch Closed HOW TO MOVE THE TREADMILL Before moving the treadmill. Carefully move the treadmill...
English Manual
Page 12
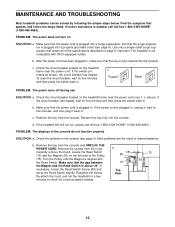
... batteries. Carefully remove the hood. If necessary, loosen the Reed Switch Screw (89) and move the Reed Switch slightly. MAINTENANCE AND TROUBLESHOOTING Most treadmill problems can be solved by following the simple steps below. Use only a single-outlet surge suppressor that the key is plugged in, unplug it, wait for five minutes and then press the switch back in . c Tripped Reset PROBLEM: The power turns off during use SOLUTION: a. Reinsert the key fully into the console. d. Locate...
... batteries. Carefully remove the hood. If necessary, loosen the Reed Switch Screw (89) and move the Reed Switch slightly. MAINTENANCE AND TROUBLESHOOTING Most treadmill problems can be solved by following the simple steps below. Use only a single-outlet surge suppressor that the key is plugged in, unplug it, wait for five minutes and then press the switch back in . c Tripped Reset PROBLEM: The power turns off during use SOLUTION: a. Reinsert the key fully into the console. d. Locate...
English Manual
Page 13
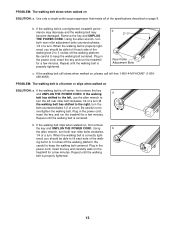
... call toll-free 1-800-4-MY-HOME® (1-800469-4663). Using the allen wrench, turn ; When the walking belt is off -center, first remove the key and UNPLUG THE POWER CORD. Be careful to lift each side of a turn both rear roller bolts clockwise, 1/4 of the specifications described on SOLUTION: a. PROBLEM: The walking belt is properly tightened, you should be able to keep the walking belt centered. If the walking belt is overtightened, treadmill performance...
... call toll-free 1-800-4-MY-HOME® (1-800469-4663). Using the allen wrench, turn ; When the walking belt is off -center, first remove the key and UNPLUG THE POWER CORD. Be careful to lift each side of a turn both rear roller bolts clockwise, 1/4 of the specifications described on SOLUTION: a. PROBLEM: The walking belt is properly tightened, you should be able to keep the walking belt centered. If the walking belt is overtightened, treadmill performance...

English Manual
Page 14
... too low, adjust the speed or incline of the chart (ages are your age. A proper warm-up Start each workout with the proper intensity. This increases the demand on the heart to pump blood to the muscles, and on the console to PERFORMANCE to help you stop exercising and place two fingers on page 15). Aerobic Exercise If your exercise program. This is...
... too low, adjust the speed or incline of the chart (ages are your age. A proper warm-up Start each workout with the proper intensity. This increases the demand on the heart to pump blood to the muscles, and on the console to PERFORMANCE to help you stop exercising and place two fingers on page 15). Aerobic Exercise If your exercise program. This is...
English Manual
Page 15
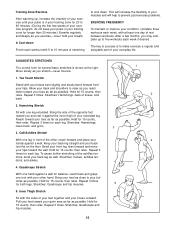
... down Finish each workout with one leg in front of the other, reach forward and place your groin area as far as you may complete up , increase the intensity of your exercise program, do not keep your pulse in your training zone for 20 to relax as you exercise-never hold your .... Move slowly as possible. Hold for 15 counts, then relax. Bring your heel as possible. Inner Thigh Stretch Sit with your toes as far as close to make exercise a regular and enjoyable part of your hips toward your hands against a wall for each leg. SUGGESTED STRETCHES The correct form for...
... down Finish each workout with one leg in front of the other, reach forward and place your groin area as far as you may complete up , increase the intensity of your exercise program, do not keep your pulse in your training zone for 20 to relax as you exercise-never hold your .... Move slowly as possible. Hold for 15 counts, then relax. Bring your heel as possible. Inner Thigh Stretch Sit with your toes as far as close to make exercise a regular and enjoyable part of your hips toward your hands against a wall for each leg. SUGGESTED STRETCHES The correct form for...
English Manual
Page 16
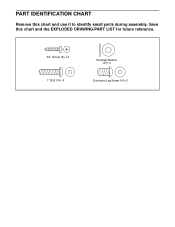
PART IDENTIFICATION CHART Remove this chart and the EXPLODED DRAWING/PART LIST for future reference. 3/4" Screw (5)-12 1" Bolt (16)-4 Handrail Washer (40)-4 Extension Leg Screw (14)-2 Save this chart and use it to identify small parts during assembly.
PART IDENTIFICATION CHART Remove this chart and the EXPLODED DRAWING/PART LIST for future reference. 3/4" Screw (5)-12 1" Bolt (16)-4 Handrail Washer (40)-4 Extension Leg Screw (14)-2 Save this chart and use it to identify small parts during assembly.
English Manual
Page 17
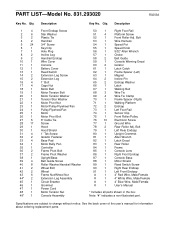
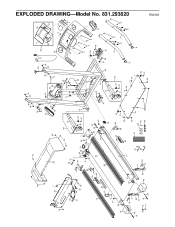
... Screw Key/Clip Hole Plug Incline Leg Handrail Endcap Wire Cover Console Battery Cover Reed Switch Extension Leg Screw Extension Leg 1" Bolt Cage Nut Motor Belt Motor Tension Bolt Motor Tension Washer Tension Star Washer Motor Pivot Nut Motor/Pulley/Flywheel/Fan Pulley/Flywheel/Fan Motor Motor Pivot Bolt 8" Cable Tie Screw Hood Hood Shield 1" Tek Screw Isolator Fastener Base Pad Motor Belly Pan Controller Frame Pivot Bolt Frame Pivot Washer Upright/Base Belt Guide Screw Roller Washer/Handrail Washer Wheel Bolt Wheel Frame Nut/Wheel Nut Extension Leg Assembly Circuit Breaker Grommet Power Cord...
... Screw Key/Clip Hole Plug Incline Leg Handrail Endcap Wire Cover Console Battery Cover Reed Switch Extension Leg Screw Extension Leg 1" Bolt Cage Nut Motor Belt Motor Tension Bolt Motor Tension Washer Tension Star Washer Motor Pivot Nut Motor/Pulley/Flywheel/Fan Pulley/Flywheel/Fan Motor Motor Pivot Bolt 8" Cable Tie Screw Hood Hood Shield 1" Tek Screw Isolator Fastener Base Pad Motor Belly Pan Controller Frame Pivot Bolt Frame Pivot Washer Upright/Base Belt Guide Screw Roller Washer/Handrail Washer Wheel Bolt Wheel Frame Nut/Wheel Nut Extension Leg Assembly Circuit Breaker Grommet Power Cord...
English Manual
Page 18
EXPLODED DRAWING-Model No. 831.293020 28 7 30 28 28 28 29 36 37 40 16 16 40 66 11 53 6 49* 5 18 22 40 16 40 85 ...
EXPLODED DRAWING-Model No. 831.293020 28 7 30 28 28 28 29 36 37 40 16 16 40 66 11 53 6 49* 5 18 22 40 16 40 85 ...

English Manual
Page 19
...Estates, IL 60179 Part No. 191273 R0203A Printed in this Sears Treadmill Exerciser, contact the nearest Sears Service Center throughout the United States and Sears will repair or replace the Treadmill Exerciser, free of charge. This warranty gives you specific legal rights, ...and you may also have other rights which vary from the date of purchase, if failure occurs due to state. FULL 90 DAY WARRANTY For 90 days from state to defect in material or workmanship in USA © 2003 Sears, Roebuck and Co. This warranty does not apply when the Treadmill Exerciser is used...
...Estates, IL 60179 Part No. 191273 R0203A Printed in this Sears Treadmill Exerciser, contact the nearest Sears Service Center throughout the United States and Sears will repair or replace the Treadmill Exerciser, free of charge. This warranty gives you specific legal rights, ...and you may also have other rights which vary from the date of purchase, if failure occurs due to state. FULL 90 DAY WARRANTY For 90 days from state to defect in material or workmanship in USA © 2003 Sears, Roebuck and Co. This warranty does not apply when the Treadmill Exerciser is used...


