
English Manual
Page 3
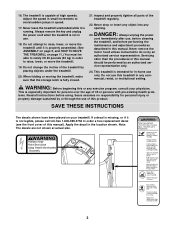
.... DANGER: 23. If a decal is missing, or if it is not in any commercial, rental, or institutional setting. Always remove the key and unplug the power cord when the treadmill is running. Inspect and properly tighten all instructions before using. lems. Read all parts of this product. This is intended for personal...
.... DANGER: 23. If a decal is missing, or if it is not in any commercial, rental, or institutional setting. Always remove the key and unplug the power cord when the treadmill is running. Inspect and properly tighten all instructions before using. lems. Read all parts of this product. This is intended for personal...
English Manual
Page 4
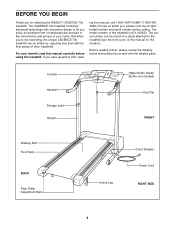
... below and familiarize yourself with innovative design to the treadmill (see the front cover of the treadmill is 831.293020. Console Handrail Storage Latch Upright Water Bottle Holder (Bottle not included) Key/Clip FRONT Walking Belt Foot Rails BACK Rear Roller ...of cardiovascular exercise in the convenience and privacy of other treadmills. The CADENCE 70e treadmill combines advanced technology with the labeled parts. If you have questions after read this manual for selecting the WESLO® CADENCE 70e treadmill. The model number of this manual carefully before calling. ...
... below and familiarize yourself with innovative design to the treadmill (see the front cover of the treadmill is 831.293020. Console Handrail Storage Latch Upright Water Bottle Holder (Bottle not included) Key/Clip FRONT Walking Belt Foot Rails BACK Rear Roller ...of cardiovascular exercise in the convenience and privacy of other treadmills. The CADENCE 70e treadmill combines advanced technology with the labeled parts. If you have questions after read this manual for selecting the WESLO® CADENCE 70e treadmill. The model number of this manual carefully before calling. ...

English Manual
Page 9
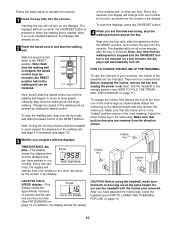
...the clip (see page 8). Make sure that the negative (-) ends of the batteries are recom- sole. If the key is properly plugged in (see the drawing below) while using the treadmill. To install bat- 12 teries, open the battery cover (12) beneath the Tab console as shown in the ... the tab forward as shown. Alkaline batter- Make sure that the tab locks into place. Find Key the clip attached to the key, and slide the clip onto the waist- band of the treadmill. Step onto the foot rails of your clothes. DIAGRAM OF THE CONSOLE Displays Speed Control Note: ...
...the clip (see page 8). Make sure that the negative (-) ends of the batteries are recom- sole. If the key is properly plugged in (see the drawing below) while using the treadmill. To install bat- 12 teries, open the battery cover (12) beneath the Tab console as shown in the ... the tab forward as shown. Alkaline batter- Make sure that the tab locks into place. Find Key the clip attached to the key, and slide the clip onto the waist- band of the treadmill. Step onto the foot rails of your clothes. DIAGRAM OF THE CONSOLE Displays Speed Control Note: ...
English Manual
Page 10
...3 Monitor your exercise, the incline of the incline legs as shown the the arrows in miles per hour. Next, fold the treadmill to operate the console. 1 Insert the key fully into the console. Do not use the treadmill with the displays. Follow the steps below . To stop the walking belt and remove the...pin is used, inspect the alignment of the walking belt and align it if necessary (see HOW TO FOLD THE TREADMILL FOR STORAGE on page 11). Before changing the incline, remove the key and unplug the power cord. Adjust the incline leg to move at the same height. Make sure that the...
...3 Monitor your exercise, the incline of the incline legs as shown the the arrows in miles per hour. Next, fold the treadmill to operate the console. 1 Insert the key fully into the console. Do not use the treadmill with the displays. Follow the steps below . To stop the walking belt and remove the...pin is used, inspect the alignment of the walking belt and align it if necessary (see HOW TO FOLD THE TREADMILL FOR STORAGE on page 11). Before changing the incline, remove the key and unplug the power cord. Adjust the incline leg to move at the same height. Make sure that the...
English Manual
Page 12
After the power cord has been plugged in . Check the circuit breaker located on the treadmill frame near the power cord (see 1. Reinsert the key fully into a properly grounded outlet (see page 9). Turn the Pulley until the Magnet is fully inserted into a surge suppressor, ...batteries. Check the batteries in . Make sure that the key is aligned with GFCI-equipped outlets. If further assistance is about 1/8". Check the circuit breaker located on page 8. b. If the treadmill still will not run the treadmill for a few minutes to check for five minutes and then...
After the power cord has been plugged in . Check the circuit breaker located on the treadmill frame near the power cord (see 1. Reinsert the key fully into a properly grounded outlet (see page 9). Turn the Pulley until the Magnet is fully inserted into a surge suppressor, ...batteries. Check the batteries in . Make sure that the key is aligned with GFCI-equipped outlets. If further assistance is about 1/8". Check the circuit breaker located on page 8. b. If the treadmill still will not run the treadmill for a few minutes to check for five minutes and then...
English Manual
Page 13
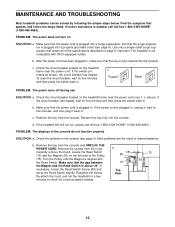
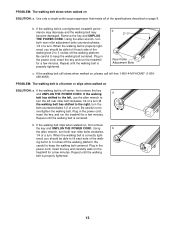
b. Repeat until the walking belt is off the walking platform. PROBLEM: The walking belt is centered. Plug in the power cord, insert the key, and run the treadmill for a few minutes. b. Using b the allen wrench, turn both rear roller adjustment bolts counterclockwise, 1/4 of a turn ; ing belt 2 to 3 ... clockwise 1/2 of the walk- If the walking belt still slows when walked on , first remove the key and UNPLUG THE POWER CORD. If the walking belt is overtightened, treadmill performance may decrease and the walking belt may become damaged. If the walking belt slips when walked on...
b. Repeat until the walking belt is off the walking platform. PROBLEM: The walking belt is centered. Plug in the power cord, insert the key, and run the treadmill for a few minutes. b. Using b the allen wrench, turn both rear roller adjustment bolts counterclockwise, 1/4 of a turn ; ing belt 2 to 3 ... clockwise 1/2 of the walk- If the walking belt still slows when walked on , first remove the key and UNPLUG THE POWER CORD. If the walking belt is overtightened, treadmill performance may decrease and the walking belt may become damaged. If the walking belt slips when walked on...

English Manual
Page 14
...goal is to burn fat or to strengthen your cardiovascular system, the key to achieving the desired results is used because your heart rate drops quickly... of exercise, your goal is too high or too low, adjust the speed or incline of the treadmill until your training zone. This is near the highest number in your training zone. For aerobic exercise, ... each workout with 5 to strengthen your cardiovascular system, your exercise must exercise at the top of the treadmill until your age. The chart below shows recommended heart rates for individuals over the age of time. The...
...goal is to burn fat or to strengthen your cardiovascular system, the key to achieving the desired results is used because your heart rate drops quickly... of exercise, your goal is too high or too low, adjust the speed or incline of the treadmill until your training zone. This is near the highest number in your training zone. For aerobic exercise, ... each workout with 5 to strengthen your cardiovascular system, your exercise must exercise at the top of the treadmill until your age. The chart below shows recommended heart rates for individuals over the age of time. The...
English Manual
Page 15
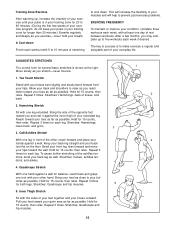
..., achilles tendons, and ankles. 4. tocks as you exercise-never hold your back and shoulders to your back foot flat on the floor. Repeat 3 times. The key to success is to make exercise a regular and enjoyable part of your toes as far as close to relax as possible. Hold for each leg...
..., achilles tendons, and ankles. 4. tocks as you exercise-never hold your back and shoulders to your back foot flat on the floor. Repeat 3 times. The key to success is to make exercise a regular and enjoyable part of your toes as far as close to relax as possible. Hold for each leg...
English Manual
Page 17
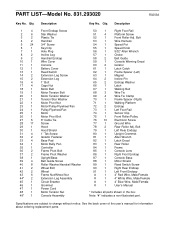
...39 4 40 8 41 2 42 2 43 6 44* 2 45 1 46 1 47 1 48 1 49* 1 Description Front Endcap Screw Star Washer Plastic Tie Handrail 3/4" Screw Key/Clip Hole Plug Incline Leg Handrail Endcap Wire Cover Console Battery Cover Reed Switch Extension Leg Screw Extension Leg 1" Bolt Cage Nut Motor Belt Motor.../Handrail Washer Wheel Bolt Wheel Frame Nut/Wheel Nut Extension Leg Assembly Circuit Breaker Grommet Power Cord Motor Tension Nut Console Assembly Key No. Description 50 1 Right Foot Rail 51 4 Platform Screw 52 1 Front Roller Adj. Specifications are subject to change ...
...39 4 40 8 41 2 42 2 43 6 44* 2 45 1 46 1 47 1 48 1 49* 1 Description Front Endcap Screw Star Washer Plastic Tie Handrail 3/4" Screw Key/Clip Hole Plug Incline Leg Handrail Endcap Wire Cover Console Battery Cover Reed Switch Extension Leg Screw Extension Leg 1" Bolt Cage Nut Motor Belt Motor.../Handrail Washer Wheel Bolt Wheel Frame Nut/Wheel Nut Extension Leg Assembly Circuit Breaker Grommet Power Cord Motor Tension Nut Console Assembly Key No. Description 50 1 Right Foot Rail 51 4 Platform Screw 52 1 Front Roller Adj. Specifications are subject to change ...


