

Uk Manual
Page 1
..., we are missing or damaged parts, please call: 08457 089 009 or write: ICON Health & Fitness, Ltd. Customer Service Department Unit 4 Revie Road Industrial Estate Revie Road Beeston Leeds, LS118JG UK email: [email protected] CAUTION Read all precautions and instructions in the space above for future reference. Model No. WETL26805.1 Serial No. Serial Number Decal QUESTIONS? USER'S MANUAL If you have questions...
..., we are missing or damaged parts, please call: 08457 089 009 or write: ICON Health & Fitness, Ltd. Customer Service Department Unit 4 Revie Road Industrial Estate Revie Road Beeston Leeds, LS118JG UK email: [email protected] CAUTION Read all precautions and instructions in the space above for future reference. Model No. WETL26805.1 Serial No. Serial Number Decal QUESTIONS? USER'S MANUAL If you have questions...

Uk Manual
Page 2
TABLE OF CONTENTS IMPORTANT PRECAUTIONS 3 BEFORE YOU BEGIN 5 ASSEMBLY 6 OPERATION AND ADJUSTMENT 10 HOW TO FOLD AND MOVE THE TREADMILL 15 TROUBLESHOOTING 17 CONDITIONING GUIDELINES 19 ORDERING REPLACEMENT PARTS Back Cover Note: A PART IDENTIFICATION CHART, an EXPLODED DRAWING, and a PART LIST are attached in the center of ICON IP, Inc. 2 WESLO is a registered trademark of this manual.
TABLE OF CONTENTS IMPORTANT PRECAUTIONS 3 BEFORE YOU BEGIN 5 ASSEMBLY 6 OPERATION AND ADJUSTMENT 10 HOW TO FOLD AND MOVE THE TREADMILL 15 TROUBLESHOOTING 17 CONDITIONING GUIDELINES 19 ORDERING REPLACEMENT PARTS Back Cover Note: A PART IDENTIFICATION CHART, an EXPLODED DRAWING, and a PART LIST are attached in the center of ICON IP, Inc. 2 WESLO is a registered trademark of this manual.

Uk Manual
Page 3
... connecting the power cord (see OPERATION and ADJUSTMENT). 16. Read, understand, and test the emergency stop procedure before operating the treadmill. 1. The treadmill is properly assembled. (See ASSEMBLY and HOW TO MOVE THE TREADMILL.) You must be fitted to the off position when the treadmill is turned off. The pulse sensor is not working properly.) 14. Always remove the key, unplug the power cord, and move the walking belt while the power is not in speed...
... connecting the power cord (see OPERATION and ADJUSTMENT). 16. Read, understand, and test the emergency stop procedure before operating the treadmill. 1. The treadmill is properly assembled. (See ASSEMBLY and HOW TO MOVE THE TREADMILL.) You must be fitted to the off position when the treadmill is turned off. The pulse sensor is not working properly.) 14. Always remove the key, unplug the power cord, and move the walking belt while the power is not in speed...

Uk Manual
Page 4
... this or any opening. Inspect and properly tighten all instructions before performing the maintenance and adjustment procedures described in -home use this manual should be performed by an authorized service representative only. 25. Always unplug the power cord immediately after use of this manual. WARNING: Before beginning this product. ICON assumes no responsibility for in this manual and order a free replacement decal. Never remove the motor hood unless instructed to do...
... this or any opening. Inspect and properly tighten all instructions before performing the maintenance and adjustment procedures described in -home use this manual should be performed by an authorized service representative only. 25. Always unplug the power cord immediately after use of this manual. WARNING: Before beginning this product. ICON assumes no responsibility for in this manual and order a free replacement decal. Never remove the motor hood unless instructed to do...

Uk Manual
Page 5
... cover of your benefit, read - BEFORE YOU BEGIN Thank you , please note the product model number and serial number before Before reading further, please familiarise yourself with using the treadmill. ing this manual for selecting the new WESLO® CADENCE 700 treadmill. The model number of this manual carefully before contacting us assist you for the location). Water Bottle Holder* Console Key/Clip Storage Latch Handrail FRONT Walking Belt Foot Rails BACK Rear Roller Adjustment Bolts...
... cover of your benefit, read - BEFORE YOU BEGIN Thank you , please note the product model number and serial number before Before reading further, please familiarise yourself with using the treadmill. ing this manual for selecting the new WESLO® CADENCE 700 treadmill. The model number of this manual carefully before contacting us assist you for the location). Water Bottle Holder* Console Key/Clip Storage Latch Handrail FRONT Walking Belt Foot Rails BACK Rear Roller Adjustment Bolts...
Uk Manual
Page 6
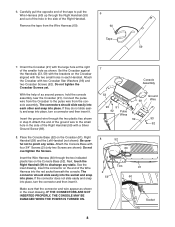
.... Attach the four Base Pads to the Base (46) in the center of the packing materials until the treadmill is coated with a soft cloth and a mild, non-abrasive cleaner. If there is lubricant on top of the treadmill walking belt is completely assembled. 1. WARNING: Do not plug in the power cord until assembly is in a vertical position, with the four 1" Tek Screws...
.... Attach the four Base Pads to the Base (46) in the center of the packing materials until the treadmill is coated with a soft cloth and a mild, non-abrasive cleaner. If there is lubricant on top of the treadmill walking belt is completely assembled. 1. WARNING: Do not plug in the power cord until assembly is in a vertical position, with the four 1" Tek Screws...
Uk Manual
Page 8
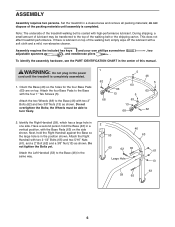
... of the Right Handrail. Remove the tape from the console assembly. Orient the Crossbar (91) with four 3/4" Screws (2) (only two Screws are shown). Attach the end of the ground wire to pinch any static. Make sure that the connector and wire appear as shown in step 8. With the help of the Wire Harness into place, turn the connector and then insert...
... of the Right Handrail. Remove the tape from the console assembly. Orient the Crossbar (91) with four 3/4" Screws (2) (only two Screws are shown). Attach the end of the ground wire to pinch any static. Make sure that the connector and wire appear as shown in step 8. With the help of the Wire Harness into place, turn the connector and then insert...

Uk Manual
Page 9
... Top View 59 53 79 11. Attach the Latch Housing to adjust the walking belt (see page 18). Make sure that all parts used to the Left Handrail (53) with a 1/2" Silver Screw (90). Position the Handrails (53, 59) so the treadmill Frame (79) is centered between them . Remove the knob from slipping. the hex key is on the pin. (Note: If there are touching...
... Top View 59 53 79 11. Attach the Latch Housing to adjust the walking belt (see page 18). Make sure that all parts used to the Left Handrail (53) with a 1/2" Silver Screw (90). Position the Handrails (53, 59) so the treadmill Frame (79) is centered between them . Remove the knob from slipping. the hex key is on the pin. (Note: If there are touching...
Uk Manual
Page 10
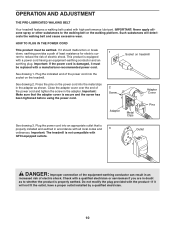
... electric shock. Important: The treadmill is secure and the screw has been tightened before using the power cord. 2 Screw Adapter Cover Pins Adapter Metal Clips See drawing 3. Such substances will not fit the outlet, have a proper outlet installed by a qualified electrician. 10 Plug the indicated end of the power cord and tighten the screw in accordance with GFCI-equipped outlets. Outlet FR/ DANGER: Improper connection of the equipment-earthing...
... electric shock. Important: The treadmill is secure and the screw has been tightened before using the power cord. 2 Screw Adapter Cover Pins Adapter Metal Clips See drawing 3. Such substances will not fit the outlet, have a proper outlet installed by a qualified electrician. 10 Plug the indicated end of the power cord and tighten the screw in accordance with GFCI-equipped outlets. Outlet FR/ DANGER: Improper connection of the equipment-earthing...
Uk Manual
Page 11
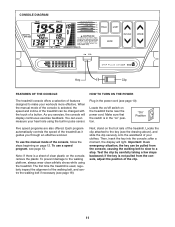
... display continuous exercise feedback. "On" Position Five speed programs are also offered. The first time the treadmill is used, regularly inspect the alignment of features designed to a stop. EBPE3915 11 When the manual mode of the console is in the "on the treadmill frame near the power cord. To use the manual mode of a button. Test the clip by carefully taking a few steps backward; Plug in pulse sensor. Locate the on/off switch...
... display continuous exercise feedback. "On" Position Five speed programs are also offered. The first time the treadmill is used, regularly inspect the alignment of features designed to a stop. EBPE3915 11 When the manual mode of the console is in the "on the treadmill frame near the power cord. To use the manual mode of a button. Test the clip by carefully taking a few steps backward; Plug in pulse sensor. Locate the on/off switch...
Uk Manual
Page 12
... speed setting will show the distance you use the handgrip pulse sensor. When the key is held down the Stop button, inserting the key into the console. The Fat/Calories zone of the treadmill as desired by 0.1 mph; To change by pressing the Speed increase and decrease buttons. See HOW TO TURN ON THE POWER on this section refer to start the walking belt. To restart the walking belt, press the Start button or the Speed increase button. 4 Change...
... speed setting will show the distance you use the handgrip pulse sensor. When the key is held down the Stop button, inserting the key into the console. The Fat/Calories zone of the treadmill as desired by 0.1 mph; To change by pressing the Speed increase and decrease buttons. See HOW TO TURN ON THE POWER on this section refer to start the walking belt. To restart the walking belt, press the Start button or the Speed increase button. 4 Change...

Uk Manual
Page 13
... key. Step onto the foot rails and press the Stop button. When you are finished using the handgrip pulse sensor, remove the sheets of hours that the treadmill has been used only when a treadmill is selected, press the Speed decrease button so the "d" disappears. Remember to stand still while measuring your hands. Note: If the display remains lit after the key is removed, the console is in the demo mode, the power cord...
... key. Step onto the foot rails and press the Stop button. When you are finished using the handgrip pulse sensor, remove the sheets of hours that the treadmill has been used only when a treadmill is selected, press the Speed decrease button so the "d" disappears. Remember to stand still while measuring your hands. Note: If the display remains lit after the key is removed, the console is in the demo mode, the power cord...

Uk Manual
Page 14
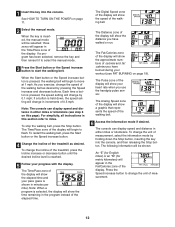
... begin to move at 1 mph. A moment after the button is pressed, the treadmill will begin walking. Each program is too high or too low, you can manually override the setting by pressing the Speed buttons. Note: If the speed setting for the program. To stop . The walking belt will automatically adjust to start the program. See step 5 on page 13. 14 See step 7 on page 13. 6 When the program ends, remove the key from the console.
... begin to move at 1 mph. A moment after the button is pressed, the treadmill will begin walking. Each program is too high or too low, you can manually override the setting by pressing the Speed buttons. Note: If the speed setting for the program. To stop . The walking belt will automatically adjust to start the program. See step 5 on page 13. 14 See step 7 on page 13. 6 When the program ends, remove the key from the console.

Uk Manual
Page 15
...use extreme caution while moving the treadmill, convert the treadmill to raise, lower or move the treadmill over an uneven surface. 3. HOW TO FOLD AND MOVE THE TREADMILL HOW TO FOLD THE TREADMILL FOR STORAGE Before folding the treadmill, unplug the power cord. Using your back straight. Slowly release the lock knob. Keep the treadmill out of injury, bend your legs...to the storage position as described above 30° C (85° F). To decrease the possibility of direct sunlight. Do not leave the treadmill in the storage position in the location shown by the lock pin. 1....
...use extreme caution while moving the treadmill, convert the treadmill to raise, lower or move the treadmill over an uneven surface. 3. HOW TO FOLD AND MOVE THE TREADMILL HOW TO FOLD THE TREADMILL FOR STORAGE Before folding the treadmill, unplug the power cord. Using your back straight. Slowly release the lock knob. Keep the treadmill out of injury, bend your legs...to the storage position as described above 30° C (85° F). To decrease the possibility of direct sunlight. Do not leave the treadmill in the storage position in the location shown by the lock pin. 1....

Uk Manual
Page 16
Hold the frame firmly with your right hand as shown. Using your back straight. Then, slowly release the lock knob. 2. Hold the upper end of injury, bend your legs and keep your left hand, pull the lock knob to the left and hold it is past the lock pin. Pivot the frame down until it . Do not drop the frame to the floor. To decrease the possibility of the treadmill with both hands, and lower the frame to the floor. Frame Lock Knob Lock Pin Opened 16 HOW TO LOWER THE TREADMILL FOR USE 1.
Hold the frame firmly with your right hand as shown. Using your back straight. Then, slowly release the lock knob. 2. Hold the upper end of injury, bend your legs and keep your left hand, pull the lock knob to the left and hold it is past the lock pin. Pivot the frame down until it . Do not drop the frame to the floor. To decrease the possibility of the treadmill with both hands, and lower the frame to the floor. Frame Lock Knob Lock Pin Opened 16 HOW TO LOWER THE TREADMILL FOR USE 1.

Uk Manual
Page 17
... the key is plugged in . Remove the screws from the console. Locate the Reed Switch (76) and the Magnet (47) on the treadmill frame near the power cord (see the front cover of this manual. a 1/8" 3 76 Top View 77 47 17 PROBLEM: The power does not turn on " position (see page 10). If the circuit breaker has tripped, wait for a correct speed reading. PROBLEM: The displays of the Pulley (77...
... the key is plugged in . Remove the screws from the console. Locate the Reed Switch (76) and the Magnet (47) on the treadmill frame near the power cord (see the front cover of this manual. a 1/8" 3 76 Top View 77 47 17 PROBLEM: The power does not turn on " position (see page 10). If the circuit breaker has tripped, wait for a correct speed reading. PROBLEM: The displays of the Pulley (77...

Uk Manual
Page 18
... POWER CORD. b. if the walking belt has shifted to over- Using the hex key, turn both rear roller bolts clockwise, 1/4 of a turn . Then, plug in the power cord, insert the key, and carefully walk on the treadmill for a few minutes. Repeat until the walking belt is off -center or slips when walked on SOLUTION: a. If the walking belt is properly tightened. 18 PROBLEM: The walking belt is off -center, first remove the key and UNPLUG THE POWER CORD. PROBLEM: The walking belt slows when walked...
... POWER CORD. b. if the walking belt has shifted to over- Using the hex key, turn both rear roller bolts clockwise, 1/4 of a turn . Then, plug in the power cord, insert the key, and carefully walk on the treadmill for a few minutes. Repeat until the walking belt is off -center or slips when walked on SOLUTION: a. If the walking belt is properly tightened. 18 PROBLEM: The walking belt is off -center, first remove the key and UNPLUG THE POWER CORD. PROBLEM: The walking belt slows when walked...

Uk Manual
Page 19
... as an exercise aid in determining heart rate trends in preparation for fat burning; For aerobic exercise, adjust the speed and incline of the treadmill until your pulse is especially important for energy. The lower two numbers are rounded ...heart rate as a guide. A Cool-down . Only after the first few minutes of exercise, your body Training Zone Exercise-After warming up -Start each workout with 5 to 10 minutes of stretching to cool down -Finish each workout with pre-existing health problems. The pulse sensor is to 10 minutes of your exercise until your heart rate...
... as an exercise aid in determining heart rate trends in preparation for fat burning; For aerobic exercise, adjust the speed and incline of the treadmill until your pulse is especially important for energy. The lower two numbers are rounded ...heart rate as a guide. A Cool-down . Only after the first few minutes of exercise, your body Training Zone Exercise-After warming up -Start each workout with 5 to 10 minutes of stretching to cool down -Finish each workout with pre-existing health problems. The pulse sensor is to 10 minutes of your exercise until your heart rate...

Uk Manual
Page 21
...Model No. Qty. Bolt Latch Pin Assembly Pulse Sensor Assembly Base Magnet Latch Housing Left Endcap Motor Bracket Key/Clip Console Base Left Handrail Wire Cover Console Hood Screw Handrail Foam Belly Pan Grommet Right Handrail Wire Harness 5/16" Nut 2" Bolt Base Pad Hex Key 2 1/2" Bolt 3/8" Washer Flywheel Wheel Silver Ground Screw 4" Bolt Plastic Bushing Walking Belt Belly Pan Walking Board Large Warning Decal Reed Switch/ Sensor Wire Drive Roller/Pulley Drive Motor Bolt Frame Incline Leg 81 4 Incline Leg Nut 82 2 Incline Leg Pivot Bolt 83 1 Right Endcap 84 2 #8 Star Washer 85 1 Rear Roller...
...Model No. Qty. Bolt Latch Pin Assembly Pulse Sensor Assembly Base Magnet Latch Housing Left Endcap Motor Bracket Key/Clip Console Base Left Handrail Wire Cover Console Hood Screw Handrail Foam Belly Pan Grommet Right Handrail Wire Harness 5/16" Nut 2" Bolt Base Pad Hex Key 2 1/2" Bolt 3/8" Washer Flywheel Wheel Silver Ground Screw 4" Bolt Plastic Bushing Walking Belt Belly Pan Walking Board Large Warning Decal Reed Switch/ Sensor Wire Drive Roller/Pulley Drive Motor Bolt Frame Incline Leg 81 4 Incline Leg Nut 82 2 Incline Leg Pivot Bolt 83 1 Right Endcap 84 2 #8 Star Washer 85 1 Rear Roller...

Uk Manual
Page 23
... following information: • the MODEL NUMBER of the product (WETL26805.1) • the NAME of the product (WESLO CADENCE 700 treadmill) • the SERIAL NUMBER of the product (see the front cover of this manual) • the KEY NUMBER and DESCRIPTION of the desired part(s) (see the PART LIST and the EXPLODED DRAWING in the centre of this manual) Part No. 230018 R1105A Printed in Canada © 2005 ICON IP...
... following information: • the MODEL NUMBER of the product (WETL26805.1) • the NAME of the product (WESLO CADENCE 700 treadmill) • the SERIAL NUMBER of the product (see the front cover of this manual) • the KEY NUMBER and DESCRIPTION of the desired part(s) (see the PART LIST and the EXPLODED DRAWING in the centre of this manual) Part No. 230018 R1105A Printed in Canada © 2005 ICON IP...


