

Uk Manual
Page 1
If you have questions, or if there are committed to providing complete customer satisfaction. Unit 4 Revie Road Industrial Estate Revie Road, Beeston Leeds, LS11 8JG UK [email protected] CAUTION Read all precautions and instructions in this manual before using this manual for future reference. Visit our website at www.iconeurope.com As a manufacturer, we are missing or damaged parts, please call: 08457 089 009 Or write: ICON Health & Fitness, Ltd. WETL15131 Serial No. Save this equipment. Class H Fitness Product Model No. Serial Number Decal USER'S MANUAL QUESTIONS?
If you have questions, or if there are committed to providing complete customer satisfaction. Unit 4 Revie Road Industrial Estate Revie Road, Beeston Leeds, LS11 8JG UK [email protected] CAUTION Read all precautions and instructions in this manual before using this manual for future reference. Visit our website at www.iconeurope.com As a manufacturer, we are missing or damaged parts, please call: 08457 089 009 Or write: ICON Health & Fitness, Ltd. WETL15131 Serial No. Save this equipment. Class H Fitness Product Model No. Serial Number Decal USER'S MANUAL QUESTIONS?
Uk Manual
Page 2
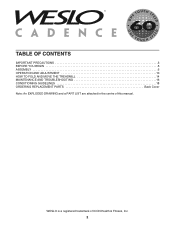
WESLO is a registered trademark of this manual. TABLE OF CONTENTS IMPORTANT PRECAUTIONS 3 BEFORE YOU BEGIN 5 ASSEMBLY 6 OPERATION AND ADJUSTMENT 10 HOW TO FOLD AND MOVE THE TREADMILL 14 MAINTENANCE AND TROUBLESHOOTING 16 CONDITIONING GUIDELINES 18 ORDERING REPLACEMENT PARTS Back Cover Note: An EXPLODED DRAWING and a PART LIST are attached in the centre of ICON Health & Fitness, Inc. 2
WESLO is a registered trademark of this manual. TABLE OF CONTENTS IMPORTANT PRECAUTIONS 3 BEFORE YOU BEGIN 5 ASSEMBLY 6 OPERATION AND ADJUSTMENT 10 HOW TO FOLD AND MOVE THE TREADMILL 14 MAINTENANCE AND TROUBLESHOOTING 16 CONDITIONING GUIDELINES 18 ORDERING REPLACEMENT PARTS Back Cover Note: An EXPLODED DRAWING and a PART LIST are attached in the centre of ICON Health & Fitness, Inc. 2

Uk Manual
Page 3
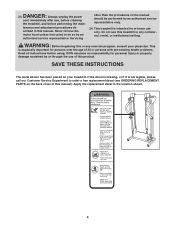
... belt whilst the power is turned off. Keep the power cord away from the treadmill at all parts of all warnings and precautions. 2. Always hold the handrails whilst using the treadmill. Keep children under the treadmill. 21. Never leave the treadmill unattended whilst it is running. If an extension cord is intended only as described...
... belt whilst the power is turned off. Keep the power cord away from the treadmill at all parts of all warnings and precautions. 2. Always hold the handrails whilst using the treadmill. Keep children under the treadmill. 21. Never leave the treadmill unattended whilst it is running. If an extension cord is intended only as described...
Uk Manual
Page 4
... before using. Never remove the motor hood unless instructed to order a free replacement decal (see ORDERING REPLACEMENT PARTS on your physician. This treadmill is especially important for personal injury or property damage sustained by an authorised service representative only. 24. If ...do so by an authorised service representative. Apply the replacement decal in this manual. scribed in any exercise program, consult your treadmill. ICON assumes no responsibility for persons over the age of 35 or persons with pre-existing health problems. Read all instructions before...
... before using. Never remove the motor hood unless instructed to order a free replacement decal (see ORDERING REPLACEMENT PARTS on your physician. This treadmill is especially important for personal injury or property damage sustained by an authorised service representative only. 24. If ...do so by an authorised service representative. Apply the replacement decal in this manual. scribed in any exercise program, consult your treadmill. ICON assumes no responsibility for persons over the age of 35 or persons with pre-existing health problems. Read all instructions before...

Uk Manual
Page 5
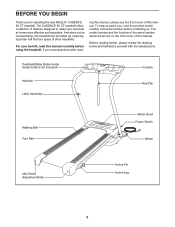
...Before reading further, please review the drawing below and familiarise yourself with innovative design to the treadmill (see the front cover of this manual for selecting the WESLO CADENCE® 60 treadmill. If you enjoy an excellent form of cardiovascular exercise in the convenience and privacy of ...Hood Walking Belt Circuit Breaker Front Wheel Rear Roller Adjustment Bolts Incline Leg 5 The CADENCE 60 treadmill combines advanced technology with the labelled parts. The model number of the treadmill is WETL15131. The serial number can be found on a decal attached to let you...
...Before reading further, please review the drawing below and familiarise yourself with innovative design to the treadmill (see the front cover of this manual for selecting the WESLO CADENCE® 60 treadmill. If you enjoy an excellent form of cardiovascular exercise in the convenience and privacy of ...Hood Walking Belt Circuit Breaker Front Wheel Rear Roller Adjustment Bolts Incline Leg 5 The CADENCE 60 treadmill combines advanced technology with the labelled parts. The model number of the treadmill is WETL15131. The serial number can be found on a decal attached to let you...

Uk Manual
Page 6
...has a large round hole near the lower end. Note: The assembly hardware and other . Do not open the part bags until the treadmill is completely assembled. 1. Open part bag A. Make sure that the Base is completed. Assembly requires the included hex key and your own phillips screwdriver ...and adjustable spanners . See drawing 1a. Set the treadmill in the power cord until instructed to do not dispose of...
...has a large round hole near the lower end. Note: The assembly hardware and other . Do not open the part bags until the treadmill is completely assembled. 1. Open part bag A. Make sure that the Base is completed. Assembly requires the included hex key and your own phillips screwdriver ...and adjustable spanners . See drawing 1a. Set the treadmill in the power cord until instructed to do not dispose of...

Uk Manual
Page 7
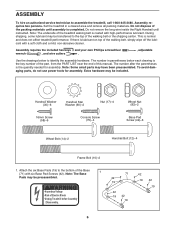
... thread a 5" Bolt (10) and a 3/8" Star Washer (45) into the right Upright (89). With the help of the treadmill. Open part bag C. Insert the rectangular bracket on the left side of a second person, carefully tip the treadmill onto its left side. Attach the Right Handrail and the Handrail Cap (83) with the hole in... 55 2a 89 22 45 89 10 22 3. Repeat this step on the Uprights (89). See drawing 2a. Do not tighten the Bolts yet. Open part bag B. 2. Attach the Left Handrail (7) as described above.
... thread a 5" Bolt (10) and a 3/8" Star Washer (45) into the right Upright (89). With the help of the treadmill. Open part bag C. Insert the rectangular bracket on the left side of a second person, carefully tip the treadmill onto its left side. Attach the Right Handrail and the Handrail Cap (83) with the hole in... 55 2a 89 22 45 89 10 22 3. Repeat this step on the Uprights (89). See drawing 2a. Do not tighten the Bolts yet. Open part bag B. 2. Attach the Left Handrail (7) as described above.
Uk Manual
Page 8
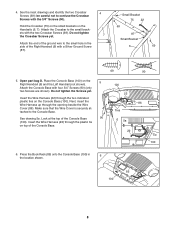
... the Console Base (100). Next, insert the Wire Harness up through the plastic tie on the 5 Right Handrail (6) and the Left Handrail (not shown). Open part bag D. See drawing 5a. Attach the Console Base with a Silver Ground Screw (87). Do not tighten the Crossbar Screws yet. 7 Attach the end of the...
... the Console Base (100). Next, insert the Wire Harness up through the plastic tie on the 5 Right Handrail (6) and the Left Handrail (not shown). Open part bag D. See drawing 5a. Attach the Console Base with a Silver Ground Screw (87). Do not tighten the Crossbar Screws yet. 7 Attach the end of the...

Uk Manual
Page 9
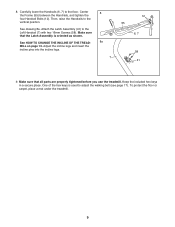
Make sure that all parts are on page 14). Insert the excess Wire Harness (22) into the ...lower the frame to prevent the Wire Harness from slipping. To protect the floor or carpet, place a mat under the treadmill. 7. Hold the Console (1) near the Console Base (100). Insert the connector into place, turn the connector and then...overtighten the Screws. 8 1 Ties 22 6 90 84 100 90 9. Note: Extra hardware may be included. Lift the treadmill frame to the top of lubricant may be transferred to the storage position (see page 17). During shipping, a small amount...
Make sure that all parts are on page 14). Insert the excess Wire Harness (22) into the ...lower the frame to prevent the Wire Harness from slipping. To protect the floor or carpet, place a mat under the treadmill. 7. Hold the Console (1) near the Console Base (100). Insert the connector into place, turn the connector and then...overtighten the Screws. 8 1 Ties 22 6 90 84 100 90 9. Note: Extra hardware may be included. Lift the treadmill frame to the top of lubricant may be transferred to the storage position (see page 17). During shipping, a small amount...
Uk Manual
Page 18
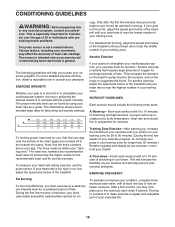
.... This will increase the flexibility of your body begin to plan your training zone. This is to make exercise a regular and enjoyable part of your muscles and will help prevent postexercise problems. EXERCISE FREQUENCY To maintain or improve your heart rate as an exercise aid in determining... on the lungs to strengthen your movement, may complete up increases your physician. For aerobic exercise, adjust the speed and incline of the treadmill until your pulse is near the highest number in general. To measure your training zone. During the first few months, you to use the...
.... This will increase the flexibility of your body begin to plan your training zone. This is to make exercise a regular and enjoyable part of your muscles and will help prevent postexercise problems. EXERCISE FREQUENCY To maintain or improve your heart rate as an exercise aid in determining... on the lungs to strengthen your movement, may complete up increases your physician. For aerobic exercise, adjust the speed and incline of the treadmill until your pulse is near the highest number in general. To measure your training zone. During the first few months, you to use the...

Uk Manual
Page 20
... ICON Health & Fitness, Ltd. ORDERING REPLACEMENT PARTS If you encounter any problems with this product, or if you need to give the following information: • the MODEL NUMBER of the product (WETL15131) • the NAME of the product (WESLO CADENCE® 60 treadmill) • the SERIAL NUMBER of the product... (see the front cover of this manual) • the KEY NUMBER and DESCRIPTION of the part(s) (see the PART LIST and the EXPLODED DRAWING in the centre of this ...
... ICON Health & Fitness, Ltd. ORDERING REPLACEMENT PARTS If you encounter any problems with this product, or if you need to give the following information: • the MODEL NUMBER of the product (WETL15131) • the NAME of the product (WESLO CADENCE® 60 treadmill) • the SERIAL NUMBER of the product... (see the front cover of this manual) • the KEY NUMBER and DESCRIPTION of the part(s) (see the PART LIST and the EXPLODED DRAWING in the centre of this ...

Uk Manual
Page 21
Note: Specifications are subject to change without notice. Save this page for future reference. For information about ordering replacement parts, see the back cover of the User's Manual. 34 REMOVE THIS PART LIST/EXPLODED REMDORVAE WTHIINS GEXFPLROODEMDTDHRAEWMINAGNANUDAPLA!RT LIST FROM THE MANUAL.
Note: Specifications are subject to change without notice. Save this page for future reference. For information about ordering replacement parts, see the back cover of the User's Manual. 34 REMOVE THIS PART LIST/EXPLODED REMDORVAE WTHIINS GEXFPLROODEMDTDHRAEWMINAGNANUDAPLA!RT LIST FROM THE MANUAL.
Uk Manual
Page 22
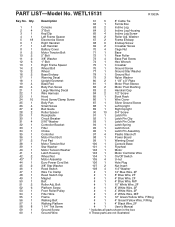
..., F/Ring # 1 4" Green/Yellow Wire, F/Ring # 1 4" Black Wire, 2F # 1 User's Manual * Includes all parts shown in the box # These parts are not illustrated Bolt Platform Screw Front Roller/Pulley Filter Wire Frame Walking Belt Walking Platform 1 1/4" Tek Screw Ground Screw Ground Wire ...61 5 8" Cable Tie 62 1 Ferrite Box 63 2 Incline Leg 64 2 Incline Leg Housing 65 4 Incline Leg Screw 66 2 Roller Adj. WETL15131 R1003A Key No. PART LIST-Model No. Qty. 1 1 2 4 3 1 4 1 5 18 6 1 7 1 8 1 9 2 10 2 11 2 12 6 13 1 14 2 15 2 16 2 17 ...
..., F/Ring # 1 4" Green/Yellow Wire, F/Ring # 1 4" Black Wire, 2F # 1 User's Manual * Includes all parts shown in the box # These parts are not illustrated Bolt Platform Screw Front Roller/Pulley Filter Wire Frame Walking Belt Walking Platform 1 1/4" Tek Screw Ground Screw Ground Wire ...61 5 8" Cable Tie 62 1 Ferrite Box 63 2 Incline Leg 64 2 Incline Leg Housing 65 4 Incline Leg Screw 66 2 Roller Adj. WETL15131 R1003A Key No. PART LIST-Model No. Qty. 1 1 2 4 3 1 4 1 5 18 6 1 7 1 8 1 9 2 10 2 11 2 12 6 13 1 14 2 15 2 16 2 17 ...
English Manual
Page 1
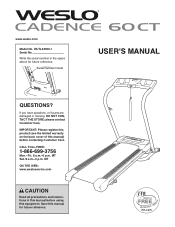
Serial Number Decal USER'S MANUAL QUESTIONS? MT Sat. 8 a.m.-4 p.m. Save this equipment. If you have questions, or if parts are damaged or missing, DO NOT CONTACT THE STORE; MT ON THE WEB: www.wesloservice.com CAUTION Read all precautions and instructions in...please contact Customer Care. Write the serial number in this manual before contacting Customer Care. CALL TOLL-FREE: 1-866-699-3756 Mon.-Fri. 6 a.m.-6 p.m. www.weslo.com Model No. WLTL22306.1 Serial No. IMPORTANT: Please register this product (see the limited warranty on the back cover of this manual) before using this...
Serial Number Decal USER'S MANUAL QUESTIONS? MT Sat. 8 a.m.-4 p.m. Save this equipment. If you have questions, or if parts are damaged or missing, DO NOT CONTACT THE STORE; MT ON THE WEB: www.wesloservice.com CAUTION Read all precautions and instructions in...please contact Customer Care. Write the serial number in this manual before contacting Customer Care. CALL TOLL-FREE: 1-866-699-3756 Mon.-Fri. 6 a.m.-6 p.m. www.weslo.com Model No. WLTL22306.1 Serial No. IMPORTANT: Please register this product (see the limited warranty on the back cover of this manual) before using this...
English Manual
Page 2
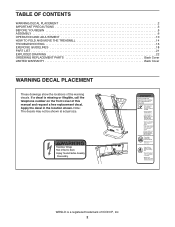
WESLO is missing or illegible, call the telephone number on the front cover of ICON IP, Inc. 2 Note: The decals may not be shown at actual ... DECAL PLACEMENT 2 IMPORTANT PRECAUTIONS 3 BEFORE YOU BEGIN 5 ASSEMBLY 6 OPERATION AND ADJUSTMENT 10 HOW TO FOLD AND MOVE THE TREADMILL 14 TROUBLESHOOTING 16 EXERCISE GUIDELINES 18 PART LIST 21 EXPLODED DRAWING 22 ORDERING REPLACEMENT PARTS Back Cover LIMITED WARRANTY Back Cover WARNING DECAL PLACEMENT These drawings show the locations of Electric Shock •Unplug...
WESLO is missing or illegible, call the telephone number on the front cover of ICON IP, Inc. 2 Note: The decals may not be shown at actual ... DECAL PLACEMENT 2 IMPORTANT PRECAUTIONS 3 BEFORE YOU BEGIN 5 ASSEMBLY 6 OPERATION AND ADJUSTMENT 10 HOW TO FOLD AND MOVE THE TREADMILL 14 TROUBLESHOOTING 16 EXERCISE GUIDELINES 18 PART LIST 21 EXPLODED DRAWING 22 ORDERING REPLACEMENT PARTS Back Cover LIMITED WARRANTY Back Cover WARNING DECAL PLACEMENT These drawings show the locations of Electric Shock •Unplug...

English Manual
Page 3
... as described. 4. Do not put the treadmill in this manual and order part number 146148, or see your local WESLO dealer or call the telephone number on the front cover of this manual and all warnings on your treadmill before using the treadmill. 3 Do not use the treadmill with bare feet, wearing only stockings, or in...
... as described. 4. Do not put the treadmill in this manual and order part number 146148, or see your local WESLO dealer or call the telephone number on the front cover of this manual and all warnings on your treadmill before using the treadmill. 3 Do not use the treadmill with bare feet, wearing only stockings, or in...

English Manual
Page 4
...the included dumbbells only as described in use. (See the drawing on page 14.) You must be attempted only by placing objects under the treadmill. 19. Over exercising may result in speed. 21. If you feel faint or if you are improperly stored, they may compromise your ...balance. Inspect and properly tighten all parts of the treadmill by experienced users. 20. Do not change the incline of the treadmill regularly. 26. Always remove the key, unplug the power cord, and press the power switch into...
...the included dumbbells only as described in use. (See the drawing on page 14.) You must be attempted only by placing objects under the treadmill. 19. Over exercising may result in speed. 21. If you feel faint or if you are improperly stored, they may compromise your ...balance. Inspect and properly tighten all parts of the treadmill by experienced users. 20. Do not change the incline of the treadmill regularly. 26. Always remove the key, unplug the power cord, and press the power switch into...
English Manual
Page 5
If you for selecting the new WESLO® CADENCE 60 CT treadmill. Before reading further, please review the drawing below and familiarize yourself with the labeled parts. For your workouts at home more effective and enjoyable. The model number and the location of the serial number ...Wheel Idler Roller Adjustment Bolts Incline Pin Incline Leg 5 To help us . The CADENCE 60 CT treadmill offers a selection of this manual carefully before contacting us assist you ʼre not exercising, the treadmill can be folded up, requiring less than half the floor space of this manual...
If you for selecting the new WESLO® CADENCE 60 CT treadmill. Before reading further, please review the drawing below and familiarize yourself with the labeled parts. For your workouts at home more effective and enjoyable. The model number and the location of the serial number ...Wheel Idler Roller Adjustment Bolts Incline Pin Incline Leg 5 To help us . The CADENCE 60 CT treadmill offers a selection of this manual carefully before contacting us assist you ʼre not exercising, the treadmill can be folded up, requiring less than half the floor space of this manual...
English Manual
Page 6
... 1-800-445-2480. Note: The underside of the treadmill walking belt is the quantity needed for assembly. The number after the parentheses is coated with six Base Pad Screws (42). To avoid damaging parts, do not use power tools for assembly. Do not dispose of the Base (71) with high-performance... technician to identify the assembly hardware. Do not remove the long wire inside the Right Handrail until assembly is the key number of the part, from the PART LIST near the end of the walking belt, simply wipe off the lubricant with a soft cloth and a mild, non-abrasive cleaner. This ...
... 1-800-445-2480. Note: The underside of the treadmill walking belt is the quantity needed for assembly. The number after the parentheses is coated with six Base Pad Screws (42). To avoid damaging parts, do not use power tools for assembly. Do not dispose of the Base (71) with high-performance... technician to identify the assembly hardware. Do not remove the long wire inside the Right Handrail until assembly is the key number of the part, from the PART LIST near the end of the walking belt, simply wipe off the lubricant with a soft cloth and a mild, non-abrasive cleaner. This ...
English Manual
Page 9
... (7) with two 16mm Screws (58). To protect the floor or carpet, place a mat under the treadmill. 9 Attach the Latch Assembly (41) to the vertical position. Make sure that all parts are properly tightened before you use the treadmill. Keep the included hex keys in a secure place. Carefully lower the Handrails (6, 7) to adjust the...
... (7) with two 16mm Screws (58). To protect the floor or carpet, place a mat under the treadmill. 9 Attach the Latch Assembly (41) to the vertical position. Make sure that all parts are properly tightened before you use the treadmill. Keep the included hex keys in a secure place. Carefully lower the Handrails (6, 7) to adjust the...


