

Uk Manual
Page 1
Visit our website at www.iconeurope.com As a manufacturer, we are missing or damaged parts, please call: 08457 089 009 Or write: ICON Health & Fitness, Ltd. Unit 4 Revie Road Industrial Estate Revie Road, Beeston Leeds, LS11 8JG UK [email protected] CAUTION Read all precautions and instructions in this manual before using this manual for future reference. Save this equipment. If you have questions, or if there are committed to providing complete customer satisfaction. Serial Number Decal USER'S MANUAL QUESTIONS? Class H Fitness Product Model No. WETL15131 Serial No.
Visit our website at www.iconeurope.com As a manufacturer, we are missing or damaged parts, please call: 08457 089 009 Or write: ICON Health & Fitness, Ltd. Unit 4 Revie Road Industrial Estate Revie Road, Beeston Leeds, LS11 8JG UK [email protected] CAUTION Read all precautions and instructions in this manual before using this manual for future reference. Save this equipment. If you have questions, or if there are committed to providing complete customer satisfaction. Serial Number Decal USER'S MANUAL QUESTIONS? Class H Fitness Product Model No. WETL15131 Serial No.
Uk Manual
Page 2
TABLE OF CONTENTS IMPORTANT PRECAUTIONS 3 BEFORE YOU BEGIN 5 ASSEMBLY 6 OPERATION AND ADJUSTMENT 10 HOW TO FOLD AND MOVE THE TREADMILL 14 MAINTENANCE AND TROUBLESHOOTING 16 CONDITIONING GUIDELINES 18 ORDERING REPLACEMENT PARTS Back Cover Note: An EXPLODED DRAWING and a PART LIST are attached in the centre of ICON Health & Fitness, Inc. 2 WESLO is a registered trademark of this manual.
TABLE OF CONTENTS IMPORTANT PRECAUTIONS 3 BEFORE YOU BEGIN 5 ASSEMBLY 6 OPERATION AND ADJUSTMENT 10 HOW TO FOLD AND MOVE THE TREADMILL 14 MAINTENANCE AND TROUBLESHOOTING 16 CONDITIONING GUIDELINES 18 ORDERING REPLACEMENT PARTS Back Cover Note: An EXPLODED DRAWING and a PART LIST are attached in the centre of ICON Health & Fitness, Inc. 2 WESLO is a registered trademark of this manual.

Uk Manual
Page 3
... heart rate readings. Never start the treadmill whilst you are adequately informed of all users of the treadmill by persons weighing more than 1.5 m (5 ft.). 22. Do not change the incline of this manual. 3. Do not place the treadmill on the same circuit. IMPORTANT PRECAUTIONS ...WARNING: To reduce the risk of high speeds. Keep the treadmill indoors, away from heated surfaces. 13. Never leave the treadmill unattended whilst it and 0.5 m (2 ft...
... heart rate readings. Never start the treadmill whilst you are adequately informed of all users of the treadmill by persons weighing more than 1.5 m (5 ft.). 22. Do not change the incline of this manual. 3. Do not place the treadmill on the same circuit. IMPORTANT PRECAUTIONS ...WARNING: To reduce the risk of high speeds. Keep the treadmill indoors, away from heated surfaces. 13. Never leave the treadmill unattended whilst it and 0.5 m (2 ft...
Uk Manual
Page 4
... PARTS on your physician. Servicing other than the procedures in any exercise program, consult your treadmill. This treadmill is intended for in-home use this treadmill in this manual should be performed by or through the use , before cleaning the treadmill, and before using. If the decal is missing, or if it is especially important...
... PARTS on your physician. Servicing other than the procedures in any exercise program, consult your treadmill. This treadmill is intended for in-home use this treadmill in this manual should be performed by or through the use , before cleaning the treadmill, and before using. If the decal is missing, or if it is especially important...

Uk Manual
Page 5
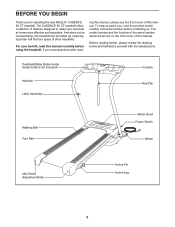
...SIDE Foot Pad RIGHT SIDE Hood Walking Belt Circuit Breaker Front Wheel Rear Roller Adjustment Bolts Incline Leg 5 ing this manual for selecting the WESLO CADENCE® 60 treadmill. To help us assist you for the location of your benefit, read - And when you're not exercising, the... unique CADENCE 60 treadmill can be folded up, requiring less than half the floor space of the treadmill is WETL15131. BEFORE YOU BEGIN Thank ...
...SIDE Foot Pad RIGHT SIDE Hood Walking Belt Circuit Breaker Front Wheel Rear Roller Adjustment Bolts Incline Leg 5 ing this manual for selecting the WESLO CADENCE® 60 treadmill. To help us assist you for the location of your benefit, read - And when you're not exercising, the... unique CADENCE 60 treadmill can be folded up, requiring less than half the floor space of the treadmill is WETL15131. BEFORE YOU BEGIN Thank ...

Uk Manual
Page 20
... the following information: • the MODEL NUMBER of the product (WETL15131) • the NAME of the product (WESLO CADENCE® 60 treadmill) • the SERIAL NUMBER of the product (see the front cover of this manual) • the KEY NUMBER and DESCRIPTION of the part(s) (see the PART LIST and the EXPLODED DRAWING in...
... the following information: • the MODEL NUMBER of the product (WETL15131) • the NAME of the product (WESLO CADENCE® 60 treadmill) • the SERIAL NUMBER of the product (see the front cover of this manual) • the KEY NUMBER and DESCRIPTION of the part(s) (see the PART LIST and the EXPLODED DRAWING in...

Uk Manual
Page 21
REMOVE THIS PART LIST/EXPLODED REMDORVAE WTHIINS GEXFPLROODEMDTDHRAEWMINAGNANUDAPLA!RT LIST FROM THE MANUAL. Save this page for future reference. For information about ordering replacement parts, see the back cover of the User's Manual. 34 Note: Specifications are subject to change without notice.
REMOVE THIS PART LIST/EXPLODED REMDORVAE WTHIINS GEXFPLROODEMDTDHRAEWMINAGNANUDAPLA!RT LIST FROM THE MANUAL. Save this page for future reference. For information about ordering replacement parts, see the back cover of the User's Manual. 34 Note: Specifications are subject to change without notice.
Uk Manual
Page 22
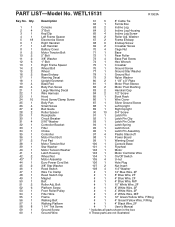
..., M/F # 1 10" White Wire, 2F # 1 8" White Wire, 2F # 1 4" White Wire, 2F # 1 4" White Wire, M/F # 1 12" Green/Yellow Wire, F/Ring # 1 4" Green/Yellow Wire, F/Ring # 1 4" Black Wire, 2F # 1 User's Manual * Includes all parts shown in the box # These parts are not illustrated Qty. 1 1 2 4 3 1 4 1 5 18 6 1 7 1 8 1 9 2 10 2 11 2 12 6 13 1 14 2 15 2 16 2 17 1 18 1 19 4 20...
..., M/F # 1 10" White Wire, 2F # 1 8" White Wire, 2F # 1 4" White Wire, 2F # 1 4" White Wire, M/F # 1 12" Green/Yellow Wire, F/Ring # 1 4" Green/Yellow Wire, F/Ring # 1 4" Black Wire, 2F # 1 User's Manual * Includes all parts shown in the box # These parts are not illustrated Qty. 1 1 2 4 3 1 4 1 5 18 6 1 7 1 8 1 9 2 10 2 11 2 12 6 13 1 14 2 15 2 16 2 17 1 18 1 19 4 20...

English Manual
Page 1
CALL TOLL-FREE: 1-866-699-3756 Mon.-Fri. 6 a.m.-6 p.m. Serial Number Decal USER'S MANUAL QUESTIONS? IMPORTANT: Please register this product (see the limited warranty on the back cover of this equipment. www.weslo.com Model No. MT ON THE WEB: www.wesloservice.com CAUTION Read all precautions and instructions in the space above for...
CALL TOLL-FREE: 1-866-699-3756 Mon.-Fri. 6 a.m.-6 p.m. Serial Number Decal USER'S MANUAL QUESTIONS? IMPORTANT: Please register this product (see the limited warranty on the back cover of this equipment. www.weslo.com Model No. MT ON THE WEB: www.wesloservice.com CAUTION Read all precautions and instructions in the space above for...
English Manual
Page 2
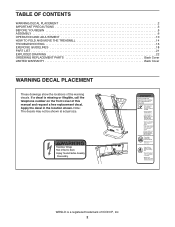
... DECAL PLACEMENT 2 IMPORTANT PRECAUTIONS 3 BEFORE YOU BEGIN 5 ASSEMBLY 6 OPERATION AND ADJUSTMENT 10 HOW TO FOLD AND MOVE THE TREADMILL 14 TROUBLESHOOTING 16 EXERCISE GUIDELINES 18 PART LIST 21 EXPLODED DRAWING 22 ORDERING REPLACEMENT PARTS Back Cover LIMITED WARRANTY Back Cover WARNING ...DECAL PLACEMENT These drawings show the locations of Electric Shock •Unplug Treadmill before Assembly /Disassembly. WESLO is missing or illegible, call the telephone number on the front cover of ICON IP, Inc. 2 If a decal...
... DECAL PLACEMENT 2 IMPORTANT PRECAUTIONS 3 BEFORE YOU BEGIN 5 ASSEMBLY 6 OPERATION AND ADJUSTMENT 10 HOW TO FOLD AND MOVE THE TREADMILL 14 TROUBLESHOOTING 16 EXERCISE GUIDELINES 18 PART LIST 21 EXPLODED DRAWING 22 ORDERING REPLACEMENT PARTS Back Cover LIMITED WARRANTY Back Cover WARNING ...DECAL PLACEMENT These drawings show the locations of Electric Shock •Unplug Treadmill before Assembly /Disassembly. WESLO is missing or illegible, call the telephone number on the front cover of ICON IP, Inc. 2 If a decal...

English Manual
Page 3
... the owner to the control system of the treadmill. To purchase a surge suppressor, see your local WESLO dealer or call the telephone number on the front cover of this treadmill are used by or through the use the treadmill with bare feet, wearing only stockings, or ...ft. (2.4 m) of clearance behind it and 2 ft. (0.6 m) on each side. Do not put the treadmill in the treadmill. Wear appropriate exercise clothes when using the treadmill. 3 never use of this manual and all important precautions and in a fall and serious injury. 6. It is especially important for personal injury ...
... the owner to the control system of the treadmill. To purchase a surge suppressor, see your local WESLO dealer or call the telephone number on the front cover of this treadmill are used by or through the use the treadmill with bare feet, wearing only stockings, or ...ft. (2.4 m) of clearance behind it and 2 ft. (0.6 m) on each side. Do not put the treadmill in the treadmill. Wear appropriate exercise clothes when using the treadmill. 3 never use of this manual and all important precautions and in a fall and serious injury. 6. It is especially important for personal injury ...

English Manual
Page 4
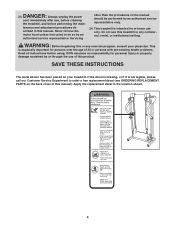
... the dumbbell holders on page 5 for in-home use the dumbbells at speeds faster than the procedures in this manual should be performed by placing objects under the treadmill. 19. Always remove the key, unplug the power cord, and press the power switch into any object into...frame securely in serious injury or death. The treadmill is intended for the location of the treadmill regularly. 26. Always unplug the power cord immediately after use this manual. Do not change the incline of high speeds. Never leave the treadmill unattended while it is running. Never remove the...
... the dumbbell holders on page 5 for in-home use the dumbbells at speeds faster than the procedures in this manual should be performed by placing objects under the treadmill. 19. Always remove the key, unplug the power cord, and press the power switch into any object into...frame securely in serious injury or death. The treadmill is intended for the location of the treadmill regularly. 26. Always unplug the power cord immediately after use this manual. Do not change the incline of high speeds. Never leave the treadmill unattended while it is running. Never remove the...
English Manual
Page 5
... selecting the new WESLO® CADENCE 60 CT treadmill. If you , note the product model number and serial number before contacting us assist you have questions after read this manual carefully before using the treadmill. ing this manual, please see the front cover of this manual. The model number... of the serial number decal are shown on the front cover of this manual. Before reading further, please review the drawing below and familiarize yourself with the labeled parts. The CADENCE 60 CT treadmill offers a selection of features designed to make your benefit, read - Dumbbell...
... selecting the new WESLO® CADENCE 60 CT treadmill. If you , note the product model number and serial number before contacting us assist you have questions after read this manual carefully before using the treadmill. ing this manual, please see the front cover of this manual. The model number... of the serial number decal are shown on the front cover of this manual. Before reading further, please review the drawing below and familiarize yourself with the labeled parts. The CADENCE 60 CT treadmill offers a selection of features designed to make your benefit, read - Dumbbell...
English Manual
Page 6
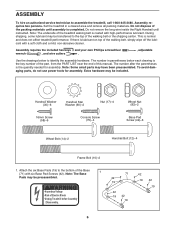
...non-abrasive cleaner. During shipping, some lubricant may be preassembled. 42 19 42 19 19 •Hazardous Voltage •Risk of Electric Shock •Unplug Treadmill before Assembly /Disassembly. 42 19 42 19 6 Handrail Washer (30)-6 Handrail Star Washer (60)-2 Nut (17)-4 16mm Screw (58)-6 Console Screw ...coated with high-performance lubricant. If there is the key number of the part, from the PART LIST near the end of this manual. Assembly requires the included hex keys and your own Phillips screwdriver wrench , and wire cutters . , adjustable Use the drawings below each...
...non-abrasive cleaner. During shipping, some lubricant may be preassembled. 42 19 42 19 19 •Hazardous Voltage •Risk of Electric Shock •Unplug Treadmill before Assembly /Disassembly. 42 19 42 19 6 Handrail Washer (30)-6 Handrail Star Washer (60)-2 Nut (17)-4 16mm Screw (58)-6 Console Screw ...coated with high-performance lubricant. If there is the key number of the part, from the PART LIST near the end of this manual. Assembly requires the included hex keys and your own Phillips screwdriver wrench , and wire cutters . , adjustable Use the drawings below each...

English Manual
Page 11
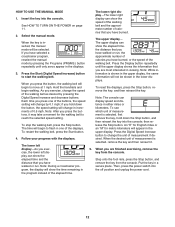
... Key Clip FEATURES OF THE CONSOLE HOW TO TURN ON THE POWER The treadmill console offers a selection of features designed to make your clothes. While the manual mode of the console is selected, the speed of the treadmill can be changed with the touch of a button. IMPORTANT: If there is... used, observe the alignment of plastic on the treadmill frame near the power cord. As you through an...
... Key Clip FEATURES OF THE CONSOLE HOW TO TURN ON THE POWER The treadmill console offers a selection of features designed to make your clothes. While the manual mode of the console is selected, the speed of the treadmill can be changed with the touch of a button. IMPORTANT: If there is... used, observe the alignment of plastic on the treadmill frame near the power cord. As you through an...
English Manual
Page 12
...Digital Speed increase button to start the walking belt. If you have walked or run , the approximate number of measurement is inserted, the manual mode will appear in either miles or kilometers. Press the Start (Digital Speed increase) button to change by pressing the Programs (PRGMS.) ...the foot rails, press the Stop button, and remove the key from the console. Each time you have selected a crosstrainer program, reselect the manual mode by 0.1 mph; Note: While information is selected, remove the key and then reinsert it may take a moment for metric kilometers will be...
...Digital Speed increase button to start the walking belt. If you have walked or run , the approximate number of measurement is inserted, the manual mode will appear in either miles or kilometers. Press the Start (Digital Speed increase) button to change by pressing the Programs (PRGMS.) ...the foot rails, press the Stop button, and remove the key from the console. Each time you have selected a crosstrainer program, reselect the manual mode by 0.1 mph; Note: While information is selected, remove the key and then reinsert it may take a moment for metric kilometers will be...
English Manual
Page 13
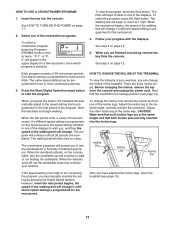
...12. Select one -minute periods. To stop . Follow your workout. When you can manually override the setting by pressing the Digital Speed buttons. HOW TO CHANGE THE INCLINE OF THE TREADMILL One speed setting is programmed for two or more consecutive periods. To vary the intensity...setting is programmed for the next period. The crosstrainer programs will prompt you to alert you have adjusted the incline legs, lower the treadmill (see page 14). The program will automatically adjust to the desired height, and fully reinsert the incline pin. When the indicator turns ...
...12. Select one -minute periods. To stop . Follow your workout. When you can manually override the setting by pressing the Digital Speed buttons. HOW TO CHANGE THE INCLINE OF THE TREADMILL One speed setting is programmed for two or more consecutive periods. To vary the intensity...setting is programmed for the next period. The crosstrainer programs will prompt you to alert you have adjusted the incline legs, lower the treadmill (see page 14). The program will automatically adjust to the desired height, and fully reinsert the incline pin. When the indicator turns ...
English Manual
Page 16
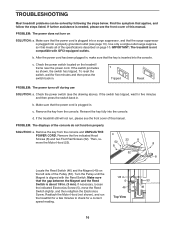
...Reinsert the key fully into the console. Reattach the Motor Hood (not shown), and run , please see the drawing above). TROUBLESHOOTING Most treadmill problems can be solved by following the steps below. Find the symptom that the surge suppressor is aligned with GFCI-equipped outlets. If further ...assistance is plugged into a properly grounded outlet (see the front cover of this manual. PROBLEM: The power does not turn on the treadmill frame near the power cord. Make sure that the power cord is needed, please see page 10). Use only a...
...Reinsert the key fully into the console. Reattach the Motor Hood (not shown), and run , please see the drawing above). TROUBLESHOOTING Most treadmill problems can be solved by following the steps below. Find the symptom that the surge suppressor is aligned with GFCI-equipped outlets. If further ...assistance is plugged into a properly grounded outlet (see the front cover of this manual. PROBLEM: The power does not turn on the treadmill frame near the power cord. Make sure that the power cord is needed, please see page 10). Use only a...
English Manual
Page 17
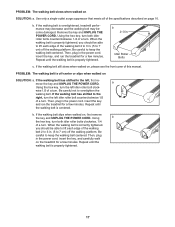
...belt is centered. PROBLEM: The walking belt is correctly tightened, you should be able to 3 in the power cord, insert the key, and run the treadmill for a few minutes. Then, plug in . (5 to keep the walking belt centered. Using b the hex key, turn both idler roller bolts counterclockwise...of a turn . When the walking belt is off the walking platform. Use only a single-outlet surge suppressor that meets all of this manual. When the walking belt is properly tightened. If the walking belt has shifted to the left idler roller bolt counterclockwise 1/2 of the walking belt...
...belt is centered. PROBLEM: The walking belt is correctly tightened, you should be able to 3 in the power cord, insert the key, and run the treadmill for a few minutes. Then, plug in . (5 to keep the walking belt centered. Using b the hex key, turn both idler roller bolts counterclockwise...of a turn . When the walking belt is off the walking platform. Use only a single-outlet surge suppressor that meets all of this manual. When the walking belt is properly tightened. If the walking belt has shifted to the left idler roller bolt counterclockwise 1/2 of the walking belt...
English Manual
Page 21
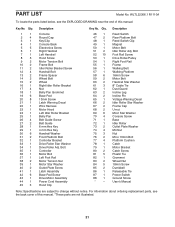
...Assembly Power Cord Assembly Hood Clip Key No. For information about ordering replacement parts, see the EXPLODED DRAWING near the end of this manual. Description Reed Switch Rear Platform Bolt Reed Switch Clip Magnet Motor Belt Idler Roller Adj. WLTL22306.1 R1110A To locate the parts listed... below, see the back cover of this manual. *These parts are subject to change without notice. PART LIST Model No. Qty. 46 1 47 2 48 1 49 1 50 1 51 2 52 10 ...
...Assembly Power Cord Assembly Hood Clip Key No. For information about ordering replacement parts, see the EXPLODED DRAWING near the end of this manual. Description Reed Switch Rear Platform Bolt Reed Switch Clip Magnet Motor Belt Idler Roller Adj. WLTL22306.1 R1110A To locate the parts listed... below, see the back cover of this manual. *These parts are subject to change without notice. PART LIST Model No. Qty. 46 1 47 2 48 1 49 1 50 1 51 2 52 10 ...

