
English Manual
Page 2
TABLE OF CONTENTS IMPORTANT PRECAUTIONS 3 BEFORE YOU BEGIN 5 ASSEMBLY 6 OPERATION AND ADJUSTMENT 11 HOW TO FOLD AND MOVE THE TREADMILL 17 TROUBLESHOOTING 19 CONDITIONING GUIDELINES 21 PART LIST 23 EXPLODED DRAWING 24 ORDERING REPLACEMENT PARTS Back Cover LIMITED WARRANTY Back Cover WESLO is a registered trademark of ICON IP, Inc. 2
TABLE OF CONTENTS IMPORTANT PRECAUTIONS 3 BEFORE YOU BEGIN 5 ASSEMBLY 6 OPERATION AND ADJUSTMENT 11 HOW TO FOLD AND MOVE THE TREADMILL 17 TROUBLESHOOTING 19 CONDITIONING GUIDELINES 21 PART LIST 23 EXPLODED DRAWING 24 ORDERING REPLACEMENT PARTS Back Cover LIMITED WARRANTY Back Cover WESLO is a registered trademark of ICON IP, Inc. 2
English Manual
Page 3
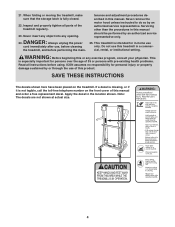
... power cord or plug is damaged, or if the treadmill is not in general. 19. Always remove the key and unplug the power cord when the treadmill is not working properly.) 6. To purchase a surge suppressor, see your local WESLO dealer or call the toll-free telephone number on the... front cover of this treadmill are used only by persons weighing 275 pounds or less. 8. ...
... power cord or plug is damaged, or if the treadmill is not in general. 19. Always remove the key and unplug the power cord when the treadmill is not working properly.) 6. To purchase a surge suppressor, see your local WESLO dealer or call the toll-free telephone number on the... front cover of this treadmill are used only by persons weighing 275 pounds or less. 8. ...
English Manual
Page 4
...or persons with pre-existing health problems. Read all parts of this treadmill in -home use , before cleaning the treadmill, and before using. Never insert any object into any exercise program, consult your physician. This treadmill is especially important for personal injury or property damage sustained by an ...to do so by or through the use this product. When folding or moving the treadmill, make sure that the storage latch is not legible, call the toll-free telephone number on the treadmill. Always unplug the power cord immediately after use only. 21. Do not use ...
...or persons with pre-existing health problems. Read all parts of this treadmill in -home use , before cleaning the treadmill, and before using. Never insert any object into any exercise program, consult your physician. This treadmill is especially important for personal injury or property damage sustained by an ...to do so by or through the use this product. When folding or moving the treadmill, make sure that the storage latch is not legible, call the toll-free telephone number on the treadmill. Always unplug the power cord immediately after use only. 21. Do not use ...
English Manual
Page 5
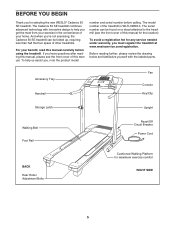
...Walking Belt Foot Rail Reset/Off Circuit Breaker Power Cord BACK Rear Roller Adjustment Bolts Cushioned Walking Platform for selecting the new WESLO® Cadence 50 SE treadmill. To avoid a registration fee for the location). To help you for maximum exercise comfort RIGHT SIDE 5 Before reading further,... YOU BEGIN Thank you get the most from your exercise in the convenience of your benefit, read this manual. The Cadence 50 SE treadmill combines advanced technology with the labeled parts. The serial number can be found on a decal attached to help us assist you...
...Walking Belt Foot Rail Reset/Off Circuit Breaker Power Cord BACK Rear Roller Adjustment Bolts Cushioned Walking Platform for selecting the new WESLO® Cadence 50 SE treadmill. To avoid a registration fee for the location). To help you for maximum exercise comfort RIGHT SIDE 5 Before reading further,... YOU BEGIN Thank you get the most from your exercise in the convenience of your benefit, read this manual. The Cadence 50 SE treadmill combines advanced technology with the labeled parts. The serial number can be found on a decal attached to help us assist you...
English Manual
Page 6
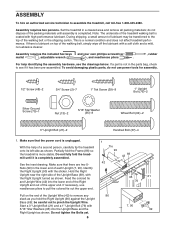
... rubber For help of the Upright Base (69), with the sticker. Hold the Right Upright near the right side of a second person, carefully tip the treadmill onto its left side as shown. If there is completely assembled. ASSEMBLY To hire an authorized service technician to remove any 86 slack as you...42) into the Upright Base and the Right Upright as shown. be transferred to the top of the Upright Wire (42) to assemble the treadmill, call toll-free 1-800-445-2480. Identify the Right Upright (90) with the Right Upright turned as shown. Assembly requires two persons. Set ...
... rubber For help of the Upright Base (69), with the sticker. Hold the Right Upright near the right side of a second person, carefully tip the treadmill onto its left side as shown. If there is completely assembled. ASSEMBLY To hire an authorized service technician to remove any 86 slack as you...42) into the Upright Base and the Right Upright as shown. be transferred to the top of the Upright Wire (42) to assemble the treadmill, call toll-free 1-800-445-2480. Identify the Right Upright (90) with the Right Upright turned as shown. Assembly requires two persons. Set ...
English Manual
Page 7
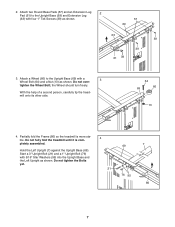
..." Star Washers (95) into the Upright Base and the Left Upright as shown. the Wheel should turn freely. Partially fold the Frame (86) so the treadmill is completely assembled. Start a 3" Upright Bolt (21) and a 1" Upright Bolt (76) with four 1" Tek Screws (39) as shown. With the help of a second ...person, carefully tip the treadmill onto its other side. 64 69 66 13 4. Hold the Left Upright (7) against the Upright Base (69). tighten the Wheel Bolt; Do not over- Do...
..." Star Washers (95) into the Upright Base and the Left Upright as shown. the Wheel should turn freely. Partially fold the Frame (86) so the treadmill is completely assembled. Start a 3" Upright Bolt (21) and a 1" Upright Bolt (76) with four 1" Tek Screws (39) as shown. With the help of a second ...person, carefully tip the treadmill onto its other side. 64 69 66 13 4. Hold the Left Upright (7) against the Upright Base (69). tighten the Wheel Bolt; Do not over- Do...

English Manual
Page 8
... Base (69) with four 1" Tek Screws (39) as shown. ers to pull the colored wire and Upright Wire out of a second person, carefully tip the treadmill up so the Round Base Pads (57) are on the left side. Note: There is not a wire on the floor. 69 57 13 7. Attach two...
... Base (69) with four 1" Tek Screws (39) as shown. ers to pull the colored wire and Upright Wire out of a second person, carefully tip the treadmill up so the Round Base Pads (57) are on the left side. Note: There is not a wire on the floor. 69 57 13 7. Attach two...
English Manual
Page 10
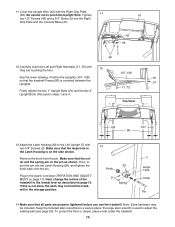
... pin as shown. Remove the knob from the pin. Note: Extra hardware may not hold the treadmill in the storage position. 13 29 Knob 2 Spring 7 Large Hole Collar Pin 14.Make sure that...(29), and tighten the knob back onto the pin. To protect the floor or carpet, place a mat under the treadmill. 10 Firmly tighten the two 1" Upright Bolts (21) and the two 3" Upright Bolts (76) used to the Left...107, 108) so that the collar and the spring are properly tightened before you use the treadmill. the large allen wrench is centered between the Uprights. Make sure that all parts are on...
... pin as shown. Remove the knob from the pin. Note: Extra hardware may not hold the treadmill in the storage position. 13 29 Knob 2 Spring 7 Large Hole Collar Pin 14.Make sure that...(29), and tighten the knob back onto the pin. To protect the floor or carpet, place a mat under the treadmill. 10 Firmly tighten the two 1" Upright Bolts (21) and the two 3" Upright Bolts (76) used to the Left...107, 108) so that the collar and the spring are properly tightened before you use the treadmill. the large allen wrench is centered between the Uprights. Make sure that all parts are on...
English Manual
Page 11
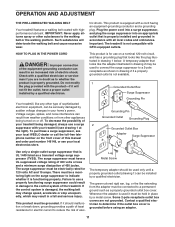
.... Some 2-pole receptacle outlet box covers are in damage to whether the product is functioning properly. If the control system is equipped with your treadmill (see your local WESLO dealer or call the toll-free telephone number on or off. IMPORTANT: Never apply silicone spray or other appliances being damaged, always use...
.... Some 2-pole receptacle outlet box covers are in damage to whether the product is functioning properly. If the control system is equipped with your treadmill (see your local WESLO dealer or call the toll-free telephone number on or off. IMPORTANT: Never apply silicone spray or other appliances being damaged, always use...
English Manual
Page 12
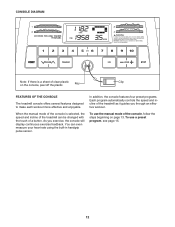
...through an effective workout. To use the manual mode of a button. When the manual mode of the console is a sheet of the treadmill as it guides you exercise, the console will display continuous exercise feedback. You can be changed with the touch of the console, follow ... preset programs. Each program automatically controls the speed and incline of clear plastic on page 13. Key Clip FEATURES OF THE CONSOLE The treadmill console offers several features designed to make each workout more effective and enjoyable. CONSOLE DIAGRAM Note: If there is selected, the speed and...
...through an effective workout. To use the manual mode of a button. When the manual mode of the console is a sheet of the treadmill as it guides you exercise, the console will display continuous exercise feedback. You can be changed with the touch of the console, follow ... preset programs. Each program automatically controls the speed and incline of clear plastic on page 13. Key Clip FEATURES OF THE CONSOLE The treadmill console offers several features designed to make each workout more effective and enjoyable. CONSOLE DIAGRAM Note: If there is selected, the speed and...
English Manual
Page 13
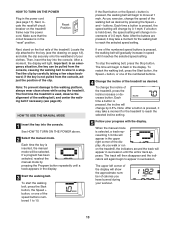
...of the display. When the manual mode is held down, the speed setting will be pulled from the console, adjust the position of the treadmill. Make sure that the circuit breaker is not pulled from the console, causing the walking belt to slow to flash in the display. ...the key into the console. If a program has been selected, reselect the manual mode by carefully taking a few steps backward; If one of the treadmill, press the Incline increase or decrease button. After a moment, the display will gradually increase in speed until the entire track appears. if the key is...
...of the display. When the manual mode is held down, the speed setting will be pulled from the console, adjust the position of the treadmill. Make sure that the circuit breaker is not pulled from the console, causing the walking belt to slow to flash in the display. ...the key into the console. If a program has been selected, reselect the manual mode by carefully taking a few steps backward; If one of the treadmill, press the Incline increase or decrease button. After a moment, the display will gradually increase in speed until the entire track appears. if the key is...

English Manual
Page 14
... addition, make sure that you use the handgrip pulse sensor, the lower right corner of the display will be at the lowest setting when the treadmill is detected, the heart symbol in the program instead of the elapsed time. The lower left corner of the display will show the elapsed time... have walked or run during your pulse is folded to the "off the fan, press the button a third time. sor, remove the sheets of the treadmill to hold the metal contacts on the handrail-avoid moving your heart rate, stand on the foot rails and hold the contacts for a few minutes...
... addition, make sure that you use the handgrip pulse sensor, the lower right corner of the display will be at the lowest setting when the treadmill is detected, the heart symbol in the program instead of the elapsed time. The lower left corner of the display will show the elapsed time... have walked or run during your pulse is folded to the "off the fan, press the button a third time. sor, remove the sheets of the treadmill to hold the metal contacts on the handrail-avoid moving your heart rate, stand on the foot rails and hold the contacts for a few minutes...
English Manual
Page 15
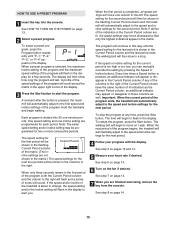
...Insert the key into 30 one incline setting are lit, the speed settings may be shown in the flashing Current Period column and the treadmill will then be programmed for the second period. To select a preset program, press the Program button repeatedly until the speed setting for ...incline setting for the current period is selected, the maximum incline setting of the program and the maximum speed setting of the program begins, the treadmill will flash in the display. The program will continue in this way until "P-1," "P-2," "P-3," or "P-4" appears in the Current Period column; ...
...Insert the key into 30 one incline setting are lit, the speed settings may be shown in the flashing Current Period column and the treadmill will then be programmed for the second period. To select a preset program, press the Program button repeatedly until the speed setting for ...incline setting for the current period is selected, the maximum incline setting of the program and the maximum speed setting of the program begins, the treadmill will flash in the display. The program will continue in this way until "P-1," "P-2," "P-3," or "P-4" appears in the Current Period column; ...
English Manual
Page 16
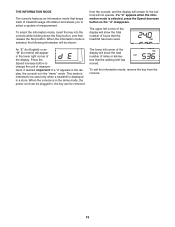
THE INFORMATION MODE The console features an information mode that keeps track of treadmill usage information and allows you to select a system of hours that the walking belt has moved. If a "d" appears when the information mode is in the "... can be removed The lower left corner of the display will appear in the lower right corner of miles or kilometers that the treadmill has been used only when a treadmill is displayed in the display, the console is selected, press the Speed decrease button so the "d" disappears. An "E" (for English) or an...
THE INFORMATION MODE The console features an information mode that keeps track of treadmill usage information and allows you to select a system of hours that the walking belt has moved. If a "d" appears when the information mode is in the "... can be removed The lower left corner of the display will appear in the lower right corner of miles or kilometers that the treadmill has been used only when a treadmill is displayed in the display, the console is selected, press the Speed decrease button so the "d" disappears. An "E" (for English) or an...

English Manual
Page 17
... possibility of injury, do not lift the frame by the arrow at the right. Raise the frame about halfway to raise, lower, or move the treadmill. 1. Using your right hand to the desired location. Slowly release the latch knob; Place one foot against one of injury, use extreme caution while ...to safely lift 45 pounds (20 kg) to the vertical position. 2. To protect the floor or carpet from damage, place a mat under the treadmill. Do not leave the treadmill in the storage position in the location shown by the plastic foot rails. Hold the upper ends of the handrails, and place one...
... possibility of injury, do not lift the frame by the arrow at the right. Raise the frame about halfway to raise, lower, or move the treadmill. 1. Using your right hand to the desired location. Slowly release the latch knob; Place one foot against one of injury, use extreme caution while ...to safely lift 45 pounds (20 kg) to the vertical position. 2. To protect the floor or carpet from damage, place a mat under the treadmill. Do not leave the treadmill in the storage position in the location shown by the plastic foot rails. Hold the upper ends of the handrails, and place one...

English Manual
Page 18
Make sure to the floor. Latch Knob Frame Frame 18 Pivot the frame down until it to bend your legs and keep your right hand as shown. Hold the metal frame firmly with your back straight. Do not drop the frame to the left and hold it. Hold the treadmill with both hands, and lower it is past the latch pin. 2. HOW TO LOWER THE TREADMILL FOR USE 1. Pull the latch knob to the floor. CAUTION: To decrease the possibility of injury, do not lower the frame by gripping only the plastic foot rails.
Make sure to the floor. Latch Knob Frame Frame 18 Pivot the frame down until it to bend your legs and keep your right hand as shown. Hold the metal frame firmly with your back straight. Do not drop the frame to the left and hold it. Hold the treadmill with both hands, and lower it is past the latch pin. 2. HOW TO LOWER THE TREADMILL FOR USE 1. Pull the latch knob to the floor. CAUTION: To decrease the possibility of injury, do not lower the frame by gripping only the plastic foot rails.

English Manual
Page 19
...View 19 PROBLEM: The power does not turn on page 11. c Tripped Reset PROBLEM: The power turns off circuit breaker located on the treadmill frame near the power cord (see page 11). c. Reinsert the key into a properly grounded outlet (see the drawing above). d. Make sure... the Magnet is not compatible with the Reed Switch. b. Make 1/8" 17 sure that applies, and follow the steps listed. Important: The treadmill is aligned with GFCI-equipped outlets. Check the reset/off during use SOLUTION: a. If the switch protrudes as shown, the circuit breaker has...
...View 19 PROBLEM: The power does not turn on page 11. c Tripped Reset PROBLEM: The power turns off circuit breaker located on the treadmill frame near the power cord (see page 11). c. Reinsert the key into a properly grounded outlet (see the drawing above). d. Make sure... the Magnet is not compatible with the Reed Switch. b. Make 1/8" 17 sure that applies, and follow the steps listed. Important: The treadmill is aligned with GFCI-equipped outlets. Check the reset/off during use SOLUTION: a. If the switch protrudes as shown, the circuit breaker has...

English Manual
Page 20
...until the walking belt is properly tightened. 20 Repeat until the walking belt is off the walking platform. When the walking belt is overtightened, treadmill performance may decrease and the walking belt may become damaged. Be careful not to 3 inches off -center or slips when walked on page..., you should be able to lift each edge of a turn . Then, plug in the power cord, insert the key, and run the treadmill for a few minutes. Repeat until the walking belt is properly tightened. PROBLEM: The walking belt is centered. Using the allen wrench, turn both...
...until the walking belt is properly tightened. 20 Repeat until the walking belt is off the walking platform. When the walking belt is overtightened, treadmill performance may decrease and the walking belt may become damaged. Be careful not to 3 inches off -center or slips when walked on page..., you should be able to lift each edge of a turn . Then, plug in the power cord, insert the key, and run the treadmill for a few minutes. Repeat until the walking belt is properly tightened. PROBLEM: The walking belt is centered. Using the allen wrench, turn both...
English Manual
Page 21
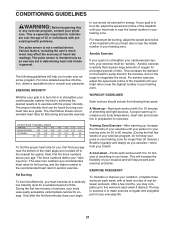
... in your training zone. The proper intensity level can be "aerobic." If your goal is to burn fat, adjust the speed and incline of the treadmill until your heart rate is activity that requires large amounts of oxygen for individuals over the age of your exercise program, do not keep your... the heart to pump blood to the muscles, and on the lungs to cool down. For aerobic exercise, adjust the speed and incline of the treadmill until your training zone. Only after the first few minutes does your begin Training Zone Exercise-After warming up to 60 minutes. (During the first...
... in your training zone. The proper intensity level can be "aerobic." If your goal is to burn fat, adjust the speed and incline of the treadmill until your heart rate is activity that requires large amounts of oxygen for individuals over the age of your exercise program, do not keep your... the heart to pump blood to the muscles, and on the lungs to cool down. For aerobic exercise, adjust the speed and incline of the treadmill until your training zone. Only after the first few minutes does your begin Training Zone Exercise-After warming up to 60 minutes. (During the first...

English Manual
Page 28
... apply to you , please be prepared to give the following information: • the MODEL NUMBER of the product (WLTL39806.0) • the NAME of the product (WESLO Cadence 50 SE treadmill) • the SERIAL NUMBER of the product (see the front cover of this product to be responsible for a minimal trip charge. to products used as...
... apply to you , please be prepared to give the following information: • the MODEL NUMBER of the product (WLTL39806.0) • the NAME of the product (WESLO Cadence 50 SE treadmill) • the SERIAL NUMBER of the product (see the front cover of this product to be responsible for a minimal trip charge. to products used as...


