
English Manual
Page 1
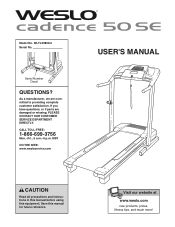
Serial Number Decal QUESTIONS? MST ON THE WEB: www.wesloservice.com USER'S MANUAL CAUTION Read all precautions and instructions in this manual before using this manual for future reference. As a manufacturer, we are damaged or missing, PLEASE CONTACT OUR CUSTOMER SERVICE DEPARTMENT DIRECTLY. CALL TOLL-FREE: 1-866-699-3756 Mon.-Fri., 6 a.m.-6 p.m. WLTL39806.0 Serial No. If you have questions, or if parts are committed to...
Serial Number Decal QUESTIONS? MST ON THE WEB: www.wesloservice.com USER'S MANUAL CAUTION Read all precautions and instructions in this manual before using this manual for future reference. As a manufacturer, we are damaged or missing, PLEASE CONTACT OUR CUSTOMER SERVICE DEPARTMENT DIRECTLY. CALL TOLL-FREE: 1-866-699-3756 Mon.-Fri., 6 a.m.-6 p.m. WLTL39806.0 Serial No. If you have questions, or if parts are committed to...
English Manual
Page 3
... stop unexpectedly, which may affect the accuracy of heart rate readings. Always remove the key and unplug the power cord when the treadmill is properly assembled. (See ASSEMBLY on page 6, and HOW TO FOLD AND MOVE THE TREADMILL on page 17.) You must be on a level surface, with bare feet, wearing only stockings, or in small increments to raise, lower, or move the walking belt while the power...
... stop unexpectedly, which may affect the accuracy of heart rate readings. Always remove the key and unplug the power cord when the treadmill is properly assembled. (See ASSEMBLY on page 6, and HOW TO FOLD AND MOVE THE TREADMILL on page 17.) You must be on a level surface, with bare feet, wearing only stockings, or in small increments to raise, lower, or move the walking belt while the power...
English Manual
Page 4
... in-home use this treadmill in this manual should be performed by an authorized service representative. tenance and adjustment procedures described in the location shown. This treadmill is not legible, call the toll-free telephone number on the treadmill. Note: The decals are not shown at actual size. 4 Apply the decal in this product. When folding or moving the treadmill, make sure that the storage latch is...
... in-home use this treadmill in this manual should be performed by an authorized service representative. tenance and adjustment procedures described in the location shown. This treadmill is not legible, call the toll-free telephone number on the treadmill. Note: The decals are not shown at actual size. 4 Apply the decal in this product. When folding or moving the treadmill, make sure that the storage latch is...
English Manual
Page 5
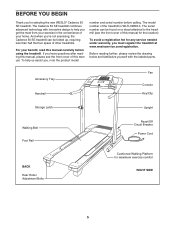
... manual for maximum exercise comfort RIGHT SIDE 5 The Cadence 50 SE treadmill combines advanced technology with the labeled parts. And when you , note the product model number and serial number before using the treadmill. To avoid a registration fee for any service needed under warranty, you for selecting the new WESLO® Cadence 50 SE treadmill. Accessory Tray Handrail Fan Console Key/Clip Storage Latch Upright Walking Belt Foot Rail Reset/Off Circuit Breaker Power Cord BACK Rear Roller Adjustment Bolts Cushioned Walking Platform for the location). The serial number...
... manual for maximum exercise comfort RIGHT SIDE 5 The Cadence 50 SE treadmill combines advanced technology with the labeled parts. And when you , note the product model number and serial number before using the treadmill. To avoid a registration fee for any service needed under warranty, you for selecting the new WESLO® Cadence 50 SE treadmill. Accessory Tray Handrail Fan Console Key/Clip Storage Latch Upright Walking Belt Foot Rail Reset/Off Circuit Breaker Power Cord BACK Rear Roller Adjustment Bolts Cushioned Walking Platform for the location). The serial number...
English Manual
Page 6
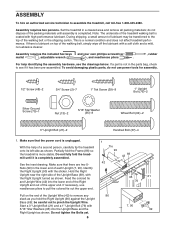
... pre-assembled. If a part is completed. Hold the Right Upright near the right side of each Upright (7, 90). If necessary, use power tools for assembly. 1/2" Screw (48)-2 3/4" Screw (2)-7 1" Tek Screw (39)-8 1" Upright Bolt (76)-2 Silver Ground Screw (75)-1 Nut (13)-2 5/16" Star Washer (95)-8 Wheel Bolt (64)-2 3" Upright Bolt (21)-2 Handrail Bolt (37)-4 1. Set the treadmill in a cleared area and remove all packing materials; Do not fully fold the treadmill until assembly is...
... pre-assembled. If a part is completed. Hold the Right Upright near the right side of each Upright (7, 90). If necessary, use power tools for assembly. 1/2" Screw (48)-2 3/4" Screw (2)-7 1" Tek Screw (39)-8 1" Upright Bolt (76)-2 Silver Ground Screw (75)-1 Nut (13)-2 5/16" Star Washer (95)-8 Wheel Bolt (64)-2 3" Upright Bolt (21)-2 Handrail Bolt (37)-4 1. Set the treadmill in a cleared area and remove all packing materials; Do not fully fold the treadmill until assembly is...
English Manual
Page 7
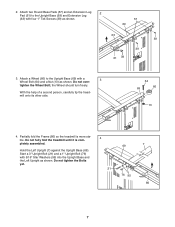
... should turn freely. Partially fold the Frame (86) so the treadmill is completely assembled. Hold the Left Upright (7) against the Upright Base (69). Do not tighten the Bolts yet. 4 21 69 76 95 7 86 7 Start a 3" Upright Bolt (21) and a 1" Upright Bolt (76) with four 1" Tek Screws (39) as shown. 57 69 63 39 39 61 39 3. Attach two Round Base Pads (57) and an Extension Leg...
... should turn freely. Partially fold the Frame (86) so the treadmill is completely assembled. Hold the Left Upright (7) against the Upright Base (69). Do not tighten the Bolts yet. 4 21 69 76 95 7 86 7 Start a 3" Upright Bolt (21) and a 1" Upright Bolt (76) with four 1" Tek Screws (39) as shown. 57 69 63 39 39 61 39 3. Attach two Round Base Pads (57) and an Extension Leg...

English Manual
Page 9
... Left Handrail with four 3/4" Screws (2). Next, press the end of the ground wire to discharge any static. Start all four Screws before tightening them; Make sure that the Upright Wire (42) is routed below the two indicated round posts (A). If the connector does not slide easily and snap into place. With the help of the Console Base (47). The connector...
... Left Handrail with four 3/4" Screws (2). Next, press the end of the ground wire to discharge any static. Start all four Screws before tightening them; Make sure that the Upright Wire (42) is routed below the two indicated round posts (A). If the connector does not slide easily and snap into place. With the help of the Console Base (47). The connector...
English Manual
Page 10
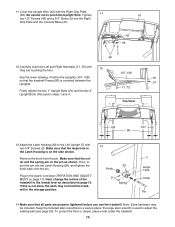
... treadmill. 10 Tighten 47 two 1/2" Screws (48) and a 3/4" Screw (2) into the Latch Housing (29), and tighten the knob back onto the pin. Position the Uprights (107, 108) so that the treadmill Frame (86) is used in steps 1 and 4. 76 21 71, 72 Top View 108 107 86 13.Attach the Latch Housing (29) to adjust the walking belt (see OPERATION AND ADJUSTMENT on page 11). Firmly tighten the two 1" Upright Bolts...
... treadmill. 10 Tighten 47 two 1/2" Screws (48) and a 3/4" Screw (2) into the Latch Housing (29), and tighten the knob back onto the pin. Position the Uprights (107, 108) so that the treadmill Frame (86) is used in steps 1 and 4. 76 21 71, 72 Top View 108 107 86 13.Attach the Latch Housing (29) to adjust the walking belt (see OPERATION AND ADJUSTMENT on page 11). Firmly tighten the two 1" Upright Bolts...
English Manual
Page 11
...: The treadmill is damaged, the walking belt may change speed, accelerate or stop unexpectedly, which may be used it will deteriorate the walking belt and cause excessive wear. To decrease the possibility of your local WESLO dealer or call the toll-free telephone number on a nominal 120-volt circuit, and has a grounding plug that is UL 1449 listed as a properly grounded outlet box cover. The...
...: The treadmill is damaged, the walking belt may change speed, accelerate or stop unexpectedly, which may be used it will deteriorate the walking belt and cause excessive wear. To decrease the possibility of your local WESLO dealer or call the toll-free telephone number on a nominal 120-volt circuit, and has a grounding plug that is UL 1449 listed as a properly grounded outlet box cover. The...
English Manual
Page 12
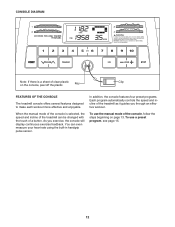
... controls the speed and incline of the treadmill as it guides you exercise, the console will display continuous exercise feedback. To use the manual mode of the console, follow the steps beginning on the console, peel off the plastic. To use a preset program, see page 15. 12 You can be changed with the touch of a button. CONSOLE DIAGRAM Note: If there is selected, the speed and incline of the treadmill can even measure your heart rate using...
... controls the speed and incline of the treadmill as it guides you exercise, the console will display continuous exercise feedback. To use the manual mode of the console, follow the steps beginning on the console, peel off the plastic. To use a preset program, see page 15. 12 You can be changed with the touch of a button. CONSOLE DIAGRAM Note: If there is selected, the speed and incline of the treadmill can even measure your heart rate using...
English Manual
Page 13
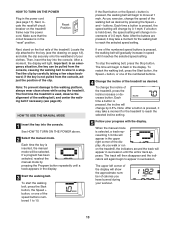
... of the display. if the key is pressed, the walking belt will again begin to a stop the walking belt, press the Stop button. See HOW TO TURN ON THE POWER above. 2 Select the manual mode. Each time the key is held down, the speed setting will be pulled from the console, adjust the position of your workout. 13 if a button is inserted, the manual mode will change the speed of the walking belt, and center the walking belt if necessary...
... of the display. if the key is pressed, the walking belt will again begin to a stop the walking belt, press the Stop button. See HOW TO TURN ON THE POWER above. 2 Select the manual mode. Each time the key is held down, the speed setting will be pulled from the console, adjust the position of your workout. 13 if a button is inserted, the manual mode will change the speed of the walking belt, and center the walking belt if necessary...

English Manual
Page 14
...: Before using the treadmill, switch the reset/off automatically after the key is removed, the console is stopped, the fan will turn off circuit breaker to hold the metal contacts on the handrail-avoid moving your heart rate. Note: If the fan is on when the walking belt is in miles or kilometers. Step onto the foot rails, press the Stop button, and adjust the incline of the treadmill to miles. 6 Measure your workout...
...: Before using the treadmill, switch the reset/off automatically after the key is removed, the console is stopped, the fan will turn off circuit breaker to hold the metal contacts on the handrail-avoid moving your heart rate. Note: If the fan is on when the walking belt is in miles or kilometers. Step onto the foot rails, press the Stop button, and adjust the incline of the treadmill to miles. 6 Measure your workout...
English Manual
Page 15
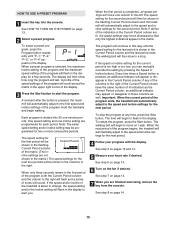
... speed and incline settings for a few times a Speed button is shown in the display to the right. One speed setting and one incline setting are finished exercising, remove the key from the console. When the first period is divided into the console. The walking belt will automatically adjust to move downward so that only the highest indicators appear in the display. Important: When the current period of the program ends, the treadmill...
... speed and incline settings for a few times a Speed button is shown in the display to the right. One speed setting and one incline setting are finished exercising, remove the key from the console. When the first period is divided into the console. The walking belt will automatically adjust to move downward so that only the highest indicators appear in the display. Important: When the current period of the program ends, the treadmill...
English Manual
Page 16
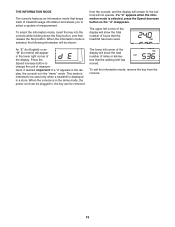
... treadmill has been used only when a treadmill is intended to be used . Press the Speed increase button to select a system of measurement. When the information mode is in the demo mode, the power cord can be plugged in the display, the console is selected, press the Speed decrease button so the "d" disappears. To select the information mode, insert the key into the console while holding down the Stop button, and then release the Stop button. When the console...
... treadmill has been used only when a treadmill is intended to be used . Press the Speed increase button to select a system of measurement. When the information mode is in the demo mode, the power cord can be plugged in the display, the console is selected, press the Speed decrease button so the "d" disappears. To select the information mode, insert the key into the console while holding down the Stop button, and then release the Stop button. When the console...

English Manual
Page 17
HOW TO FOLD AND MOVE THE TREADMILL HOW TO FOLD THE TREADMILL FOR STORAGE Before folding the treadmill, adjust the incline to the position shown and hold it rolls freely on the wheels. Bend your legs and keep your left hand, pull the latch knob to the desired location. Raise the frame until it . make sure that the latch pin is not done, the treadmill may become permanently...
HOW TO FOLD AND MOVE THE TREADMILL HOW TO FOLD THE TREADMILL FOR STORAGE Before folding the treadmill, adjust the incline to the position shown and hold it rolls freely on the wheels. Bend your legs and keep your left hand, pull the latch knob to the desired location. Raise the frame until it . make sure that the latch pin is not done, the treadmill may become permanently...

English Manual
Page 19
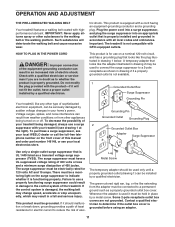
... the power cord is plugged into the console. Make sure that the surge suppressor is plugged in . Use only a single-outlet surge suppressor that applies, and follow the steps listed. Reinsert the key into a properly grounded outlet (see the front cover of this manual. If necessary, loosen the 10 3/4" Screw (58), move the Reed Switch slightly, and 18 then retighten the Screw. PROBLEM: The power does not turn on...
... the power cord is plugged into the console. Make sure that the surge suppressor is plugged in . Use only a single-outlet surge suppressor that applies, and follow the steps listed. Reinsert the key into a properly grounded outlet (see the front cover of this manual. If necessary, loosen the 10 3/4" Screw (58), move the Reed Switch slightly, and 18 then retighten the Screw. PROBLEM: The power does not turn on...

English Manual
Page 20
... front cover of the specifications described on page 11. b. Then, plug in the power cord, insert the key, and run the treadmill for a few minutes. If the walking belt a has shifted to the left rear roller bolt clockwise 1/2 of a turn ; Then, plug in the power cord, insert the key, and run the treadmill for a few minutes. Repeat until the walking belt is properly tightened. b 2"-3" Rear Roller Bolts c. Then, plug in the power cord, insert the key, and carefully walk...
... front cover of the specifications described on page 11. b. Then, plug in the power cord, insert the key, and run the treadmill for a few minutes. If the walking belt a has shifted to the left rear roller bolt clockwise 1/2 of a turn ; Then, plug in the power cord, insert the key, and run the treadmill for a few minutes. Repeat until the walking belt is properly tightened. b 2"-3" Rear Roller Bolts c. Then, plug in the power cord, insert the key, and carefully walk...
English Manual
Page 21
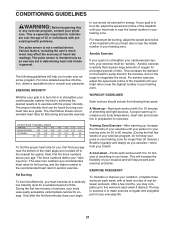
... postexercise problems. EXERCISE FREQUENCY To maintain or improve your physician. This will increase the flexibility of heart rate readings. For maximum fat burning, adjust the speed and incline of stretching and light exercise. To find the proper heart rate for exercise. Various factors, including the user's movement, may complete up increases your physician. to achieving the desired results is intended only as a guide. WORKOUT...
... postexercise problems. EXERCISE FREQUENCY To maintain or improve your physician. This will increase the flexibility of heart rate readings. For maximum fat burning, adjust the speed and incline of stretching and light exercise. To find the proper heart rate for exercise. Various factors, including the user's movement, may complete up increases your physician. to achieving the desired results is intended only as a guide. WORKOUT...
English Manual
Page 23
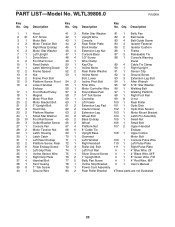
... Grip Plate 76 2 1" Upright Bolt # 1 8" Green Wire, F/R 37 4 Handrail Bolt 77 5 Belly Pan Screw # 1 4" Red Wire, M/F 38 1 Fan Housing 78 1 Incline Stop Bracket # 1 User's Manual 39 8 1" Tek Screw 79 1 Power Cord Assembly 40 1 Ground Wire 80 2 Rear Roller Bracket #These parts are not illustrated 23 Description Key No. Qty. PART LIST-Model No. Description 1 1 Hood 41 3 Roller Star Washer 81 1 Belly Pan 2 21 3/4" Screw 42 1 Upright Wire 82 2 Belt Guide 3 1 Motor Belt 43 1 Console 83 4 Belt Guide Screw 4 2 Motor Tension Bolt 44 2 Rear Roller Plate 84 4 Isolator...
... Grip Plate 76 2 1" Upright Bolt # 1 8" Green Wire, F/R 37 4 Handrail Bolt 77 5 Belly Pan Screw # 1 4" Red Wire, M/F 38 1 Fan Housing 78 1 Incline Stop Bracket # 1 User's Manual 39 8 1" Tek Screw 79 1 Power Cord Assembly 40 1 Ground Wire 80 2 Rear Roller Bracket #These parts are not illustrated 23 Description Key No. Qty. PART LIST-Model No. Description 1 1 Hood 41 3 Roller Star Washer 81 1 Belly Pan 2 21 3/4" Screw 42 1 Upright Wire 82 2 Belt Guide 3 1 Motor Belt 43 1 Console 83 4 Belt Guide Screw 4 2 Motor Tension Bolt 44 2 Rear Roller Plate 84 4 Isolator...
English Manual
Page 28
... product (WESLO Cadence 50 SE treadmill) • the SERIAL NUMBER of the product (see the front cover of this manual. For inhome service, the customer will be the customer's responsibility. No other warranties and any implied warranties of merchantability or fitness for a particular purpose is authorized by ICON. The warranty extended hereunder is in lieu of any and all other warranty beyond that specifically set forth herein. ICON HEALTH & FITNESS, INC...
... product (WESLO Cadence 50 SE treadmill) • the SERIAL NUMBER of the product (see the front cover of this manual. For inhome service, the customer will be the customer's responsibility. No other warranties and any implied warranties of merchantability or fitness for a particular purpose is authorized by ICON. The warranty extended hereunder is in lieu of any and all other warranty beyond that specifically set forth herein. ICON HEALTH & FITNESS, INC...


