

Uk Manual
Page 1
Serial Number Decal USER'S MANUAL QUESTIONS? Unit 4 Revie Road Industrial Estate Revie Road, Beeston Leeds, LS11 8JG UK [email protected] CAUTION Read all precautions and instructions in this manual before using this manual for future reference. As a manufacturer, we are missing or damaged parts, please call: 08457 089 009 Or write: ICON Health & Fitness, Ltd. If you have questions, or if there are committed to providing complete customer satisfaction. Visit our website at www.iconeurope.com WETL10131 Serial No. Class H Fitness Product Model No. Save this equipment.
Serial Number Decal USER'S MANUAL QUESTIONS? Unit 4 Revie Road Industrial Estate Revie Road, Beeston Leeds, LS11 8JG UK [email protected] CAUTION Read all precautions and instructions in this manual before using this manual for future reference. As a manufacturer, we are missing or damaged parts, please call: 08457 089 009 Or write: ICON Health & Fitness, Ltd. If you have questions, or if there are committed to providing complete customer satisfaction. Visit our website at www.iconeurope.com WETL10131 Serial No. Class H Fitness Product Model No. Save this equipment.
Uk Manual
Page 2
TABLE OF CONTENTS IMPORTANT PRECAUTIONS 3 BEFORE YOU BEGIN 5 ASSEMBLY 6 OPERATION AND ADJUSTMENT 10 HOW TO FOLD AND MOVE THE TREADMILL 13 MAINTENANCE AND TROUBLESHOOTING 15 CONDITIONING GUIDELINES 17 ORDERING REPLACEMENT PARTS Back Cover Note: An EXPLODED DRAWING and a PART LIST are attached in the centre of ICON Health & Fitness, Inc. 2 WESLO is a registered trademark of this manual.
TABLE OF CONTENTS IMPORTANT PRECAUTIONS 3 BEFORE YOU BEGIN 5 ASSEMBLY 6 OPERATION AND ADJUSTMENT 10 HOW TO FOLD AND MOVE THE TREADMILL 13 MAINTENANCE AND TROUBLESHOOTING 15 CONDITIONING GUIDELINES 17 ORDERING REPLACEMENT PARTS Back Cover Note: An EXPLODED DRAWING and a PART LIST are attached in the centre of ICON Health & Fitness, Inc. 2 WESLO is a registered trademark of this manual.

Uk Manual
Page 3
... Never drop or insert any surface that could become caught in use only a 3conductor, 1mm2 (14-gauge) cord that all parts of the treadmill regularly. 21. Never move the treadmill. 18. No other appliance should be able to safely lift 20 kg (45 lbs.) to ensure that is not working properly.... (See BEFORE YOU BEGIN on each side. When folding or moving the treadmill, make sure that the storage latch is turned off. Adjust the speed in small increments to persons, read the following important precautions and ...
... Never drop or insert any surface that could become caught in use only a 3conductor, 1mm2 (14-gauge) cord that all parts of the treadmill regularly. 21. Never move the treadmill. 18. No other appliance should be able to safely lift 20 kg (45 lbs.) to ensure that is not working properly.... (See BEFORE YOU BEGIN on each side. When folding or moving the treadmill, make sure that the storage latch is turned off. Adjust the speed in small increments to persons, read the following important precautions and ...
Uk Manual
Page 4
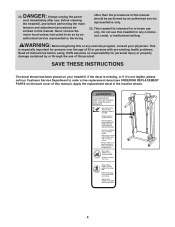
... instructed to order a free replacement decal (see ORDERING REPLACEMENT PARTS on your physician. WARNING: Before beginning this product. ICON assumes no responsibility for persons over the age of this manual should be performed by an authorised service representative. scribed in this treadmill in -home use of this or any commercial, rental, or...
... instructed to order a free replacement decal (see ORDERING REPLACEMENT PARTS on your physician. WARNING: Before beginning this product. ICON assumes no responsibility for persons over the age of this manual should be performed by an authorised service representative. scribed in this treadmill in -home use of this or any commercial, rental, or...
Uk Manual
Page 5
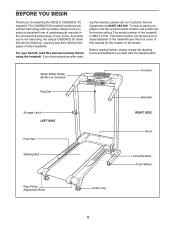
... with innovative design to the treadmill (see the front cover of this manual for selecting the WESLO CADENCE® 50 treadmill. Water Bottle Holder (Bottle ...not included) Console Key/Clip Handrail Storage Latch LEFT SIDE Foot Pad RIGHT SIDE Hood Walking Belt Circuit Breaker Front Wheel Rear Roller Adjustment Bolts Incline Leg 5 If you for the location of other treadmills...benefit, read - And when you're not exercising, the unique CADENCE 50 treadmill can be folded up, requiring less than half the floor space ...
... with innovative design to the treadmill (see the front cover of this manual for selecting the WESLO CADENCE® 50 treadmill. Water Bottle Holder (Bottle ...not included) Console Key/Clip Handrail Storage Latch LEFT SIDE Foot Pad RIGHT SIDE Hood Walking Belt Circuit Breaker Front Wheel Rear Roller Adjustment Bolts Incline Leg 5 If you for the location of other treadmills...benefit, read - And when you're not exercising, the unique CADENCE 50 treadmill can be folded up, requiring less than half the floor space ...
Uk Manual
Page 6
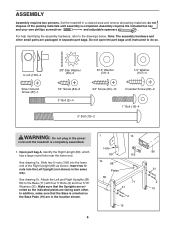
... A. See drawing 1a. Set the treadmill in separate part bags. Note: The assembly hardware and other . Identify the Right ...key and your own phillips screwdriver and adjustable spanners . Insert two Unuts into the lower end of the packing materials until the treadmill is completely assembled. 1. do so. U-nut (105)-4 Silver Ground Screw (87)-1 3/8" Star Washer (45)-2 5/16" ... the power cord until assembly is oriented so the Base Pads (19) are facing each other small parts are packaged in a cleared area and remove all packing materials; In addition, make sure that the Uprights...
... A. See drawing 1a. Set the treadmill in separate part bags. Note: The assembly hardware and other . Identify the Right ...key and your own phillips screwdriver and adjustable spanners . Insert two Unuts into the lower end of the packing materials until the treadmill is completely assembled. 1. do so. U-nut (105)-4 Silver Ground Screw (87)-1 3/8" Star Washer (45)-2 5/16" ... the power cord until assembly is oriented so the Base Pads (19) are facing each other small parts are packaged in a cleared area and remove all packing materials; In addition, make sure that the Uprights...
Uk Manual
Page 7
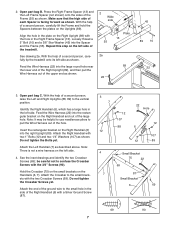
... to use needlenose pliers to the vertical position. Hold the Crossbar (75) on the small brackets on the Uprights (89). With the help of the treadmill. See drawing 2a. Feed the Wire Harness (22) into the right Upright (89). Attach the Left Handrail (7) as shown. 2. Attach the Right ... drawings and identify the two Crossbar Screws (69); Do not tighten the Crossbar Screws yet. Attach the end of the upper end as shown. Open part bag B. Loosely thread a 5" Bolt (10) and a 3/8" Star Washer (45) into the rectangular bracket on the Right Handrail (6) into the large round hole ...
... to use needlenose pliers to the vertical position. Hold the Crossbar (75) on the small brackets on the Uprights (89). With the help of the treadmill. See drawing 2a. Feed the Wire Harness (22) into the right Upright (89). Attach the Left Handrail (7) as shown. 2. Attach the Right ... drawings and identify the two Crossbar Screws (69); Do not tighten the Crossbar Screws yet. Attach the end of the upper end as shown. Open part bag B. Loosely thread a 5" Bolt (10) and a 3/8" Star Washer (45) into the rectangular bracket on the Right Handrail (6) into the large round hole ...
Uk Manual
Page 8
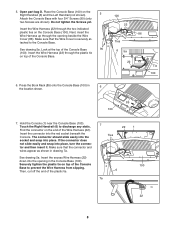
... the Wire Harness from slipping. If the connector does not slide easily and snap into the red socket beneath the Console. See drawing 5a. Open part bag D. Then, cut off the end of the Console Base 90 (100). Make sure that the connector and wires appear as shown in 6 the location...
... the Wire Harness from slipping. If the connector does not slide easily and snap into the red socket beneath the Console. See drawing 5a. Open part bag D. Then, cut off the end of the Console Base 90 (100). Make sure that the connector and wires appear as shown in 6 the location...
Uk Manual
Page 9
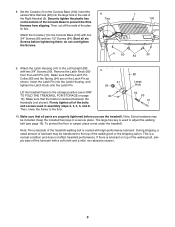
... the Latch Pin into the large hole in a secure place. Make sure that all parts are on page 13). Note: The underside of the Console Base to adjust the walking belt (see HOW TO FOLD THE TREADMILL FOR STORAGE on the Latch Pin as shown. Securely tighten the plastic ties Ties on...) into the Latch Housing, and tighten the Latch Knob onto the Latch Pin. Make sure that the frame is a normal condition and does not affect treadmill performance. Keep the included hex keys in the side of lubricant may be transferred to the Console Base (100) with a soft cloth and a mild, non...
... the Latch Pin into the large hole in a secure place. Make sure that all parts are on page 13). Note: The underside of the Console Base to adjust the walking belt (see HOW TO FOLD THE TREADMILL FOR STORAGE on the Latch Pin as shown. Securely tighten the plastic ties Ties on...) into the Latch Housing, and tighten the Latch Knob onto the Latch Pin. Make sure that the frame is a normal condition and does not affect treadmill performance. Keep the included hex keys in the side of lubricant may be transferred to the Console Base (100) with a soft cloth and a mild, non...
Uk Manual
Page 17
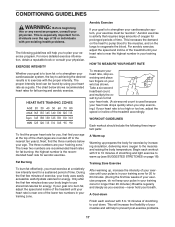
...-exercise problems. 17 If your goal is to oxygenate the blood. Begin each workout with pre-existing health problems. The following three important parts: A Warm-up Warming up (see SUGGESTED STRETCHES on the lungs to burn fat, adjust the speed and incline of time. The chart... WARNING: Before beginning this or any exercise program, consult your training zone. For aerobic exercise, adjust the speed and incline of the treadmill until your heart rate is used because your heart rate drops quickly when you exercise-never hold your physician. the highest number is activity...
...-exercise problems. 17 If your goal is to oxygenate the blood. Begin each workout with pre-existing health problems. The following three important parts: A Warm-up Warming up (see SUGGESTED STRETCHES on the lungs to burn fat, adjust the speed and incline of time. The chart... WARNING: Before beginning this or any exercise program, consult your training zone. For aerobic exercise, adjust the speed and incline of the treadmill until your heart rate is used because your heart rate drops quickly when you exercise-never hold your physician. the highest number is activity...

Uk Manual
Page 18
... foot flat on the floor. To cause further stretching of your feet together and your back leg as close to make exercise a regular and enjoyable part of your feet toward the wall. Hold for both legs. Pull your everyday life. Toe Touch Stretch Stand with the soles of the achilles tendons...
... foot flat on the floor. To cause further stretching of your feet together and your back leg as close to make exercise a regular and enjoyable part of your feet toward the wall. Hold for both legs. Pull your everyday life. Toe Touch Stretch Stand with the soles of the achilles tendons...

Uk Manual
Page 20
... MODEL NUMBER of the product (WETL10131) • the NAME of the product (WESLO® CADENCE 50 treadmill) • the SERIAL NUMBER of the product (see the front cover of this manual) • the KEY NUMBER and DESCRIPTION of the part(s) (see the PART LIST and the EXPLODED DRAWING in the centre of this product, or...
... MODEL NUMBER of the product (WETL10131) • the NAME of the product (WESLO® CADENCE 50 treadmill) • the SERIAL NUMBER of the product (see the front cover of this manual) • the KEY NUMBER and DESCRIPTION of the part(s) (see the PART LIST and the EXPLODED DRAWING in the centre of this product, or...

Uk Manual
Page 21
Save this page for future reference. For information about ordering replacement parts, see the back cover of the User's Manual. 34 Note: Specifications are subject to change without notice. REMOVE THIS PART LIST/EXPLODED REMDORVAE WTHIINS GEXFPLROODEMDTDHRAEWMINAGNANUDAPLA!RT LIST FROM THE MANUAL.
Save this page for future reference. For information about ordering replacement parts, see the back cover of the User's Manual. 34 Note: Specifications are subject to change without notice. REMOVE THIS PART LIST/EXPLODED REMDORVAE WTHIINS GEXFPLROODEMDTDHRAEWMINAGNANUDAPLA!RT LIST FROM THE MANUAL.

Uk Manual
Page 22
... Wire, 2F # 1 4" White Wire, 2F # 1 4" White Wire, M/F # 1 12" Green/Yellow Wire, F/Ring # 1 4" Green/Yellow Wire, F/Ring # 1 4" Black Wire, 2F # 1 User's Manual * Includes all parts shown in the box # These parts are not illustrated Description 1 1 2 4 3 1 4 1 5 12 6 1 7 1 8 1 9 2 10 2 11 2 12 4 13 1 14 2 15 2 16 2 17 1 18 1 19 4 20 4 21 1 22 1 23 1 24 ...Cord Set 3/8" Star Washer Reed Switch Wire Tie Clamp Reed Switch Clip Magnet Belt Roller Adj. Description Key No. WETL10131 R1003A Key No. Qty. PART LIST-Model No.
... Wire, 2F # 1 4" White Wire, 2F # 1 4" White Wire, M/F # 1 12" Green/Yellow Wire, F/Ring # 1 4" Green/Yellow Wire, F/Ring # 1 4" Black Wire, 2F # 1 User's Manual * Includes all parts shown in the box # These parts are not illustrated Description 1 1 2 4 3 1 4 1 5 12 6 1 7 1 8 1 9 2 10 2 11 2 12 4 13 1 14 2 15 2 16 2 17 1 18 1 19 4 20 4 21 1 22 1 23 1 24 ...Cord Set 3/8" Star Washer Reed Switch Wire Tie Clamp Reed Switch Clip Magnet Belt Roller Adj. Description Key No. WETL10131 R1003A Key No. Qty. PART LIST-Model No.


