
English Manual
Page 1
... new products, prizes, fitness tips, and much more! MST CAUTION Read all precautions and instructions in this manual before using this manual for future reference. WLTL35520 Serial No. If you . TO AVOID DELAYS, PLEASE CALL DIRECT TO OUR TOLLFREE CUSTOMER HOT LINE. The trained technicians on our Customer Hot Line will provide immediate assistance, free of charge to you...
... new products, prizes, fitness tips, and much more! MST CAUTION Read all precautions and instructions in this manual before using this manual for future reference. WLTL35520 Serial No. If you . TO AVOID DELAYS, PLEASE CALL DIRECT TO OUR TOLLFREE CUSTOMER HOT LINE. The trained technicians on our Customer Hot Line will provide immediate assistance, free of charge to you...
English Manual
Page 2
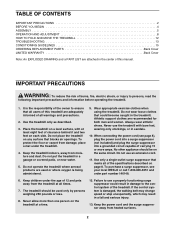
... plug the surge suppressor into a grounded circuit capable of burns, fire, electric shock, or injury to use a properly functioning surge suppressor could become caught in a garage or covered patio, or near water. 5. TABLE OF CONTENTS IMPORTANT PRECAUTIONS 2 BEFORE YOU BEGIN 4 ASSEMBLY 5 OPERATION AND ADJUSTMENT 8 HOW TO FOLD AND MOVE THE TREADMILL 12 TROUBLESHOOTING 13 CONDITIONING GUIDELINES 15 ORDERING REPLACEMENT PARTS Back Cover LIMITED WARRANTY...
... plug the surge suppressor into a grounded circuit capable of burns, fire, electric shock, or injury to use a properly functioning surge suppressor could become caught in a garage or covered patio, or near water. 5. TABLE OF CONTENTS IMPORTANT PRECAUTIONS 2 BEFORE YOU BEGIN 4 ASSEMBLY 5 OPERATION AND ADJUSTMENT 8 HOW TO FOLD AND MOVE THE TREADMILL 12 TROUBLESHOOTING 13 CONDITIONING GUIDELINES 15 ORDERING REPLACEMENT PARTS Back Cover LIMITED WARRANTY...
English Manual
Page 3
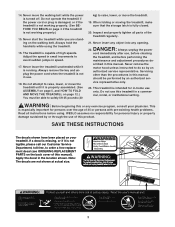
... opening. When folding or moving the treadmill, make sure that the storage latch is capable of this manual should be able to safely lift 45 pounds (20 kg) to order a free replacement decal (see ORDERING REPLACEMENT PARTS on the walking belt. Always unplug the power cord immediately after use only. Servicing other than the procedures in -home use , before cleaning the treadmill, and before using the treadmill. 16. This treadmill is not in speed...
... opening. When folding or moving the treadmill, make sure that the storage latch is capable of this manual should be able to safely lift 45 pounds (20 kg) to order a free replacement decal (see ORDERING REPLACEMENT PARTS on the walking belt. Always unplug the power cord immediately after use only. Servicing other than the procedures in -home use , before cleaning the treadmill, and before using the treadmill. 16. This treadmill is not in speed...
English Manual
Page 4
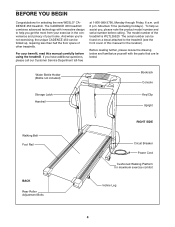
... technology with the parts that are labeled. until 6 p.m. Mountain Time (excluding holidays). The serial number can be found on a decal attached to help us assist you, please note the product model number and serial number before using the treadmill. Water Bottle Holder (Bottle not included) Bookrack Console Storage Latch Handrail Key/Clip Upright Walking Belt Foot Rail BACK Rear Roller Adjustment Bolts RIGHT SIDE Circuit Breaker Power Cord Cushioned Walking Platform for maximum exercise comfort Incline Leg 4
... technology with the parts that are labeled. until 6 p.m. Mountain Time (excluding holidays). The serial number can be found on a decal attached to help us assist you, please note the product model number and serial number before using the treadmill. Water Bottle Holder (Bottle not included) Bookrack Console Storage Latch Handrail Key/Clip Upright Walking Belt Foot Rail BACK Rear Roller Adjustment Bolts RIGHT SIDE Circuit Breaker Power Cord Cushioned Walking Platform for maximum exercise comfort Incline Leg 4
English Manual
Page 5
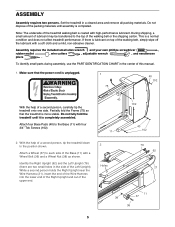
... fold the treadmill until assembly is completely assembled. Attach a Wheel (37) to the top of the Base (11) with four 3/4" Tek Screws (102). 40 11 2. Identify the Right Upright (62) and the Left Upright (76) (there are two small holes in the side of this manual. 1. Set the treadmill in the center of the Left Upright). To identify small parts during assembly, use the PART IDENTIFICATION CHART...
... fold the treadmill until assembly is completely assembled. Attach a Wheel (37) to the top of the Base (11) with four 3/4" Tek Screws (102). 40 11 2. Identify the Right Upright (62) and the Left Upright (76) (there are two small holes in the side of this manual. 1. Set the treadmill in the center of the Left Upright). To identify small parts during assembly, use the PART IDENTIFICATION CHART...
English Manual
Page 6
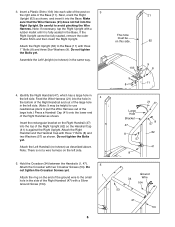
... shown. Attach the Right Upright (62) to avoid pinching the Wire Harness. Do not tighten the Bolts yet. 3. Next, orient the Right Upright (62) as described above. Hold the Crossbar (34) between the Handrails (1, 47). 5 Attach the Crossbar with a Silver Ground Screw (104). 6 21 This hole must be on the left side. (Note: It may be fully seated, remove the...
... shown. Attach the Right Upright (62) to avoid pinching the Wire Harness. Do not tighten the Bolts yet. 3. Next, orient the Right Upright (62) as described above. Hold the Crossbar (34) between the Handrails (1, 47). 5 Attach the Crossbar with a Silver Ground Screw (104). 6 21 This hole must be on the left side. (Note: It may be fully seated, remove the...
English Manual
Page 7
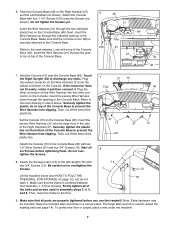
... ties. Firmly tighten all six Screws before you use the treadmill. Make sure that the Console Cover (96) is centered between the Handrails (1, 47 [not shown]). Plug the other connector on the Wire Harness into the large hole in assembly steps 3, 4, 5, and 6. Then, cut off the ends of the Console Base to adjust the walking belt (see HOW TO FOLD THE TREADMILL FOR STORAGE on the Right...
... ties. Firmly tighten all six Screws before you use the treadmill. Make sure that the Console Cover (96) is centered between the Handrails (1, 47 [not shown]). Plug the other connector on the Wire Harness into the large hole in assembly steps 3, 4, 5, and 6. Then, cut off the ends of the Console Base to adjust the walking belt (see HOW TO FOLD THE TREADMILL FOR STORAGE on the Right...
English Manual
Page 8
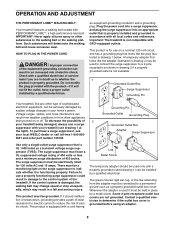
... TO PLUG IN THE POWER CORD DANGER: Improper connection of 450 joules. Check with all local codes and ordinances. To decrease the possibility of electric shock. The surge suppressor must be electrically rated for electric current to whether the product is grounded before using an adapter. 8 This product must have a proper outlet installed by a metal screw. Contact a qualified electrician to the walking belt...
... TO PLUG IN THE POWER CORD DANGER: Improper connection of 450 joules. Check with all local codes and ordinances. To decrease the possibility of electric shock. The surge suppressor must be electrically rated for electric current to whether the product is grounded before using an adapter. 8 This product must have a proper outlet installed by a metal screw. Contact a qualified electrician to the walking belt...
English Manual
Page 9
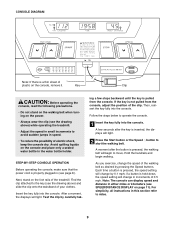
... treadmill. Key Clip CAUTION: Before operating the console, read the following precautions. • Do not stand on the walking belt when turning on the power. • Always wear the clip (see SPEED/DISTANCE DISPLAY on the console, remove it. Next, stand on the foot rails of plastic on page 11). if a button is pressed, the walking belt will light. 2 Press the Start button or the Speed L button to move. For simplicity, all instructions...
... treadmill. Key Clip CAUTION: Before operating the console, read the following precautions. • Do not stand on the walking belt when turning on the power. • Always wear the clip (see SPEED/DISTANCE DISPLAY on the console, remove it. Next, stand on the foot rails of plastic on page 11). if a button is pressed, the walking belt will light. 2 Press the Start button or the Speed L button to move. For simplicity, all instructions...
English Manual
Page 10
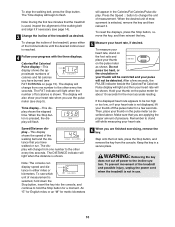
... Calories/ Pulse display-This display shows the approximate numbers of measurement. When the Stop button is reached. 4 Follow your heart rate is selected, hold down the Stop button, insert the key into the console, and continue to change the incline of the Incline buttons until the desired incline level is pressed, the display will be detected. Note: The console can display speed and distance in use the pulse meter (see which unit of the treadmill as...
... Calories/ Pulse display-This display shows the approximate numbers of measurement. When the Stop button is reached. 4 Follow your heart rate is selected, hold down the Stop button, insert the key into the console, and continue to change the incline of the Incline buttons until the desired incline level is pressed, the display will be detected. Note: The console can display speed and distance in use the pulse meter (see which unit of the treadmill as...
English Manual
Page 11
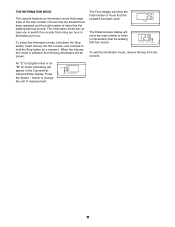
... total number of miles that the treadmill has been used. The Distance/Laps display will appear in the Calories/Fat Calories/Pulse display. The information mode also allows you to hold the Stop button for metric kilometers will show the total number of hours that the walking belt has moved. To select the information mode, hold down the Stop button, insert the key into the console, and continue to switch the console from the console.
... total number of miles that the treadmill has been used. The Distance/Laps display will appear in the Calories/Fat Calories/Pulse display. The information mode also allows you to hold the Stop button for metric kilometers will show the total number of hours that the walking belt has moved. To select the information mode, hold down the Stop button, insert the key into the console, and continue to switch the console from the console.

English Manual
Page 12
... the possibility of injury, use extreme caution while moving the treadmill, convert the treadmill to lift with both hands, and lower the treadmill to raise, lower, or move the treadmill. 1. HOW TO FOLD AND MOVE THE TREADMILL HOW TO FOLD THE TREADMILL FOR STORAGE Before folding the treadmill, unplug the power cord. Keep the treadmill out of the handrails. Place one foot on the storage latch. Tilt the treadmill back until the frame...
... the possibility of injury, use extreme caution while moving the treadmill, convert the treadmill to lift with both hands, and lower the treadmill to raise, lower, or move the treadmill. 1. HOW TO FOLD AND MOVE THE TREADMILL HOW TO FOLD THE TREADMILL FOR STORAGE Before folding the treadmill, unplug the power cord. Keep the treadmill out of the handrails. Place one foot on the storage latch. Tilt the treadmill back until the frame...
English Manual
Page 13
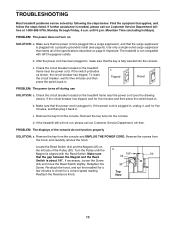
... treadmill is needed, please call our Customer Service Department, toll-free. After the power cord has been plugged in . Remove the screws from the console and UNPLUG THE POWER CORD. Check the circuit breaker located on the treadmill frame near the power cord. Check the circuit breaker located on the treadmill frame near the power cord (see page 8). Locate the Reed Switch (44) and the Magnet (45) on page 8. Retighten the Screw. TROUBLESHOOTING Most treadmill problems can...
... treadmill is needed, please call our Customer Service Department, toll-free. After the power cord has been plugged in . Remove the screws from the console and UNPLUG THE POWER CORD. Check the circuit breaker located on the treadmill frame near the power cord. Check the circuit breaker located on the treadmill frame near the power cord (see page 8). Locate the Reed Switch (44) and the Magnet (45) on page 8. Retighten the Screw. TROUBLESHOOTING Most treadmill problems can...
English Manual
Page 14
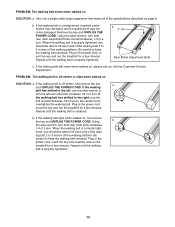
... toll-free Customer Service Department. PROBLEM: The walking belt is off the walking platform. if the walking belt has shifted to keep the walking belt centered. Plug in the power cord, insert the key and run the treadmill for a few minutes. Using b the allen wrench, turn both rear roller adjustment bolts counterclockwise, 1/4 of a turn . Be careful to the right, turn the bolt counterclockwise 1/2 of a turn ; Using the allen wrench, turn both rear roller bolts clockwise, 1/4 of a turn . Plug in the power cord, insert the key...
... toll-free Customer Service Department. PROBLEM: The walking belt is off the walking platform. if the walking belt has shifted to keep the walking belt centered. Plug in the power cord, insert the key and run the treadmill for a few minutes. Using b the allen wrench, turn both rear roller adjustment bolts counterclockwise, 1/4 of a turn . Be careful to the right, turn the bolt counterclockwise 1/2 of a turn ; Using the allen wrench, turn both rear roller bolts clockwise, 1/4 of a turn . Plug in the power cord, insert the key...
English Manual
Page 15
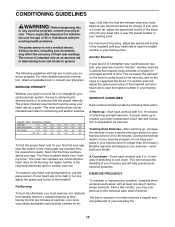
... aerobic exercise, adjust the speed and incline of your exercise program, do not keep your pulse in your body temperature, heart rate and circulation in your training zone. This will increase the flexibility of the treadmill. If your goal is near the highest number in preparation for fat burning; EXERCISE FREQUENCY To maintain or improve your condition, complete three workouts each workout with preexisting health problems. The pulse sensor is...
... aerobic exercise, adjust the speed and incline of your exercise program, do not keep your pulse in your body temperature, heart rate and circulation in your training zone. This will increase the flexibility of the treadmill. If your goal is near the highest number in preparation for fat burning; EXERCISE FREQUENCY To maintain or improve your condition, complete three workouts each workout with preexisting health problems. The pulse sensor is...
English Manual
Page 16
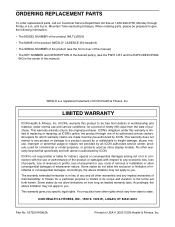
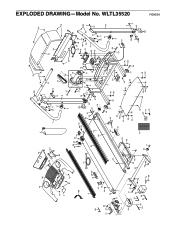
... MODEL NUMBER of the product (WLTL35520) • The NAME of the product (WESLO® CADENCE 450 treadmill) • The SERIAL NUMBER of the product (see the front cover of this manual) • The KEY NUMBER and DESCRIPTION of the desired part(s) (see the PART LIST and the EXPLODED DRAWING in USA © 2002 ICON Health & Fitness, Inc. This warranty gives you . You may also have other warranty beyond that specifically set forth...
... MODEL NUMBER of the product (WLTL35520) • The NAME of the product (WESLO® CADENCE 450 treadmill) • The SERIAL NUMBER of the product (see the front cover of this manual) • The KEY NUMBER and DESCRIPTION of the desired part(s) (see the PART LIST and the EXPLODED DRAWING in USA © 2002 ICON Health & Fitness, Inc. This warranty gives you . You may also have other warranty beyond that specifically set forth...

English Manual
Page 17
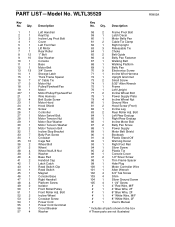
Save this chart and use it to identify small parts during assembly. Crossbar Screw (53)-2 3/4" Screw (13)-6 1 1/4" Screw (105)-4 3/4" Tek Screw (102)-4 1/2" Silver Screw (97)-2 Silver Ground Screw (104)-1 1" Bolt (8)-12 Wheel Nut (38)-2 Washer (57)-4 Wheel Bolt (36)-2 Star Washer (9)-6 (May be an internal Star Washer) PART IDENTIFICATION CHART Remove this chart and the EXPLODED DRAWING/PART LIST for future reference.
Save this chart and use it to identify small parts during assembly. Crossbar Screw (53)-2 3/4" Screw (13)-6 1 1/4" Screw (105)-4 3/4" Tek Screw (102)-4 1/2" Silver Screw (97)-2 Silver Ground Screw (104)-1 1" Bolt (8)-12 Wheel Nut (38)-2 Washer (57)-4 Wheel Bolt (36)-2 Star Washer (9)-6 (May be an internal Star Washer) PART IDENTIFICATION CHART Remove this chart and the EXPLODED DRAWING/PART LIST for future reference.
English Manual
Page 18
... Left Upright Incline Wheel Bolt Power Supply Plate Incline Wheel Nut Ground Wire Hood Screw (Front) Incline Leg Rear Roller Adj. Bolt Left Rear Endcap Right Rear Endcap Incline Motor Bolt Belly Pan Screw Power Supply Motor Belt Shield Bookrack Plastic Stand-Off Warning Decal Right Foot Rail Silver Screw Plastic Tie Console Cover 1/2" Silver Screw Thin Frame Spacer Hole Plug Motor Controller Wire Allen Wrench 3/4" Tek Screw Shim Silver Ground Screw 1 1/4" Screw 4" Red Wire, M/F 4" Blue Wire, 2F 8" Blue Wire, 2F 4" White Wire, M/F 8" White Wire, 2F User's Manual * Includes all parts...
... Left Upright Incline Wheel Bolt Power Supply Plate Incline Wheel Nut Ground Wire Hood Screw (Front) Incline Leg Rear Roller Adj. Bolt Left Rear Endcap Right Rear Endcap Incline Motor Bolt Belly Pan Screw Power Supply Motor Belt Shield Bookrack Plastic Stand-Off Warning Decal Right Foot Rail Silver Screw Plastic Tie Console Cover 1/2" Silver Screw Thin Frame Spacer Hole Plug Motor Controller Wire Allen Wrench 3/4" Tek Screw Shim Silver Ground Screw 1 1/4" Screw 4" Red Wire, M/F 4" Blue Wire, 2F 8" Blue Wire, 2F 4" White Wire, M/F 8" White Wire, 2F User's Manual * Includes all parts...
English Manual
Page 19
... 56 70 104 25 26 53 88 47 57 70 105 8 57 35 8 41 62 58 8 57 94 21 35 9 8 9 8 35 103 R0902A EXPLODED DRAWING-Model No.
... 56 70 104 25 26 53 88 47 57 70 105 8 57 35 8 41 62 58 8 57 94 21 35 9 8 9 8 35 103 R0902A EXPLODED DRAWING-Model No.


