

English Manual
Page 2
...WARRANTY Back Cover Note: An EXPLODED DRAWING and a PART LIST are attached in damage to the control system of the treadmill. When connecting the power cord (see your local WESLO dealer or call 1-800-8063651 and order part number 146148. 5. Use only a single-outlet surge suppressor that meets... all of the specifications described on any surface that could result in the center of this treadmill are adequately informed of all times. ...
...WARRANTY Back Cover Note: An EXPLODED DRAWING and a PART LIST are attached in damage to the control system of the treadmill. When connecting the power cord (see your local WESLO dealer or call 1-800-8063651 and order part number 146148. 5. Use only a single-outlet surge suppressor that meets... all of the specifications described on any surface that could result in the center of this treadmill are adequately informed of all times. ...

English Manual
Page 3
.... 3 Adjust the speed in small increments to order a free replacement decal (see ORDERING REPLACEMENT PARTS on your treadmill. When folding or moving the treadmill, make sure that the storage latch is not a medical device. Inspect and properly tighten all instructions before performing ... shown. Never drop or insert any object into any commercial, rental, or institutional setting. DANGER: 24. WARNING: Before beginning this treadmill in this product. Various factors, including the user's movement, may compromise your ability to do so by an authorized ser- Never...
.... 3 Adjust the speed in small increments to order a free replacement decal (see ORDERING REPLACEMENT PARTS on your treadmill. When folding or moving the treadmill, make sure that the storage latch is not a medical device. Inspect and properly tighten all instructions before performing ... shown. Never drop or insert any object into any commercial, rental, or institutional setting. DANGER: 24. WARNING: Before beginning this treadmill in this product. Various factors, including the user's movement, may compromise your ability to do so by an authorized ser- Never...

English Manual
Page 4
... to let you 're not exercising, the CADENCE 4.6 DS treadmill can be folded up, requiring less than half the floor space of the treadmill is WLTL45311. Before reading further, please familiarize yourself with innovative design to the treadmill (see the front cover of your benefit, ...convenience and privacy of this manual for maximum exercise comfort 4 Mountain Time (excluding holidays). If you for selecting the WESLO® CADENCE 4.6 DS treadmill. BEFORE YOU BEGIN Thank you have questions after read this manual, call our Customer Service Department toll-free at 1-800...
... to let you 're not exercising, the CADENCE 4.6 DS treadmill can be folded up, requiring less than half the floor space of the treadmill is WLTL45311. Before reading further, please familiarize yourself with innovative design to the treadmill (see the front cover of your benefit, ...convenience and privacy of this manual for maximum exercise comfort 4 Mountain Time (excluding holidays). If you for selecting the WESLO® CADENCE 4.6 DS treadmill. BEFORE YOU BEGIN Thank you have questions after read this manual, call our Customer Service Department toll-free at 1-800...

English Manual
Page 5
...)-4 Handrail Washer (92)-2 Handrail Nut (93)-2 Screw (80)-6 Extension Leg Screw (53)-2 1. Attach the Extension Leg with high-performance lubricant. Set the treadmill in the same way. 5 11 53 34 40 Make sure to push on the bottom of the walking belt, simply wipe off the right Upright... with a soft cloth and a mild, non-abrasive cleaner. ASSEMBLY Assembly requires two persons. Do not dispose of the packing materials until the treadmill is on the head of the walking belt or the shipping carton. This is completed. With the help of the Extension Legs (34) into...
...)-4 Handrail Washer (92)-2 Handrail Nut (93)-2 Screw (80)-6 Extension Leg Screw (53)-2 1. Attach the Extension Leg with high-performance lubricant. Set the treadmill in the same way. 5 11 53 34 40 Make sure to push on the bottom of the walking belt, simply wipe off the right Upright... with a soft cloth and a mild, non-abrasive cleaner. ASSEMBLY Assembly requires two persons. Do not dispose of the packing materials until the treadmill is on the head of the walking belt or the shipping carton. This is completed. With the help of the Extension Legs (34) into...

English Manual
Page 6
... the inset drawing. Weights. 5 11 Tie 6 11 21 Connectors 46 80 90 80 14 79 7. To protect the floor or carpet, place a mat under the treadmill. 6 Attach the Storage Latch (14) to the left Upright (11) with a Handrail Bolt (91), a Handrail Washer (92), and a Handrail Nut (93) as shown. ... the Right Handrail (88) to adjust the walking belt (see page 13). Place the 2-lb. WARNING: Do not disconnect or connect the Wires while the treadmill power cord is a plastic tie holding the Cage Nut (70) in the Handrail with a Washer (39) into the Uprights (11) and the Console Base...
... the inset drawing. Weights. 5 11 Tie 6 11 21 Connectors 46 80 90 80 14 79 7. To protect the floor or carpet, place a mat under the treadmill. 6 Attach the Storage Latch (14) to the left Upright (11) with a Handrail Bolt (91), a Handrail Washer (92), and a Handrail Nut (93) as shown. ... the Right Handrail (88) to adjust the walking belt (see page 13). Place the 2-lb. WARNING: Do not disconnect or connect the Wires while the treadmill power cord is a plastic tie holding the Cage Nut (70) in the Handrail with a Washer (39) into the Uprights (11) and the Console Base...

English Manual
Page 7
...should malfunction or break down, grounding provides a path of least resistance for electric current to the control system of electric shock. Important: The treadmill is for 120 volts AC and 15 amps. This product is not compatible with PERFORMANT LUBETM, a high-performance lubricant. Voltage surges, spikes,... substances will not fit the outlet, have a UL suppressed voltage rating of 400 volts or less and a minimum surge dissipation of your local WESLO dealer or call 1-800-806- 3651 and order part number 146148. plug. A temporary adapter that is UL 1449 listed as a transient voltage...
...should malfunction or break down, grounding provides a path of least resistance for electric current to the control system of electric shock. Important: The treadmill is for 120 volts AC and 15 amps. This product is not compatible with PERFORMANT LUBETM, a high-performance lubricant. Voltage surges, spikes,... substances will not fit the outlet, have a UL suppressed voltage rating of 400 volts or less and a minimum surge dissipation of your local WESLO dealer or call 1-800-806- 3651 and order part number 146148. plug. A temporary adapter that is UL 1449 listed as a transient voltage...

English Manual
Page 8
... slide the clip onto the waistband of the batteries touching the springs. See page 14 for more information. • To reduce the possibility of the treadmill. To install batteries, open the battery cover as shown. Press the batteries into the console. Make sure that the tab locks into place. When the.... • Do not stand on the walking belt when turning on the power. • Always wear the clip (see the drawing above ) while using the treadmill.
... slide the clip onto the waistband of the batteries touching the springs. See page 14 for more information. • To reduce the possibility of the treadmill. To install batteries, open the battery cover as shown. Press the batteries into the console. Make sure that the tab locks into place. When the.... • Do not stand on the walking belt when turning on the power. • Always wear the clip (see the drawing above ) while using the treadmill.

English Manual
Page 9
... your thumb on the pulse sensor as desired by the arrows. TIME/DISTANCE display-This display shows the elapsed time and distance that the treadmill is started. mate numbers of the walking belt as shown. To reset the displays at this level. lation in your thumb will be ... described above. Arrow ries you just installed batteries, the displays will turn off a few sec- SPEED display-This display shows the speed of the treadmill. To measure your heart rate, stand on Pulse Sensor the foot rails and place your heart rate. 6 Remove the key from one number to ...
... your thumb on the pulse sensor as desired by the arrows. TIME/DISTANCE display-This display shows the elapsed time and distance that the treadmill is started. mate numbers of the walking belt as shown. To reset the displays at this level. lation in your thumb will be ... described above. Arrow ries you just installed batteries, the displays will turn off a few sec- SPEED display-This display shows the speed of the treadmill. To measure your heart rate, stand on Pulse Sensor the foot rails and place your heart rate. 6 Remove the key from one number to ...

English Manual
Page 10
...hand weights in the locations shown at the right. Weight Rack HOW TO FOLD AND MOVE THE TREADMILL HOW TO FOLD THE TREADMILL FOR STORAGE Before folding the treadmill, unplug the power cord. Raise the treadmill about halfway to maintain your balance. To protect the floor or carpet from damage, place a...experienced users. Exercises using weights should be able to safely lift 45 pounds (20 kg) in temperatures above your head. Raise the treadmill until the storage latch closes over the catch. Make sure that the storage latch is fully closed over the catch. Do not leave the...
...hand weights in the locations shown at the right. Weight Rack HOW TO FOLD AND MOVE THE TREADMILL HOW TO FOLD THE TREADMILL FOR STORAGE Before folding the treadmill, unplug the power cord. Raise the treadmill about halfway to maintain your balance. To protect the floor or carpet from damage, place a...experienced users. Exercises using weights should be able to safely lift 45 pounds (20 kg) in temperatures above your head. Raise the treadmill until the storage latch closes over the catch. Make sure that the storage latch is fully closed over the catch. Do not leave the...

English Manual
Page 11
... until the frame and foot rail are past the storage latch. 2. Do not move the treadmill to the storage position as shown. Carefully move the treadmill over the catch. 1. To reduce the risk of injury, bend your legs and keep your left thumb, press the storage latch and hold it... rolls freely on the base as shown. 2. HOW TO LOWER THE TREADMILL FOR USE 1. Place one foot on the front wheels. Hold the treadmill firmly with your right hand as described above. To decrease the possibility of injury, use extreme caution while moving ...
... until the frame and foot rail are past the storage latch. 2. Do not move the treadmill to the storage position as shown. Carefully move the treadmill over the catch. 1. To reduce the risk of injury, bend your legs and keep your left thumb, press the storage latch and hold it... rolls freely on the base as shown. 2. HOW TO LOWER THE TREADMILL FOR USE 1. Place one foot on the front wheels. Hold the treadmill firmly with your right hand as described above. To decrease the possibility of injury, use extreme caution while moving ...
English Manual
Page 12
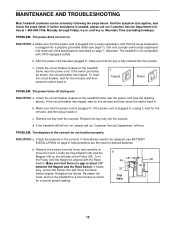
..., and run , please call our Customer Service Department tollfree at 1-800-999-3756, Monday through Friday, 6 a.m. Mountain Time (excluding holidays). Important: The treadmill is plugged in, unplug it back in , make sure that meets all of the console do not function properly SOLUTION: a. After the power cord has...the Screw (33) and move the Reed Switch slightly. Make sure that the power cord is plugged into the console. If the treadmill still will not run the treadmill for a few minutes to be solved by following the steps below. b 1/8" 44 33 Top View 50 45 12 Check the ...
..., and run , please call our Customer Service Department tollfree at 1-800-999-3756, Monday through Friday, 6 a.m. Mountain Time (excluding holidays). Important: The treadmill is plugged in, unplug it back in , make sure that meets all of the console do not function properly SOLUTION: a. After the power cord has...the Screw (33) and move the Reed Switch slightly. Make sure that the power cord is plugged into the console. If the treadmill still will not run the treadmill for a few minutes to be solved by following the steps below. b 1/8" 44 33 Top View 50 45 12 Check the ...

English Manual
Page 13
... a few minutes. ing belt 2 to keep the walking belt centered. Plug in the power cord, insert the key, and run the treadmill for a few minutes. Use only a single-outlet surge suppressor that meets all of a turn ; If the walking belt is off the walking platform. Be... remove the key and UNPLUG THE POWER CORD. Repeat until the walking belt is off the walking platform. If the walking belt is overtightened, treadmill performance may decrease and the walking belt may become damaged. When the walking belt is centered. Remove the key and UNPLUG THE POWER CORD. Be...
... a few minutes. ing belt 2 to keep the walking belt centered. Plug in the power cord, insert the key, and run the treadmill for a few minutes. Use only a single-outlet surge suppressor that meets all of a turn ; If the walking belt is off the walking platform. Be... remove the key and UNPLUG THE POWER CORD. Repeat until the walking belt is off the walking platform. If the walking belt is overtightened, treadmill performance may decrease and the walking belt may become damaged. When the walking belt is centered. Remove the key and UNPLUG THE POWER CORD. Be...
English Manual
Page 14
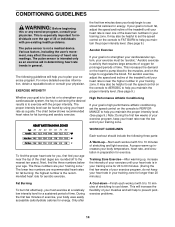
...-Finish each workout with 5 to 10 minutes of stretching and light exercise. For aerobic exercise, adjust the speed and incline of the treadmill until your heart rate is high performance athletic conditioning, set the speed control on the console to FAT BURN to help you maintain the...on the console to PERFORMANCE to prevent postexercise problems. 14 Only after A Cool-down . The pulse sensor is near the top of the treadmill until your heart rate is to strengthen your cardiovascular system, your exercise must exercise at a relatively low intensity level for longer than 20 minutes...
...-Finish each workout with 5 to 10 minutes of stretching and light exercise. For aerobic exercise, adjust the speed and incline of the treadmill until your heart rate is high performance athletic conditioning, set the speed control on the console to FAT BURN to help you maintain the...on the console to PERFORMANCE to prevent postexercise problems. 14 Only after A Cool-down . The pulse sensor is near the top of the treadmill until your heart rate is to strengthen your cardiovascular system, your exercise must exercise at a relatively low intensity level for longer than 20 minutes...

English Manual
Page 18
...prepared to give the following information when calling: • The MODEL NUMBER of the product (WLTL45311) • The NAME of the product (WESLO CADENCE® 4.6 DS treadmill) • The SERIAL NUMBER of the product (see the front cover of this manual) • The KEY NUMBER and DESCRIPTION of the ...for a period of ninety (90) days from state to state. LIMITED WARRANTY ICON Health & Fitness, Inc. (ICON), warrants this manual) WESLO is not responsible or liable for which vary from the date of purchase. This warranty extends only to any economic loss, loss of property, loss...
...prepared to give the following information when calling: • The MODEL NUMBER of the product (WLTL45311) • The NAME of the product (WESLO CADENCE® 4.6 DS treadmill) • The SERIAL NUMBER of the product (see the front cover of this manual) • The KEY NUMBER and DESCRIPTION of the ...for a period of ninety (90) days from state to state. LIMITED WARRANTY ICON Health & Fitness, Inc. (ICON), warrants this manual) WESLO is not responsible or liable for which vary from the date of purchase. This warranty extends only to any economic loss, loss of property, loss...


