

English Manual
Page 4
...a grounded circuit capable of overheating, do so by persons weighing 250 pounds or less. 7. Always unplug the power cord before operating the treadmill. 1. When connecting the power cord (see OPERATION AND ADJUSTMENT on the walking belt. Athletic support clothes are recommended for longer than the ... Do not operate where aerosol products are standing on page 7), plug the power cord directly into any air opening . 10. Position the treadmill on the same circuit. Never move the walking belt while the power is turned off the power and adjust the roller guards, if necessary. ...
...a grounded circuit capable of overheating, do so by persons weighing 250 pounds or less. 7. Always unplug the power cord before operating the treadmill. 1. When connecting the power cord (see OPERATION AND ADJUSTMENT on the walking belt. Athletic support clothes are recommended for longer than the ... Do not operate where aerosol products are standing on page 7), plug the power cord directly into any air opening . 10. Position the treadmill on the same circuit. Never move the walking belt while the power is turned off the power and adjust the roller guards, if necessary. ...
English Manual
Page 5
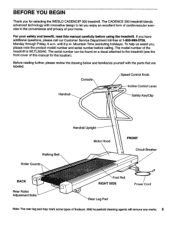
... reading further, please review the drawing below and familiarize yourself with innovative design to the treadmill (see the front cover of your safety and benefit, read this manual for selecting the WESLO CADENCE® 300 treadmill. The model number of linoleum. BEFORE YOU BEGIN Thank you for the location). The.serial number can be found...
... reading further, please review the drawing below and familiarize yourself with innovative design to the treadmill (see the front cover of your safety and benefit, read this manual for selecting the WESLO CADENCE® 300 treadmill. The model number of linoleum. BEFORE YOU BEGIN Thank you for the location). The.serial number can be found...

English Manual
Page 6
... Clip. Press the Wrench Clip onto the Right Endcap (79) in a cleared area and remove all parts are tightened before using the treadmill. Do not dispose of the packing materials until it is completed. Turn the Knob clockwise until assembly is tight. 22 36 35 2. ASSEMBLY... Set the treadmill in the indicated location. Note: To protect the floor, a covering should be placed under the treadmill. 0 79 81 82 6 Make sure that all packing materials. Remove the paper backing from ...
... Clip. Press the Wrench Clip onto the Right Endcap (79) in a cleared area and remove all parts are tightened before using the treadmill. Do not dispose of the packing materials until it is completed. Turn the Knob clockwise until assembly is tight. 22 36 35 2. ASSEMBLY... Set the treadmill in the indicated location. Note: To protect the floor, a covering should be placed under the treadmill. 0 79 81 82 6 Make sure that all packing materials. Remove the paper backing from ...

English Manual
Page 7
... of the equipment-grounding conductor can be installed by a qualified electrician. Contact a qualified electrician to determine if the outlet box cover is grounded before the treadmill is equipped with the product-if it should be used . The temporary adapter should malfunction or break down, grounding provides a path of least resistance for... and minimize wear, a non-oil-, non-petroleum-base silicone lubricant must be applied to the walking platform before using an adapter. If it will reduce treadmill performance.
... of the equipment-grounding conductor can be installed by a qualified electrician. Contact a qualified electrician to determine if the outlet box cover is grounded before the treadmill is equipped with the product-if it should be used . The temporary adapter should malfunction or break down, grounding provides a path of least resistance for... and minimize wear, a non-oil-, non-petroleum-base silicone lubricant must be applied to the walking platform before using an adapter. If it will reduce treadmill performance.

English Manual
Page 8
..., peel it off the power. Adjust the speed slowly until the ON/CLEAR button is turned, there will light. Change the speed of the treadmill. Remove the battery clip from the power switch, instantly turning off before the walking belt begins to the safety key, and slide the clip onto... the waistband of the treadmill. Note: If batteries were just installed, the four displays will not appear until you fall, the safety key will be pulled from the console. ...
..., peel it off the power. Adjust the speed slowly until the ON/CLEAR button is turned, there will light. Change the speed of the treadmill. Remove the battery clip from the power switch, instantly turning off before the walking belt begins to the safety key, and slide the clip onto... the waistband of the treadmill. Note: If batteries were just installed, the four displays will not appear until you fall, the safety key will be pulled from the console. ...

English Manual
Page 9
... few seconds. Store the safety key in a secure location. 9 Note: When the walking belt is restarted. The four displays will remain on the treadmill. To decrease the incline, stand toward the back of the foot rails and pull back the lever. To increase the incline, stand toward the front... shows the total distance that you have walked or run. INCLINE ADJUSTMENT To vary the intensity of your exercise, the incline of the treadmill can be reset by pressing the ON/CLEAR button. Do not adjust the incline while you have burned. MOTIVATIONAL FITNESS MONITOR The four ...
... few seconds. Store the safety key in a secure location. 9 Note: When the walking belt is restarted. The four displays will remain on the treadmill. To decrease the incline, stand toward the back of the foot rails and pull back the lever. To increase the incline, stand toward the front... shows the total distance that you have walked or run. INCLINE ADJUSTMENT To vary the intensity of your exercise, the incline of the treadmill can be reset by pressing the ON/CLEAR button. Do not adjust the incline while you have burned. MOTIVATIONAL FITNESS MONITOR The four ...

English Manual
Page 10
...6 a.m. c. Various indicators on page 7.) b. If the walking belt is plugged in the power cord, insert the safety key and run the treadmill for a few minutes. 10 Repeat until 6 p.m. SYMPTOM: THE POWER TURNS OFF DURING USE Tripped Reset a. Reapply lubricant after every 10 hours ...of a turn. TROUBLE-SHOOTING AND STORAGE Most treadmill problems can be permanently damaged. SYMPTOM: THE POWER DOES NOT TURN ON a. If the switch protrudes as shown, the circuit breaker has...
...6 a.m. c. Various indicators on page 7.) b. If the walking belt is plugged in the power cord, insert the safety key and run the treadmill for a few minutes. 10 Repeat until 6 p.m. SYMPTOM: THE POWER TURNS OFF DURING USE Tripped Reset a. Reapply lubricant after every 10 hours ...of a turn. TROUBLE-SHOOTING AND STORAGE Most treadmill problems can be permanently damaged. SYMPTOM: THE POWER DOES NOT TURN ON a. If the switch protrudes as shown, the circuit breaker has...

English Manual
Page 11
... minutes. 4. If the walking belt has shifted to overtighten the walking belt. Plug in the power cord, insert the safety key and run the treadmill for a few minutes. Repeat until the walking belt is properly tightened. 5. Be careful not to lift each side of drained batteries. Plug in... the power cord, insert the safety key and run the treadmill for a few minutes. The center of a turn each . Plug in the console. (See INSTALLING BATTERIES on page 8.) Most problems are the ...
... minutes. 4. If the walking belt has shifted to overtighten the walking belt. Plug in the power cord, insert the safety key and run the treadmill for a few minutes. Repeat until the walking belt is properly tightened. 5. Be careful not to lift each side of drained batteries. Plug in... the power cord, insert the safety key and run the treadmill for a few minutes. The center of a turn each . Plug in the console. (See INSTALLING BATTERIES on page 8.) Most problems are the ...

English Manual
Page 16
...., a Subsidiary of the product (WLTL30040). 2. The KEY NUMBER of the part(s) from page 14 of the product (WESLO CADENCE® 300 treadmill). 3. Mountain Time (excluding holidays). If possible, place the treadmill near your telephone for easy reference when calling. When ordering parts, please be prepared to give the following information: 1. The NAME of this manual...
...., a Subsidiary of the product (WLTL30040). 2. The KEY NUMBER of the part(s) from page 14 of the product (WESLO CADENCE® 300 treadmill). 3. Mountain Time (excluding holidays). If possible, place the treadmill near your telephone for easy reference when calling. When ordering parts, please be prepared to give the following information: 1. The NAME of this manual...


