

English Manual
Page 1
... you complete customer satisfaction. MST ACAUTION: Read all safety precautions and instructions in this manual carefully before using this manual for future reference. OWNER'S MANUAL TO AVOID UNNECESSARY DELAYS, PLEASE CALL DIRECT TO OUR TOLL-FREE CUSTOMER HOT LINE. auto incline lir,, --r -x-_-7•_0_-_v th. The trained technicians on our Customer Hot Line will guarantee you complete satisfaction through...
... you complete customer satisfaction. MST ACAUTION: Read all safety precautions and instructions in this manual carefully before using this manual for future reference. OWNER'S MANUAL TO AVOID UNNECESSARY DELAYS, PLEASE CALL DIRECT TO OUR TOLL-FREE CUSTOMER HOT LINE. auto incline lir,, --r -x-_-7•_0_-_v th. The trained technicians on our Customer Hot Line will guarantee you complete satisfaction through...

English Manual
Page 2
... YOU. This warranty gives you specific legal rights. LIMITED WARRANTY Weslo, Inc. ("WESLO"), warrants this product to be free from defects in workmanship and material, under this warranty is limited to replacing or repairing, at WESLO's option, the product at one of its authorized service centers with all freight and other transportation charges prepaid, accompanied by a WESLO authorized service center or for products used for commercial...
... YOU. This warranty gives you specific legal rights. LIMITED WARRANTY Weslo, Inc. ("WESLO"), warrants this product to be free from defects in workmanship and material, under this warranty is limited to replacing or repairing, at WESLO's option, the product at one of its authorized service centers with all freight and other transportation charges prepaid, accompanied by a WESLO authorized service center or for products used for commercial...

English Manual
Page 3
... SAFETY PRECAUTIONS BEFORE YOU BEGIN ASSEMBLY OPERATION AND ADJUSTMENT TROUBLE-SHOOTING AND STORAGE CONDITIONING GUIDELINES PART LIST EXPLODED DRAWING ORDERING REPLACEMENT PARTS auto incline 4 5 6 7 10 12 14 15 Back Cover A WARNING: Before beginning this product. 3 This is especially important for personal injury or property damage sustained by or through the use of 35 or persons with pre-existing health problems. Read all instructions before using.
... SAFETY PRECAUTIONS BEFORE YOU BEGIN ASSEMBLY OPERATION AND ADJUSTMENT TROUBLE-SHOOTING AND STORAGE CONDITIONING GUIDELINES PART LIST EXPLODED DRAWING ORDERING REPLACEMENT PARTS auto incline 4 5 6 7 10 12 14 15 Back Cover A WARNING: Before beginning this product. 3 This is especially important for personal injury or property damage sustained by or through the use of 35 or persons with pre-existing health problems. Read all instructions before using.

English Manual
Page 4
... and information before performing the maintenance and adjustment procedures described in this manual. When connecting the power cord (see OPERATION AND ADJUSTMENT on page 7), plug the power cord directly into any object into a grounded circuit capable of carrying 12 or more than one person on the walking belt. Never drop or insert any opening . Position the treadmill on the treadmill. 8. Keep the power cord away from the treadmill at a time. Servicing...
... and information before performing the maintenance and adjustment procedures described in this manual. When connecting the power cord (see OPERATION AND ADJUSTMENT on page 7), plug the power cord directly into any object into a grounded circuit capable of carrying 12 or more than one person on the walking belt. Never drop or insert any opening . Position the treadmill on the treadmill. 8. Keep the power cord away from the treadmill at a time. Servicing...
English Manual
Page 5
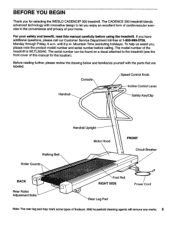
Handrail Console Speed Control Knob NI• zet.C4- -1 Pr Incline Control Lever iL I T l aI17 Safety Key/Clip Walking Belt Roller Guards Handrail Upright Motor Hood FRONT Circuit Breaker BACK Rear Roller Adjustment Bolts • Foot Rail RIGHT SIDE Power Cord Rear Leg Pad Note: The rear leg pad may mark some types of the treadmill is WLTL30040. Mild household cleaning agents will remove any marks. 5 If you for the location). Before reading further, please review the drawing...
Handrail Console Speed Control Knob NI• zet.C4- -1 Pr Incline Control Lever iL I T l aI17 Safety Key/Clip Walking Belt Roller Guards Handrail Upright Motor Hood FRONT Circuit Breaker BACK Rear Roller Adjustment Bolts • Foot Rail RIGHT SIDE Power Cord Rear Leg Pad Note: The rear leg pad may mark some types of the treadmill is WLTL30040. Mild household cleaning agents will remove any marks. 5 If you for the location). Before reading further, please review the drawing...

English Manual
Page 6
... and remove all parts are tightened before using the treadmill. Note: To protect the floor, a covering should be placed under the treadmill. 0 79 81 82 6 ASSEMBLY Set the treadmill in the indicated location. Press the Allen Wrench (81) into the Upright. Make sure that all packing materials. Insert the Lock Knob (36), with the Lock Knob Washer (35), into the Wrench Clip. Turn the Knob clockwise until assembly...
... and remove all parts are tightened before using the treadmill. Note: To protect the floor, a covering should be placed under the treadmill. 0 79 81 82 6 ASSEMBLY Set the treadmill in the indicated location. Press the Allen Wrench (81) into the Upright. Make sure that all packing materials. Insert the Lock Knob (36), with the Lock Knob Washer (35), into the Wrench Clip. Turn the Knob clockwise until assembly...

English Manual
Page 7
Failure to apply lubricant will not fit the outlet, have a proper outlet installed by a qualified electrician. Lubricant is equipped with all local codes and ordinances,. Silicone Lubricant PLUGGING IN THE POWER CORD This product must be installed by a qualified ...cord having an equipment-grounding conductor and a grounding plug. Whenever the adapter is used to connect this plug to the entire shaded area. Some 2-pole receptacle outlet box covers are in place by a metal screw. OPERATION AND ADJUSTMENT APPLYING SILICONE LUBRICANT To reduce the friction of the walking belt...
Failure to apply lubricant will not fit the outlet, have a proper outlet installed by a qualified electrician. Lubricant is equipped with all local codes and ordinances,. Silicone Lubricant PLUGGING IN THE POWER CORD This product must be installed by a qualified ...cord having an equipment-grounding conductor and a grounding plug. Whenever the adapter is used to connect this plug to the entire shaded area. Some 2-pole receptacle outlet box covers are in place by a metal screw. OPERATION AND ADJUSTMENT APPLYING SILICONE LUBRICANT To reduce the friction of the walking belt...

English Manual
Page 8
... displays of your clothing. Carefully step onto the walking belt and begin exercising. Remove the battery clip from the power switch, instantly turning off before the walking belt begins to the safety key, and slide the clip onto the waistband of the motivational fitness monitor will be turned. DIAGRAM OF THE CONSOLE ACCUSMART MOTIVATIONAL FITNESS MONITOR TIME Motivational Fitness Monitor - Press the batteries into the power switch. Note: If there is pressed, or the walking belt begins to "RESET." CALORIE Battery Cover SPEED DISTANCE Speed Control Knob Power...
... displays of your clothing. Carefully step onto the walking belt and begin exercising. Remove the battery clip from the power switch, instantly turning off before the walking belt begins to the safety key, and slide the clip onto the waistband of the motivational fitness monitor will be turned. DIAGRAM OF THE CONSOLE ACCUSMART MOTIVATIONAL FITNESS MONITOR TIME Motivational Fitness Monitor - Press the batteries into the power switch. Note: If there is pressed, or the walking belt begins to "RESET." CALORIE Battery Cover SPEED DISTANCE Speed Control Knob Power...

English Manual
Page 9
.... TURNING OFF THE POWER To turn off the power, remove the safety key from the console. Note: If the walking belt is reached. MOTIVATIONAL FITNESS MONITOR The four displays of the walking belt. When the desired incline is restarted. The four displays are walking or running on . Store the safety key in a secure location. 9 INCLINE ADJUSTMENT To vary the intensity of your exercise, the incline of the treadmill can be reset by pressing the ON/CLEAR button...
.... TURNING OFF THE POWER To turn off the power, remove the safety key from the console. Note: If the walking belt is reached. MOTIVATIONAL FITNESS MONITOR The four displays of the walking belt. When the desired incline is restarted. The four displays are walking or running on . Store the safety key in a secure location. 9 INCLINE ADJUSTMENT To vary the intensity of your exercise, the incline of the treadmill can be reset by pressing the ON/CLEAR button...

English Manual
Page 10
... the power cord. To reset the circuit breaker, remove the safety key, wait for five minutes and then press the switch back in . 2. Check the circuit breaker located on the treadmill frame near the power cord. Make sure that the safety key is needed , please call our Customer Service Department toll-free at 1-800-999-3756, Monday through Friday, 6 a.m. If the walking belt is plugged into the console. The...
... the power cord. To reset the circuit breaker, remove the safety key, wait for five minutes and then press the switch back in . 2. Check the circuit breaker located on the treadmill frame near the power cord. Make sure that the safety key is needed , please call our Customer Service Department toll-free at 1-800-999-3756, Monday through Friday, 6 a.m. If the walking belt is plugged into the console. The...

English Manual
Page 11
... left rear roller adjustment bolt counterclockwise, and the right bolt clockwise, 1/4 of the walking belt 3-4 inches off the walking platform. Keep the lock knob and lock knob washer in the console. (See INSTALLING BATTERIES on page 8.) Most problems are the result of storage. 11 Be careful not to overtighten the walking belt. c. Plug in the power cord, insert the safety key and run the treadmill for a few minutes. SYMPTOM: THE MOTIVATIONAL FITNESS MONITOR DOES...
... left rear roller adjustment bolt counterclockwise, and the right bolt clockwise, 1/4 of the walking belt 3-4 inches off the walking platform. Keep the lock knob and lock knob washer in the console. (See INSTALLING BATTERIES on page 8.) Most problems are the result of storage. 11 Be careful not to overtighten the walking belt. c. Plug in the power cord, insert the safety key and run the treadmill for a few minutes. SYMPTOM: THE MOTIVATIONAL FITNESS MONITOR DOES...

English Manual
Page 12
... regularly and deeply as you exercise. To measure your heart rate, stop exercising.) Adjust the intensity of three basic parts: a warm-up . AWARNING: Before beginning this or any exercise program, consult your heart rate is near the low end of exercising, it is at the proper level. For effective aerobic exercise, your maximum heart rate as you exercise-never hold your wrist. Training zones are essential for...
... regularly and deeply as you exercise. To measure your heart rate, stop exercising.) Adjust the intensity of three basic parts: a warm-up . AWARNING: Before beginning this or any exercise program, consult your heart rate is near the low end of exercising, it is at the proper level. For effective aerobic exercise, your maximum heart rate as you exercise-never hold your wrist. Training zones are essential for...

English Manual
Page 13
... down . TOE TOUCH STRETCH Stand with your back leg as well. Bend your front leg, lean forward and move your hips. To cause further stretching of the achilles... as far as possible. Allow your extended leg. Keep your back leg straight and your hands against a wall. Hold for 15 counts, then relax. Correct form for balance, reach back and grasp one ... shown in front of your feet together and your buttocks as possible. Stretches: Hamstrings, lower back and groin. Hold for both legs. Repeat 3 times for 15 counts, then relax. Stretches: Calves, achilles tendons and ...
... down . TOE TOUCH STRETCH Stand with your back leg as well. Bend your front leg, lean forward and move your hips. To cause further stretching of the achilles... as far as possible. Allow your extended leg. Keep your back leg straight and your hands against a wall. Hold for 15 counts, then relax. Correct form for balance, reach back and grasp one ... shown in front of your feet together and your buttocks as possible. Stretches: Hamstrings, lower back and groin. Hold for both legs. Repeat 3 times for 15 counts, then relax. Stretches: Calves, achilles tendons and ...

English Manual
Page 14
... Console Bolt Handrail Bushing Safety Key/Clip Console Screw Foam Block 6" Cable Loom Power Switch Wire Console Speed Control Knob Incline Control Lever Incline Cable Shock Release E-Clip Shock Bracket Shock Spacer Incline Shock Push Nut Shock Pin Plastic Spacer Upright Right Handrail Wire Cover Hood Screw Small Screw Motor Swivel Bolt Motor Swivel Washer/Tension Washer Wire Clip Reed Switch Bracket Reed Switch Reed Switch Extension Wire Flat Washer 12" Cable Loom Lock Knob Washer Lock Knob Power Cord Pivot Bolt Circuit Breaker Power Cord Grommet Safety Cover Screw Front Roller Adjustment Bolt...
... Console Bolt Handrail Bushing Safety Key/Clip Console Screw Foam Block 6" Cable Loom Power Switch Wire Console Speed Control Knob Incline Control Lever Incline Cable Shock Release E-Clip Shock Bracket Shock Spacer Incline Shock Push Nut Shock Pin Plastic Spacer Upright Right Handrail Wire Cover Hood Screw Small Screw Motor Swivel Bolt Motor Swivel Washer/Tension Washer Wire Clip Reed Switch Bracket Reed Switch Reed Switch Extension Wire Flat Washer 12" Cable Loom Lock Knob Washer Lock Knob Power Cord Pivot Bolt Circuit Breaker Power Cord Grommet Safety Cover Screw Front Roller Adjustment Bolt...

English Manual
Page 15
i 57 28 59 56 64 55 54 53 60 `•. 61 62 63 65 ! 66 26 73 261 26 O. 71 72 68 67 28 27 EXPLODED DRAWING Model No. WLTL30040 2 10 6 11 00 12 R894A /25 7 51 8 86-'1 85 0 83 82 84 81 80 5 3 9 6 8 4 3 86 25 77 25 32 23 is,26 24 26 45 31 82 2' 304- 1 28 29) 86 70 52-4 58 &vuel i 49 50 33 48 47 46 51 13 14 15 16 6 17 18 20 22 21 33 34 36 35 37 3 39 26 4 41 42 4...) 44 43 2 76 9 78 75-I I 74 33- 26-
i 57 28 59 56 64 55 54 53 60 `•. 61 62 63 65 ! 66 26 73 261 26 O. 71 72 68 67 28 27 EXPLODED DRAWING Model No. WLTL30040 2 10 6 11 00 12 R894A /25 7 51 8 86-'1 85 0 83 82 84 81 80 5 3 9 6 8 4 3 86 25 77 25 32 23 is,26 24 26 45 31 82 2' 304- 1 28 29) 86 70 52-4 58 &vuel i 49 50 33 48 47 46 51 13 14 15 16 6 17 18 20 22 21 33 34 36 35 37 3 39 26 4 41 42 4...) 44 43 2 76 9 78 75-I I 74 33- 26-

English Manual
Page 16
... easy reference when calling. The MODEL NUMBER of the product (WESLO CADENCE® 300 treadmill). 3. until 6 p.m. The SERIAL NUMBER of the product (see the front cover of Weider Health and Fitness, Inc. Part No. 119954 R894A 1994 Weslo, Inc., a Subsidiary of this manual. When ordering parts, please be prepared to give the following information: 1. ORDERING REPLACEMENT PARTS To order replacement parts, call our Customer Service Department toll-free at 1-800-999-3756...
... easy reference when calling. The MODEL NUMBER of the product (WESLO CADENCE® 300 treadmill). 3. until 6 p.m. The SERIAL NUMBER of the product (see the front cover of Weider Health and Fitness, Inc. Part No. 119954 R894A 1994 Weslo, Inc., a Subsidiary of this manual. When ordering parts, please be prepared to give the following information: 1. ORDERING REPLACEMENT PARTS To order replacement parts, call our Customer Service Department toll-free at 1-800-999-3756...


