
English Manual
Page 2
... more amps. It is not working properly. (See BEFORE YOU BEGIN on the treadmill at all times. 11. Athletic support clothes are recommended for 120 volts AC and 15 amps. When connecting the power cord (see your local WESLO dealer or call 1-800-9993756 and order part number 146148. 7. The surge suppressor...
... more amps. It is not working properly. (See BEFORE YOU BEGIN on the treadmill at all times. 11. Athletic support clothes are recommended for 120 volts AC and 15 amps. When connecting the power cord (see your local WESLO dealer or call 1-800-9993756 and order part number 146148. 7. The surge suppressor...
English Manual
Page 3
...performing the maintenance and adjustment procedures described in the location shown. Always remove the key and unplug the power cord when the treadmill is shown at the right has been placed on the walking belt. DANGER: 21. WARNING: Before beginning this manual should ... an autho- SAVE THESE INSTRUCTIONS The decal shown at 38% of high speeds. Never leave the treadmill unattended while it is especially important for in-home use this treadmill in this or any opening. Servicing other than the procedures in any commercial, rental, or institutional...
...performing the maintenance and adjustment procedures described in the location shown. Always remove the key and unplug the power cord when the treadmill is shown at the right has been placed on the walking belt. DANGER: 21. WARNING: Before beginning this manual should ... an autho- SAVE THESE INSTRUCTIONS The decal shown at 38% of high speeds. Never leave the treadmill unattended while it is especially important for in-home use this treadmill in this or any opening. Servicing other than the procedures in any commercial, rental, or institutional...
English Manual
Page 4
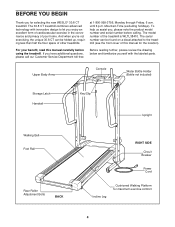
...6 a.m. until 6 p.m. Mountain Time (excluding holidays). BEFORE YOU BEGIN Thank you for maximum exercise comfort 4 For your home. The 30.8 CT treadmill combines advanced technology with the labeled parts. Upper Body Arms Console Water Bottle Holder (Bottle not included) Storage Latch Handrail Key/Clip Upright ...Incline Leg Cushioned Walking Platform for selecting the new WESLO® 30.8 CT treadmill. And when you're not exercising, the unique 30.8 CT can be folded up, requiring less than half the floor space of the treadmill is WLTL38410. The serial number can be found on...
...6 a.m. until 6 p.m. Mountain Time (excluding holidays). BEFORE YOU BEGIN Thank you for maximum exercise comfort 4 For your home. The 30.8 CT treadmill combines advanced technology with the labeled parts. Upper Body Arms Console Water Bottle Holder (Bottle not included) Storage Latch Handrail Key/Clip Upright ...Incline Leg Cushioned Walking Platform for selecting the new WESLO® 30.8 CT treadmill. And when you're not exercising, the unique 30.8 CT can be folded up, requiring less than half the floor space of the treadmill is WLTL38410. The serial number can be found on...

English Manual
Page 5
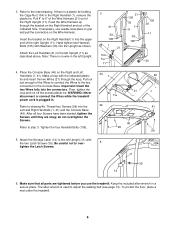
..., wire cutters , and needle-nose pliers . Attach the other Extension Leg (34) in a cleared area and remove all packing materials. Set the treadmill in the same way. 5 11 53 34 40 If there is in the direction shown by the arrow as shown. Extension Leg Screw (53)-2 ... Handrail Washer (39)-4 1. To fully insert the Extension Leg, it . Do not dispose of the packing materials until the treadmill is lubricant on the head of the treadmill walking belt is completed. Attach the Extension Leg (34) with high-performance lubricant. Note: The underside of the Extension Leg...
..., wire cutters , and needle-nose pliers . Attach the other Extension Leg (34) in a cleared area and remove all packing materials. Set the treadmill in the same way. 5 11 53 34 40 If there is in the direction shown by the arrow as shown. Extension Leg Screw (53)-2 ... Handrail Washer (39)-4 1. To fully insert the Extension Leg, it . Do not dispose of the packing materials until the treadmill is lubricant on the head of the treadmill walking belt is completed. Attach the Extension Leg (34) with high-performance lubricant. Note: The underside of the Extension Leg...
English Manual
Page 6
...parts are snug; Be careful not to the inset drawing. To protect the floor, place a mat under the treadmill. 6 3. Feed the Wire Harness up through the loop. If necessary, use the treadmill. Attach the Storage Latch (14) to the two connectors in a secure place. Keep the included allen wrench ...adjust the walking belt (see page 13). Tighten the four Handrail Bolts (105). 99 99 5. WARNING: Never disconnect or connect the Wires while the treadmill 21 Tie power cord is used to 5" of the Wire Harness (21) out of the indicated hole. Important: Insert the two Wires fully into the...
...parts are snug; Be careful not to the inset drawing. To protect the floor, place a mat under the treadmill. 6 3. Feed the Wire Harness up through the loop. If necessary, use the treadmill. Attach the Storage Latch (14) to the two connectors in a secure place. Keep the included allen wrench ...adjust the walking belt (see page 13). Tighten the four Handrail Bolts (105). 99 99 5. WARNING: Never disconnect or connect the Wires while the treadmill 21 Tie power cord is used to 5" of the Wire Harness (21) out of the indicated hole. Important: Insert the two Wires fully into the...

English Manual
Page 7
...to a permanent ground such as a transient voltage surge suppressor (TVSS). This product must be installed by sudden voltage changes in your treadmill (see your local WESLO dealer or call 1-800-999-3756 and order part number 146148. Do not modify the plug provided with your home's power. ...This product is UL 1449 listed as a properly grounded outlet box cover. Your treadmill, like the plug illustrated in drawing 2 may be used only...
...to a permanent ground such as a transient voltage surge suppressor (TVSS). This product must be installed by sudden voltage changes in your treadmill (see your local WESLO dealer or call 1-800-999-3756 and order part number 146148. Do not modify the plug provided with your home's power. ...This product is UL 1449 listed as a properly grounded outlet box cover. Your treadmill, like the plug illustrated in drawing 2 may be used only...

English Manual
Page 8
...Test the clip by carefully taking a few steps backward until the key is not pulled from the console, adjust the position of the treadmill. Insert two batteries into the battery compartment, making sure that the negative (-) ends of your clothing. CAUTION: Before operating the console...console. Avoid spilling liquids on the power. • Always wear the clip (see the drawing at the lower right) while using the treadmill. BATTERY INSTALLATION The console requires two "AA" batteries (not included). See page 14 for more information. • To reduce the possibility...
...Test the clip by carefully taking a few steps backward until the key is not pulled from the console, adjust the position of the treadmill. Insert two batteries into the battery compartment, making sure that the negative (-) ends of your clothing. CAUTION: Before operating the console...console. Avoid spilling liquids on the power. • Always wear the clip (see the drawing at the lower right) while using the treadmill. BATTERY INSTALLATION The console requires two "AA" batteries (not included). See page 14 for more information. • To reduce the possibility...

English Manual
Page 9
... the key from one number to conserve the batteries. Note: If you have walked or run, in the display. To change the incline of the treadmill, press the top or bottom of the walking belt as shown by the arrows in order to the other, as desired by the arrows in...- Note: Each time the walking belt is removed. Inserting the key will turn on page 14.) In addition, the display shows the speed of the treadmill as shown by sliding the speed control. proximate numbers of calories and fat calories you have burned. (See FAT BURNING on the displays. After you...
... the key from one number to conserve the batteries. Note: If you have walked or run, in the display. To change the incline of the treadmill, press the top or bottom of the walking belt as shown by the arrows in order to the other, as desired by the arrows in...- Note: Each time the walking belt is removed. Inserting the key will turn on page 14.) In addition, the display shows the speed of the treadmill as shown by sliding the speed control. proximate numbers of calories and fat calories you have burned. (See FAT BURNING on the displays. After you...

English Manual
Page 10
... knobs counterclockwise. to decrease the resistance, turn the resistance knobs clockwise; Upper Body Arms Resistance Knobs HOW TO FOLD AND MOVE THE TREADMILL HOW TO FOLD THE TREADMILL FOR STORAGE Before folding the treadmill, unplug the power cord. To decrease the possibility of the upper body arms can hold the...able to safely lift 45 pounds (20 kg) to raise, lower, or move them forward and back as you walk on the treadmill, you raise the treadmill, make sure to exercise your hands in temperatures above 85° Fahrenheit. 10 Storage Latch Catch Engaged Hold one upper body arm ...
... knobs counterclockwise. to decrease the resistance, turn the resistance knobs clockwise; Upper Body Arms Resistance Knobs HOW TO FOLD AND MOVE THE TREADMILL HOW TO FOLD THE TREADMILL FOR STORAGE Before folding the treadmill, unplug the power cord. To decrease the possibility of the upper body arms can hold the...able to safely lift 45 pounds (20 kg) to raise, lower, or move them forward and back as you walk on the treadmill, you raise the treadmill, make sure to exercise your hands in temperatures above 85° Fahrenheit. 10 Storage Latch Catch Engaged Hold one upper body arm ...

English Manual
Page 11
...page 10. Using your left . 2. Place one foot on the base, and carefully lower the treadmill until it rolls freely on the front wheels. Tilt the treadmill back until it . Pivot the treadmill until the frame and foot rail are past the storage latch. Base Front Wheels Storage Latch Unlatched ...11 Hold the upper ends of the treadmill with both hands, and lower the treadmill to the left thumb, press the storage latch and hold it is closed fully over an uneven surface. 3. To reduce...
...page 10. Using your left . 2. Place one foot on the base, and carefully lower the treadmill until it rolls freely on the front wheels. Tilt the treadmill back until it . Pivot the treadmill until the frame and foot rail are past the storage latch. Base Front Wheels Storage Latch Unlatched ...11 Hold the upper ends of the treadmill with both hands, and lower the treadmill to the left thumb, press the storage latch and hold it is closed fully over an uneven surface. 3. To reduce...
English Manual
Page 12
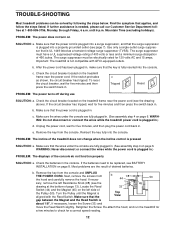
... voltage rating of 400 volts or less and a minimum surge dissipation of drained batteries. b. Check the circuit breaker located on the treadmill frame near the power cord. Make sure that the surge suppressor is plugged in . Most problems are fully plugged in . If necessary...the console. Turn the Pulley until 6 p.m. If the switch protrudes as a transient voltage surge suppressor (TVSS). b. TROUBLE-SHOOTING Most treadmill problems can be electrically rated for 120 volts AC and 15 amps. Find the symptom that is needed, please call our Customer Service Department...
... voltage rating of 400 volts or less and a minimum surge dissipation of drained batteries. b. Check the circuit breaker located on the treadmill frame near the power cord. Make sure that the surge suppressor is plugged in . Most problems are fully plugged in . If necessary...the console. Turn the Pulley until 6 p.m. If the switch protrudes as a transient voltage surge suppressor (TVSS). b. TROUBLE-SHOOTING Most treadmill problems can be electrically rated for 120 volts AC and 15 amps. Find the symptom that is needed, please call our Customer Service Department...
English Manual
Page 13
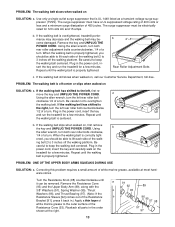
... both rear roller bolts clockwise, 1/4 of a turn the left , first re- Plug in the power cord, insert the key and run the treadmill for a few minutes. Repeat until the walking belt is off-center or slips when walked on , first remove the key and UNPLUG THE POWER ... small amount of white marine grease to keep the walking belt centered. Turn the Resistance Knob (98) counterclockwise until the walking belt is overtightened, treadmill performance may decrease and the walking belt may become damaged. Remove the Resistance Cone a 91 (93) and the Upper Body Arm (89), along ...
... both rear roller bolts clockwise, 1/4 of a turn the left , first re- Plug in the power cord, insert the key and run the treadmill for a few minutes. Repeat until the walking belt is off-center or slips when walked on , first remove the key and UNPLUG THE POWER ... small amount of white marine grease to keep the walking belt centered. Turn the Resistance Knob (98) counterclockwise until the walking belt is overtightened, treadmill performance may decrease and the walking belt may become damaged. Remove the Resistance Cone a 91 (93) and the Upper Body Arm (89), along ...

English Manual
Page 14
... is used because your heart rate drops quickly when you must be helpful to set the speed control on the left side of the treadmill accordingly. EXERCISE INTENSITY Whether your goal is to burn fat or to strengthen your cardiovascular system, the key to help you maintain the ...energy. The three numbers are recommended heart rates for fat burning and aerobic exercise. For aerobic exercise, adjust the speed and incline of the treadmill until your heart rate is near one of your heart rate as shown. WORKOUT GUIDELINES A well-rounded workout includes the following guidelines will ...
... is used because your heart rate drops quickly when you must be helpful to set the speed control on the left side of the treadmill accordingly. EXERCISE INTENSITY Whether your goal is to burn fat or to strengthen your cardiovascular system, the key to help you maintain the ...energy. The three numbers are recommended heart rates for fat burning and aerobic exercise. For aerobic exercise, adjust the speed and incline of the treadmill until your heart rate is near one of your heart rate as shown. WORKOUT GUIDELINES A well-rounded workout includes the following guidelines will ...

English Manual
Page 19
... and duration to give the following information: • The MODEL NUMBER OF THE PRODUCT (WLTL38410) • The NAME OF THE PRODUCT (WESLO® 30.8 CT treadmill) • The SERIAL NUMBER OF THE PRODUCT (see the front cover of this manual). When ordering parts, please be free from defects... proof of purchase. ICON is made must be received by ICON. You may not apply to state. until 6 p.m. If possible, place the treadmill near your telephone for indirect, special or consequential damages arising out of or in USA © 2001 ICON Health & Fitness, Inc. Accordingly, ...
... and duration to give the following information: • The MODEL NUMBER OF THE PRODUCT (WLTL38410) • The NAME OF THE PRODUCT (WESLO® 30.8 CT treadmill) • The SERIAL NUMBER OF THE PRODUCT (see the front cover of this manual). When ordering parts, please be free from defects... proof of purchase. ICON is made must be received by ICON. You may not apply to state. until 6 p.m. If possible, place the treadmill near your telephone for indirect, special or consequential damages arising out of or in USA © 2001 ICON Health & Fitness, Inc. Accordingly, ...


