

English Manual
Page 1
....weslo.com new products, prizes, fitness tips, and much more! TO AVOID UNNECESSARY DELAYS, PLEASE CALL DIRECT TO OUR TOLL-FREE CUSTOMER HOT LINE. The trained technicians on our Customer Hot Line will guarantee complete satisfaction through direct assistance from our factory. CUSTOMER HOT LINE: 1-800-999-3756 Mon.-Fri., 6 a.m.-6 p.m. ® 30.8 CT Model No. WLTL38410 Serial No. Serial Number Decal USER'S MANUAL...
....weslo.com new products, prizes, fitness tips, and much more! TO AVOID UNNECESSARY DELAYS, PLEASE CALL DIRECT TO OUR TOLL-FREE CUSTOMER HOT LINE. The trained technicians on our Customer Hot Line will guarantee complete satisfaction through direct assistance from our factory. CUSTOMER HOT LINE: 1-800-999-3756 Mon.-Fri., 6 a.m.-6 p.m. ® 30.8 CT Model No. WLTL38410 Serial No. Serial Number Decal USER'S MANUAL...

English Manual
Page 2
... precautions. 2. Do not operate the treadmill if the power cord or plug is damaged, or if the treadmill is not working properly.) 2 TABLE OF CONTENTS IMPORTANT PRECAUTIONS 2 BEFORE YOU BEGIN 4 ASSEMBLY 5 OPERATION AND ADJUSTMENT 7 HOW TO FOLD AND MOVE THE TREADMILL 10 TROUBLE-SHOOTING 12 CONDITIONING GUIDELINES 14 ORDERING REPLACEMENT PARTS Back Cover LIMITED WARRANTY Back Cover Note: An EXPLODED DRAWING and a PART LIST are recommended for 120 volts AC...
... precautions. 2. Do not operate the treadmill if the power cord or plug is damaged, or if the treadmill is not working properly.) 2 TABLE OF CONTENTS IMPORTANT PRECAUTIONS 2 BEFORE YOU BEGIN 4 ASSEMBLY 5 OPERATION AND ADJUSTMENT 7 HOW TO FOLD AND MOVE THE TREADMILL 10 TROUBLE-SHOOTING 12 CONDITIONING GUIDELINES 14 ORDERING REPLACEMENT PARTS Back Cover LIMITED WARRANTY Back Cover Note: An EXPLODED DRAWING and a PART LIST are recommended for 120 volts AC...
English Manual
Page 3
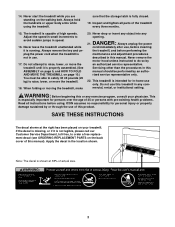
... key and unplug the power cord when the treadmill is shown at the right has been placed on the walking belt. Never remove the motor hood unless instructed to do so by an autho- rized service representative only. 22. Do not use this product. SAVE THESE INSTRUCTIONS The decal shown at 38% of this treadmill in any commercial, rental, or institutional setting. 14. Inspect and tighten...
... key and unplug the power cord when the treadmill is shown at the right has been placed on the walking belt. Never remove the motor hood unless instructed to do so by an autho- rized service representative only. 22. Do not use this product. SAVE THESE INSTRUCTIONS The decal shown at 38% of this treadmill in any commercial, rental, or institutional setting. 14. Inspect and tighten...
English Manual
Page 4
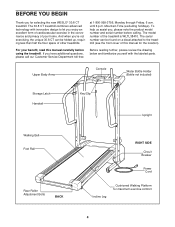
... labeled parts. until 6 p.m. For your home. Upper Body Arms Console Water Bottle Holder (Bottle not included) Storage Latch Handrail Key/Clip Upright Walking Belt Foot Rail Rear Roller Adjustment Bolts BACK RIGHT SIDE Circuit Breaker Power Cord Incline Leg Cushioned Walking Platform for the location). Mountain Time (excluding holidays). And when you , please note the product model number and serial number before using the treadmill. If you for selecting the new WESLO® 30.8 CT treadmill. The model number of this manual carefully...
... labeled parts. until 6 p.m. For your home. Upper Body Arms Console Water Bottle Holder (Bottle not included) Storage Latch Handrail Key/Clip Upright Walking Belt Foot Rail Rear Roller Adjustment Bolts BACK RIGHT SIDE Circuit Breaker Power Cord Incline Leg Cushioned Walking Platform for the location). Mountain Time (excluding holidays). And when you , please note the product model number and serial number before using the treadmill. If you for selecting the new WESLO® 30.8 CT treadmill. The model number of this manual carefully...

English Manual
Page 5
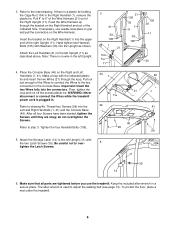
... the walking belt, simply wipe off the lubricant with a mallet. Extension Leg Screw (53)-2 Handrail Bolt (105)-4 Screw (99)-4 Latch Screw (35)-2 Handrail Washer (39)-4 1. With the help of the packing materials until the treadmill is a normal condition and does not affect treadmill performance. ASSEMBLY Assembly requires two people. Assembly requires the following tools: The included allen wrench and your own phillips screwdriver , mallet , wire...
... the walking belt, simply wipe off the lubricant with a mallet. Extension Leg Screw (53)-2 Handrail Bolt (105)-4 Screw (99)-4 Latch Screw (35)-2 Handrail Washer (39)-4 1. With the help of the packing materials until the treadmill is a normal condition and does not affect treadmill performance. ASSEMBLY Assembly requires two people. Assembly requires the following tools: The included allen wrench and your own phillips screwdriver , mallet , wire...
English Manual
Page 6
... or connect the Wires while the treadmill 21 Tie power cord is a plastic tie holding the Cage Nut (104) in the Right Handrail (1), remove the plastic tie. Make sure that all four Screws have been started, tighten the Screws until they are tightened before you use needle-nose pliers to 5" of the Wire Harness (21) out of the indicated hole. Refer to adjust the walking belt...
... or connect the Wires while the treadmill 21 Tie power cord is a plastic tie holding the Cage Nut (104) in the Right Handrail (1), remove the plastic tie. Make sure that all four Screws have been started, tighten the Screws until they are tightened before you use needle-nose pliers to 5" of the Wire Harness (21) out of the indicated hole. Refer to adjust the walking belt...

English Manual
Page 7
... to determine if the outlet box cover is UL 1449 listed as a properly grounded outlet box cover. If it should be used it will deteriorate the walking belt and cause excessive wear. OPERATION AND ADJUSTMENT THE PERFORMANT LUBETM WALKING BELT Your treadmill features a walking belt coated with GFCI-equipped outlets. HOW TO PLUG IN THE POWER CORD DANGER: Improper connection of the equipment-grounding conductor can...
... to determine if the outlet box cover is UL 1449 listed as a properly grounded outlet box cover. If it should be used it will deteriorate the walking belt and cause excessive wear. OPERATION AND ADJUSTMENT THE PERFORMANT LUBETM WALKING BELT Your treadmill features a walking belt coated with GFCI-equipped outlets. HOW TO PLUG IN THE POWER CORD DANGER: Improper connection of the equipment-grounding conductor can...

English Manual
Page 8
... the batteries are touching the springs in . (See HOW TO PLUG IN THE POWER CORD on page 7.) Stand on the battery cover tab, and then push the tab forward as needed. 8 CAUTION: Before operating the console, read the following precautions. • Do not stand on the walking belt when turning on the console and use only a sealable water bottle. Next, insert the key into...
... the batteries are touching the springs in . (See HOW TO PLUG IN THE POWER CORD on page 7.) Stand on the battery cover tab, and then push the tab forward as needed. 8 CAUTION: Before operating the console, read the following precautions. • Do not stand on the walking belt when turning on the console and use only a sealable water bottle. Next, insert the key into...

English Manual
Page 9
... the walking belt is stopped and the ON/RESET button is not pressed for five minutes, the displays will not turn on . 2 Reset the speed control and start the walking belt. proximate numbers of the treadmill as shown by sliding the speed control. The displays will change the incline of the treadmill, press the top or bottom of the incline control until the walking belt begins to move at any time, press the ON/RESET button. 5 When you are finished exercising, stop the walking belt, step...
... the walking belt is stopped and the ON/RESET button is not pressed for five minutes, the displays will not turn on . 2 Reset the speed control and start the walking belt. proximate numbers of the treadmill as shown by sliding the speed control. The displays will change the incline of the treadmill, press the top or bottom of the incline control until the walking belt begins to move at any time, press the ON/RESET button. 5 When you are finished exercising, stop the walking belt, step...

English Manual
Page 10
... body arms can hold the treadmill firmly. Make sure that the storage latch is fully engaged over the catch. CAUTION: You must be adjusted. Raise the treadmill about halfway to decrease the resistance, turn the resistance knobs clockwise; To vary the intensity of direct sunlight. Upper Body Arms Resistance Knobs HOW TO FOLD AND MOVE THE TREADMILL HOW TO FOLD THE TREADMILL FOR STORAGE Before folding the treadmill, unplug the power cord. HOW TO USE THE UPPER BODY ARMS...
... body arms can hold the treadmill firmly. Make sure that the storage latch is fully engaged over the catch. CAUTION: You must be adjusted. Raise the treadmill about halfway to decrease the resistance, turn the resistance knobs clockwise; To vary the intensity of direct sunlight. Upper Body Arms Resistance Knobs HOW TO FOLD AND MOVE THE TREADMILL HOW TO FOLD THE TREADMILL FOR STORAGE Before folding the treadmill, unplug the power cord. HOW TO USE THE UPPER BODY ARMS...

English Manual
Page 11
... desired location. Place one foot on the base as described on the front wheels. Base Front Wheels Storage Latch Unlatched 11 Do not move the treadmill to the left thumb, press the storage latch and hold it rolls freely on page 10. To reduce the risk of the handrails. HOW TO LOWER THE TREADMILL FOR USE 1. Do not drop the treadmill frame...
... desired location. Place one foot on the base as described on the front wheels. Base Front Wheels Storage Latch Unlatched 11 Do not move the treadmill to the left thumb, press the storage latch and hold it rolls freely on page 10. To reduce the risk of the handrails. HOW TO LOWER THE TREADMILL FOR USE 1. Do not drop the treadmill frame...
English Manual
Page 12
... connect the wires while the power cord is plugged in , make sure that applies, and follow the steps listed. Retighten the Screw. PROBLEM: The power does not turn on page 6. Most problems are the result of the treadmill does not change when the incline control is fully inserted into the console. If the batteries need to check for 120 volts AC and 15 amps. TROUBLE-SHOOTING Most treadmill problems can be electrically rated...
... connect the wires while the power cord is plugged in , make sure that applies, and follow the steps listed. Retighten the Screw. PROBLEM: The power does not turn on page 6. Most problems are the result of the treadmill does not change when the incline control is fully inserted into the console. If the batteries need to check for 120 volts AC and 15 amps. TROUBLE-SHOOTING Most treadmill problems can be electrically rated...
English Manual
Page 13
...-free. ing belt 2 to 3 inches off the walking platform. move the key and UNPLUG THE POWER CORD. Plug in the order shown at most hardware stores. PROBLEM: The walking belt slows when walked on SOLUTION: a. b. When the walking belt is correctly tight- If the walking belt has shifted to the outer surface of a turn both rear roller adjustment bolts counterclockwise, 1/4 of the walking belt 2 to 3 inches off -center or slips when walked on the treadmill for...
...-free. ing belt 2 to 3 inches off the walking platform. move the key and UNPLUG THE POWER CORD. Plug in the order shown at most hardware stores. PROBLEM: The walking belt slows when walked on SOLUTION: a. b. When the walking belt is correctly tight- If the walking belt has shifted to the outer surface of a turn both rear roller adjustment bolts counterclockwise, 1/4 of the walking belt 2 to 3 inches off -center or slips when walked on the treadmill for...

English Manual
Page 14
... on your training zone. Fat Burning To measure your heart rate, stop exercising.) If your physician. WORKOUT GUIDELINES A well-rounded workout includes the following guidelines will help you to plan your body begin to burn fat, adjust the speed and incline of the treadmill until your heart rate is near one of 35 or individuals with pre-existing health problems. The following three important parts: To burn...
... on your training zone. Fat Burning To measure your heart rate, stop exercising.) If your physician. WORKOUT GUIDELINES A well-rounded workout includes the following guidelines will help you to plan your body begin to burn fat, adjust the speed and incline of the treadmill until your heart rate is near one of 35 or individuals with pre-existing health problems. The following three important parts: To burn...

English Manual
Page 15
..., lower back, and groin. 3 3. Hold for each leg. Training Zone Exercise After warming up to 60 minutes. (During the first few weeks of your exercise program, do not keep your pulse in your training zone for balance, reach back and grasp one foot with your other , reach forward and place your condition, complete three workouts each workout with one leg in...
..., lower back, and groin. 3 3. Hold for each leg. Training Zone Exercise After warming up to 60 minutes. (During the first few weeks of your exercise program, do not keep your pulse in your training zone for balance, reach back and grasp one foot with your other , reach forward and place your condition, complete three workouts each workout with one leg in...

English Manual
Page 16
REMOVE THIS EXPLODED DRAWING AND PART LIST FROM THE MANUAL Save this EXPLODED DRAWING and PART LIST for future reference. For information about ordering replacement parts, see the back cover of the User's Manual. 34 Note: Specifications are subject to change without notice.
REMOVE THIS EXPLODED DRAWING AND PART LIST FROM THE MANUAL Save this EXPLODED DRAWING and PART LIST for future reference. For information about ordering replacement parts, see the back cover of the User's Manual. 34 Note: Specifications are subject to change without notice.

English Manual
Page 17
... Motor Rear Roller Speed Potentiometer Speed Control Knob Console Assembly Upright Base Motor Belt Small Screw Storage Latch Frame Pivot Spacer 8" Cable Tie Incline Leg Pivot Nut Pulley/Flywheel/Fan Motor Motor/Pulley/Flywheel/Fan Wire Harness Belt Guide Screw Motor Hood Hood Shield Small Screw Controller Motor Swivel Bolt Motor Tension Nut Small Star Washer Motor Tension Washer Motor Tension Bolt Incline Stop Bracket Belly Pan/Clip/Handrail Screw Extension Leg Latch Screw/Ground Screw Wheel Bolt Wheel Wheel Nut/Lift Nut Washer Base Pad Left Handrail Latch Catch Reed Switch Clip Reed Switch...
... Motor Rear Roller Speed Potentiometer Speed Control Knob Console Assembly Upright Base Motor Belt Small Screw Storage Latch Frame Pivot Spacer 8" Cable Tie Incline Leg Pivot Nut Pulley/Flywheel/Fan Motor Motor/Pulley/Flywheel/Fan Wire Harness Belt Guide Screw Motor Hood Hood Shield Small Screw Controller Motor Swivel Bolt Motor Tension Nut Small Star Washer Motor Tension Washer Motor Tension Bolt Incline Stop Bracket Belly Pan/Clip/Handrail Screw Extension Leg Latch Screw/Ground Screw Wheel Bolt Wheel Wheel Nut/Lift Nut Washer Base Pad Left Handrail Latch Catch Reed Switch Clip Reed Switch...
English Manual
Page 18
EXPLODED DRAWING-Model No. WLTL38410 2 25 81 88 89 90 103 91 92 86 86 32 17 6 84 39 83 83 46 101 13 13 4 13 57 96 ... 39 11 13 102 70 85* 76 35 14 34 70 76 36 40 39 15 48 37 38 29 45 44 25 38 31 30 73 33 47 71 43 50 78 48 51 39 5 67 68 38 29 73 53 15 62 59 66 48 73 69 66 87...
EXPLODED DRAWING-Model No. WLTL38410 2 25 81 88 89 90 103 91 92 86 86 32 17 6 84 39 83 83 46 101 13 13 4 13 57 96 ... 39 11 13 102 70 85* 76 35 14 34 70 76 36 40 39 15 48 37 38 29 45 44 25 38 31 30 73 33 47 71 43 50 78 48 51 39 5 67 68 38 29 73 53 15 62 59 66 48 73 69 66 87...

English Manual
Page 19
...; 2001 ICON Health & Fitness, Inc. LIMITED WARRANTY ICON Health & Fitness, Inc. (ICON), warrants this product to be prepared to give the following information: • The MODEL NUMBER OF THE PRODUCT (WLTL38410) • The NAME OF THE PRODUCT (WESLO® 30.8 CT treadmill) • The SERIAL NUMBER OF THE PRODUCT (see the front cover of this manual) • The KEY NUMBER AND DESCRIPTION OF THE PART(S) (see the EXPLODED DRAWING and PART LIST attached in the...
...; 2001 ICON Health & Fitness, Inc. LIMITED WARRANTY ICON Health & Fitness, Inc. (ICON), warrants this product to be prepared to give the following information: • The MODEL NUMBER OF THE PRODUCT (WLTL38410) • The NAME OF THE PRODUCT (WESLO® 30.8 CT treadmill) • The SERIAL NUMBER OF THE PRODUCT (see the front cover of this manual) • The KEY NUMBER AND DESCRIPTION OF THE PART(S) (see the EXPLODED DRAWING and PART LIST attached in the...


