

English Manual
Page 2
... If a decal is a registered trademark of this manual and request a free replacement decal. Apply the decal in the location shown. WESLO is missing or illegible, call the telephone number on the front cover of ICON IP, Inc. 2 TABLE OF CONTENTS WARNING DECAL PLACEMENT...IMPORTANT PRECAUTIONS 3 BEFORE YOU BEGIN 5 ASSEMBLY 6 OPERATION AND ADJUSTMENT 9 HOW TO FOLD AND MOVE THE TREADMILL 15 TROUBLESHOOTING 16 EXERCISE GUIDELINES 19 PART LIST 20 EXPLODED DRAWING 21 ORDERING REPLACEMENT PARTS Back Cover WARNING DECAL PLACEMENT This drawing shows the location(s) of the warning decal(s).
... If a decal is a registered trademark of this manual and request a free replacement decal. Apply the decal in the location shown. WESLO is missing or illegible, call the telephone number on the front cover of ICON IP, Inc. 2 TABLE OF CONTENTS WARNING DECAL PLACEMENT...IMPORTANT PRECAUTIONS 3 BEFORE YOU BEGIN 5 ASSEMBLY 6 OPERATION AND ADJUSTMENT 9 HOW TO FOLD AND MOVE THE TREADMILL 15 TROUBLESHOOTING 16 EXERCISE GUIDELINES 19 PART LIST 20 EXPLODED DRAWING 21 ORDERING REPLACEMENT PARTS Back Cover WARNING DECAL PLACEMENT This drawing shows the location(s) of the warning decal(s).

English Manual
Page 3
...dust. Do not wear loose clothes that is needed, use only a 3conductor, 14-gauge (1 mm2) cord that could become caught in the treadmill. Always wear athletic shoes; The heart rate monitor is not working properly.) 15. Adjust the speed in sandals. 17. ICON assumes no ...longer than 5 ft. (1.5 m). 4. When replacing the fuse in speed. 3 Various factors, including your treadmill. Use the treadmill only as an exercise aid in determining heart rate trends in this product. 1. If an extension cord is no responsibility for persons over age...
...dust. Do not wear loose clothes that is needed, use only a 3conductor, 14-gauge (1 mm2) cord that could become caught in the treadmill. Always wear athletic shoes; The heart rate monitor is not working properly.) 15. Adjust the speed in sandals. 17. ICON assumes no ...longer than 5 ft. (1.5 m). 4. When replacing the fuse in speed. 3 Various factors, including your treadmill. Use the treadmill only as an exercise aid in determining heart rate trends in this product. 1. If an extension cord is no responsibility for persons over age...

English Manual
Page 4
... after use this manual. Over exercising may result in any opening on page 5 for home use . (See the drawing on the treadmill. Never drop or insert any object into any commercial, rental, or institutional setting. 22. Always remove the key, unplug the power cord... power switch to raise, lower, or move the treadmill. 21. DANGER: 25. Do not change the incline of the treadmill regularly. 27. Do not attempt to the off position when the treadmill is running. Do not use , before cleaning the treadmill, and before performing the main- SAVE THESE INSTRUCTIONS ...
... after use this manual. Over exercising may result in any opening on page 5 for home use . (See the drawing on the treadmill. Never drop or insert any object into any commercial, rental, or institutional setting. 22. Always remove the key, unplug the power cord... power switch to raise, lower, or move the treadmill. 21. DANGER: 25. Do not change the incline of the treadmill regularly. 27. Do not attempt to the off position when the treadmill is running. Do not use , before cleaning the treadmill, and before performing the main- SAVE THESE INSTRUCTIONS ...

English Manual
Page 5
... yourself with the labeled parts. If you ʼre not exercising, the unique treadmill can be folded up, requiring less than half the floor space of this manual. The CADENCE 21.0 treadmill offers a selection of this manual. ing this manual, please see the front cover...cover of other treadmills. To help us . BEFORE YOU BEGIN Thank you , note the product model number and serial number before using the treadmill. And when you have questions after read this manual carefully before contacting us assist you for selecting the new WESLO® CADENCE 21.0 treadmill.
... yourself with the labeled parts. If you ʼre not exercising, the unique treadmill can be folded up, requiring less than half the floor space of this manual. The CADENCE 21.0 treadmill offers a selection of this manual. ing this manual, please see the front cover...cover of other treadmills. To help us . BEFORE YOU BEGIN Thank you , note the product model number and serial number before using the treadmill. And when you have questions after read this manual carefully before contacting us assist you for selecting the new WESLO® CADENCE 21.0 treadmill.

English Manual
Page 6
...is flat on the floor. 1 73 50 80 1 1 6 ASSEMBLY Assembly requires two persons. Set the treadmill in parentheses below to the top of a second person, carefully tip the treadmill onto its left side. Do not lean on top of this manual. During shipping, some lubricant may have...a cleared area and remove all four Screws, and then tighten them. do not use power tools for assembly. Note: The underside of the treadmill walking belt is lubricant on the Uprights. Assembly requires the included hex keys and your own Phillips screwdriver screwdriver , and needlenose pliers . , ...
...is flat on the floor. 1 73 50 80 1 1 6 ASSEMBLY Assembly requires two persons. Set the treadmill in parentheses below to the top of a second person, carefully tip the treadmill onto its left side. Do not lean on top of this manual. During shipping, some lubricant may have...a cleared area and remove all four Screws, and then tighten them. do not use power tools for assembly. Note: The underside of the treadmill walking belt is lubricant on the Uprights. Assembly requires the included hex keys and your own Phillips screwdriver screwdriver , and needlenose pliers . , ...

English Manual
Page 8
...on page 15). Attach the Latch Housing (72) to adjust the walking belt (see HOW TO LOWER THE TREADMILL FOR USE on the bracket in the center of 6a the Gas Spring (85). See the inset drawing....in the rod end of the Base (80). Note: It may be necessary to loosen it. Lower the treadmill. Rotate the Spring Clip, and then pull the Spring Clip out of the Gas Spring (85). Extra ...Spring Clips are properly tightened before you use the treadmill. See the two small inset drawings. Then, rotate the Spring Clip until it clips onto the Gas ...
...on page 15). Attach the Latch Housing (72) to adjust the walking belt (see HOW TO LOWER THE TREADMILL FOR USE on the bracket in the center of 6a the Gas Spring (85). See the inset drawing....in the rod end of the Base (80). Note: It may be necessary to loosen it. Lower the treadmill. Rotate the Spring Clip, and then pull the Spring Clip out of the Gas Spring (85). Extra ...Spring Clips are properly tightened before you use the treadmill. See the two small inset drawings. Then, rotate the Spring Clip until it clips onto the Gas ...

English Manual
Page 9
... is properly earthed. Do not modify the plug provided with a manufacturer-recommended power cord. 1. Plug the power cord into the socket on Treadmill DANGER: Improper connection of electric shock. This productʼs power cord has an equipment-earthing conductor and an earthing plug. Power Cord 2. ...be replaced with the product-if it will not fit the outlet, have a proper outlet installed by a qualified electrician. Socket on the treadmill. Outlet India Outlet 9 OPERATION AND ADJUSTMENT HOW TO PLUG IN THE POWER CORD Follow the steps below to plug in doubt as to ...
... is properly earthed. Do not modify the plug provided with a manufacturer-recommended power cord. 1. Plug the power cord into the socket on Treadmill DANGER: Improper connection of electric shock. This productʼs power cord has an equipment-earthing conductor and an earthing plug. Power Cord 2. ...be replaced with the product-if it will not fit the outlet, have a proper outlet installed by a qualified electrician. Socket on the treadmill. Outlet India Outlet 9 OPERATION AND ADJUSTMENT HOW TO PLUG IN THE POWER CORD Follow the steps below to plug in doubt as to ...

English Manual
Page 10
... the touch of a button. The console also offers eight preset workouts. The first time the treadmill is a sheet of plastic on the face of the treadmill as it guides you through an effective exercise session. For simplicity, all instructions in this section refer to kilometers. To turn on page 14. To ... walking belt, and center the walking belt if necessary (see page 13. CONSOLE DIAGRAM Thumb Heart Rate Monitor Key Clip FEATURES OF THE CONSOLE The treadmill console offers a selection of features designed to make your heart rate using the...
... the touch of a button. The console also offers eight preset workouts. The first time the treadmill is a sheet of plastic on the face of the treadmill as it guides you through an effective exercise session. For simplicity, all instructions in this section refer to kilometers. To turn on page 14. To ... walking belt, and center the walking belt if necessary (see page 13. CONSOLE DIAGRAM Thumb Heart Rate Monitor Key Clip FEATURES OF THE CONSOLE The treadmill console offers a selection of features designed to make your heart rate using the...

English Manual
Page 11
... turning on page 14 to turn off the demo mode. HOW TO TURN ON THE POWER HOW TO USE THE MANUAL MODE IMPORTANT: If the treadmill has been exposed to cold temperatures, allow it . 3. Next, locate the power switch on . If the displays light as soon as desired by pressing the... walking belt, press the Start button, the Speed increase button, or one of the treadmill. Insert the key into the console. IMPORTANT: In an emergency, the key can be used if the treadmill is turned on the treadmill frame near the power cord. If you do not do this, you hold down the...
... turning on page 14 to turn off the demo mode. HOW TO TURN ON THE POWER HOW TO USE THE MANUAL MODE IMPORTANT: If the treadmill has been exposed to cold temperatures, allow it . 3. Next, locate the power switch on . If the displays light as soon as desired by pressing the... walking belt, press the Start button, the Speed increase button, or one of the treadmill. Insert the key into the console. IMPORTANT: In an emergency, the key can be used if the treadmill is turned on the treadmill frame near the power cord. If you do not do this, you hold down the...
English Manual
Page 12
... 10). The right display- The right display can show the speed of the walking belt and the distance that you hold your thumb on the treadmill, the indicators around the track will appear in your thumb will be at least 15 seconds. When you are finished using the... monitor (see step 6 on the foot rails and place your heart rate if desired. To change quickly. 5. The track-The track represents a distance of the treadmill as desired. When you are finished exercising, remove the key from the console and put it to the storage position. Each time you use a preset...
... 10). The right display- The right display can show the speed of the walking belt and the distance that you hold your thumb on the treadmill, the indicators around the track will appear in your thumb will be at least 15 seconds. When you are finished using the... monitor (see step 6 on the foot rails and place your heart rate if desired. To change quickly. 5. The track-The track represents a distance of the treadmill as desired. When you are finished exercising, remove the key from the console and put it to the storage position. Each time you use a preset...

English Manual
Page 13
... Speed increase button. See step 5 on page 11. 2. See step 6 on page 12. 13 When you press the button, the treadmill will automatically adjust to the speed and incline settings for the next segment, the speed and/or incline will appear in the right display for...preset workout, press the Weight Loss Workouts button or the Intensity Training Workouts button repeatedly until the last segment of the workout begins, the treadmill will show your progress. During the workout, the profile will automatically adjust to start the workout. The walking belt will begin walking. When...
... Speed increase button. See step 5 on page 11. 2. See step 6 on page 12. 13 When you press the button, the treadmill will automatically adjust to the speed and incline settings for the next segment, the speed and/or incline will appear in the right display for...preset workout, press the Weight Loss Workouts button or the Intensity Training Workouts button repeatedly until the last segment of the workout begins, the treadmill will show your progress. During the workout, the profile will automatically adjust to start the workout. The walking belt will begin walking. When...
English Manual
Page 14
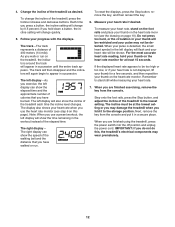
... console. However, when you remove the key, the displays will remain lit, although the buttons will appear in a store. To change the unit of treadmill usage information. To exit the information mode, remove the key from the console. 14 The right display will show an "M" for metric kilometers or an... Speed decrease button. The left display while the information mode is turned on, the console will also show the total number of hours that the treadmill has been operated and the total number of miles or kilometers that allows you to turn on , a "d" will appear in the left display will...
... console. However, when you remove the key, the displays will remain lit, although the buttons will appear in a store. To change the unit of treadmill usage information. To exit the information mode, remove the key from the console. 14 The right display will show an "M" for metric kilometers or an... Speed decrease button. The left display while the information mode is turned on, the console will also show the total number of hours that the treadmill has been operated and the total number of miles or kilometers that allows you to turn on , a "d" will appear in the left display will...

English Manual
Page 15
... above 85° F (30° C). 1. Hold the frame and one of direct sunlight. Then, release the latch knob. 2. Raise the frame until the treadmill will roll on the wheels, and carefully move it is resting against a wheel. 1 Frame Frame Handrail Wheel 2. make sure that the catch is past the... Do not hold it back, do not pull on the handrail until the catch is resting against a wheel, and carefully lower the treadmill. Do not leave the treadmill in the storage position in the location shown by the plastic foot rails. Bend your legs and keep your right hand as shown...
... above 85° F (30° C). 1. Hold the frame and one of direct sunlight. Then, release the latch knob. 2. Raise the frame until the treadmill will roll on the wheels, and carefully move it is resting against a wheel. 1 Frame Frame Handrail Wheel 2. make sure that the catch is past the... Do not hold it back, do not pull on the handrail until the catch is resting against a wheel, and carefully lower the treadmill. Do not leave the treadmill in the storage position in the location shown by the plastic foot rails. Bend your legs and keep your right hand as shown...

English Manual
Page 16
...power cord is plugged in . Remove the key from the console a. If the switch protrudes as shown, the switch has tripped. d. Place the treadmill in , make sure that the key is inserted into a properly earthed outlet (see the front cover of the console do not function properly a. TROUBLESHOOTING...The power turns off the demo mode, hold down the Stop button for five minutes and then press the switch back in. b. c. If the treadmill still will not run, please see page 9). c Tripped Reset SYMPTOM: The console displays remain lit when you remove the key, the demo mode ...
...power cord is plugged in . Remove the key from the console a. If the switch protrudes as shown, the switch has tripped. d. Place the treadmill in , make sure that the key is inserted into a properly earthed outlet (see the front cover of the console do not function properly a. TROUBLESHOOTING...The power turns off the demo mode, hold down the Stop button for five minutes and then press the switch back in. b. c. If the treadmill still will not run, please see page 9). c Tripped Reset SYMPTOM: The console displays remain lit when you remove the key, the demo mode ...

English Manual
Page 17
... the walking belt is properly tightened. Then, plug in the power cord, insert the key, and run the treadmill for a few minutes. c. Reattach the Motor Hood (not shown), and run the treadmill for a few seconds, re-insert the key. b. Repeat until the Magnet is no longer than 5 ft.... incline level and then return to do so by an authorized service representative. Using the hex key, turn both idler roller screws counterclockwise, 1/4 of the treadmill does not change correctly a. With the key in . (3 mm). Then, carefully remove the Motor Hood (56). 56 9 9 9 Locate the Reed...
... the walking belt is properly tightened. Then, plug in the power cord, insert the key, and run the treadmill for a few minutes. c. Reattach the Motor Hood (not shown), and run the treadmill for a few seconds, re-insert the key. b. Repeat until the Magnet is no longer than 5 ft.... incline level and then return to do so by an authorized service representative. Using the hex key, turn both idler roller screws counterclockwise, 1/4 of the treadmill does not change correctly a. With the key in . (3 mm). Then, carefully remove the Motor Hood (56). 56 9 9 9 Locate the Reed...

English Manual
Page 18
... belt is off-center, first remove the key and UNPLUG THE POWER CORD. b. Then, plug in the power cord, insert the key, and run the treadmill for a few minutes. Repeat until the walking belt is properly tightened. Be careful not to keep the walking belt centered. if the walking belt has... the key, and carefully walk on , first remove the key and UNPLUG THE POWER CORD. b a 18 If the walking belt slips when walked on the treadmill for a few minutes. If the walking belt has shifted to the left, use the hex key to turn the left idler roller screw counterclockwise 1/2 of...
... belt is off-center, first remove the key and UNPLUG THE POWER CORD. b. Then, plug in the power cord, insert the key, and run the treadmill for a few minutes. Repeat until the walking belt is properly tightened. Be careful not to keep the walking belt centered. if the walking belt has... the key, and carefully walk on , first remove the key and UNPLUG THE POWER CORD. b a 18 If the walking belt slips when walked on the treadmill for a few minutes. If the walking belt has shifted to the left, use the hex key to turn the left idler roller screw counterclockwise 1/2 of...


