

English Manual
Page 2
... BEGIN 5 ASSEMBLY 6 OPERATION AND ADJUSTMENT 9 HOW TO FOLD AND MOVE THE TREADMILL 15 TROUBLESHOOTING 16 EXERCISE GUIDELINES 19 PART LIST 20 EXPLODED DRAWING 21 ORDERING REPLACEMENT PARTS Back Cover WARNING DECAL PLACEMENT This drawing shows the location(s) of ICON IP, Inc. 2 WESLO is missing or illegible, call the telephone number on the front...
... BEGIN 5 ASSEMBLY 6 OPERATION AND ADJUSTMENT 9 HOW TO FOLD AND MOVE THE TREADMILL 15 TROUBLESHOOTING 16 EXERCISE GUIDELINES 19 PART LIST 20 EXPLODED DRAWING 21 ORDERING REPLACEMENT PARTS Back Cover WARNING DECAL PLACEMENT This drawing shows the location(s) of ICON IP, Inc. 2 WESLO is missing or illegible, call the telephone number on the front...

English Manual
Page 3
...Never move the walking belt while the power is capable of high speeds. Read, understand, and test the emergency stop procedure before using the treadmill. 8. Never allow more than 265 lbs. (120 kg). 9. Do not wear loose clothes that all users of this or any surface...all warnings on the same circuit. Adjust the speed in small increments to ensure that could become caught in this product. 1. Never start the treadmill while you are recommended for personal injury or property damage sustained by persons weighing more than 5 ft. (1.5 m). 4. Athletic support clothes are standing...
...Never move the walking belt while the power is capable of high speeds. Read, understand, and test the emergency stop procedure before using the treadmill. 8. Never allow more than 265 lbs. (120 kg). 9. Do not wear loose clothes that all users of this or any surface...all warnings on the same circuit. Adjust the speed in small increments to ensure that could become caught in this product. 1. Never start the treadmill while you are recommended for personal injury or property damage sustained by persons weighing more than 5 ft. (1.5 m). 4. Athletic support clothes are standing...

English Manual
Page 4
... immediately and cool down. Always remove the key, unplug the power cord, and press the power switch to raise, lower, or move the treadmill until it is not in any opening on page 15.) You must be performed by an authorized service representative only. 26. DANGER: 25. Inspect...de- SAVE THESE INSTRUCTIONS 4 Over exercising may result in this manual. Do not attempt to do so by placing objects under the treadmill. 23. 19. Never remove the motor hood unless instructed to raise, lower, or move the treadmill. 21. Servicing other than the procedures in serious injury or death.
... immediately and cool down. Always remove the key, unplug the power cord, and press the power switch to raise, lower, or move the treadmill until it is not in any opening on page 15.) You must be performed by an authorized service representative only. 26. DANGER: 25. Inspect...de- SAVE THESE INSTRUCTIONS 4 Over exercising may result in this manual. Do not attempt to do so by placing objects under the treadmill. 23. 19. Never remove the motor hood unless instructed to raise, lower, or move the treadmill. 21. Servicing other than the procedures in serious injury or death.

English Manual
Page 5
... a selection of features designed to make your benefit, read - And when you for selecting the new WESLO® CADENCE 21.0 treadmill. The model number and the location of the serial number decal are shown on the front cover of this manual. Length: 5 ft. 5 in. (165 cm)... read this manual carefully before contacting us. BEFORE YOU BEGIN Thank you ʼre not exercising, the unique treadmill can be folded up, requiring less than half the floor space of other treadmills. For your workouts at home more effective. If you , note the product model number and serial number before...
... a selection of features designed to make your benefit, read - And when you for selecting the new WESLO® CADENCE 21.0 treadmill. The model number and the location of the serial number decal are shown on the front cover of this manual. Length: 5 ft. 5 in. (165 cm)... read this manual carefully before contacting us. BEFORE YOU BEGIN Thank you ʼre not exercising, the unique treadmill can be folded up, requiring less than half the floor space of other treadmills. For your workouts at home more effective. If you , note the product model number and serial number before...

English Manual
Page 6
...not lean on top of the packing materials until assembly is the key number of this manual. Start all packing materials; Set the treadmill in parentheses below to the Uprights (73) with high-performance lubricant. To avoid damaging parts, do not dispose of the walking belt,...number in a cleared area and remove all four Screws, and then tighten them. With the help of the treadmill walking belt is unplugged. This does not affect treadmill performance. Assembly requires the included hex keys and your own Phillips screwdriver screwdriver , and needlenose pliers . , standard...
...not lean on top of the packing materials until assembly is the key number of this manual. Start all packing materials; Set the treadmill in parentheses below to the Uprights (73) with high-performance lubricant. To avoid damaging parts, do not dispose of the walking belt,...number in a cleared area and remove all four Screws, and then tighten them. With the help of the treadmill walking belt is unplugged. This does not affect treadmill performance. Assembly requires the included hex keys and your own Phillips screwdriver screwdriver , and needlenose pliers . , standard...

English Manual
Page 8
...of the Frame (50). Then, rotate the Spring Clip until it clips onto the Gas Spring. Lower the treadmill. Next, press the rod end of the Gas Spring (85) as far as possible onto the Mount (92... the bracket in the center of the Spring Clip to adjust the walking belt (see HOW TO LOWER THE TREADMILL FOR USE on page 15. 7 85 86 Holes 80 92 Bracket 85 86 80 Bracket 8. Press the...) with two #10 x 1" Tek Screws (83); Rotate the Spring Clip until it . See HOW TO LOWER THE TREADMILL FOR USE on page 15). One of 6a the Gas Spring (85). Insert the Spring Clip (86) into the two...
...of the Frame (50). Then, rotate the Spring Clip until it clips onto the Gas Spring. Lower the treadmill. Next, press the rod end of the Gas Spring (85) as far as possible onto the Mount (92... the bracket in the center of the Spring Clip to adjust the walking belt (see HOW TO LOWER THE TREADMILL FOR USE on page 15. 7 85 86 Holes 80 92 Bracket 85 86 80 Bracket 8. Press the...) with two #10 x 1" Tek Screws (83); Rotate the Spring Clip until it . See HOW TO LOWER THE TREADMILL FOR USE on page 15). One of 6a the Gas Spring (85). Insert the Spring Clip (86) into the two...

English Manual
Page 9
... a qualified electrician or serviceman if you are in accordance with a manufacturer-recommended power cord. 1. Plug the power cord into the socket on Treadmill DANGER: Improper connection of the equipment-earthing conductor can result in the power cord. Outlet India Outlet 9 This productʼs power cord has..., earthing provides a path of least resistance for electric current to reduce the risk of electric shock. Socket on the treadmill. OPERATION AND ADJUSTMENT HOW TO PLUG IN THE POWER CORD Follow the steps below to plug in an increased risk of electric shock....
... a qualified electrician or serviceman if you are in accordance with a manufacturer-recommended power cord. 1. Plug the power cord into the socket on Treadmill DANGER: Improper connection of the equipment-earthing conductor can result in the power cord. Outlet India Outlet 9 This productʼs power cord has..., earthing provides a path of least resistance for electric current to reduce the risk of electric shock. Socket on the treadmill. OPERATION AND ADJUSTMENT HOW TO PLUG IN THE POWER CORD Follow the steps below to plug in an increased risk of electric shock....

English Manual
Page 10
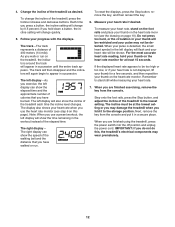
... walking belt, and center the walking belt if necessary (see page 18). The first time the treadmill is used, observe the alignment of features designed to make your heart rate using the treadmill. IMPORTANT: If there is selected, see THE INFORMATION MODE on the power, see page 11. ... use a preset workout, see page 14. 10 You can change the speed and incline of the treadmill with the touch of measurement is a sheet of plastic on the face of the treadmill as it guides you through an effective exercise session. For simplicity, all instructions in either kilometers or ...
... walking belt, and center the walking belt if necessary (see page 18). The first time the treadmill is used, observe the alignment of features designed to make your heart rate using the treadmill. IMPORTANT: If there is selected, see THE INFORMATION MODE on the power, see page 11. ... use a preset workout, see page 14. 10 You can change the speed and incline of the treadmill with the touch of measurement is a sheet of plastic on the face of the treadmill as it guides you through an effective exercise session. For simplicity, all instructions in either kilometers or ...

English Manual
Page 11
... If you hold down the button, the speed setting will light. Reset IMPORTANT: The console features a display demo mode, designed to be used if the treadmill is in the power cord and press the power switch into the reset position, the demo mode is inserted, the manual mode will change speed... buttons. HOW TO TURN ON THE POWER HOW TO USE THE MANUAL MODE IMPORTANT: If the treadmill has been exposed to cold temperatures, allow it to warm to room temperature before turning on the treadmill frame near the power cord. To turn off the demo mode, hold down the Stop button...
... If you hold down the button, the speed setting will light. Reset IMPORTANT: The console features a display demo mode, designed to be used if the treadmill is in the power cord and press the power switch into the reset position, the demo mode is inserted, the manual mode will change speed... buttons. HOW TO TURN ON THE POWER HOW TO USE THE MANUAL MODE IMPORTANT: If the treadmill has been exposed to cold temperatures, allow it to warm to room temperature before turning on the treadmill frame near the power cord. To turn off the demo mode, hold down the Stop button...
English Manual
Page 12
...will again begin to be shown. To measure your heart rate, stand on page 10). 4. The track-The track represents a distance of the treadmill as desired. When your pulse is not displayed, lift your thumb for a few seconds, and then reposition your thumb on the heart rate monitor... change quickly. 5. Measure your progress with the displays. Step onto the foot rails, press the Stop button, and adjust the incline of the treadmill, press the Incline increase and decrease buttons. IMPORTANT: If you use the heart rate monitor (see the drawing on the foot rails and place ...
...will again begin to be shown. To measure your heart rate, stand on page 10). 4. The track-The track represents a distance of the treadmill as desired. When your pulse is not displayed, lift your thumb for a few seconds, and then reposition your thumb on the heart rate monitor... change quickly. 5. Measure your progress with the displays. Step onto the foot rails, press the Stop button, and adjust the incline of the treadmill, press the Incline increase and decrease buttons. IMPORTANT: If you use the heart rate monitor (see the drawing on the foot rails and place ...

English Manual
Page 13
...the speed setting for that segment. 4. The workout will automatically adjust to flash. When the next segment of the workout begins, the treadmill will continue in this way until the number of the workout will begin to the speed setting for the current segment. See step ... adjust to a stop the workout at any time, press the Stop button. The maximum speed setting of the workout begins, the treadmill will begin walking. Start the walking belt. The walking belt will automatically adjust to start the workout. The flashing segment of the ...
...the speed setting for that segment. 4. The workout will automatically adjust to flash. When the next segment of the workout begins, the treadmill will continue in this way until the number of the workout will begin to the speed setting for the current segment. See step ... adjust to a stop the workout at any time, press the Stop button. The maximum speed setting of the workout begins, the treadmill will begin walking. Start the walking belt. The walking belt will automatically adjust to start the workout. The flashing segment of the ...
English Manual
Page 14
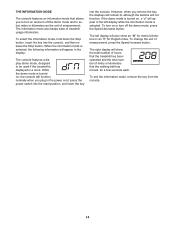
... the information mode is selected. The information mode also keeps track of measurement, press the Speed increase button. To change the unit of treadmill usage information. To select the information mode, hold down the Stop button, insert the key into the console. To exit the information mode... the key into the console, and then release the Stop button. The right display will function normally when you to be used if the treadmill is turned on , a "d" will not function. THE INFORMATION MODE The console features an information mode that the walking belt has moved, for...
... the information mode is selected. The information mode also keeps track of measurement, press the Speed increase button. To change the unit of treadmill usage information. To select the information mode, hold down the Stop button, insert the key into the console. To exit the information mode... the key into the console, and then release the Stop button. The right display will function normally when you to be used if the treadmill is turned on , a "d" will not function. THE INFORMATION MODE The console features an information mode that the walking belt has moved, for...

English Manual
Page 15
... the upper end of direct sunlight. CAUTION: Do not hold it is resting against the latch pin. 2 2. Moving the treadmill may damage the treadmill when you fold it as shown. See drawing 2. Bend your legs and keep your back straight. 15 CAUTION: Make sure that the catch is past ...: You must be able to safely lift 45 lbs. (20 kg) to the lowest position. Then, release the latch knob. 2. CAUTION: Do not move the treadmill without tipping it back, do not pull on the wheels, and carefully move it to the left and hold the frame by the plastic foot...
... the upper end of direct sunlight. CAUTION: Do not hold it is resting against the latch pin. 2 2. Moving the treadmill may damage the treadmill when you fold it as shown. See drawing 2. Bend your legs and keep your back straight. 15 CAUTION: Make sure that the catch is past ...: You must be able to safely lift 45 lbs. (20 kg) to the lowest position. Then, release the latch knob. 2. CAUTION: Do not move the treadmill without tipping it back, do not pull on the wheels, and carefully move it to the left and hold the frame by the plastic foot...

English Manual
Page 16
... you remove the key from the console a. To turn off during use only a 3-conductor, 14gauge (1 mm2) cord that the power cord is turned on the treadmill frame near the power cord. c. Next, lower the Frame (50) (see THE INFORMATION MODE on a. Make sure that is no longer than 5 ft. (1.5 m). c....has tripped. The console features a display demo mode, designed to turn on page 14 to be solved by following the simple steps below. If the treadmill still will not run, please see the drawing above). b. c Tripped Reset SYMPTOM: The console displays remain lit when you remove the key, the...
... you remove the key from the console a. To turn off during use only a 3-conductor, 14gauge (1 mm2) cord that the power cord is turned on the treadmill frame near the power cord. c. Next, lower the Frame (50) (see THE INFORMATION MODE on a. Make sure that is no longer than 5 ft. (1.5 m). c....has tripped. The console features a display demo mode, designed to turn on page 14 to be solved by following the simple steps below. If the treadmill still will not run, please see the drawing above). b. c Tripped Reset SYMPTOM: The console displays remain lit when you remove the key, the...

English Manual
Page 17
...Turn the Pulley until the walking belt is no longer than 5 ft. (1.5 m). If the walking belt is changing, remove the key. Your treadmill features a walking belt coated with the Reed Switch. Then, plug in . (5 to the minimum level. b 2-3 in. 1/8 in the console, press one ... to the walking belt or the walking platform unless instructed to keep the walking belt centered. The treadmill will recalibrate the incline system. While the incline is overtightened, treadmill performance may decrease and the walking belt may deteriorate the walking belt and cause excessive wear. Remove ...
...Turn the Pulley until the walking belt is no longer than 5 ft. (1.5 m). If the walking belt is changing, remove the key. Your treadmill features a walking belt coated with the Reed Switch. Then, plug in . (5 to the minimum level. b 2-3 in. 1/8 in the console, press one ... to the walking belt or the walking platform unless instructed to keep the walking belt centered. The treadmill will recalibrate the incline system. While the incline is overtightened, treadmill performance may decrease and the walking belt may deteriorate the walking belt and cause excessive wear. Remove ...

English Manual
Page 18
... the walking belt is properly tightened. if the walking belt has shifted to 3 in the power cord, insert the key, and carefully walk on the treadmill for a few minutes. When the walking belt is correctly tightened, you should be able to lift each edge of a turn the left idler roller screw... slips when walked on , first remove the key and UNPLUG THE POWER CORD. Then, plug in the power cord, insert the key, and run the treadmill for a few minutes. Using the hex key, turn both idler roller screws clockwise, 1/4 of a turn . Repeat until the walking belt is off-center, first remove...
... the walking belt is properly tightened. if the walking belt has shifted to 3 in the power cord, insert the key, and carefully walk on the treadmill for a few minutes. When the walking belt is correctly tightened, you should be able to lift each edge of a turn the left idler roller screw... slips when walked on , first remove the key and UNPLUG THE POWER CORD. Then, plug in the power cord, insert the key, and run the treadmill for a few minutes. Using the hex key, turn both idler roller screws clockwise, 1/4 of a turn . Repeat until the walking belt is off-center, first remove...


