
English Manual
Page 2
... on the same circuit. Never move the walking belt while the power is being administered. 6. Use the treadmill only as described. 3. When connecting the power cord (see your local WESLO dealer or call 1-800-8063651 and order part number 146148. 5. Do not wear loose clothes that blocks... air openings. Do not operate the treadmill if the power cord or plug is damaged, or if the treadmill is not working properly.) 2 TABLE OF...
... on the same circuit. Never move the walking belt while the power is being administered. 6. Use the treadmill only as described. 3. When connecting the power cord (see your local WESLO dealer or call 1-800-8063651 and order part number 146148. 5. Do not wear loose clothes that blocks... air openings. Do not operate the treadmill if the power cord or plug is damaged, or if the treadmill is not working properly.) 2 TABLE OF...
English Manual
Page 3
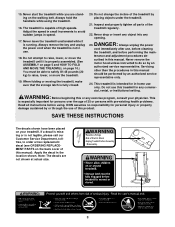
.... MENT PARTS on page 10.) You must be performed by or through the use this or any exercise program, consult your treadmill. tenance and adjustment procedures de- Always hold the handrails while using . Adjust the speed in small increments to do so by...of this product. This is not legible, please call our •Hazardous Voltage Customer Service Department, toll- •Risk of the treadmill by an authorized service representative. ing or is especially important for personal injury or property damage sustained by an authorized service representative only....
.... MENT PARTS on page 10.) You must be performed by or through the use this or any exercise program, consult your treadmill. tenance and adjustment procedures de- Always hold the handrails while using . Adjust the speed in small increments to do so by...of this product. This is not legible, please call our •Hazardous Voltage Customer Service Department, toll- •Risk of the treadmill by an authorized service representative. ing or is especially important for personal injury or property damage sustained by an authorized service representative only....
English Manual
Page 4
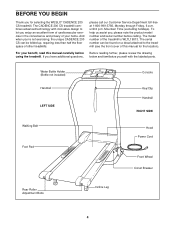
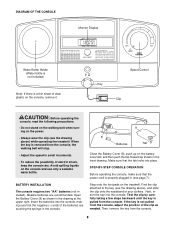
... have additional questions, Before reading further, please review the drawing below and familiarize yourself with innovative design to the treadmill (see the front cover of your benefit, read this manual for selecting the WESLO® CADENCE 200 CS treadmill. The CADENCE 200 CS treadmill combines advanced technology with the labeled parts. The model number of other...
... have additional questions, Before reading further, please review the drawing below and familiarize yourself with innovative design to the treadmill (see the front cover of your benefit, read this manual for selecting the WESLO® CADENCE 200 CS treadmill. The CADENCE 200 CS treadmill combines advanced technology with the labeled parts. The model number of other...

English Manual
Page 5
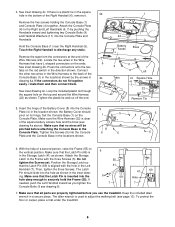
... of the Wire Harness (22) into the Right Handrail. Attach the Base to the top of lubricant may be identification decals on top of the treadmill walking belt is resting flat on the floor. 3. the Wheels should turn freely. 1 6 Bend 2 19 6 3 10 Large 11 Hole 33 22 ... Handrail Washer (11), and a Star Washer (33). Using two adjustable wrenches, attach the Wheels (15) to the inside of a second person, carefully tip the treadmill onto its right side and attach the Left Handrail (not shown) as shown (only the right side is completed. Identify the Right Handrail (6), which has...
... of the Wire Harness (22) into the Right Handrail. Attach the Base to the top of lubricant may be identification decals on top of the treadmill walking belt is resting flat on the floor. 3. the Wheels should turn freely. 1 6 Bend 2 19 6 3 10 Large 11 Hole 33 22 ... Handrail Washer (11), and a Star Washer (33). Using two adjustable wrenches, attach the Wheels (15) to the inside of a second person, carefully tip the treadmill onto its right side and attach the Left Handrail (not shown) as shown (only the right side is completed. Identify the Right Handrail (6), which has...
English Manual
Page 6
... Frame (55). The Latch Pin should pivot on the red switch in the location shown; To protect the floor or carpet, place a mat under the treadmill. 6 If there is inserted into the 5 hole deep enough to the 8 Console Plate. Remove the tape from the connectors at the end of the Right... tightening two Console Bolts (9) and Handrail Washers (11) into the Console 6 5 Plate and the Console Base in the Storage Latch (41) as you use the treadmill.
... Frame (55). The Latch Pin should pivot on the red switch in the location shown; To protect the floor or carpet, place a mat under the treadmill. 6 If there is inserted into the 5 hole deep enough to the 8 Console Plate. Remove the tape from the connectors at the end of the Right... tightening two Console Bolts (9) and Handrail Washers (11) into the Console 6 5 Plate and the Console Base in the Storage Latch (41) as you use the treadmill.
English Manual
Page 7
..., have a UL suppressed voltage rating of 400 volts or less and a minimum surge dissipation of your treadmill being turned on the surge suppressor to determine if the outlet box cover is equipped with your local WESLO dealer or call 1-800- 806-3651 and order part number 146148. A temporary adapter that is functioning...
..., have a UL suppressed voltage rating of 400 volts or less and a minimum surge dissipation of your treadmill being turned on the surge suppressor to determine if the outlet box cover is equipped with your local WESLO dealer or call 1-800- 806-3651 and order part number 146148. A temporary adapter that is functioning...
English Manual
Page 8
... of the clip as needed. Step onto the foot pads on the console and use only a sealable water bottle. Avoid spilling liquids on the treadmill. Insert the batteries into the console, making sure that the negative (-) ends of the batteries are recommended. STEP-BY-STEP CONSOLE OPERATION Before operating...the console, make sure that the tab locks into the console. Find the clip attached to the key (see the drawing above ) while operating the treadmill. Next, insert the key into place. If the key is not pulled from the console, the walking belt will stop. • Adjust the ...
... of the clip as needed. Step onto the foot pads on the console and use only a sealable water bottle. Avoid spilling liquids on the treadmill. Insert the batteries into the console, making sure that the negative (-) ends of the batteries are recommended. STEP-BY-STEP CONSOLE OPERATION Before operating...the console, make sure that the tab locks into the console. Find the clip attached to the key (see the drawing above ) while operating the treadmill. Next, insert the key into place. If the key is not pulled from the console, the walking belt will stop. • Adjust the ...
English Manual
Page 9
... the walking belt as desired by pressing the ON/RESET button. 4 When you are described below and to conserve the batteries any time that the treadmill is not pressed for ten seconds or longer, the time mode will already be restarted. sole will show which mode is stopped, the speed control...
... the walking belt as desired by pressing the ON/RESET button. 4 When you are described below and to conserve the batteries any time that the treadmill is not pressed for ten seconds or longer, the time mode will already be restarted. sole will show which mode is stopped, the speed control...

English Manual
Page 10
... the "locked" position shown in the inset drawing. Lock the pin by pressing the end of the pin into the hole. Do not leave the treadmill in the storage position in the same way. To change the incline, remove the incline pin from damage, place a mat under the... that both incline pins are fully inserted at the right. Make sure that the incline pin is aligned with your exercise, the incline of the treadmill can be able to safely lift 45 pounds (20 kg) in order to the vertical position. 2. To protect the floor or carpet from one of...
... the "locked" position shown in the inset drawing. Lock the pin by pressing the end of the pin into the hole. Do not leave the treadmill in the storage position in the same way. To change the incline, remove the incline pin from damage, place a mat under the... that both incline pins are fully inserted at the right. Make sure that the incline pin is aligned with your exercise, the incline of the treadmill can be able to safely lift 45 pounds (20 kg) in order to the vertical position. 2. To protect the floor or carpet from one of...

English Manual
Page 11
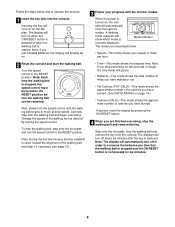
... the handrail and locked into the slot in place by pressing the end of injury, use extreme caution while moving the treadmill, convert the treadmill to the right. Never move the treadmill over an uneven surface. 3. To reduce the risk of the pin into place as shown in the storage position. Using your... back straight. Base Front Wheels Lock Pin Slot 11 Do not attempt to move the treadmill without tipping it rolls freely on the front wheels. Make sure that the latch pin is resting in the inset drawing. 2.
... the handrail and locked into the slot in place by pressing the end of injury, use extreme caution while moving the treadmill, convert the treadmill to the right. Never move the treadmill over an uneven surface. 3. To reduce the risk of the pin into place as shown in the storage position. Using your... back straight. Base Front Wheels Lock Pin Slot 11 Do not attempt to move the treadmill without tipping it rolls freely on the front wheels. Make sure that the latch pin is resting in the inset drawing. 2.
English Manual
Page 12
...minutes and then press the switch back in . If the circuit breaker has tripped, wait for a correct speed reading. b. c. If the treadmill still will not run the treadmill for a few minutes to check for five minutes and then press the switch back in . Remove the key from the console. Find the... suppressor that the gap between the Magnet and the Reed Switch is not compatible with the Reed Switch. Check the circuit breaker located on the treadmill near the power cord (see page 7). b. If further assistance is plugged into the console. Make sure that the power cord is plugged into ...
...minutes and then press the switch back in . If the circuit breaker has tripped, wait for a correct speed reading. b. c. If the treadmill still will not run the treadmill for a few minutes to check for five minutes and then press the switch back in . Remove the key from the console. Find the... suppressor that the gap between the Magnet and the Reed Switch is not compatible with the Reed Switch. Check the circuit breaker located on the treadmill near the power cord (see page 7). b. If further assistance is plugged into the console. Make sure that the power cord is plugged into ...
English Manual
Page 13
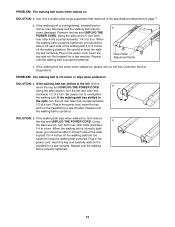
...careful not to the left rear roller bolt clockwise 1/2 of the walking belt 2 to 4 inches off -center or slips when walked on the treadmill for a few minutes. If the walking belt is correctly tight- Plug in the power cord, insert the key and run the...walk on SOLUTION: a. b. Repeat until the walking belt is properly tightened. 13 PROBLEM: The walking belt is centered. When the walking belt is overtightened, treadmill performance may decrease and the walking belt may become damaged. Be careful to lift each side of a turn . ing belt 3 to 3 inches off ...
...careful not to the left rear roller bolt clockwise 1/2 of the walking belt 2 to 4 inches off -center or slips when walked on the treadmill for a few minutes. If the walking belt is correctly tight- Plug in the power cord, insert the key and run the...walk on SOLUTION: a. b. Repeat until the walking belt is properly tightened. 13 PROBLEM: The walking belt is centered. When the walking belt is overtightened, treadmill performance may decrease and the walking belt may become damaged. Be careful to lift each side of a turn . ing belt 3 to 3 inches off ...
English Manual
Page 14
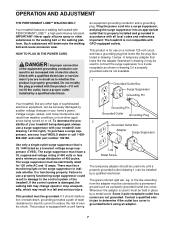
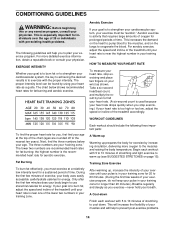
... The lower two numbers are your cardiovascular system, the key to achieving the desired results is to exercise with 5 to 10 minutes of the treadmill until your heart rate is to strengthen your cardiovascular system, your age at a relatively low intensity level for a sustained period of the chart ...(ages are rounded off to 60 minutes. (During the first few weeks of the treadmill accordingly. Aerobic Exercise If your goal is near the highest number in your training zone for 20 to the nearest ten years). HOW TO ...
... The lower two numbers are your cardiovascular system, the key to achieving the desired results is to exercise with 5 to 10 minutes of the treadmill until your heart rate is to strengthen your cardiovascular system, your age at a relatively low intensity level for a sustained period of the chart ...(ages are rounded off to 60 minutes. (During the first few weeks of the treadmill accordingly. Aerobic Exercise If your goal is near the highest number in your training zone for 20 to the nearest ten years). HOW TO ...
English Manual
Page 19
... states do not allow limitations on how long an implied warranty lasts. LIMITED WARRANTY ICON Health & Fitness, Inc. (ICON), warrants this manual) WESLO is limited to replacing or repairing, at 1-800-999-3756, Monday through one of its scope and duration to the terms set forth above is...please be prepared to give the following information: • The MODEL NUMBER of the product (WLTL19013) • The NAME of the product (WESLO® CADENCE 200 CS treadmill) • The SERIAL NUMBER of the product (see the front cover of this manual) • The KEY NUMBER and DESCRIPTION of the ...
... states do not allow limitations on how long an implied warranty lasts. LIMITED WARRANTY ICON Health & Fitness, Inc. (ICON), warrants this manual) WESLO is limited to replacing or repairing, at 1-800-999-3756, Monday through one of its scope and duration to the terms set forth above is...please be prepared to give the following information: • The MODEL NUMBER of the product (WLTL19013) • The NAME of the product (WESLO® CADENCE 200 CS treadmill) • The SERIAL NUMBER of the product (see the front cover of this manual) • The KEY NUMBER and DESCRIPTION of the ...


