
English Manual
Page 1
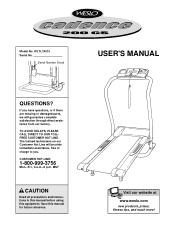
... questions, or if there are missing or damaged parts, we will provide immediate assistance, free of charge to you. The trained technicians on our Customer Hot Line will guarantee complete satisfaction through direct assistance from our factory. MST CAUTION Read all precautions and instructions in this manual before using this manual for future reference. Serial Number Decal USER'S MANUAL QUESTIONS? WLTL19013 Serial No.
... questions, or if there are missing or damaged parts, we will provide immediate assistance, free of charge to you. The trained technicians on our Customer Hot Line will guarantee complete satisfaction through direct assistance from our factory. MST CAUTION Read all precautions and instructions in this manual before using this manual for future reference. Serial Number Decal USER'S MANUAL QUESTIONS? WLTL19013 Serial No.

English Manual
Page 2
... of the treadmill. Do not use the treadmill with at a time. 9. Do not wear loose clothes that all warnings and precautions. TABLE OF CONTENTS IMPORTANT PRECAUTIONS 2 BEFORE YOU BEGIN 4 ASSEMBLY 5 OPERATION AND ADJUSTMENT 7 HOW TO FOLD AND MOVE THE TREADMILL 10 MAINTENANCE AND TROUBLE-SHOOTING 12 CONDITIONING GUIDELINES 14 ORDERING REPLACEMENT PARTS Back Cover LIMITED WARRANTY Back Cover Note: A PART IDENTIFICATION CHART, an EXPLODED DRAWING, and a PART LIST are recommended...
... of the treadmill. Do not use the treadmill with at a time. 9. Do not wear loose clothes that all warnings and precautions. TABLE OF CONTENTS IMPORTANT PRECAUTIONS 2 BEFORE YOU BEGIN 4 ASSEMBLY 5 OPERATION AND ADJUSTMENT 7 HOW TO FOLD AND MOVE THE TREADMILL 10 MAINTENANCE AND TROUBLE-SHOOTING 12 CONDITIONING GUIDELINES 14 ORDERING REPLACEMENT PARTS Back Cover LIMITED WARRANTY Back Cover Note: A PART IDENTIFICATION CHART, an EXPLODED DRAWING, and a PART LIST are recommended...
English Manual
Page 3
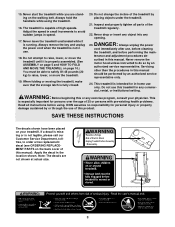
... and adjustment procedures de- SAVE THESE INSTRUCTIONS The decals shown have been placed on the walking belt. Apply the decal in -home use , before cleaning the treadmill, and before using the treadmill. 16. Always remove the key and unplug the power cord when the treadmill is properly assembled. (See ASSEMBLY on page 5 and HOW TO FOLD AND MOVE THE TREADMILL on the back cover of this or any exercise program, consult your treadmill. Servicing...
... and adjustment procedures de- SAVE THESE INSTRUCTIONS The decals shown have been placed on the walking belt. Apply the decal in -home use , before cleaning the treadmill, and before using the treadmill. 16. Always remove the key and unplug the power cord when the treadmill is properly assembled. (See ASSEMBLY on page 5 and HOW TO FOLD AND MOVE THE TREADMILL on the back cover of this or any exercise program, consult your treadmill. Servicing...
English Manual
Page 4
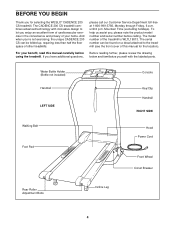
... Console Key/Clip Handrail RIGHT SIDE Walking Belt Foot Pad Hood Power Cord Front Wheel Circuit Breaker Rear Roller Adjustment Bolts Incline Leg 4 The CADENCE 200 CS treadmill combines advanced technology with the labeled parts. please call our Customer Service Department toll-free at 1-800-999-3756, Monday through Friday, 6 a.m. To help us assist you for the location). The serial number can be found on a decal attached to let you 're not exercising...
... Console Key/Clip Handrail RIGHT SIDE Walking Belt Foot Pad Hood Power Cord Front Wheel Circuit Breaker Rear Roller Adjustment Bolts Incline Leg 4 The CADENCE 200 CS treadmill combines advanced technology with the labeled parts. please call our Customer Service Department toll-free at 1-800-999-3756, Monday through Friday, 6 a.m. To help us assist you for the location). The serial number can be found on a decal attached to let you 're not exercising...

English Manual
Page 5
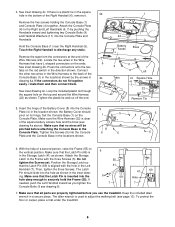
... a wire harness in the lower end of the Right Handrail and out of the upper end of Electric Shock •Unplug Treadmill before Assembly /Disassembly. Tip the treadmill onto its left side. If there is coated with the two Wheel Bolts (14) and the two Nuts (42) as described above. With the help of the treadmill walking belt is lubricant on...
... a wire harness in the lower end of the Right Handrail and out of the upper end of Electric Shock •Unplug Treadmill before Assembly /Disassembly. Tip the treadmill onto its left side. If there is coated with the two Wheel Bolts (14) and the two Nuts (42) as described above. With the help of the treadmill walking belt is lubricant on...
English Manual
Page 6
.... Attach the Storage Latch to the 8 Console Plate. Do not 55 tighten the Screws yet. Then, tighten the three Screws. Make sure that no wires will be pinched before you tighten the 7 7 Console Bolts (9 see drawing 5). 7. To protect the floor or carpet, place a mat under the treadmill. 6 If there is clear of a second person, raise the Frame (55) to the back of the Battery Cover...
.... Attach the Storage Latch to the 8 Console Plate. Do not 55 tighten the Screws yet. Then, tighten the three Screws. Make sure that no wires will be pinched before you tighten the 7 7 Console Bolts (9 see drawing 5). 7. To protect the floor or carpet, place a mat under the treadmill. 6 If there is clear of a second person, raise the Frame (55) to the back of the Battery Cover...
English Manual
Page 7
... a grounding plug. Contact a qualified electrician to determine if the outlet box cover is not compatible with a cord having Lug Metal Screw The temporary adapter should malfunction or break down, grounding provides a path of least resistance for electric current to whether the product is damaged, the walking belt may change speed or stop unexpectedly, which may be used it should be electrically rated for use...
... a grounding plug. Contact a qualified electrician to determine if the outlet box cover is not compatible with a cord having Lug Metal Screw The temporary adapter should malfunction or break down, grounding provides a path of least resistance for electric current to whether the product is damaged, the walking belt may change speed or stop unexpectedly, which may be used it should be electrically rated for use...
English Manual
Page 8
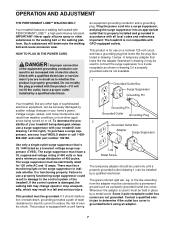
... inset drawing. Open the Battery Cover (8) as needed. Test the clip by carefully taking a few steps backward until the key is pulled from the console. 8 Speed Control Key Clip CAUTION: Before operating the console, read the following precautions. • Do not stand on the walking belt when turning on the power. • Always wear the clip (see the drawing above ) while operating the treadmill. Next, insert...
... inset drawing. Open the Battery Cover (8) as needed. Test the clip by carefully taking a few steps backward until the key is pulled from the console. 8 Speed Control Key Clip CAUTION: Before operating the console, read the following precautions. • Do not stand on the walking belt when turning on the power. • Always wear the clip (see the drawing above ) while operating the treadmill. Next, insert...
English Manual
Page 9
... just installed batteries, the display will not turn the speed control to the RESET position before the walking belt can be on the display. Note: If you stop the walking belt, step onto the foot pads and turn on . 2 Reset the console and start the walking belt. Carefully step onto the walking belt and begin exercising. If desired, reset the display by turning the speed control. Step onto the foot pads, stop the walking belt and remove the key. Note: Each time the walking belt is started. The modes...
... just installed batteries, the display will not turn the speed control to the RESET position before the walking belt can be on the display. Note: If you stop the walking belt, step onto the foot pads and turn on . 2 Reset the console and start the walking belt. Carefully step onto the walking belt and begin exercising. If desired, reset the display by turning the speed control. Step onto the foot pads, stop the walking belt and remove the key. Note: Each time the walking belt is started. The modes...

English Manual
Page 10
... you have adjusted the incline legs, lower the treadmill (see HOW TO FOLD THE TREADMILL FOR STORAGE on page 11). Move your back. Do not use the treadmill with your legs rather than your right hand to safely lift 45 pounds (20 kg) in the inset drawing. Incline Pin HOW TO FOLD AND MOVE THE TREADMILL HOW TO FOLD THE TREADMILL FOR STORAGE Unplug the power cord. Lock the pin by pressing the end...
... you have adjusted the incline legs, lower the treadmill (see HOW TO FOLD THE TREADMILL FOR STORAGE on page 11). Move your back. Do not use the treadmill with your legs rather than your right hand to safely lift 45 pounds (20 kg) in the inset drawing. Incline Pin HOW TO FOLD AND MOVE THE TREADMILL HOW TO FOLD THE TREADMILL FOR STORAGE Unplug the power cord. Lock the pin by pressing the end...

English Manual
Page 11
... legs and keep your back straight. To decrease the possibility of the treadmill with both hands, and lower the treadmill to the desired location. Base Front Wheels Lock Pin Slot 11 Carefully move the treadmill over an uneven surface. 3. Make sure that the latch pin is resting in place by pressing the end of injury, use extreme caution while moving the treadmill, convert the treadmill...
... legs and keep your back straight. To decrease the possibility of the treadmill with both hands, and lower the treadmill to the desired location. Base Front Wheels Lock Pin Slot 11 Carefully move the treadmill over an uneven surface. 3. Make sure that the latch pin is resting in place by pressing the end of injury, use extreme caution while moving the treadmill, convert the treadmill...
English Manual
Page 12
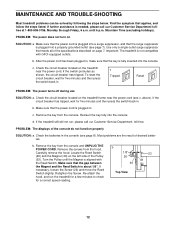
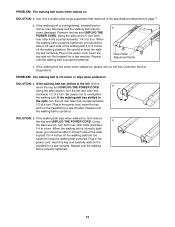
... move the Reed Switch slightly. c Tripped Reset PROBLEM: The power turns off during use SOLUTION: a. Retighten the Screw. b 1/8" 26 46 53 49 Top View 12 c. b. Turn the Pulley until 6 p.m. above). Make sure that applies, and follow the steps listed. c. To reset the circuit breaker, wait for a correct speed reading. Check the circuit breaker located on page 7. If further assistance is plugged into the console. MAINTENANCE AND TROUBLE-SHOOTING Most treadmill problems can...
... move the Reed Switch slightly. c Tripped Reset PROBLEM: The power turns off during use SOLUTION: a. Retighten the Screw. b 1/8" 26 46 53 49 Top View 12 c. b. Turn the Pulley until 6 p.m. above). Make sure that applies, and follow the steps listed. c. To reset the circuit breaker, wait for a correct speed reading. Check the circuit breaker located on page 7. If further assistance is plugged into the console. MAINTENANCE AND TROUBLE-SHOOTING Most treadmill problems can...
English Manual
Page 13
..., turn both rear roller bolts counterclockwise, 1/4 of a turn . ing belt 3 to keep the walking belt centered. Be careful to 3 inches off the walking platform. Repeat until the walking belt is properly tightened. Using the allen wrench, turn both rear roller bolts clockwise, 1/4 of a turn . b 2"-3" Rear Roller Adjustment Bolts c. a Using the allen wrench, turn the left rear roller bolt clockwise 1/2 of a turn . If the walking belt slips when walked on , please call our toll-free Customer Service Department. Plug in the power cord, insert the key and run the treadmill...
..., turn both rear roller bolts counterclockwise, 1/4 of a turn . ing belt 3 to keep the walking belt centered. Be careful to 3 inches off the walking platform. Repeat until the walking belt is properly tightened. Using the allen wrench, turn both rear roller bolts clockwise, 1/4 of a turn . b 2"-3" Rear Roller Adjustment Bolts c. a Using the allen wrench, turn the left rear roller bolt clockwise 1/2 of a turn . If the walking belt slips when walked on , please call our toll-free Customer Service Department. Plug in the power cord, insert the key and run the treadmill...
English Manual
Page 14
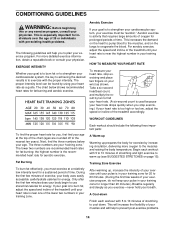
... ten years). The lower two numbers are rounded off to the muscles, and on page 15). This will increase the flexibility of the treadmill until your heart rate is to strengthen your cardiovascular system, your muscles and will help to burn fat, adjust the speed and incline of the treadmill until your pulse is to exercise with pre-existing health problems. The following...
... ten years). The lower two numbers are rounded off to the muscles, and on page 15). This will increase the flexibility of the treadmill until your heart rate is to strengthen your cardiovascular system, your muscles and will help to burn fat, adjust the speed and incline of the treadmill until your pulse is to exercise with pre-existing health problems. The following...

English Manual
Page 15
...workouts each leg. Allow your hips. Hold for 15 counts, then relax. Repeat 3 times for each week if desired. Hold for 15 counts, then relax. Hold for 15 counts, then relax. Stretches: Hamstrings, back of the opposite foot to make exercise a regular and enjoyable part of rest be- Stretches: Hamstrings, lower... back, and groin. 3 3. Stretches: Calves, achilles tendons, and ankles. 4. SUGGESTED STRETCHES The correct form for balance, reach back and grasp ...
...workouts each leg. Allow your hips. Hold for 15 counts, then relax. Repeat 3 times for each week if desired. Hold for 15 counts, then relax. Hold for 15 counts, then relax. Stretches: Hamstrings, back of the opposite foot to make exercise a regular and enjoyable part of rest be- Stretches: Hamstrings, lower... back, and groin. 3 3. Stretches: Calves, achilles tendons, and ankles. 4. SUGGESTED STRETCHES The correct form for balance, reach back and grasp ...
English Manual
Page 16
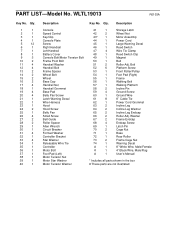
... Cap Handrail Nut Handrail Grommet Base Pad Belly Pan Screw Latch Warning Decal Wire Harness Hood Hood Screw Belly Pan Small Screw Belt Guide Roller Spacer Allen Wrench Circuit Breaker Formed Washer Controller Bracket Star Washer Releasable Wire Tie Controller Motor Bolt Foot Pad (Left) Motor Tension Nut Motor Star Washer Motor Tension Washer Key No. Bolt Platform Screw Front Roller/Pulley Foot Pad (Right) Frame Walking Belt Walking Platform Incline Pin Ground Screw Ground Wire 8" Cable Tie Power Cord Grommet Incline Leg Incline Leg Washer Incline Leg Endcap Roller Adj.
... Cap Handrail Nut Handrail Grommet Base Pad Belly Pan Screw Latch Warning Decal Wire Harness Hood Hood Screw Belly Pan Small Screw Belt Guide Roller Spacer Allen Wrench Circuit Breaker Formed Washer Controller Bracket Star Washer Releasable Wire Tie Controller Motor Bolt Foot Pad (Left) Motor Tension Nut Motor Star Washer Motor Tension Washer Key No. Bolt Platform Screw Front Roller/Pulley Foot Pad (Right) Frame Walking Belt Walking Platform Incline Pin Ground Screw Ground Wire 8" Cable Tie Power Cord Grommet Incline Leg Incline Leg Washer Incline Leg Endcap Roller Adj.

English Manual
Page 17
PART IDENTIFICATION CHART Remove this chart and the EXPLODED DRAWING/PART LIST for future reference. Save this chart and use it to identify small parts during assembly. Console Bolt (9)-2 Screw (5)-3 Star Washer (33)-2 Formed Washer (31)-4 Handrail Bolt (12)-4 Handrail Nut (17)-4 Handrail Washer (11)-4 Wheel Bolt (14)-2 Frame Bolt (10)-2 Wheel Nut (42)-2
PART IDENTIFICATION CHART Remove this chart and the EXPLODED DRAWING/PART LIST for future reference. Save this chart and use it to identify small parts during assembly. Console Bolt (9)-2 Screw (5)-3 Star Washer (33)-2 Formed Washer (31)-4 Handrail Bolt (12)-4 Handrail Nut (17)-4 Handrail Washer (11)-4 Wheel Bolt (14)-2 Frame Bolt (10)-2 Wheel Nut (42)-2
English Manual
Page 18
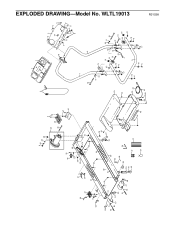
9 40 39 38 5 43* 35 36 26 46 27 69 41 26 37 5 58 21 68 51 66 67 52 72 63 64 65 51 66 67 68 50 48 28 49 73 53 73 52 52 54 56 57 55 59 28 24 27 26 60 58 29 63 64 65 47 61 34 5 32 20 45 1 2 3 54 5 74 5 70 5 11 5 11 8 9 7 10 6 23 24 25 44 30 20 62 11 33 31 17 13 12 42 16 13 15 14 18 19 5 22 33 11 10 12 14 15 16 42 19 71 5 19 5 19 5 31 17 R0103A EXPLODED DRAWING-Model No. WLTL19013
9 40 39 38 5 43* 35 36 26 46 27 69 41 26 37 5 58 21 68 51 66 67 52 72 63 64 65 51 66 67 68 50 48 28 49 73 53 73 52 52 54 56 57 55 59 28 24 27 26 60 58 29 63 64 65 47 61 34 5 32 20 45 1 2 3 54 5 74 5 70 5 11 5 11 8 9 7 10 6 23 24 25 44 30 20 62 11 33 31 17 13 12 42 16 13 15 14 18 19 5 22 33 11 10 12 14 15 16 42 19 71 5 19 5 19 5 31 17 R0103A EXPLODED DRAWING-Model No. WLTL19013
English Manual
Page 19
LIMITED WARRANTY ICON Health & Fitness, Inc. (ICON), warrants this manual) • The KEY NUMBER and DESCRIPTION of the desired part(s) (see the PART LIST and the EXPLODED DRAWING in connection with the use or performance of purchase. This warranty extends only to freight damage, abuse, misuse, improper or abnormal usage or repairs not provided by an ICON authorized service center; ICON's obligation under normal use and service conditions, for a period of ninety...
LIMITED WARRANTY ICON Health & Fitness, Inc. (ICON), warrants this manual) • The KEY NUMBER and DESCRIPTION of the desired part(s) (see the PART LIST and the EXPLODED DRAWING in connection with the use or performance of purchase. This warranty extends only to freight damage, abuse, misuse, improper or abnormal usage or repairs not provided by an ICON authorized service center; ICON's obligation under normal use and service conditions, for a period of ninety...


