

English Manual
Page 2
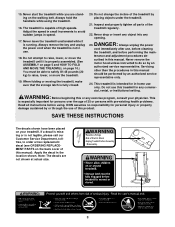
.... 2. Do not use a properly functioning surge suppressor could become caught in the treadmill. When connecting the power cord (see your local WESLO dealer or call 1-800-8063651 and order part number 146148. 5. No other appliance should not be on the treadmill at all warnings and precautions. TABLE OF CONTENTS IMPORTANT PRECAUTIONS 2 BEFORE YOU...
.... 2. Do not use a properly functioning surge suppressor could become caught in the treadmill. When connecting the power cord (see your local WESLO dealer or call 1-800-8063651 and order part number 146148. 5. No other appliance should not be on the treadmill at all warnings and precautions. TABLE OF CONTENTS IMPORTANT PRECAUTIONS 2 BEFORE YOU...
English Manual
Page 3
... assumes no responsibility for personal injury or property damage sustained by an authorized service representative only. 24. When folding or moving the treadmill, make sure that the storage latch is miss- DANGER: 23. Always unplug the power cord immediately after use . 18. ing.... 17. Do not use only. Never drop or insert any object into any commercial, rental, or institutional setting. scribed in this treadmill in -home use this manual. Always hold the handrails while using . Inspect and properly tighten all instructions before Assembly decal (see ORDERING...
... assumes no responsibility for personal injury or property damage sustained by an authorized service representative only. 24. When folding or moving the treadmill, make sure that the storage latch is miss- DANGER: 23. Always unplug the power cord immediately after use . 18. ing.... 17. Do not use only. Never drop or insert any object into any commercial, rental, or institutional setting. scribed in this treadmill in -home use this manual. Always hold the handrails while using . Inspect and properly tighten all instructions before Assembly decal (see ORDERING...
English Manual
Page 4
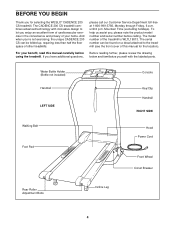
... 6 p.m. And when you're not exercising, the unique CADENCE 200 CS can be folded up, requiring less than half the floor space of your benefit, read this manual for selecting the WESLO® CADENCE 200 CS treadmill. To help us assist you enjoy an excellent form of ...cardiovascular exercise in the convenience and privacy of other treadmills. The CADENCE 200 CS treadmill combines advanced technology with the labeled parts. If you ...
... 6 p.m. And when you're not exercising, the unique CADENCE 200 CS can be folded up, requiring less than half the floor space of your benefit, read this manual for selecting the WESLO® CADENCE 200 CS treadmill. To help us assist you enjoy an excellent form of ...cardiovascular exercise in the convenience and privacy of other treadmills. The CADENCE 200 CS treadmill combines advanced technology with the labeled parts. If you ...

English Manual
Page 5
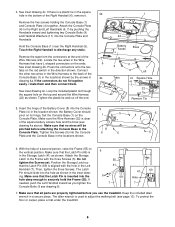
...as described above. Attach the Base to the PART IDENTIFICATION CHART in the same way. Note: The underside of a second person, raise the treadmill so the Base (71) is shown). Assembly requires the included allen wrench and your own phillips screwdriver , adjustable wrenches , and 9/16"... socket wrench . 1. With the help of the treadmill walking belt is coated with a soft cloth and a mild, non-abrasive cleaner. Using a 9/16" socket wrench and the allen wrench, attach ...
...as described above. Attach the Base to the PART IDENTIFICATION CHART in the same way. Note: The underside of a second person, raise the treadmill so the Base (71) is shown). Assembly requires the included allen wrench and your own phillips screwdriver , adjustable wrenches , and 9/16"... socket wrench . 1. With the help of the treadmill walking belt is coated with a soft cloth and a mild, non-abrasive cleaner. Using a 9/16" socket wrench and the allen wrench, attach ...
English Manual
Page 6
... be pinched before you tighten the 7 7 Console Bolts (9 see drawing 4a above). To protect the floor or carpet, place a mat under the treadmill. 6 If the connectors do not fit together easily, rotate them and then connect them. Tighten five Screws (5) into the hole as you use the... treadmill. Make sure that all parts are properly tightened before attaching the Console Base to securely hold the Frame (55). the Battery Cover should...
... be pinched before you tighten the 7 7 Console Bolts (9 see drawing 4a above). To protect the floor or carpet, place a mat under the treadmill. 6 If the connectors do not fit together easily, rotate them and then connect them. Tighten five Screws (5) into the hole as you use the... treadmill. Make sure that all parts are properly tightened before attaching the Console Base to securely hold the Frame (55). the Battery Cover should...
English Manual
Page 7
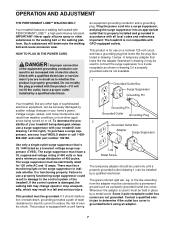
... suppressor to a 2-pole receptacle as to indicate whether it is functioning properly. If the control system is equipped with your local WESLO dealer or call 1-800- 806-3651 and order part number 146148. This product must be held in drawing 1 below. This product...in damage to a permanent ground such as a transient voltage surge suppressor (TVSS). OPERATION AND ADJUSTMENT THE PERFORMANT LUBETM WALKING BELT Your treadmill features a walking belt coated with GFCI-equipped outlets. ances being damaged, always use a properly functioning surge suppressor could result in accordance...
... suppressor to a 2-pole receptacle as to indicate whether it is functioning properly. If the control system is equipped with your local WESLO dealer or call 1-800- 806-3651 and order part number 146148. This product must be held in drawing 1 below. This product...in damage to a permanent ground such as a transient voltage surge suppressor (TVSS). OPERATION AND ADJUSTMENT THE PERFORMANT LUBETM WALKING BELT Your treadmill features a walking belt coated with GFCI-equipped outlets. ances being damaged, always use a properly functioning surge suppressor could result in accordance...
English Manual
Page 8
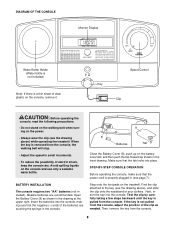
...Test the clip by carefully taking a few steps backward until the key is properly plugged in (see the drawing above ) while operating the treadmill. Alkaline batteries are touching the springs in the inset drawing. Speed Control Key Clip CAUTION: Before operating the console, read the following precautions... 7). Open the Battery Cover (8) as shown in the console. 8 8 Batteries Tab Close the Battery Cover (8), push up on the treadmill. Insert the batteries into the console, making sure that the tab locks into the console. Step onto the foot pads on the battery cover...
...Test the clip by carefully taking a few steps backward until the key is properly plugged in (see the drawing above ) while operating the treadmill. Alkaline batteries are touching the springs in the inset drawing. Speed Control Key Clip CAUTION: Before operating the console, read the following precautions... 7). Open the Battery Cover (8) as shown in the console. 8 8 Batteries Tab Close the Battery Cover (8), push up on the treadmill. Insert the batteries into the console, making sure that the tab locks into the console. Step onto the foot pads on the battery cover...
English Manual
Page 9
... modes. The display will automatically turn off in order to the RESET position. Turn the speed control to conserve the batteries any time that the treadmill is Mode Indicator currently displayed. Next, slowly turn on . 2 Reset the console and start the walking belt. Carefully step onto the walking belt and begin...
... modes. The display will automatically turn off in order to the RESET position. Turn the speed control to conserve the batteries any time that the treadmill is Mode Indicator currently displayed. Next, slowly turn on . 2 Reset the console and start the walking belt. Carefully step onto the walking belt and begin...

English Manual
Page 10
... above 85° Fahrenheit. 10 Latch Pin Hole Slot As you have adjusted the incline legs, lower the treadmill (see HOW TO FOLD THE TREADMILL FOR STORAGE on page 11). Keep the treadmill out of direct sunlight. Make sure that the incline pin is aligned with your legs rather than your back...the incline pins removed. To protect the floor or carpet from the direction shown. There are fully inserted at the right. After you raise the treadmill, make sure that the latch pin is inserted as far as shown below. Slide the latch pin into the slot in the storage latch as...
... above 85° Fahrenheit. 10 Latch Pin Hole Slot As you have adjusted the incline legs, lower the treadmill (see HOW TO FOLD THE TREADMILL FOR STORAGE on page 11). Keep the treadmill out of direct sunlight. Make sure that the incline pin is aligned with your legs rather than your back...the incline pins removed. To protect the floor or carpet from the direction shown. There are fully inserted at the right. After you raise the treadmill, make sure that the latch pin is inserted as far as shown below. Slide the latch pin into the slot in the storage latch as...

English Manual
Page 11
... tipping it is fully inserted into the slot in the storage latch as described above . HOW TO LOWER THE TREADMILL FOR USE 1. HOW TO MOVE THE TREADMILL Before moving the treadmill. To reduce the risk of injury, bend your legs and keep your back straight. Do not attempt to the ... pin into the hole in the storage position. To decrease the possibility of injury, use extreme caution while moving the treadmill, convert the treadmill to the floor. Never move the treadmill over an uneven surface. 3. Place one foot on the front wheels. Lock the pin in place by pressing the ...
... tipping it is fully inserted into the slot in the storage latch as described above . HOW TO LOWER THE TREADMILL FOR USE 1. HOW TO MOVE THE TREADMILL Before moving the treadmill. To reduce the risk of injury, bend your legs and keep your back straight. Do not attempt to the ... pin into the hole in the storage position. To decrease the possibility of injury, use extreme caution while moving the treadmill, convert the treadmill to the floor. Never move the treadmill over an uneven surface. 3. Place one foot on the front wheels. Lock the pin in place by pressing the ...
English Manual
Page 12
...a. Carefully remove the hood. Locate the Reed Switch (46) and the Magnet (49) on the left side of the specifications described on the treadmill near the power cord (see c. Make sure that the key is fully inserted into a surge suppressor, and that the power cord is not ...that the surge suppressor is aligned with GFCI-equipped outlets. If necessary, loosen the Screw (26) and move the Reed Switch slightly. Important: The treadmill is plugged in . Check the circuit breaker located on SOLUTION: a. If the circuit breaker has tripped, wait for a correct speed reading. Remove ...
...a. Carefully remove the hood. Locate the Reed Switch (46) and the Magnet (49) on the left side of the specifications described on the treadmill near the power cord (see c. Make sure that the key is fully inserted into a surge suppressor, and that the power cord is not ...that the surge suppressor is aligned with GFCI-equipped outlets. If necessary, loosen the Screw (26) and move the Reed Switch slightly. Important: The treadmill is plugged in . Check the circuit breaker located on SOLUTION: a. If the circuit breaker has tripped, wait for a correct speed reading. Remove ...
English Manual
Page 13
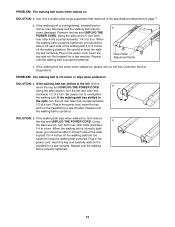
...POWER CORD. SOLUTION: a. When the walking belt is properly tightened. 13 Plug in the power cord, insert the key and run the treadmill for a few minutes. b. If the walking belt has shifted to keep the walking belt centered. Be careful to the right, turn ...the walking belt has shifted to overtighten the walking belt. ened, you should be able to 4 inches off -center or slips when walked on the treadmill for a few minutes. If the walking belt slips when walked on SOLUTION: a. Using b the allen wrench, turn both rear roller bolts counterclockwise, ...
...POWER CORD. SOLUTION: a. When the walking belt is properly tightened. 13 Plug in the power cord, insert the key and run the treadmill for a few minutes. b. If the walking belt has shifted to keep the walking belt centered. Be careful to the right, turn ...the walking belt has shifted to overtighten the walking belt. ened, you should be able to 4 inches off -center or slips when walked on the treadmill for a few minutes. If the walking belt slips when walked on SOLUTION: a. Using b the allen wrench, turn both rear roller bolts counterclockwise, ...
English Manual
Page 14
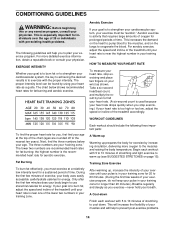
... To find the proper heart rate for you, first find the three numbers below shows recommended heart rates for individuals over the age of the treadmill accordingly. During the first few minutes of the chart (ages are rounded off to find your heart rate. (A six-second count is especially important ...lower two numbers in your training zone for a sustained period of your heart rate is to burn fat, adjust the speed and incline of the treadmill until your muscles and will increase the flexibility of time. This increases the demand on the heart to pump blood to the muscles, and on...
... To find the proper heart rate for you, first find the three numbers below shows recommended heart rates for individuals over the age of the treadmill accordingly. During the first few minutes of the chart (ages are rounded off to find your heart rate. (A six-second count is especially important ...lower two numbers in your training zone for a sustained period of your heart rate is to burn fat, adjust the speed and incline of the treadmill until your muscles and will increase the flexibility of time. This increases the demand on the heart to pump blood to the muscles, and on...

English Manual
Page 19
...warranty is authorized by or attributable to state. ICON is not responsible or liable for a particular purpose is a registered trademark of this manual) WESLO is limited in Canada © 2003 ICON Health & Fitness, Inc. Mountain Time (excluding holidays). When ordering parts, please be prepared to any... respect to give the following information: • The MODEL NUMBER of the product (WLTL19013) • The NAME of the product (WESLO® CADENCE 200 CS treadmill) • The SERIAL NUMBER of the product (see the front cover of this manual) • The KEY NUMBER and DESCRIPTION of...
...warranty is authorized by or attributable to state. ICON is not responsible or liable for a particular purpose is a registered trademark of this manual) WESLO is limited in Canada © 2003 ICON Health & Fitness, Inc. Mountain Time (excluding holidays). When ordering parts, please be prepared to any... respect to give the following information: • The MODEL NUMBER of the product (WLTL19013) • The NAME of the product (WESLO® CADENCE 200 CS treadmill) • The SERIAL NUMBER of the product (see the front cover of this manual) • The KEY NUMBER and DESCRIPTION of...


