
English Manual
Page 2
... are attached in sandals. 2. Never use an extension cord. 11. Use the treadmill only as described. 3. Keep the treadmill indoors, away from the treadmill at all of burns, fire, electric shock, or injury to ensure that blocks air openings. When connecting the power cord... (see your local WESLO dealer or call 1-800-8063651 and order part number 146148. 5. Keep children under the treadmill....
... are attached in sandals. 2. Never use an extension cord. 11. Use the treadmill only as described. 3. Keep the treadmill indoors, away from the treadmill at all of burns, fire, electric shock, or injury to ensure that blocks air openings. When connecting the power cord... (see your local WESLO dealer or call 1-800-8063651 and order part number 146148. 5. Keep children under the treadmill....
English Manual
Page 3
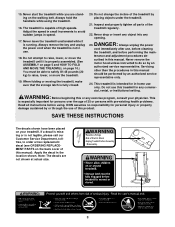
... use this manual). tenance and adjustment procedures de- 15. When folding or moving the treadmill, make sure that the storage latch is not legible, please call our •Hazardous Voltage Customer Service Department, toll- •Risk of Electric Shock /D•Uisn•aRpsi•lssHukegamzoTabfrrelEdyal.oeducmstrilVilcoblSteahfgooercek Assembly free, to raise, lower, or...
... use this manual). tenance and adjustment procedures de- 15. When folding or moving the treadmill, make sure that the storage latch is not legible, please call our •Hazardous Voltage Customer Service Department, toll- •Risk of Electric Shock /D•Uisn•aRpsi•lssHukegamzoTabfrrelEdyal.oeducmstrilVilcoblSteahfgooercek Assembly free, to raise, lower, or...

English Manual
Page 5
... which has a large hole near the lower end. (Note: There may be transferred to the top of a second person, carefully tip the treadmill onto its right side and attach the Left Handrail (not shown) as shown (only the right side is shown). Using a 9/16" socket ...screwdriver , adjustable wrenches , and 9/16" socket wrench . 1. Feed the end of Electric Shock •Unplug Treadmill before Assembly /Disassembly. This does not affect treadmill performance. With the help of a second person, raise the treadmill so the Base (71) is lubricant on the Handrails.) Hold the Right Handrail in ...
... which has a large hole near the lower end. (Note: There may be transferred to the top of a second person, carefully tip the treadmill onto its right side and attach the Left Handrail (not shown) as shown (only the right side is shown). Using a 9/16" socket ...screwdriver , adjustable wrenches , and 9/16" socket wrench . 1. Feed the end of Electric Shock •Unplug Treadmill before Assembly /Disassembly. This does not affect treadmill performance. With the help of a second person, raise the treadmill so the Base (71) is lubricant on the Handrails.) Hold the Right Handrail in ...
English Manual
Page 7
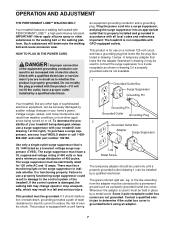
...surge dissipation of electric shock. To decrease the pos- 2 sibility of electric shock. Grounding Pin Grounded Outlet Grounding Plug Grounded Outlet Box Adapter Surge Suppressor Use only a single-outlet surge suppressor that looks like the plug illustrated in your treadmill (see your local WESLO dealer or ...should malfunction or break down, grounding provides a path of least resistance for electric current to use a properly functioning surge suppressor could result in an increased risk of your treadmill being turned on the surge suppressor to determine if the outlet box cover ...
...surge dissipation of electric shock. To decrease the pos- 2 sibility of electric shock. Grounding Pin Grounded Outlet Grounding Plug Grounded Outlet Box Adapter Surge Suppressor Use only a single-outlet surge suppressor that looks like the plug illustrated in your treadmill (see your local WESLO dealer or ...should malfunction or break down, grounding provides a path of least resistance for electric current to use a properly functioning surge suppressor could result in an increased risk of your treadmill being turned on the surge suppressor to determine if the outlet box cover ...
English Manual
Page 8
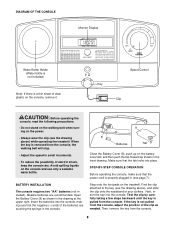
...the batteries into the console. Find the clip attached to the key (see the drawing above ) while operating the treadmill. Next, insert the key into the console, making sure that the negative (-) ends of your clothes. BATTERY ...INSTALLATION The console requires two "AA" batteries (not included). Avoid spilling liquids on the treadmill. Alkaline batteries are touching the springs in the console. 8 8 Batteries Tab Close the Battery Cover (8), push up ... a few steps backward until the key is a thin sheet of electric shock, keep the console dry.
...the batteries into the console. Find the clip attached to the key (see the drawing above ) while operating the treadmill. Next, insert the key into the console, making sure that the negative (-) ends of your clothes. BATTERY ...INSTALLATION The console requires two "AA" batteries (not included). Avoid spilling liquids on the treadmill. Alkaline batteries are touching the springs in the console. 8 8 Batteries Tab Close the Battery Cover (8), push up ... a few steps backward until the key is a thin sheet of electric shock, keep the console dry.


