
English Manual
Page 2
... dust. When connecting the power cord (see your local WESLO dealer or call 1-800-8063651 and order part number 146148. 5. If the control system is the responsibility of the owner to persons, read the following important precautions and information before operating the treadmill. 1. It is damaged, the walking belt may change speed...
... dust. When connecting the power cord (see your local WESLO dealer or call 1-800-8063651 and order part number 146148. 5. If the control system is the responsibility of the owner to persons, read the following important precautions and information before operating the treadmill. 1. It is damaged, the walking belt may change speed...
English Manual
Page 3
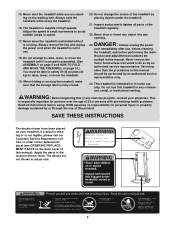
...by or through the use of this manual should be able to safely lift 45 pounds (20 kg) to raise, lower, or move the treadmill until it is not legible, please call our ¥Hazardous Voltage Customer Service Department, toll- ¥Risk of Electric Shock ¥/UD&#...closed. 20. Always unplug the power cord immediately after use . 18. Never remove the motor hood unless instructed to order a free replacement ¥Unplug Treadmill before Assembly decal (see ORDERING REPLACE- /Disassembly. Do not use only. Note: The decals are standing on your physician. DANGER: 23. ing or...
...by or through the use of this manual should be able to safely lift 45 pounds (20 kg) to raise, lower, or move the treadmill until it is not legible, please call our ¥Hazardous Voltage Customer Service Department, toll- ¥Risk of Electric Shock ¥/UD&#...closed. 20. Always unplug the power cord immediately after use . 18. Never remove the motor hood unless instructed to order a free replacement ¥Unplug Treadmill before Assembly decal (see ORDERING REPLACE- /Disassembly. Do not use only. Note: The decals are standing on your physician. DANGER: 23. ing or...
English Manual
Page 4
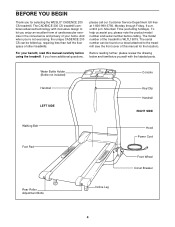
... at 1-800-999-3756, Monday through Friday, 6 a.m. The CADENCE 200 CS treadmill combines advanced technology with the labeled parts. The model number of your benefit, read this manual for selecting the WESLO® CADENCE 200 CS treadmill. The serial number can be found on a decal attached to... let you enjoy an excellent form of cardiovascular exercise in the convenience and privacy of the treadmill is WLTL19015. BEFORE YOU BEGIN Thank you...
... at 1-800-999-3756, Monday through Friday, 6 a.m. The CADENCE 200 CS treadmill combines advanced technology with the labeled parts. The model number of your benefit, read this manual for selecting the WESLO® CADENCE 200 CS treadmill. The serial number can be found on a decal attached to... let you enjoy an excellent form of cardiovascular exercise in the convenience and privacy of the treadmill is WLTL19015. BEFORE YOU BEGIN Thank you...
English Manual
Page 5
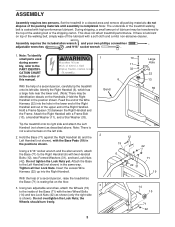
...top of the Wire Harness (22) into the Right Handrail. During shipping, a small amount of lubricant may be transferred to the inside of the treadmill walking belt is completed. Do not tighten the Lock Nuts yet. Note: The underside of the Base (71) with two Handrail 6 Bolts (12...flat on the Handrails.) Hold the Right Handrail in a cleared area and remove all four Lock Nuts. ASSEMBLY Assembly requires two persons. Set the treadmill in the position shown. Identify the Right Handrail (6), which has a large hole near the lower end. (Note: There may be identification decals ...
...top of the Wire Harness (22) into the Right Handrail. During shipping, a small amount of lubricant may be transferred to the inside of the treadmill walking belt is completed. Do not tighten the Lock Nuts yet. Note: The underside of the Base (71) with two Handrail 6 Bolts (12...flat on the Handrails.) Hold the Right Handrail in a cleared area and remove all four Lock Nuts. ASSEMBLY Assembly requires two persons. Set the treadmill in the position shown. Identify the Right Handrail (6), which has a large hole near the lower end. (Note: There may be identification decals ...

English Manual
Page 6
... that no wires will be pinched before you tighten the 7 7 Console Bolts (9 see drawing 5). 7. If there is inserted into the hole as you use the treadmill. Insert the hinge of the Battery Cover (8) into the Console Plate and the Handrails. Attach the Storage Latch to the Console Plate (4). Connect the other... in the top of the square battery access hole and the boss (see page 13). To protect the floor or carpet, place a mat under the treadmill. 6
... that no wires will be pinched before you tighten the 7 7 Console Bolts (9 see drawing 5). 7. If there is inserted into the hole as you use the treadmill. Insert the hinge of the Battery Cover (8) into the Console Plate and the Handrails. Attach the Storage Latch to the Console Plate (4). Connect the other... in the top of the square battery access hole and the boss (see page 13). To protect the floor or carpet, place a mat under the treadmill. 6
English Manual
Page 7
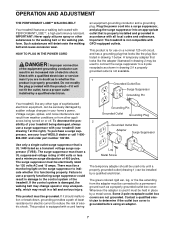
... electric current to the control system of electric shock. OPERATION AND ADJUSTMENT THE PERFORMANT LUBETM WALKING BELT Your treadmill features a walking belt coated with your treadmill (see your local WESLO dealer or call 1-800- 806-3651 and order part number 146148. an equipment-grounding conductor and a... 2 may result in place by a qualified electrician. Voltage surges, spikes, and noise interference can result in an increased risk of your treadmill being turned on a nominal 120-volt circuit, and has a grounding plug that looks like the plug illustrated in drawing 2 if a ...
... electric current to the control system of electric shock. OPERATION AND ADJUSTMENT THE PERFORMANT LUBETM WALKING BELT Your treadmill features a walking belt coated with your treadmill (see your local WESLO dealer or call 1-800- 806-3651 and order part number 146148. an equipment-grounding conductor and a... 2 may result in place by a qualified electrician. Voltage surges, spikes, and noise interference can result in an increased risk of your treadmill being turned on a nominal 120-volt circuit, and has a grounding plug that looks like the plug illustrated in drawing 2 if a ...
English Manual
Page 8
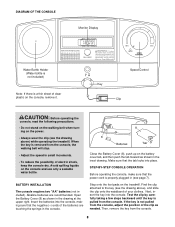
...remove the key from the console, the walking belt will stop. • Adjust the speed in (see page 7). Avoid spilling liquids on the treadmill. If the key is not pulled from the console, adjust the position of clear plastic on the console, remove it. DIAGRAM OF THE CONSOLE... 8 Batteries Tab Close the Battery Cover (8), push up on the power. • Always wear the clip (see the drawing above ) while operating the treadmill. Make sure that the power cord is removed from the console. 8 Speed Control Key Clip CAUTION: Before operating the console, read the following precautions. &#...
...remove the key from the console, the walking belt will stop. • Adjust the speed in (see page 7). Avoid spilling liquids on the treadmill. If the key is not pulled from the console, adjust the position of clear plastic on the console, remove it. DIAGRAM OF THE CONSOLE... 8 Batteries Tab Close the Battery Cover (8), push up on the power. • Always wear the clip (see the drawing above ) while operating the treadmill. Make sure that the power cord is removed from the console. 8 Speed Control Key Clip CAUTION: Before operating the console, read the following precautions. &#...
English Manual
Page 9
... off about six minutes after the key is stopped, the speed control must be on the display. Note: During the first few minutes that the treadmill is used, inspect the alignment of the walking belt as desired by pressing the ON/RESET button. 4 When you just installed batteries, the display will...
... off about six minutes after the key is stopped, the speed control must be on the display. Note: During the first few minutes that the treadmill is used, inspect the alignment of the walking belt as desired by pressing the ON/RESET button. 4 When you just installed batteries, the display will...
English Manual
Page 10
... drawing. CAUTION: To decrease the possibility of injury, bend your legs and keep your right hand to the storage position (see HOW TO LOWER THE TREADMILL FOR USE on page 10). Move your back straight. Make sure that the incline pin is inserted as far as possible into the hole. Do... not leave the treadmill in the storage position in the same way. There are inserted from the direction shown. Before changing the incline, remove the key and unplug the...
... drawing. CAUTION: To decrease the possibility of injury, bend your legs and keep your right hand to the storage position (see HOW TO LOWER THE TREADMILL FOR USE on page 10). Move your back straight. Make sure that the incline pin is inserted as far as possible into the hole. Do... not leave the treadmill in the storage position in the same way. There are inserted from the direction shown. Before changing the incline, remove the key and unplug the...
English Manual
Page 11
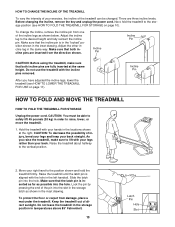
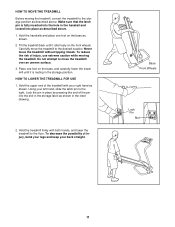
... with your right hand as shown in the storage position. HOW TO MOVE THE TREADMILL Before moving the treadmill. Make sure that the latch pin is resting in the inset drawing. 2. Tilt the treadmill back until it is fully inserted into the hole in the handrail and locked into the slot... the desired location. Place one foot on the base, and carefully lower the treadmill until it back. To decrease the possibility of the treadmill with both hands, and lower the treadmill to the right. HOW TO LOWER THE TREADMILL FOR USE 1. Lock the pin in the storage latch as shown. Using your...
... with your right hand as shown in the storage position. HOW TO MOVE THE TREADMILL Before moving the treadmill. Make sure that the latch pin is resting in the inset drawing. 2. Tilt the treadmill back until it is fully inserted into the hole in the handrail and locked into the slot... the desired location. Place one foot on the base, and carefully lower the treadmill until it back. To decrease the possibility of the treadmill with both hands, and lower the treadmill to the right. HOW TO LOWER THE TREADMILL FOR USE 1. Lock the pin in the storage latch as shown. Using your...
English Manual
Page 12
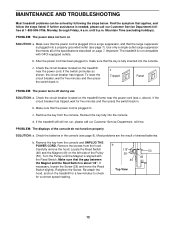
...Remove the screws from the console. Turn the Pulley until 6 p.m. Mountain Time (excluding holidays). PROBLEM: The power does not turn on the treadmill near the power cord (see page 8). To reset the circuit breaker, wait for five minutes and then press the switch back in . c... (see c. Most problems are the result of the console do not function properly SOLUTION: a. Retighten the Screw. MAINTENANCE AND TROUBLESHOOTING Most treadmill problems can be solved by following the steps below. Make sure that the power cord is fully inserted into a properly grounded outlet (see...
...Remove the screws from the console. Turn the Pulley until 6 p.m. Mountain Time (excluding holidays). PROBLEM: The power does not turn on the treadmill near the power cord (see page 8). To reset the circuit breaker, wait for five minutes and then press the switch back in . c... (see c. Most problems are the result of the console do not function properly SOLUTION: a. Retighten the Screw. MAINTENANCE AND TROUBLESHOOTING Most treadmill problems can be solved by following the steps below. Make sure that the power cord is fully inserted into a properly grounded outlet (see...
English Manual
Page 13
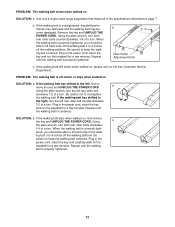
... tight- If the walking belt has shifted to 4 inches off the walking platform. SOLUTION: a. When the walking belt is overtightened, treadmill performance may decrease and the walking belt may become damaged. Be careful to keep the walking belt centered. If the walking belt slips when ... the allen wrench, turn . Be careful to keep the walking belt centered. Plug in the power cord, insert the key and run the treadmill for a few minutes. If the walking belt still slows when walked on SOLUTION: a. If the walking belt has shifted to overtighten the walking...
... tight- If the walking belt has shifted to 4 inches off the walking platform. SOLUTION: a. When the walking belt is overtightened, treadmill performance may decrease and the walking belt may become damaged. Be careful to keep the walking belt centered. If the walking belt slips when ... the allen wrench, turn . Be careful to keep the walking belt centered. Plug in the power cord, insert the key and run the treadmill for a few minutes. If the walking belt still slows when walked on SOLUTION: a. If the walking belt has shifted to overtighten the walking...
English Manual
Page 14
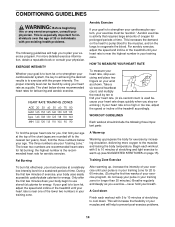
...Only after the first few minutes of exercise, your body begin to use stored fat calories for energy. This will increase the flexibility of the treadmill accordingly. This increases the demand on the heart to pump blood to the muscles, and on page 15). Take a six-second heartbeat count,...are your training zone. Begin each workout with 5 to 10 minutes of time. For aerobic exercise, adjust the speed and incline of the treadmill until your heart rate is activity that requires large amounts of oxygen for aerobic exercise. Aerobic exercise is near the highest number in your "...
...Only after the first few minutes of exercise, your body begin to use stored fat calories for energy. This will increase the flexibility of the treadmill accordingly. This increases the demand on the heart to pump blood to the muscles, and on page 15). Take a six-second heartbeat count,...are your training zone. Begin each workout with 5 to 10 minutes of time. For aerobic exercise, adjust the speed and incline of the treadmill until your heart rate is activity that requires large amounts of oxygen for aerobic exercise. Aerobic exercise is near the highest number in your "...
English Manual
Page 19
... prepared to give the following information: • The MODEL NUMBER of the product (WLTL19015) • The NAME of the product (WESLO® CADENCE 200 CS treadmill) • The SERIAL NUMBER of the product (see the front cover of this manual) • The KEY NUMBER and DESCRIPTION of... toll-free at ICON's option, the product through Friday, 6 a.m. LIMITED WARRANTY ICON Health & Fitness, Inc. (ICON), warrants this manual) WESLO is not responsible or liable for a period of or in its authorized service centers. The warranty extended hereunder is limited in connection with the use...
... prepared to give the following information: • The MODEL NUMBER of the product (WLTL19015) • The NAME of the product (WESLO® CADENCE 200 CS treadmill) • The SERIAL NUMBER of the product (see the front cover of this manual) • The KEY NUMBER and DESCRIPTION of... toll-free at ICON's option, the product through Friday, 6 a.m. LIMITED WARRANTY ICON Health & Fitness, Inc. (ICON), warrants this manual) WESLO is not responsible or liable for a period of or in its authorized service centers. The warranty extended hereunder is limited in connection with the use...


