

Uk Manual
Page 1
...: ICON Health & Fitness, Ltd. Customer Service Department Unit 4 Revie Road Industrial Estate Revie Road Beeston Leeds, LS118JG UK email: [email protected] CAUTION Read all precautions and instructions in the space above for future reference. USER'S MANUAL Save this equipment. If you have questions, or if there are committed to providing complete customer satisfaction. Write the serial number in this manual...
...: ICON Health & Fitness, Ltd. Customer Service Department Unit 4 Revie Road Industrial Estate Revie Road Beeston Leeds, LS118JG UK email: [email protected] CAUTION Read all precautions and instructions in the space above for future reference. USER'S MANUAL Save this equipment. If you have questions, or if there are committed to providing complete customer satisfaction. Write the serial number in this manual...

Uk Manual
Page 2
TABLE OF CONTENTS IMPORTANT PRECAUTIONS 3 BEFORE YOU BEGIN 5 ASSEMBLY 6 OPERATION AND ADJUSTMENT 10 HOW TO FOLD AND MOVE THE TREADMILL 14 TROUBLESHOOTING 16 CONDITIONING GUIDELINES 18 ORDERING REPLACEMENT PARTS Back Cover Note: A PART IDENTIFICATION CHART, an EXPLODED DRAWING, and a PART LIST are attached in the center of ICON IP, Inc. 2 WESLO is a registered trademark of this manual.
TABLE OF CONTENTS IMPORTANT PRECAUTIONS 3 BEFORE YOU BEGIN 5 ASSEMBLY 6 OPERATION AND ADJUSTMENT 10 HOW TO FOLD AND MOVE THE TREADMILL 14 TROUBLESHOOTING 16 CONDITIONING GUIDELINES 18 ORDERING REPLACEMENT PARTS Back Cover Note: A PART IDENTIFICATION CHART, an EXPLODED DRAWING, and a PART LIST are attached in the center of ICON IP, Inc. 2 WESLO is a registered trademark of this manual.
Uk Manual
Page 3
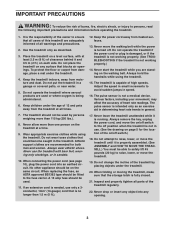
... not working properly.) 14. Always hold the handrails while using the treadmill. The treadmill is not working properly. (See TROUBLESHOOTING if the treadmill is capable of high speeds. The pulse sensor is turned off switch.) 18. Never leave the treadmill unattended while it and 0.5 m (2 ft.) on /off . Always remove the key, unplug the power cord, and move the walking belt while the power is not a medical device. Do not change the incline of heart rate...
... not working properly.) 14. Always hold the handrails while using the treadmill. The treadmill is not working properly. (See TROUBLESHOOTING if the treadmill is capable of high speeds. The pulse sensor is turned off switch.) 18. Never leave the treadmill unattended while it and 0.5 m (2 ft.) on /off . Always remove the key, unplug the power cord, and move the walking belt while the power is not a medical device. Do not change the incline of heart rate...
Uk Manual
Page 4
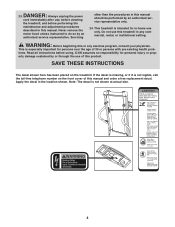
... 35 or persons with pre-existing health problems. Read all instructions before performing the maintenance and adjustment procedures described in this manual. Apply the decal in the location shown. DANGER: 23. SAVE THESE INSTRUCTIONS The decal shown here has been placed on the front cover of this treadmill in -home use this product. Never remove the motor hood unless instructed to do so by or through...
... 35 or persons with pre-existing health problems. Read all instructions before performing the maintenance and adjustment procedures described in this manual. Apply the decal in the location shown. DANGER: 23. SAVE THESE INSTRUCTIONS The decal shown here has been placed on the front cover of this treadmill in -home use this product. Never remove the motor hood unless instructed to do so by or through...
Uk Manual
Page 5
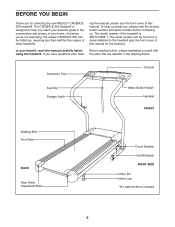
... CADENCE 200 can be folded up, requiring less than half the floor space of other treadmills. or your home. The model number of this manual carefully before contacting us. Accessory Tray Console Key/Clip Storage Latch Water Bottle Holder* Handrail FRONT Walking Belt Foot Rails BACK Rear Roller Adjustment Bolts Circuit Breaker On/Off Switch RIGHT SIDE Incline Pin Incline Leg *No water bottle is WETL14805.1. The CADENCE 200 treadmill is designed to the treadmill (see the front cover...
... CADENCE 200 can be folded up, requiring less than half the floor space of other treadmills. or your home. The model number of this manual carefully before contacting us. Accessory Tray Console Key/Clip Storage Latch Water Bottle Holder* Handrail FRONT Walking Belt Foot Rails BACK Rear Roller Adjustment Bolts Circuit Breaker On/Off Switch RIGHT SIDE Incline Pin Incline Leg *No water bottle is WETL14805.1. The CADENCE 200 treadmill is designed to the treadmill (see the front cover...
Uk Manual
Page 6
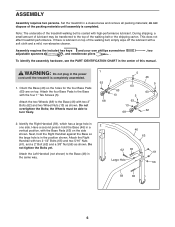
... keys and your own phillips screwdriver adjustable spanners , and needlenose pliers . , two To identify the assembly hardware, see the PART IDENTIFICATION CHART in the center of lubricant may be able to the Base (46) in the position shown. Next, hold the Base (46) in the power cord until assembly is lubricant on top of the walking belt or the shipping carton. Set the treadmill...
... keys and your own phillips screwdriver adjustable spanners , and needlenose pliers . , two To identify the assembly hardware, see the PART IDENTIFICATION CHART in the center of lubricant may be able to the Base (46) in the position shown. Next, hold the Base (46) in the power cord until assembly is lubricant on top of the walking belt or the shipping carton. Set the treadmill...
Uk Manual
Page 8
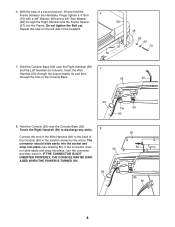
... THE CONSOLE MAY BE DAM- AGED WHEN THE POWER IS TURNED ON. 59 55 60 8b 60 8 The connector should slide easily into the socket and snap into place, turn the connector 52 and then insert it. Hold the Console Base (52) near the Console Base (52). Repeat this step on ...to discharge any static. 8 Connect the end of the Wire Harness (60) to the back of the Console (55) in the Console Base. 52 60 59 Tie 60 60 8. If the connector does not slide easily and snap into place (see drawing 8b). 6. Do not tighten the Bolt yet. Finger tighten a 4" Bolt (70) with a 3/8" ...
... THE CONSOLE MAY BE DAM- AGED WHEN THE POWER IS TURNED ON. 59 55 60 8b 60 8 The connector should slide easily into the socket and snap into place, turn the connector 52 and then insert it. Hold the Console Base (52) near the Console Base (52). Repeat this step on ...to discharge any static. 8 Connect the end of the Wire Harness (60) to the back of the Console (55) in the Console Base. 52 60 59 Tie 60 60 8. If the connector does not slide easily and snap into place (see drawing 8b). 6. Do not tighten the Bolt yet. Finger tighten a 4" Bolt (70) with a 3/8" ...
Uk Manual
Page 9
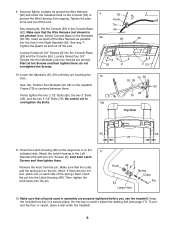
.... Tighten the plastic tie and cut off the end. Start all parts used to prevent the Wire Harness from the pin. Position the Handrails (53, 59) so the treadmill Frame (79) is on the 11 indicated side. Attach the Latch Housing to overtighten the Bolts. 10a 70 65 53, 59 62 65 79 Top View 59 53 79 11. Set the Console...
.... Tighten the plastic tie and cut off the end. Start all parts used to prevent the Wire Harness from the pin. Position the Handrails (53, 59) so the treadmill Frame (79) is on the 11 indicated side. Attach the Latch Housing to overtighten the Bolts. 10a 70 65 53, 59 62 65 79 Top View 59 53 79 11. Set the Console...
Uk Manual
Page 10
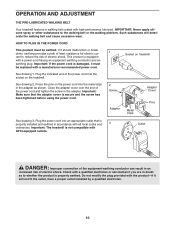
... must be replaced with high-performance lubricant. Close the adapter cover over the end of least resistance for electric cur- 1 rent to the walking belt or the walking platform. Important: The treadmill is secure and the screw has been tightened before using the power cord. 2 Screw Adapter Metal Clips Adapter Cover Pins See drawing 3. If it should malfunction or break down, earthing provides a path of the power cord and tighten the screw in...
... must be replaced with high-performance lubricant. Close the adapter cover over the end of least resistance for electric cur- 1 rent to the walking belt or the walking platform. Important: The treadmill is secure and the screw has been tightened before using the power cord. 2 Screw Adapter Metal Clips Adapter Cover Pins See drawing 3. If it should malfunction or break down, earthing provides a path of the power cord and tighten the screw in...
Uk Manual
Page 11
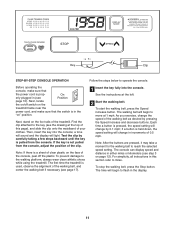
... display will change by pressing the Speed increase and decrease buttons. Next, stand on the face of the console, peel off switch on the treadmill frame near the power cord, and make sure that the switch is used, observe the alignment of the treadmill. If the key is a sheet of clear plastic on the foot rails of the walking belt, and center the walking belt if necessary (see step...
... display will change by pressing the Speed increase and decrease buttons. Next, stand on the face of the console, peel off switch on the treadmill frame near the power cord, and make sure that the switch is used, observe the alignment of the treadmill. If the key is a sheet of clear plastic on the foot rails of the walking belt, and center the walking belt if necessary (see step...
Uk Manual
Page 12
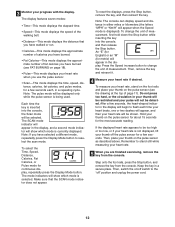
... show which mode is displayed). Step onto the foot rails, press the Stop button, and remove the key from the console. To select the Time, Speed, Distance, Calories, Fat Calories, or Pulse mode for continuous display, repeatedly press the Display Mode button. To change the unit of fat calories you are finished exercising, remove the key from the console. Make sure that you have walked or run. • Calories-This mode displays the approximate number of calories...
... show which mode is displayed). Step onto the foot rails, press the Stop button, and remove the key from the console. To select the Time, Speed, Distance, Calories, Fat Calories, or Pulse mode for continuous display, repeatedly press the Display Mode button. To change the unit of fat calories you are finished exercising, remove the key from the console. Make sure that you have walked or run. • Calories-This mode displays the approximate number of calories...
Uk Manual
Page 13
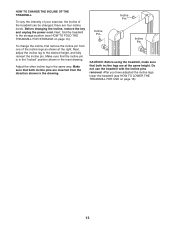
... the direction shown in the drawing. Make sure that the incline pin is in the "locked" position shown in the same way. HOW TO CHANGE THE INCLINE OF THE TREADMILL To vary the intensity of your exercise, the incline of the incline legs as shown at the same height. Do not use the treadmill with the incline pins removed. Before changing the incline, remove the key and unplug the power cord.
... the direction shown in the drawing. Make sure that the incline pin is in the "locked" position shown in the same way. HOW TO CHANGE THE INCLINE OF THE TREADMILL To vary the intensity of your exercise, the incline of the incline legs as shown at the same height. Do not use the treadmill with the incline pins removed. Before changing the incline, remove the key and unplug the power cord.
Uk Manual
Page 14
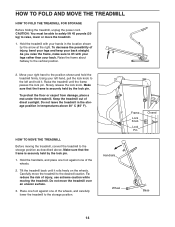
... the treadmill firmly. Hold the treadmill with your legs rather than your right hand to the desired location. HOW TO MOVE THE TREADMILL Before moving the treadmill. Carefully move the treadmill. 1. HOW TO FOLD AND MOVE THE TREADMILL HOW TO FOLD THE TREADMILL FOR STORAGE Before folding the treadmill, unplug the power cord. CAUTION: You must be able to safely lift 45 pounds (20 kg) to raise, lower or move the treadmill to...
... the treadmill firmly. Hold the treadmill with your legs rather than your right hand to the desired location. HOW TO MOVE THE TREADMILL Before moving the treadmill. Carefully move the treadmill. 1. HOW TO FOLD AND MOVE THE TREADMILL HOW TO FOLD THE TREADMILL FOR STORAGE Before folding the treadmill, unplug the power cord. CAUTION: You must be able to safely lift 45 pounds (20 kg) to raise, lower or move the treadmill to...
Uk Manual
Page 15
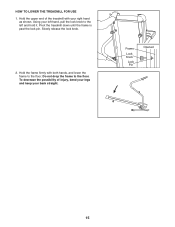
Hold the upper end of injury, bend your legs and keep your back straight. Using your right hand as shown. Do not drop the frame to the left hand, pull the lock knob to the floor. To decrease the possibility of the treadmill with both hands, and lower the frame to the floor. Hold the frame firmly with your left and hold it. HOW TO LOWER THE TREADMILL FOR USE 1. Slowly release the lock knob. 2. Pivot the treadmill down until the frame is past the lock pin. Frame Lock Knob Lock Pin Opened 15
Hold the upper end of injury, bend your legs and keep your back straight. Using your right hand as shown. Do not drop the frame to the left hand, pull the lock knob to the floor. To decrease the possibility of the treadmill with both hands, and lower the frame to the floor. Hold the frame firmly with your left and hold it. HOW TO LOWER THE TREADMILL FOR USE 1. Slowly release the lock knob. 2. Pivot the treadmill down until the frame is past the lock pin. Frame Lock Knob Lock Pin Opened 15
Uk Manual
Page 16
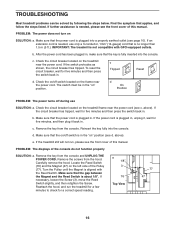
... then press the switch back in , make sure that is plugged in . The switch must be solved by following the steps below. If the power cord is not compatible with the Reed Switch. Remove the key from the console and UNPLUG THE POWER CORD. Carefully remove the hood. Turn the Pulley until the Magnet is needed , please see the front cover of this manual. Check the circuit breaker located on the treadmill frame...
... then press the switch back in , make sure that is plugged in . The switch must be solved by following the steps below. If the power cord is not compatible with the Reed Switch. Remove the key from the console and UNPLUG THE POWER CORD. Carefully remove the hood. Turn the Pulley until the Magnet is needed , please see the front cover of this manual. Check the circuit breaker located on the treadmill frame...
Uk Manual
Page 17
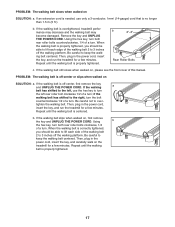
... careful to turn the left rear roller bolt clockwise 1/2 of a turn . If an extension cord is needed, use the hex key to keep the walking belt centered. Remove the key and UNPLUG THE POWER CORD. Then, plug in the power cord, insert the key, and run the treadmill for a few minutes. When the walking belt is off the walking platform. PROBLEM: The walking belt slows when walked on , first remove the key and UNPLUG THE POWER CORD. b. PROBLEM: The walking belt is correctly tightened, you...
... careful to turn the left rear roller bolt clockwise 1/2 of a turn . If an extension cord is needed, use the hex key to keep the walking belt centered. Remove the key and UNPLUG THE POWER CORD. Then, plug in the power cord, insert the key, and run the treadmill for a few minutes. When the walking belt is off the walking platform. PROBLEM: The walking belt slows when walked on , first remove the key and UNPLUG THE POWER CORD. b. PROBLEM: The walking belt is correctly tightened, you...
Uk Manual
Page 18
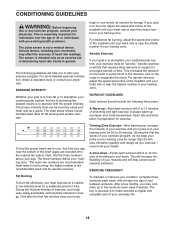
... beginning this or any exercise program, consult your everyday life. 18 The sensor is intended only as you to plan your cardiovascular system, the key to strengthen your exercise program. If your goal is to burn fat, adjust the speed and incline of the treadmill until your pulse is to exercise with 5 to 10 minutes of the treadmill until your heart rate is to burn...
... beginning this or any exercise program, consult your everyday life. 18 The sensor is intended only as you to plan your cardiovascular system, the key to strengthen your exercise program. If your goal is to burn fat, adjust the speed and incline of the treadmill until your pulse is to exercise with 5 to 10 minutes of the treadmill until your heart rate is to burn...
Uk Manual
Page 20
... Guide Belt Guide Screw Reed Switch Clip Reed Switch Screw Hood Anchor Drive Motor Wire Tie Frame U-nut Motor Tension Bolt Motor Isolator Plate Motor Star Washer Motor Tension Nut Motor Pivot Bolt Frame Spacer Outlet Adapter 3/8" Star Washer Power Cord Controller Electronic Screw Filter Bracket Grommet Electronics Bracket On/Off Switch Circuit Breaker Roller Adjustment Washer Front Roller Adjustment Bolt Plastic Fastener Motor Belt Receptical Rear Roller Adjustment Bolt Latch Pin Assembly Rear Platform Screw Base Magnet Latch Housing Left Endcap Motor Bracket 51 1 Key/Clip 52 1 Console...
... Guide Belt Guide Screw Reed Switch Clip Reed Switch Screw Hood Anchor Drive Motor Wire Tie Frame U-nut Motor Tension Bolt Motor Isolator Plate Motor Star Washer Motor Tension Nut Motor Pivot Bolt Frame Spacer Outlet Adapter 3/8" Star Washer Power Cord Controller Electronic Screw Filter Bracket Grommet Electronics Bracket On/Off Switch Circuit Breaker Roller Adjustment Washer Front Roller Adjustment Bolt Plastic Fastener Motor Belt Receptical Rear Roller Adjustment Bolt Latch Pin Assembly Rear Platform Screw Base Magnet Latch Housing Left Endcap Motor Bracket 51 1 Key/Clip 52 1 Console...
Uk Manual
Page 21
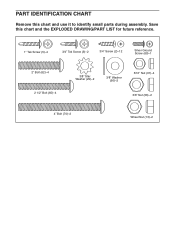
Save this chart and use it to identify small parts during assembly. Frame Bolt (32)-2 Handrail Bolt (20)-4 PART IDENTIFICATION CHART Remove this chart and the EXPLODED DRAWING/PART LIST for future reference. 1" Tek Screw (5)-4 3/4" Tek Screw (3)-2 3/4" Screw (2)-12 Silver Ground Screw (69)-1 2" Bolt (62)-4 2 1/2" Bolt (65)-4 3/8" Star Washer (29)-2 3/8" Washer (66)-2 5/16" Nut (61)-4 3/8" Nut (56)-2 4" Bolt (70)-2 Wheel Nut (13)-2
Save this chart and use it to identify small parts during assembly. Frame Bolt (32)-2 Handrail Bolt (20)-4 PART IDENTIFICATION CHART Remove this chart and the EXPLODED DRAWING/PART LIST for future reference. 1" Tek Screw (5)-4 3/4" Tek Screw (3)-2 3/4" Screw (2)-12 Silver Ground Screw (69)-1 2" Bolt (62)-4 2 1/2" Bolt (65)-4 3/8" Star Washer (29)-2 3/8" Washer (66)-2 5/16" Nut (61)-4 3/8" Nut (56)-2 4" Bolt (70)-2 Wheel Nut (13)-2
Uk Manual
Page 23
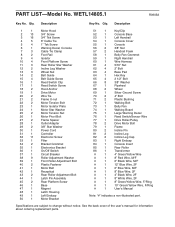
...centre of this manual) • the KEY NUMBER and DESCRIPTION of the desired part(s) (see the front cover of the product (see the PART LIST and the EXPLODED DRAW- ORDERING REPLACEMENT PARTS To order replacement parts, contact the ICON Health & Fitness, Ltd. Customer Service Department Unit 4,... the following information: • the MODEL NUMBER of the product (WETL14805.1) • the NAME of the product (WESLO CADENCE 200 treadmill) • the SERIAL NUMBER of this manual) Part No. 230205 R0905A Printed in Canada © 2005 ICON IP, Inc. office, or write: ICON Health & Fitness, Ltd.
...centre of this manual) • the KEY NUMBER and DESCRIPTION of the desired part(s) (see the front cover of the product (see the PART LIST and the EXPLODED DRAW- ORDERING REPLACEMENT PARTS To order replacement parts, contact the ICON Health & Fitness, Ltd. Customer Service Department Unit 4,... the following information: • the MODEL NUMBER of the product (WETL14805.1) • the NAME of the product (WESLO CADENCE 200 treadmill) • the SERIAL NUMBER of this manual) Part No. 230205 R0905A Printed in Canada © 2005 ICON IP, Inc. office, or write: ICON Health & Fitness, Ltd.


