

Uk Manual
Page 1
... call: 08457 089 009 or write: ICON Health & Fitness, Ltd. Model No. Save this equipment. Serial Number Decal QUESTIONS? USER'S MANUAL Write the serial number in this manual before using this manual for future reference. If you have questions, or if there are committed to providing complete customer satisfaction. WETL14805.1 Serial No. Customer...
... call: 08457 089 009 or write: ICON Health & Fitness, Ltd. Model No. Save this equipment. Serial Number Decal QUESTIONS? USER'S MANUAL Write the serial number in this manual before using this manual for future reference. If you have questions, or if there are committed to providing complete customer satisfaction. WETL14805.1 Serial No. Customer...

Uk Manual
Page 2
TABLE OF CONTENTS IMPORTANT PRECAUTIONS 3 BEFORE YOU BEGIN 5 ASSEMBLY 6 OPERATION AND ADJUSTMENT 10 HOW TO FOLD AND MOVE THE TREADMILL 14 TROUBLESHOOTING 16 CONDITIONING GUIDELINES 18 ORDERING REPLACEMENT PARTS Back Cover Note: A PART IDENTIFICATION CHART, an EXPLODED DRAWING, and a PART LIST are attached in the center of ICON IP, Inc. 2 WESLO is a registered trademark of this manual.
TABLE OF CONTENTS IMPORTANT PRECAUTIONS 3 BEFORE YOU BEGIN 5 ASSEMBLY 6 OPERATION AND ADJUSTMENT 10 HOW TO FOLD AND MOVE THE TREADMILL 14 TROUBLESHOOTING 16 CONDITIONING GUIDELINES 18 ORDERING REPLACEMENT PARTS Back Cover Note: A PART IDENTIFICATION CHART, an EXPLODED DRAWING, and a PART LIST are attached in the center of ICON IP, Inc. 2 WESLO is a registered trademark of this manual.
Uk Manual
Page 4
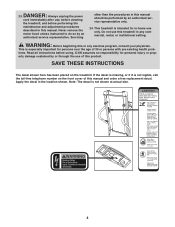
...described in any exercise program, consult your physician. Apply the decal in this manual should be performed by an authorized service representative only. 24. Do not use of this manual and order a free replacement decal. This treadmill is not shown at actual size. 50% 4 This is not legible,... call the toll-free telephone number on the treadmill. ICON assumes no responsibility for persons over the age of...
...described in any exercise program, consult your physician. Apply the decal in this manual should be performed by an authorized service representative only. 24. Do not use of this manual and order a free replacement decal. This treadmill is not shown at actual size. 50% 4 This is not legible,... call the toll-free telephone number on the treadmill. ICON assumes no responsibility for persons over the age of...
Uk Manual
Page 5
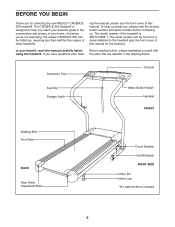
... the product model number and serial number before Before reading further, please familiarise yourself with using the treadmill. The CADENCE 200 treadmill is designed to the treadmill (see the front cover of this manual for selecting the new WESLO® CADENCE 200 treadmill. Accessory Tray Console Key/Clip Storage Latch Water Bottle Holder* Handrail FRONT Walking Belt Foot Rails BACK...
... the product model number and serial number before Before reading further, please familiarise yourself with using the treadmill. The CADENCE 200 treadmill is designed to the treadmill (see the front cover of this manual for selecting the new WESLO® CADENCE 200 treadmill. Accessory Tray Console Key/Clip Storage Latch Water Bottle Holder* Handrail FRONT Walking Belt Foot Rails BACK...
Uk Manual
Page 6
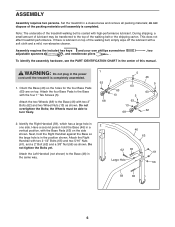
... spanners , and needlenose pliers . , two To identify the assembly hardware, see the PART IDENTIFICATION CHART in the center of the treadmill walking belt is in the power cord until assembly is completed. Attach the Right Handrail with the Base Pads (63) on the side... requires two persons. If there is completely assembled. 1. This does not affect treadmill performance. do not dispose of the packing materials until the treadmill is lubricant on top. Note: The underside of this manual. Have a second person hold the Right Handrail against the Base so the large...
... spanners , and needlenose pliers . , two To identify the assembly hardware, see the PART IDENTIFICATION CHART in the center of the treadmill walking belt is in the power cord until assembly is completed. Attach the Right Handrail with the Base Pads (63) on the side... requires two persons. If there is completely assembled. 1. This does not affect treadmill performance. do not dispose of the packing materials until the treadmill is lubricant on top. Note: The underside of this manual. Have a second person hold the Right Handrail against the Base so the large...
Uk Manual
Page 16
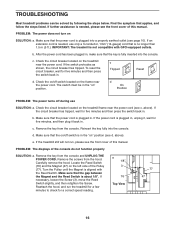
... been plugged in, make sure that the power cord is in the "on" position (see the front cover of this manual. Check the circuit breaker located on the treadmill frame near the power cord. b. If the power cord is fully inserted into the console. Reinsert the key fully into ...To reset the circuit breaker, wait for five minutes and then press the switch back in. a 1/8" 3 76 Top View 77 47 16 TROUBLESHOOTING Most treadmill problems can be in the "on" position. c. d. Make sure that the gap between the Magnet and the Reed Switch is aligned with GFCI-equipped ...
... been plugged in, make sure that the power cord is in the "on" position (see the front cover of this manual. Check the circuit breaker located on the treadmill frame near the power cord. b. If the power cord is fully inserted into the console. Reinsert the key fully into ...To reset the circuit breaker, wait for five minutes and then press the switch back in. a 1/8" 3 76 Top View 77 47 16 TROUBLESHOOTING Most treadmill problems can be in the "on" position. c. d. Make sure that the gap between the Magnet and the Reed Switch is aligned with GFCI-equipped ...
Uk Manual
Page 17
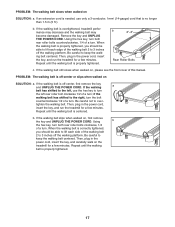
... is correctly tightened, you should be able to lift each side of a turn . Be careful to over- PROBLEM: The walking belt is overtightened, treadmill performance may decrease and the walking belt may become damaged. b. PROBLEM: The walking belt slows when walked on SOLUTION: a. If the walking belt is... off -center, first remove the key and UNPLUG THE POWER CORD. Using the hex key, turn both rear roller bolts clockwise, 1/4 of this manual. b 2"-3" Rear Roller Bolts c. Then, plug in the power cord, insert the key, and carefully walk on , please see the front cover of a...
... is correctly tightened, you should be able to lift each side of a turn . Be careful to over- PROBLEM: The walking belt is overtightened, treadmill performance may decrease and the walking belt may become damaged. b. PROBLEM: The walking belt slows when walked on SOLUTION: a. If the walking belt is... off -center, first remove the key and UNPLUG THE POWER CORD. Using the hex key, turn both rear roller bolts clockwise, 1/4 of this manual. b 2"-3" Rear Roller Bolts c. Then, plug in the power cord, insert the key, and carefully walk on , please see the front cover of a...
Uk Manual
Page 20
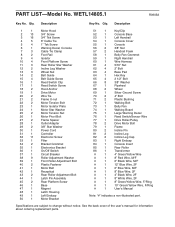
Specifications are subject to change without notice. Qty. Description Key No. See the back cover of the user's manual for information about ordering replacement parts. WETL14805.1 R0905A Key No. Description 1 1 2 13 3 16 4 5 5 4 6 1 7 3 8 2 9 4 10 4 11 3 12 2 13 3 14 2 15 4 16 1 17 1... # 1 6" Blue Wire, M/F # 1 8" Blue Wire, 2F # 1 4" Black Wire, 2F # 1 8" White Wire, 2F # 1 8" Green/Yellow Wire, F/Ring # 1 10" Green/Yellow Wire, F/Ring # 1 User's Manual Note: "#" indicates a non-illustrated part. PART LIST-Model No. Qty.
Specifications are subject to change without notice. Qty. Description Key No. See the back cover of the user's manual for information about ordering replacement parts. WETL14805.1 R0905A Key No. Description 1 1 2 13 3 16 4 5 5 4 6 1 7 3 8 2 9 4 10 4 11 3 12 2 13 3 14 2 15 4 16 1 17 1... # 1 6" Blue Wire, M/F # 1 8" Blue Wire, 2F # 1 4" Black Wire, 2F # 1 8" White Wire, 2F # 1 8" Green/Yellow Wire, F/Ring # 1 10" Green/Yellow Wire, F/Ring # 1 User's Manual Note: "#" indicates a non-illustrated part. PART LIST-Model No. Qty.
Uk Manual
Page 23
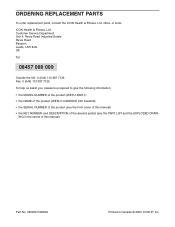
....1) • the NAME of the product (WESLO CADENCE 200 treadmill) • the SERIAL NUMBER of the product (see the PART LIST and the EXPLODED DRAW- ING in the centre of the desired part(s) (see the front cover of this manual) • the KEY NUMBER and DESCRIPTION of this manual) Part No. 230205 R0905A Printed in Canada...
....1) • the NAME of the product (WESLO CADENCE 200 treadmill) • the SERIAL NUMBER of the product (see the PART LIST and the EXPLODED DRAW- ING in the centre of the desired part(s) (see the front cover of this manual) • the KEY NUMBER and DESCRIPTION of this manual) Part No. 230205 R0905A Printed in Canada...

