
Uk Manual
Page 2
...water. 11. TABLE OF CONTENTS IMPORTANT PRECAUTIONS 2 BEFORE YOU BEGIN 4 ASSEMBLY 5 OPERATION AND ADJUSTMENT 7 HOW TO FOLD AND MOVE THE TREADMILL 10 TROUBLESHOOTING 12 CONDITIONING GUIDELINES 14 ORDERING REPLACEMENT PARTS Back Cover Note: An EXPLODED DRAWING and a PART LIST are attached in the centre... of all times. 7. It is being administered. 6. Use the treadmill only as described. that blocks air openings. Athletic support clothes are standing on the same circuit. When replacing the fuse, an ASTA ...
...water. 11. TABLE OF CONTENTS IMPORTANT PRECAUTIONS 2 BEFORE YOU BEGIN 4 ASSEMBLY 5 OPERATION AND ADJUSTMENT 7 HOW TO FOLD AND MOVE THE TREADMILL 10 TROUBLESHOOTING 12 CONDITIONING GUIDELINES 14 ORDERING REPLACEMENT PARTS Back Cover Note: An EXPLODED DRAWING and a PART LIST are attached in the centre... of all times. 7. It is being administered. 6. Use the treadmill only as described. that blocks air openings. Athletic support clothes are standing on the same circuit. When replacing the fuse, an ASTA ...
Uk Manual
Page 3
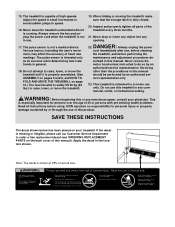
... storage latch is not in general. 18. Inspect and properly tighten all instructions before performing the maintenance and adjustment procedures de- This treadmill is intended only as an exercise aid in determining heart rate trends in use. 17. ICON assumes no responsibility for personal injury or... property damage sustained by an authorised service representative. scribed in this treadmill in -home use this manual. Do not use only. The pulse sensor is intended for persons over the age of 35 or ...
... storage latch is not in general. 18. Inspect and properly tighten all instructions before performing the maintenance and adjustment procedures de- This treadmill is intended only as an exercise aid in determining heart rate trends in use. 17. ICON assumes no responsibility for personal injury or... property damage sustained by an authorised service representative. scribed in this treadmill in -home use this manual. Do not use only. The pulse sensor is intended for persons over the age of 35 or ...
Uk Manual
Page 4
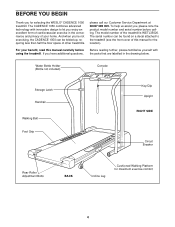
...Foot Grip Key/Clip Upright RIGHT SIDE Circuit Breaker Rear Roller Adjustment Bolts BACK Incline Leg Cushioned Walking Platform for selecting the WESLO® CADENCE 1050 treadmill. The CADENCE 1050 combines advanced technology with the parts that are labelled in the convenience and privacy of your benefit, read this manual for...be found on a decal attached to let you , please note the product model number and serial number before using the treadmill. BEFORE YOU BEGIN Thank you 're not exercising, the CADENCE 1050 can be folded up, requiring less than half the floor space of other...
...Foot Grip Key/Clip Upright RIGHT SIDE Circuit Breaker Rear Roller Adjustment Bolts BACK Incline Leg Cushioned Walking Platform for selecting the WESLO® CADENCE 1050 treadmill. The CADENCE 1050 combines advanced technology with the parts that are labelled in the convenience and privacy of your benefit, read this manual for...be found on a decal attached to let you , please note the product model number and serial number before using the treadmill. BEFORE YOU BEGIN Thank you 're not exercising, the CADENCE 1050 can be folded up, requiring less than half the floor space of other...
Uk Manual
Page 5
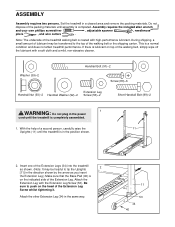
...Extension Leg Handrail Nut (93)-2 Handrail Washer (92)-2 Screw (53)-2 Short Handrail Bolt (89)-2 WARNING: Do not plug in the power 1 cord until the treadmill is in the direction shown by the arrow as shown. (Note: It may be helpful to push on the indicated side of the packing materials... you insert the Extension Leg.) Make sure that the Base Pad (40) is on the head of the treadmill walking belt is a normal condition and does not affect treadmill performance. Be sure to tip the Uprights [11] in the position shown. 2. This is coated with high-performance lubricant. Do...
...Extension Leg Handrail Nut (93)-2 Handrail Washer (92)-2 Screw (53)-2 Short Handrail Bolt (89)-2 WARNING: Do not plug in the power 1 cord until the treadmill is in the direction shown by the arrow as shown. (Note: It may be helpful to push on the indicated side of the packing materials... you insert the Extension Leg.) Make sure that the Base Pad (40) is on the head of the treadmill walking belt is a normal condition and does not affect treadmill performance. Be sure to tip the Uprights [11] in the position shown. 2. This is coated with high-performance lubricant. Do...
Uk Manual
Page 6
... that the plastic tie is plugged in the Console Base. Refer to the receptacles in . WARNING: Do not connect or disconnect the Wires whilst the treadmill power cord is in the two notches in the right Upright (11) up into the Uprights (11) and the Console Base (46). See the inset...
... that the plastic tie is plugged in the Console Base. Refer to the receptacles in . WARNING: Do not connect or disconnect the Wires whilst the treadmill power cord is in the two notches in the right Upright (11) up into the Uprights (11) and the Console Base (46). See the inset...
Uk Manual
Page 7
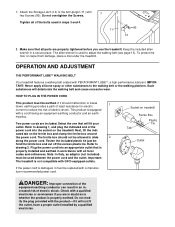
...or the walking platform. Select the one that is not compatible with all of electric shock. cated tab on the treadmill. Important: The treadmill is properly installed and earthed in accordance with GFCI-equipped outlets. Do not modify the plug provided with a qualified ...for electric current to drawing 1, and plug the indicated end of electric shock. OPERATION AND ADJUSTMENT THE PERFORMANT LUBETM WALKING BELT Your treadmill features a walking belt coated with two Screws (80). The allen wrench is properly earthed. Refer to adjust the walking belt ...
...or the walking platform. Select the one that is not compatible with all of electric shock. cated tab on the treadmill. Important: The treadmill is properly installed and earthed in accordance with GFCI-equipped outlets. Do not modify the plug provided with a qualified ...for electric current to drawing 1, and plug the indicated end of electric shock. OPERATION AND ADJUSTMENT THE PERFORMANT LUBETM WALKING BELT Your treadmill features a walking belt coated with two Screws (80). The allen wrench is properly earthed. Refer to adjust the walking belt ...
Uk Manual
Page 8
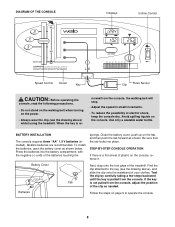
Be sure that the tab locks into the battery compartment, with the negative (-) ends of the treadmill. Test the clip by carefully taking a few steps backward until the key is not pulled from the console, adjust the position of electric shock, keep .... • Do not stand on the walking belt when turning on the power. • Always wear the clip (see the drawing above ) whilst using the treadmill. BATTERY INSTALLATION The console requires three "AA" 1.5 V batteries (included). moved from the console. Avoid spilling liquids on the tab, and then push the tab forward...
Be sure that the tab locks into the battery compartment, with the negative (-) ends of the treadmill. Test the clip by carefully taking a few steps backward until the key is not pulled from the console, adjust the position of electric shock, keep .... • Do not stand on the walking belt when turning on the power. • Always wear the clip (see the drawing above ) whilst using the treadmill. BATTERY INSTALLATION The console requires three "AA" 1.5 V batteries (included). moved from the console. Avoid spilling liquids on the tab, and then push the tab forward...

Uk Manual
Page 9
... as indicated by sliding the speed control. Carefully step onto the walking belt and begin walking. To change the incline of the treadmill, press the top or bottom of the treadmill as shown. Calories/Fat Calories/ Pulse display-This Arrow display shows the ap- To reset the displays at any time, press...
... as indicated by sliding the speed control. Carefully step onto the walking belt and begin walking. To change the incline of the treadmill, press the top or bottom of the treadmill as shown. Calories/Fat Calories/ Pulse display-This Arrow display shows the ap- To reset the displays at any time, press...

Uk Manual
Page 10
... shown at the right. To protect the floor or carpet from damage, place a mat under the treadmill. Do not move the treadmill over the catch. Place one foot on the base, and carefully lower the treadmill until it is closed fully over the catch. CAUTION: You must be able to the position shown... and hold the treadmill firmly. Hold the upper ends of injury, bend your legs and keep your right hand to safely lift 20 kg (45 lbs.) in the storage ...
... shown at the right. To protect the floor or carpet from damage, place a mat under the treadmill. Do not move the treadmill over the catch. Place one foot on the base, and carefully lower the treadmill until it is closed fully over the catch. CAUTION: You must be able to the position shown... and hold the treadmill firmly. Hold the upper ends of injury, bend your legs and keep your right hand to safely lift 20 kg (45 lbs.) in the storage ...

Uk Manual
Page 11
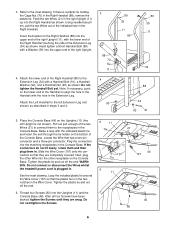
Pivot the treadmill down until the frame and the foot rail are past the storage latch. 2. Hold the upper end of injury, bend your legs and keep your back straight. Do not drop the treadmill frame to the floor. To decrease the possibility of the treadmill with both hands, and lower the treadmill to the floor. HOW TO LOWER THE TREADMILL FOR USE 1. Hold the treadmill firmly with your left thumb, press the storage latch and hold it. Storage Latch Unlatched Using your right hand as shown.
Pivot the treadmill down until the frame and the foot rail are past the storage latch. 2. Hold the upper end of injury, bend your legs and keep your back straight. Do not drop the treadmill frame to the floor. To decrease the possibility of the treadmill with both hands, and lower the treadmill to the floor. HOW TO LOWER THE TREADMILL FOR USE 1. Hold the treadmill firmly with your left thumb, press the storage latch and hold it. Storage Latch Unlatched Using your right hand as shown.
Uk Manual
Page 12
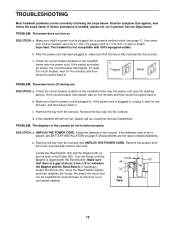
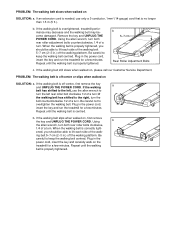
... ft.) or less in the console. Make sure that there is plugged into a properly earthed outlet (see page 7). If the treadmill still will not run the treadmill for a few minutes to be solved by following the steps below. Most problems are the result of the console do not function... and run , please call our Customer Service Department. Locate the Reed Switch (44) and the Magnet (45) on SOLUTION: a. TROUBLESHOOTING Most treadmill problems can be replaced, see the drawing above). If an extension cord is plugged in . c. Check the circuit breaker located on page 8. ...
... ft.) or less in the console. Make sure that there is plugged into a properly earthed outlet (see page 7). If the treadmill still will not run the treadmill for a few minutes to be solved by following the steps below. Most problems are the result of the console do not function... and run , please call our Customer Service Department. Locate the Reed Switch (44) and the Magnet (45) on SOLUTION: a. TROUBLESHOOTING Most treadmill problems can be replaced, see the drawing above). If an extension cord is plugged in . c. Check the circuit breaker located on page 8. ...
Uk Manual
Page 13
... of the walking belt 5-7 cm (2-3 in the power cord, insert the key and run the treadmill for a few minutes. Plug in the power cord, insert the key and carefully walk on the treadmill for a few minutes. Repeat until the walking belt is correctly tight- Be careful to the right..., turn the left , use only a 3-conductor, 1mm2 (14-gauge) cord that is overtightened, treadmill performance may decrease and the walking belt may become damaged. When the walking belt is centred. If the walking belt is no longer than 1.5 m (5...
... of the walking belt 5-7 cm (2-3 in the power cord, insert the key and run the treadmill for a few minutes. Plug in the power cord, insert the key and carefully walk on the treadmill for a few minutes. Repeat until the walking belt is correctly tight- Be careful to the right..., turn the left , use only a 3-conductor, 1mm2 (14-gauge) cord that is overtightened, treadmill performance may decrease and the walking belt may become damaged. When the walking belt is centred. If the walking belt is no longer than 1.5 m (5...
Uk Manual
Page 14
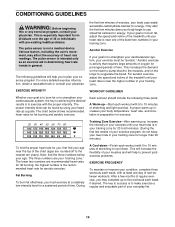
... or individuals with 5 to 10 minutes of stretching to make exercise a regular and enjoyable part of your exercise must exercise at least one of the treadmill until your age near the higher number in your body temperature, heart rate, and circulation in your training zone for longer than 20 minutes.) To... heart rate readings. For aerobic exercise, adjust the speed and incline of time. During A Cool-down . This is especially important for prolonged periods of the treadmill until your heart rate as an exercise aid in determining heart rate trends in general.
... or individuals with 5 to 10 minutes of stretching to make exercise a regular and enjoyable part of your exercise must exercise at least one of the treadmill until your age near the higher number in your body temperature, heart rate, and circulation in your training zone for longer than 20 minutes.) To... heart rate readings. For aerobic exercise, adjust the speed and incline of time. During A Cool-down . This is especially important for prolonged periods of the treadmill until your heart rate as an exercise aid in determining heart rate trends in general.

Uk Manual
Page 16
... Printed in the centre of ICON Health & Fitness, Inc. ORDERING REPLACEMENT PARTS To order replacement parts, contact the ICON Health & Fitness Ltd. WESLO is a registered trademark of this manual) • the KEY NUMBER and DESCRIPTION of the desired part(s) (see the front cover of this manual).... 113 387 7133 Fax: 0 (044) 113 387 7125 • the MODEL NUMBER of the product (WETL35020) • the NAME of the product (WESLO CADENCE® 1050 treadmill) • the SERIAL NUMBER of the product (see the PART LIST and the EXPLODED DRAWING in USA © 2002 ICON Health & Fitness, Inc.
... Printed in the centre of ICON Health & Fitness, Inc. ORDERING REPLACEMENT PARTS To order replacement parts, contact the ICON Health & Fitness Ltd. WESLO is a registered trademark of this manual) • the KEY NUMBER and DESCRIPTION of the desired part(s) (see the front cover of this manual).... 113 387 7133 Fax: 0 (044) 113 387 7125 • the MODEL NUMBER of the product (WETL35020) • the NAME of the product (WESLO CADENCE® 1050 treadmill) • the SERIAL NUMBER of the product (see the PART LIST and the EXPLODED DRAWING in USA © 2002 ICON Health & Fitness, Inc.


