

Canadian English Manual
Page 2
... 14. TABLE OF CONTENTS IMPORTANT PRECAUTIONS 2 BEFORE YOU BEGIN 4 ASSEMBLY 5 OPERATION AND ADJUSTMENT 7 HOW TO FOLD AND MOVE THE TREADMILL 10 MAINTENANCE AND TROUBLE-SHOOTING 12 CONDITIONING GUIDELINES 14 ORDERING REPLACEMENT PARTS 15 CUSTOMER RECORD 15 LIMITED WARRANTY Back Cover Note: A PART LIST...burns, fire, electric shock, or injury to ensure that blocks any air openings. Do not put the treadmill in the treadmill. Use the treadmill only as described in this treadmill are recommended for both men and women. No other appliance should not be on a level surface, with...
... 14. TABLE OF CONTENTS IMPORTANT PRECAUTIONS 2 BEFORE YOU BEGIN 4 ASSEMBLY 5 OPERATION AND ADJUSTMENT 7 HOW TO FOLD AND MOVE THE TREADMILL 10 MAINTENANCE AND TROUBLE-SHOOTING 12 CONDITIONING GUIDELINES 14 ORDERING REPLACEMENT PARTS 15 CUSTOMER RECORD 15 LIMITED WARRANTY Back Cover Note: A PART LIST...burns, fire, electric shock, or injury to ensure that blocks any air openings. Do not put the treadmill in the treadmill. Use the treadmill only as described in this treadmill are recommended for both men and women. No other appliance should not be on a level surface, with...
Canadian English Manual
Page 3
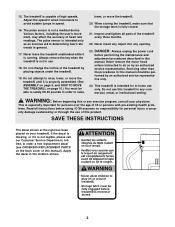
...an authorized service representative. If the decal is missing, or if it is properly assembled. (See ASSEMBLY on page 5, and HOW TO MOVE THE TREADMILL on page 10.) You must be performed by or through the use only. Apply the decal in general. 17. The pulse sensor is fully ...closed. 21. Inspect and tighten all instructions before performing the maintenance and adjustment procedures described in order to raise, lower, or move the treadmill. 20. 15. Do not use . 18. SAVE THESE INSTRUCTIONS The decal shown at the right has been placed on the back cover of ...
...an authorized service representative. If the decal is missing, or if it is properly assembled. (See ASSEMBLY on page 5, and HOW TO MOVE THE TREADMILL on page 10.) You must be performed by or through the use only. Apply the decal in general. 17. The pulse sensor is fully ...closed. 21. Inspect and tighten all instructions before performing the maintenance and adjustment procedures described in order to raise, lower, or move the treadmill. 20. 15. Do not use . 18. SAVE THESE INSTRUCTIONS The decal shown at the right has been placed on the back cover of ...
Canadian English Manual
Page 4
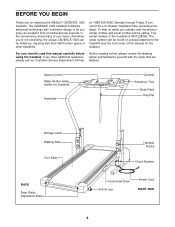
... of your benefit, read this manual for selecting the WESLO® CADENCE 1020 treadmill. For your home. BEFORE YOU BEGIN Thank you 're not exercising, the unique CADENCE 1020 can be folded up, requiring less than half the floor space of other treadmills. The serial number can be found on a decal... attached to let you , please note the product model number and serial number before using the treadmill. The model number of...
... of your benefit, read this manual for selecting the WESLO® CADENCE 1020 treadmill. For your home. BEFORE YOU BEGIN Thank you 're not exercising, the unique CADENCE 1020 can be folded up, requiring less than half the floor space of other treadmills. The serial number can be found on a decal... attached to let you , please note the product model number and serial number before using the treadmill. The model number of...
Canadian English Manual
Page 5
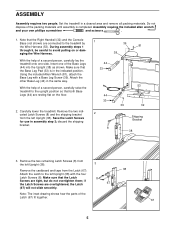
...inset drawing shows how the parts of the Base Legs (44) into the Upright (38) as shown. ASSEMBLY Assembly requires two people. Carefully lower the treadmill. discard the shipping bracket. 1 39 81 38 44 33 44 33 2 8 53 39 32 Shipping Bracket 38 3. Remove the two remaining Latch Screws...of the packing materials until assembly is in a cleared area and remove all packing materials. With the help of a second person, carefully lay the treadmill onto one of the Latch (67) fit together. 67 5 Remove the two indicated Latch Screws (8) and the shipping bracket from the Latch (67)....
...inset drawing shows how the parts of the Base Legs (44) into the Upright (38) as shown. ASSEMBLY Assembly requires two people. Carefully lower the treadmill. discard the shipping bracket. 1 39 81 38 44 33 44 33 2 8 53 39 32 Shipping Bracket 38 3. Remove the two remaining Latch Screws...of the packing materials until assembly is in a cleared area and remove all packing materials. With the help of a second person, carefully lay the treadmill onto one of the Latch (67) fit together. 67 5 Remove the two indicated Latch Screws (8) and the shipping bracket from the Latch (67)....
Canadian English Manual
Page 6
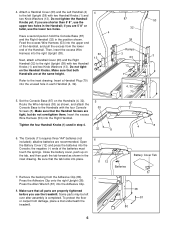
...(38). alkaline batteries are properly tightened before you are at the same height. Be sure that both 1 Handrails are shorter than 5' 8", use the treadmill. 4. Then, insert the excess Wire Harness into place. 6 11 12 Batteries Battery Cover Tab 7. Refer to the right Upright (38) with two... hole in step 4. 32 8 87 4 8 6. en the Handrail Knobs. To protect the floor or carpet from damage, place a mat underneath the treadmill. 38 81 80 6 Do not tighten the Handrail Knobs yet. Press the Allen Wrench (81) into the Console; Do not tight- Insert a Handrail ...
...(38). alkaline batteries are properly tightened before you are at the same height. Be sure that both 1 Handrails are shorter than 5' 8", use the treadmill. 4. Then, insert the excess Wire Harness into place. 6 11 12 Batteries Battery Cover Tab 7. Refer to the right Upright (38) with two... hole in step 4. 32 8 87 4 8 6. en the Handrail Knobs. To protect the floor or carpet from damage, place a mat underneath the treadmill. 38 81 80 6 Do not tighten the Handrail Knobs yet. Press the Allen Wrench (81) into the Console; Do not tight- Insert a Handrail ...
Canadian English Manual
Page 7
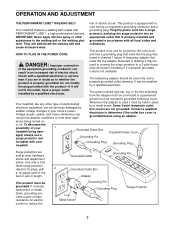
...and department stores. This product must be used only until a properly grounded outlet (drawing 1) can be installed by a metal screw. Your treadmill, like the adapter illustrated in drawing 2 may be held in length. Contact a qualified electrician to whether the product is equipped with a... cord having an equipment-grounding conductor and a Your treadmill features a walking belt coated with all local codes and form. Plug the power cord into an IMPORTANT: Never apply silicone spray or...
...and department stores. This product must be used only until a properly grounded outlet (drawing 1) can be installed by a metal screw. Your treadmill, like the adapter illustrated in drawing 2 may be held in length. Contact a qualified electrician to whether the product is equipped with a... cord having an equipment-grounding conductor and a Your treadmill features a walking belt coated with all local codes and form. Plug the power cord into an IMPORTANT: Never apply silicone spray or...
Canadian English Manual
Page 8
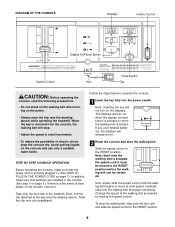
... when the walking belt is a thin sheet of electric shock, keep the console dry. Avoid spilling liquids on the displays. Change the speed of the treadmill. Next, find the clip attached to the RESET position before the walking belt can be on. • To reduce the possibility of clear plastic on.... • Do not stand on the walking belt when turning on the power. • Always wear the clip (see the drawing above ) while operating the treadmill.
... when the walking belt is a thin sheet of electric shock, keep the console dry. Avoid spilling liquids on the displays. Change the speed of the treadmill. Next, find the clip attached to the RESET position before the walking belt can be on. • To reduce the possibility of clear plastic on.... • Do not stand on the walking belt when turning on the power. • Always wear the clip (see the drawing above ) while operating the treadmill.
Canadian English Manual
Page 9
... appear in miles per hour. To measure your pulse, stand on the Pulse foot rails and place Sensor your pulse. 5 Adjust the incline of the treadmill as shown. sor is reached. After a few seconds, three dashes will change the incline, press the top or bottom of two different heights. Remove the...
... appear in miles per hour. To measure your pulse, stand on the Pulse foot rails and place Sensor your pulse. 5 Adjust the incline of the treadmill as shown. sor is reached. After a few seconds, three dashes will change the incline, press the top or bottom of two different heights. Remove the...

Canadian English Manual
Page 10
... sure that the storage latch closes fully over an uneven surface. 3. Place one foot near one foot on the front wheels. Hold the treadmill with your legs rather than your hands in the storage position. To decrease the possibility of the front wheels as described above 85° ...Fahrenheit. To reduce the risk of injury, use extreme caution while moving the treadmill, convert the treadmill to the position shown at the right. Make sure that the storage latch is resting in the locations shown at the right, and...
... sure that the storage latch closes fully over an uneven surface. 3. Place one foot near one foot on the front wheels. Hold the treadmill with your legs rather than your hands in the storage position. To decrease the possibility of the front wheels as described above 85° ...Fahrenheit. To reduce the risk of injury, use extreme caution while moving the treadmill, convert the treadmill to the position shown at the right. Make sure that the storage latch is resting in the locations shown at the right, and...

Canadian English Manual
Page 11
Hold the upper end of injury, bend your legs and keep your right hand as shown. Pivot the treadmill until the frame is past the storage latch. 2. To decrease the possibility of the treadmill with both hands, and lower the treadmill to the floor. Hold the treadmill firmly with your back straight. Storage Latch Frame Guide Opened 11 Using your left thumb, slide open the storage latch and hold it open. HOW TO LOWER THE TREADMILL FOR USE 1.
Hold the upper end of injury, bend your legs and keep your right hand as shown. Pivot the treadmill until the frame is past the storage latch. 2. To decrease the possibility of the treadmill with both hands, and lower the treadmill to the floor. Hold the treadmill firmly with your back straight. Storage Latch Frame Guide Opened 11 Using your left thumb, slide open the storage latch and hold it open. HOW TO LOWER THE TREADMILL FOR USE 1.
Canadian English Manual
Page 12
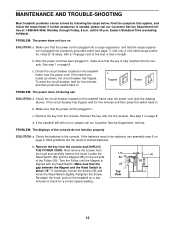
...Check the circuit breaker located on page 8. Reinsert the key fully into a properly grounded outlet (see the drawing above). See step 1 on the treadmill frame near the power cord. Next remove the screws from the hood and carefully remove the hood. Retighten the Screw. c. Make sure that the gap... between the Magnet and the Reed Switch is plugged in , make sure that applies, and follow the steps listed. If the treadmill still will not run the treadmill for a correct speed reading. 1/8" 89 28 Top View 90 88 12 Check the batteries in . Make sure that the power...
...Check the circuit breaker located on page 8. Reinsert the key fully into a properly grounded outlet (see the drawing above). See step 1 on the treadmill frame near the power cord. Next remove the screws from the hood and carefully remove the hood. Retighten the Screw. c. Make sure that the gap... between the Magnet and the Reed Switch is plugged in , make sure that applies, and follow the steps listed. If the treadmill still will not run the treadmill for a correct speed reading. 1/8" 89 28 Top View 90 88 12 Check the batteries in . Make sure that the power...
Canadian English Manual
Page 13
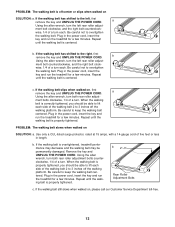
... Use only a CUL-listed surge protector, rated at 15 amps, with a 14-gauge cord of a turn . If the walking belt is overtightened, treadmill performance may decrease and the walking belt may be able to lift each side of a turn each side of a turn. Using the allen wrench, turn ...both rear roller adjust- Plug in the power cord, insert the key and run the treadmill for a few minutes. PROBLEM: The walking belt is off the walking platform. a Using the allen wrench, turn both rear roller adjustment bolts counterclockwise, 1/4...
... Use only a CUL-listed surge protector, rated at 15 amps, with a 14-gauge cord of a turn . If the walking belt is overtightened, treadmill performance may decrease and the walking belt may be able to lift each side of a turn each side of a turn. Using the allen wrench, turn ...both rear roller adjust- Plug in the power cord, insert the key and run the treadmill for a few minutes. PROBLEM: The walking belt is off the walking platform. a Using the allen wrench, turn both rear roller adjustment bolts counterclockwise, 1/4...
Canadian English Manual
Page 14
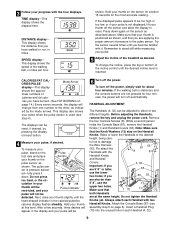
...are your physician. To find the proper heart rate for exercise. If your goal is to burn fat, adjust the speed and incline of the treadmill until your heart rate is to strengthen your cardiovascular system, your age at a relatively low intensity level for a sustained period of your exercise program... rate is near the low end of your training zone. (See pages 8 and 9.) Aerobic Exercise If your goal is near the middle of the treadmill as a guide. If your heart rate as needed. After a few minutes of exercise, your cardiovascular system, the key to plan your muscles and ...
...are your physician. To find the proper heart rate for exercise. If your goal is to burn fat, adjust the speed and incline of the treadmill until your heart rate is to strengthen your cardiovascular system, your age at a relatively low intensity level for a sustained period of your exercise program... rate is near the low end of your training zone. (See pages 8 and 9.) Aerobic Exercise If your goal is near the middle of the treadmill as a guide. If your heart rate as needed. After a few minutes of exercise, your cardiovascular system, the key to plan your muscles and ...

Canadian English Manual
Page 15
... you, please be prepared to give the following information when calling: • The MODEL NUMBER of the product (WCTL28090) • The NAME of the product (WESLO CADENCE® 1020 treadmill) • The SERIAL NUMBER of Canada Inc. 900 de l'Industrie St-Jérôme, Québec Canada, J7Y 4B8 PLACE STAMP HERE 15
... you, please be prepared to give the following information when calling: • The MODEL NUMBER of the product (WCTL28090) • The NAME of the product (WESLO CADENCE® 1020 treadmill) • The SERIAL NUMBER of Canada Inc. 900 de l'Industrie St-Jérôme, Québec Canada, J7Y 4B8 PLACE STAMP HERE 15

Canadian English Manual
Page 19
...? ❏ No ❏ Yes What other Manufacturer? 9) Based on how long an implied warranty lasts. Jérôme, QC J7Y 4B8 WESLO is authorized by sufficient proof of purchase. PURCHASE DATE: RETAILER NAME: RETAILER ADDRESS: 1) Primary user(s) of product: ❏ Male ❏ Female...name equipment would you purchase? 10) What other type of exercise equipment do you own? ❏ Bicycle ❏ Exercise Cycle ❏ Treadmill ❏ Home Gym ❏ Weight Bench ❏ Stepper ❏ Cardio Glide ❏ Other 11) Which type of magazines do not ...
...? ❏ No ❏ Yes What other Manufacturer? 9) Based on how long an implied warranty lasts. Jérôme, QC J7Y 4B8 WESLO is authorized by sufficient proof of purchase. PURCHASE DATE: RETAILER NAME: RETAILER ADDRESS: 1) Primary user(s) of product: ❏ Male ❏ Female...name equipment would you purchase? 10) What other type of exercise equipment do you own? ❏ Bicycle ❏ Exercise Cycle ❏ Treadmill ❏ Home Gym ❏ Weight Bench ❏ Stepper ❏ Cardio Glide ❏ Other 11) Which type of magazines do not ...


