

Canadian English Manual
Page 1
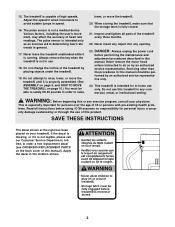
... DIRECT TO OUR TOLL-FREE CUSTOMER HOT LINE. Write the serial number in this manual before using this manual for future reference. Save this equipment. Serial Number Decal QUESTIONS? Model No. EST (excluding holidays) ® USER'S MANUAL CAUTION Read all precautions and instructions in the space above for future reference. Visit our website at www.weslo.com new products, prizes, fitness tips, and much more! The trained...
... DIRECT TO OUR TOLL-FREE CUSTOMER HOT LINE. Write the serial number in this manual before using this manual for future reference. Save this equipment. Serial Number Decal QUESTIONS? Model No. EST (excluding holidays) ® USER'S MANUAL CAUTION Read all precautions and instructions in the space above for future reference. Visit our website at www.weslo.com new products, prizes, fitness tips, and much more! The trained...

Canadian English Manual
Page 2
... of 12 and pets away from damage, place a mat under the treadmill. 4. TABLE OF CONTENTS IMPORTANT PRECAUTIONS 2 BEFORE YOU BEGIN 4 ASSEMBLY 5 OPERATION AND ADJUSTMENT 7 HOW TO FOLD AND MOVE THE TREADMILL 10 MAINTENANCE AND TROUBLE-SHOOTING 12 CONDITIONING GUIDELINES 14 ORDERING REPLACEMENT PARTS 15 CUSTOMER RECORD 15 LIMITED WARRANTY Back Cover Note: A PART LIST and an EXPLODED DRAWING are attached in length. It is being administered. 6.
... of 12 and pets away from damage, place a mat under the treadmill. 4. TABLE OF CONTENTS IMPORTANT PRECAUTIONS 2 BEFORE YOU BEGIN 4 ASSEMBLY 5 OPERATION AND ADJUSTMENT 7 HOW TO FOLD AND MOVE THE TREADMILL 10 MAINTENANCE AND TROUBLE-SHOOTING 12 CONDITIONING GUIDELINES 14 ORDERING REPLACEMENT PARTS 15 CUSTOMER RECORD 15 LIMITED WARRANTY Back Cover Note: A PART LIST and an EXPLODED DRAWING are attached in length. It is being administered. 6.
Canadian English Manual
Page 3
... -home use of this manual. The pulse sensor is especially important for persons over the age of 35 or persons with pre-existing health problems. Read all parts of high speeds. Do not change the incline of heart rate readings. Adjust the speed in small increments to safely lift 45 pounds in this product. When storing the treadmill, make sure that the storage latch is not a medical device. ICON...
... -home use of this manual. The pulse sensor is especially important for persons over the age of 35 or persons with pre-existing health problems. Read all parts of high speeds. Do not change the incline of heart rate readings. Adjust the speed in small increments to safely lift 45 pounds in this product. When storing the treadmill, make sure that the storage latch is not a medical device. ICON...
Canadian English Manual
Page 4
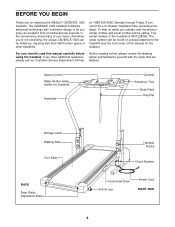
... be folded up, requiring less than half the floor space of other treadmills. Speed Control Water Bottle Holder (bottle not included) Handrails Console Accessory Tray Book Rack Key/Clip Storage Latch Walking Belt Foot Rails BACK Rear Roller Adjustment Bolts Handrail Knobs Circuit Breaker Cushioned Deck Incline Leg Power Cord RIGHT SIDE 4 at 1-888-936-4266, Monday through Friday, 8 a.m. Eastern Standard Time (excluding holidays). The CADENCE 1020 treadmill combines advanced technology with the parts...
... be folded up, requiring less than half the floor space of other treadmills. Speed Control Water Bottle Holder (bottle not included) Handrails Console Accessory Tray Book Rack Key/Clip Storage Latch Walking Belt Foot Rails BACK Rear Roller Adjustment Bolts Handrail Knobs Circuit Breaker Cushioned Deck Incline Leg Power Cord RIGHT SIDE 4 at 1-888-936-4266, Monday through Friday, 8 a.m. Eastern Standard Time (excluding holidays). The CADENCE 1020 treadmill combines advanced technology with the parts...
Canadian English Manual
Page 5
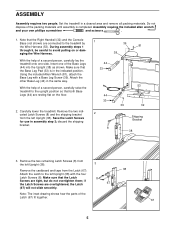
.... Set the treadmill in assembly step 3; Using the included Allen Wrench (81), attach the Base Leg with the four Latch Screws (8). Attach the other Base Leg (44) in the indicated position. Remove the two indicated Latch Screws (8) and the shipping bracket from the Latch (67). 38 Attach the Latch to the upright position so that the Latch Screws are resting flat on or damaging the Wire Harness. Remove the two remaining Latch Screws (8) from...
.... Set the treadmill in assembly step 3; Using the included Allen Wrench (81), attach the Base Leg with the four Latch Screws (8). Attach the other Base Leg (44) in the indicated position. Remove the two indicated Latch Screws (8) and the shipping bracket from the Latch (67). 38 Attach the Latch to the upright position so that the Latch Screws are resting flat on or damaging the Wire Harness. Remove the two remaining Latch Screws (8) from...
Canadian English Manual
Page 6
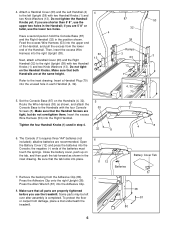
... Console Screws (8). Feed the excess Wire Harness (53) into the right Upright (38). 63 13 Next, attach a Handrail Cover (63) and the Right Handrail (32) to the inset drawing. alkaline batteries are at the same height. Refer to the right Upright (38) with two Handrail Knobs (1) and two Knob Washers (13). Open the Battery Cover (12) and press the batteries into the Right Handrail. 5 53 Tighten...
... Console Screws (8). Feed the excess Wire Harness (53) into the right Upright (38). 63 13 Next, attach a Handrail Cover (63) and the Right Handrail (32) to the inset drawing. alkaline batteries are at the same height. Refer to the right Upright (38) with two Handrail Knobs (1) and two Knob Washers (13). Open the Battery Cover (12) and press the batteries into the Right Handrail. 5 53 Tighten...
Canadian English Manual
Page 7
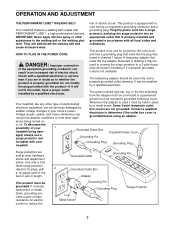
... wear. grounded in length. A temporary adapter that DANGER: Improper connection of five feet or less in accordance with the product-if it should be used it must be used to connect the surge protector to the walking belt or the walking plat- Do not modify the plug provided with all local codes and form. Plug the power cord into an IMPORTANT: Never apply silicone...
... wear. grounded in length. A temporary adapter that DANGER: Improper connection of five feet or less in accordance with the product-if it should be used it must be used to connect the surge protector to the walking belt or the walking plat- Do not modify the plug provided with all local codes and form. Plug the power cord into an IMPORTANT: Never apply silicone...
Canadian English Manual
Page 8
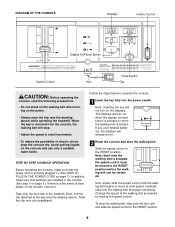
... ). STEP BY STEP CONSOLE OPERATION Before operating the console, make sure that the power cord is started. Change the speed of the treadmill. Step onto the foot rails of the walking belt as desired by moving the speed control. The displays will stop the walking belt, step onto the foot rails and slide the speed control to the RESET position. Note: Each time the walking belt is removed from the console, the walking belt will turn on /reset button is pressed or when the walking belt...
... ). STEP BY STEP CONSOLE OPERATION Before operating the console, make sure that the power cord is started. Change the speed of the treadmill. Step onto the foot rails of the walking belt as desired by moving the speed control. The displays will stop the walking belt, step onto the foot rails and slide the speed control to the RESET position. Note: Each time the walking belt is removed from the console, the walking belt will turn on /reset button is pressed or when the walking belt...
Canadian English Manual
Page 9
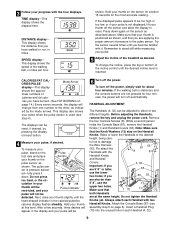
... for four minutes, the power will turn off the power. If the displayed pulse appears to reset. To change from one number to stand still while measuring your pulse. 5 Adjust the incline of the walking belt, in the calories/pulse/fat calories display flashes steadily. This display also shows your pulse when the pulse sensor is pressure activat- sor is used (see assembly step 5 on the Handrail Knobs. culation in miles. Next, raise your...
... for four minutes, the power will turn off the power. If the displayed pulse appears to reset. To change from one number to stand still while measuring your pulse. 5 Adjust the incline of the walking belt, in the calories/pulse/fat calories display flashes steadily. This display also shows your pulse when the pulse sensor is pressure activat- sor is used (see assembly step 5 on the Handrail Knobs. culation in miles. Next, raise your...

Canadian English Manual
Page 10
... a mat under the treadmill. HOW TO FOLD AND MOVE THE TREADMILL HOW TO FOLD THE TREADMILL FOR STORAGE Before folding the treadmill, unplug the power cord. Raise the treadmill until it is locked fully over an uneven surface. 3. Hold the upper ends of injury, bend your legs and keep your hands in order to safely lift 45 pounds in the locations shown at the...
... a mat under the treadmill. HOW TO FOLD AND MOVE THE TREADMILL HOW TO FOLD THE TREADMILL FOR STORAGE Before folding the treadmill, unplug the power cord. Raise the treadmill until it is locked fully over an uneven surface. 3. Hold the upper ends of injury, bend your legs and keep your hands in order to safely lift 45 pounds in the locations shown at the...

Canadian English Manual
Page 11
Pivot the treadmill until the frame is past the storage latch. 2. Storage Latch Frame Guide Opened 11 Hold the treadmill firmly with your back straight. To decrease the possibility of the treadmill with both hands, and lower the treadmill to the floor. Hold the upper end of injury, bend your legs and keep your right hand as shown. Using your left thumb, slide open the storage latch and hold it open. HOW TO LOWER THE TREADMILL FOR USE 1.
Pivot the treadmill until the frame is past the storage latch. 2. Storage Latch Frame Guide Opened 11 Hold the treadmill firmly with your back straight. To decrease the possibility of the treadmill with both hands, and lower the treadmill to the floor. Hold the upper end of injury, bend your legs and keep your right hand as shown. Using your left thumb, slide open the storage latch and hold it open. HOW TO LOWER THE TREADMILL FOR USE 1.
Canadian English Manual
Page 12
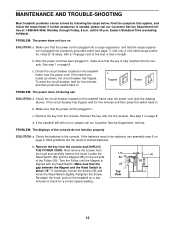
... assistance is aligned with a 14-gauge cord of the Pulley (90). Use only a CUL-listed surge protector, rated at 1-888-963-4266, Monday through Friday, 8 a.m. See step 1 on page 8. Check the batteries in . Locate the Reed Switch (89) and the Magnet (88) on the treadmill frame near the power cord. Retighten the Screw. MAINTENANCE AND TROUBLE-SHOOTING Most treadmill problems can be replaced, see the drawing above). Eastern Standard...
... assistance is aligned with a 14-gauge cord of the Pulley (90). Use only a CUL-listed surge protector, rated at 1-888-963-4266, Monday through Friday, 8 a.m. See step 1 on page 8. Check the batteries in . Locate the Reed Switch (89) and the Magnet (88) on the treadmill frame near the power cord. Retighten the Screw. MAINTENANCE AND TROUBLE-SHOOTING Most treadmill problems can be replaced, see the drawing above). Eastern Standard...
Canadian English Manual
Page 13
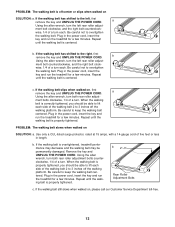
..., turn . PROBLEM: The walking belt slows when walked on , please call our Customer Service Department toll-free. 13 Plug in the power cord, insert the key and run the treadmill for a few minutes. Use only a CUL-listed surge protector, rated at 15 amps, with a 14-gauge cord of the walking belt 2 to lift each . If the walking belt still slows when walked on SOLUTION: a. wise, 1/4 of a turn each side of a turn the left rear roller adjust- Using...
..., turn . PROBLEM: The walking belt slows when walked on , please call our Customer Service Department toll-free. 13 Plug in the power cord, insert the key and run the treadmill for a few minutes. Use only a CUL-listed surge protector, rated at 15 amps, with a 14-gauge cord of the walking belt 2 to lift each . If the walking belt still slows when walked on SOLUTION: a. wise, 1/4 of a turn each side of a turn the left rear roller adjust- Using...
Canadian English Manual
Page 14
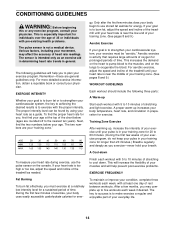
... is to burn fat, adjust the speed and incline of the treadmill until your heart rate is near the middle of your training zone. (See pages 8 and 9.) WORKOUT GUIDELINES Each workout should include the following guidelines will help you must be found by using your exercise program. Aerobic exercise is too high or too low, adjust the speed and incline of your training zone. (See pages 8 and...
... is to burn fat, adjust the speed and incline of the treadmill until your heart rate is near the middle of your training zone. (See pages 8 and 9.) WORKOUT GUIDELINES Each workout should include the following guidelines will help you must be found by using your exercise program. Aerobic exercise is too high or too low, adjust the speed and incline of your training zone. (See pages 8 and...

Canadian English Manual
Page 15
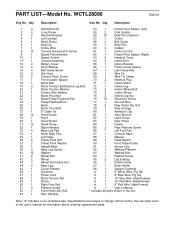
CUSTOMER RECORD Model No.: Retailer Name: Retailer Address: Serial No.: Purchase Date: ICON of this manual). until 6:30 p.m. Eastern Standard Time (excluding holidays). ORDERING REPLACEMENT PARTS To order replacement parts, simply call our Customer Service Department toll-free at the ...information when calling: • The MODEL NUMBER of the product (WCTL28090) • The NAME of the product (WESLO CADENCE® 1020 treadmill) • The SERIAL NUMBER of the product (see the front cover of this manual) • The KEY NUMBER and DESCRIPTION of the desired part(s) (see the PART LIST...
CUSTOMER RECORD Model No.: Retailer Name: Retailer Address: Serial No.: Purchase Date: ICON of this manual). until 6:30 p.m. Eastern Standard Time (excluding holidays). ORDERING REPLACEMENT PARTS To order replacement parts, simply call our Customer Service Department toll-free at the ...information when calling: • The MODEL NUMBER of the product (WCTL28090) • The NAME of the product (WESLO CADENCE® 1020 treadmill) • The SERIAL NUMBER of the product (see the front cover of this manual) • The KEY NUMBER and DESCRIPTION of the desired part(s) (see the PART LIST...
Canadian English Manual
Page 16
... Screw/Latch Screw Speed Potentiometer Speed Control Console Assembly Battery Cover Knob Washer Belt Guide Screw Not Used Console Rack Screw Front Isolator Spacer Motor Belt Motor Tension Bolt/Incline Leg Bolt Motor Tension Washer Tension Star Washer Motor Pivot Nut Motor/Pulley/Flywheel/Fan Pulley/Flywheel/Fan Motor Motor Pivot Bolt 8" Cable Tie Hood Screw Hood Hood Shield Small Screw Right Handrail Base Leg Pad Motor Belly Pan Controller Frame Pivot Bolt Frame Pivot Washer Upright/Base Base Leg Screw Washer Wheel Bolt Wheel Wheel Nut/Incline Nut Base Leg Circuit Breaker Grommet Power Cord...
... Screw/Latch Screw Speed Potentiometer Speed Control Console Assembly Battery Cover Knob Washer Belt Guide Screw Not Used Console Rack Screw Front Isolator Spacer Motor Belt Motor Tension Bolt/Incline Leg Bolt Motor Tension Washer Tension Star Washer Motor Pivot Nut Motor/Pulley/Flywheel/Fan Pulley/Flywheel/Fan Motor Motor Pivot Bolt 8" Cable Tie Hood Screw Hood Hood Shield Small Screw Right Handrail Base Leg Pad Motor Belly Pan Controller Frame Pivot Bolt Frame Pivot Washer Upright/Base Base Leg Screw Washer Wheel Bolt Wheel Wheel Nut/Incline Nut Base Leg Circuit Breaker Grommet Power Cord...

Canadian English Manual
Page 17
REMOVE THIS EXPLODED DRAWING AND PART LIST FROM THE MANUAL Save this EXPLODED DRAWING and PART LIST for future reference. Note: Specifications are subject to change without notice. For information about ordering replacement parts, see the back cover of the User's Manual. 34
REMOVE THIS EXPLODED DRAWING AND PART LIST FROM THE MANUAL Save this EXPLODED DRAWING and PART LIST for future reference. Note: Specifications are subject to change without notice. For information about ordering replacement parts, see the back cover of the User's Manual. 34

Canadian English Manual
Page 18
9 10 22 18 12 11* 28 28 28 61 8 67* 5 19 21 20 99 28 36 37 95 51 54 43 88 89 44 40 33 31 49 76 50 41 48 55 76 76 51 91 90 92 93 51 40 52 43 39 62 76 51 85 55 76 56 59 58 56 57 76 76 60 56 56 44 95 40 80 33 28 23* 28 24 25 26 28 29 30 28 99 31 42 43 47 46 45 98 31 8 53 37 7 36 76 42 43 76 41 32 38 39 2 35 63 13 3 40 1 33 31 40 40 31 34 2 70 40 31 40 31 R0201A EXPLODED DRAWING-Model No. WCTL28090
9 10 22 18 12 11* 28 28 28 61 8 67* 5 19 21 20 99 28 36 37 95 51 54 43 88 89 44 40 33 31 49 76 50 41 48 55 76 76 51 91 90 92 93 51 40 52 43 39 62 76 51 85 55 76 56 59 58 56 57 76 76 60 56 56 44 95 40 80 33 28 23* 28 24 25 26 28 29 30 28 99 31 42 43 47 46 45 98 31 8 53 37 7 36 76 42 43 76 41 32 38 39 2 35 63 13 3 40 1 33 31 40 40 31 34 2 70 40 31 40 31 R0201A EXPLODED DRAWING-Model No. WCTL28090
Canadian English Manual
Page 19
...: MODEL NO. No other warranty beyond that specifically set forth herein. The warranty extended hereunder is limited to replacing or repairing, at ICON's option, the product at one (1) year from province to be sent further bulletins about ICON products? ❏ Yes ❏ No THANK YOU FOR YOUR TIME © 2001 ICON of its authorized service centers. Jérôme, QC J7Y 4B8 WESLO...
...: MODEL NO. No other warranty beyond that specifically set forth herein. The warranty extended hereunder is limited to replacing or repairing, at ICON's option, the product at one (1) year from province to be sent further bulletins about ICON products? ❏ Yes ❏ No THANK YOU FOR YOUR TIME © 2001 ICON of its authorized service centers. Jérôme, QC J7Y 4B8 WESLO...


