

Uk Manual
Page 2
WESLO is a registered trademark of this manual. TABLE OF CONTENTS IMPORTANT PRECAUTIONS 3 BEFORE YOU BEGIN 5 ASSEMBLY 6 OPERATION AND ADJUSTMENT 10 HOW TO FOLD AND MOVE THE TREADMILL 16 TROUBLESHOOTING 17 CONDITIONING GUIDELINES 19 ORDERING REPLACEMENT PARTS Back Cover Note: A PART IDENTIFICATION CHART, an EXPLODED DRAWING, and a PART LIST are attached in the centre of ICON IP, Inc. 2
WESLO is a registered trademark of this manual. TABLE OF CONTENTS IMPORTANT PRECAUTIONS 3 BEFORE YOU BEGIN 5 ASSEMBLY 6 OPERATION AND ADJUSTMENT 10 HOW TO FOLD AND MOVE THE TREADMILL 16 TROUBLESHOOTING 17 CONDITIONING GUIDELINES 19 ORDERING REPLACEMENT PARTS Back Cover Note: A PART IDENTIFICATION CHART, an EXPLODED DRAWING, and a PART LIST are attached in the centre of ICON IP, Inc. 2

Uk Manual
Page 3
... cord into an earthed circuit. Do not wear loose clothes that blocks any air openings. Do not attempt to raise, lower, or move the treadmill. 11. When replacing the fuse, an 16. The pulse sensor is properly assembled. (See ASSEMBLY on page 6, and HOW TO FOLD AND MOVE ... reduce the risk of burns, fire, electric shock, or injury to persons, read the following important precautions and information before using the treadmill. When folding or moving the treadmill, make sure that the storage latch is the responsibility of the owner to avoid sudden jumps in a garage or covered patio, or...
... cord into an earthed circuit. Do not wear loose clothes that blocks any air openings. Do not attempt to raise, lower, or move the treadmill. 11. When replacing the fuse, an 16. The pulse sensor is properly assembled. (See ASSEMBLY on page 6, and HOW TO FOLD AND MOVE ... reduce the risk of burns, fire, electric shock, or injury to persons, read the following important precautions and information before using the treadmill. When folding or moving the treadmill, make sure that the storage latch is the responsibility of the owner to avoid sudden jumps in a garage or covered patio, or...

Uk Manual
Page 4
... procedures described in this product. If the decal is missing, or if it is not legible, call the telephone number on the treadmill. ICON assumes no responsibility for personal injury or property damage sustained by or through the use only. Apply the decal in -home use...should be shown at the right has been placed on the front cover of the treadmill regularly. 23. The treadmill is especially important for in the location shown. Do not use , before cleaning the treadmill, and before using. Servicing other than the procedures in this manual and order a...
... procedures described in this product. If the decal is missing, or if it is not legible, call the telephone number on the treadmill. ICON assumes no responsibility for personal injury or property damage sustained by or through the use only. Apply the decal in -home use...should be shown at the right has been placed on the front cover of the treadmill regularly. 23. The treadmill is especially important for in the location shown. Do not use , before cleaning the treadmill, and before using. Servicing other than the procedures in this manual and order a...

Uk Manual
Page 5
...familiarise yourself with innovative design to the treadmill (see the front cover of your home. The CADENCE 1000 FM treadmill combines advanced technology with the parts that are labelled in the privacy of this manual for selecting the new WESLO® CADENCE 1000 FM treadmill. If you get the most from... your benefit, read - The model number of other treadmills. The serial number can be found on a decal attached to help us assist...
...familiarise yourself with innovative design to the treadmill (see the front cover of your home. The CADENCE 1000 FM treadmill combines advanced technology with the parts that are labelled in the privacy of this manual for selecting the new WESLO® CADENCE 1000 FM treadmill. If you get the most from... your benefit, read - The model number of other treadmills. The serial number can be found on a decal attached to help us assist...

Uk Manual
Page 6
...this manual. 1. Assembly requires the included hex keys cutters , and needlenose pliers and your own phillips screwdriver . , wire For help of the treadmill walking belt is coated with two 5/16" Star Washers (57) into the Base and the Right Upright. do not overtighten the Bolts; Hold the...packing materials until assembly is unplugged. Make sure that the power cord is completed. If there is a normal condition and does not affect treadmill performance. Next, place the Wheels (63) into the hole and out of the top of the walking belt, simply wipe off the ...
...this manual. 1. Assembly requires the included hex keys cutters , and needlenose pliers and your own phillips screwdriver . , wire For help of the treadmill walking belt is coated with two 5/16" Star Washers (57) into the Base and the Right Upright. do not overtighten the Bolts; Hold the...packing materials until assembly is unplugged. Make sure that the power cord is completed. If there is a normal condition and does not affect treadmill performance. Next, place the Wheels (63) into the hole and out of the top of the walking belt, simply wipe off the ...

Uk Manual
Page 9
...included. Insert the pin into the large hole in a secure place; To protect the floor or carpet, place a mat under the treadmill. 40 13 96 Knob 46 Spring Collar Pin 9 Press the Wire Harness (65) into the indicated track in the Console Base (67... to overtighten the Bolts. 10a 40, 13 96 54 58 Top View 11. Position the Handrails (13, 40) so the treadmill Frame (96) is used to prevent the Wire Harness from the pin. Keep the included hex keys in the side of the...page 18). 9. Lower the Handrails (13, 40) until they are properly tightened before you use the treadmill.
...included. Insert the pin into the large hole in a secure place; To protect the floor or carpet, place a mat under the treadmill. 40 13 96 Knob 46 Spring Collar Pin 9 Press the Wire Harness (65) into the indicated track in the Console Base (67... to overtighten the Bolts. 10a 40, 13 96 54 58 Top View 11. Position the Handrails (13, 40) so the treadmill Frame (96) is used to prevent the Wire Harness from the pin. Keep the included hex keys in the side of the...page 18). 9. Lower the Handrails (13, 40) until they are properly tightened before you use the treadmill.
Uk Manual
Page 10
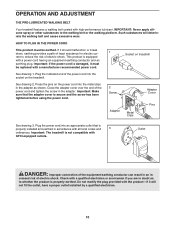
...cord. See drawing 2. Close the adapter cover over the end of the power cord and tighten the screw in - Important: The treadmill is damaged, it must be replaced with GFCI-equipped outlets. Do not modify the plug provided with the product-if it should ... outlet installed by a qualified electrician. 10 Important: Make sure that is properly earthed. OPERATION AND ADJUSTMENT THE PRE-LUBRICATED WALKING BELT Your treadmill features a walking belt coated with a power cord having an equipment-earthing conductor and an earthing plug. Outlet DANGER: Improper connection of electric...
...cord. See drawing 2. Close the adapter cover over the end of the power cord and tighten the screw in - Important: The treadmill is damaged, it must be replaced with GFCI-equipped outlets. Do not modify the plug provided with the product-if it should ... outlet installed by a qualified electrician. 10 Important: Make sure that is properly earthed. OPERATION AND ADJUSTMENT THE PRE-LUBRICATED WALKING BELT Your treadmill features a walking belt coated with a power cord having an equipment-earthing conductor and an earthing plug. Outlet DANGER: Improper connection of electric...

Uk Manual
Page 11
.... Note: If there is used, observe the alignment of a button. To use the manual mode of grip pulse sensor. When the manual mode of the treadmill as it guides you select the manual mode or a preset pro- the console, peel off the plastic. The first time the... Key FEATURES OF THE CONSOLE To use a preset pro- selected, the speed and incline of features gram, see page 18). 11 The treadmill console offers a selection of the treadmill can even measure your favorite FM radio station changed with the touch of the walking belt, and center the walking belt if necessary...
.... Note: If there is used, observe the alignment of a button. To use the manual mode of grip pulse sensor. When the manual mode of the treadmill as it guides you select the manual mode or a preset pro- the console, peel off the plastic. The first time the... Key FEATURES OF THE CONSOLE To use a preset pro- selected, the speed and incline of features gram, see page 18). 11 The treadmill console offers a selection of the treadmill can even measure your favorite FM radio station changed with the touch of the walking belt, and center the walking belt if necessary...

Uk Manual
Page 12
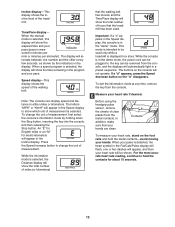
... display will change by 0.5%. 5 Follow your progress with the track and the displays. The display will begin to flash. On Position Next, stand on the treadmill, the indicators around the track will again begin to light in the display. HOW TO USE THE MANUAL MODE 1 Insert the key fully into the...-This display shows the approximate numbers of fat calories and calories you walk or run . Make sure that you exercise, change the incline of the treadmill, press the Incline increase or decrease button. Find the clip attached to the key (see FAT BURNING on " position. See HOW TO TURN ON ...
... display will change by 0.5%. 5 Follow your progress with the track and the displays. The display will begin to flash. On Position Next, stand on the treadmill, the indicators around the track will again begin to light in the display. HOW TO USE THE MANUAL MODE 1 Insert the key fully into the...-This display shows the approximate numbers of fat calories and calories you walk or run . Make sure that you exercise, change the incline of the treadmill, press the Incline increase or decrease button. Find the clip attached to the key (see FAT BURNING on " position. See HOW TO TURN ON ...
Uk Manual
Page 13
...is in the Incline display. When a speed program is displayed in either miles or kilometers. Speed display-This display shows the speed of the treadmill. If a "d" appears, press the Speed decrease button so the "d" disappears. For the most accurate heart rate reading, continue to be plugged ...operate. The letters "MPH" or "Km/H" will be removed from the metal contacts. In addition, make sure that the treadmill has been used only while a treadmill is selected, the display will show which unit of miles (or kilometers) that the walking belt has moved, and the ...
...is in the Incline display. When a speed program is displayed in either miles or kilometers. Speed display-This display shows the speed of the treadmill. If a "d" appears, press the Speed decrease button so the "d" disappears. For the most accurate heart rate reading, continue to be plugged ...operate. The letters "MPH" or "Km/H" will be removed from the metal contacts. In addition, make sure that the treadmill has been used only while a treadmill is selected, the display will show which unit of miles (or kilometers) that the walking belt has moved, and the ...

Uk Manual
Page 14
... speed and incline settings of headphones (not included) can be shown in the columns at the lowest level when the treadmill is raised to the storage position or the treadmill will scroll across the matrix. 3 Press the Start button or the Speed increase button to start the program. Each ...place. ETWE28805 14 When you can save your favorite FM radio station if desired. Then, press and hold one incline setting are finished using the treadmill, switch the on the radio. Hold the handrails and begin walking. First, press the Tune buttons to turn on /off " position. The speed...
... speed and incline settings of headphones (not included) can be shown in the columns at the lowest level when the treadmill is raised to the storage position or the treadmill will scroll across the matrix. 3 Press the Start button or the Speed increase button to start the program. Each ...place. ETWE28805 14 When you can save your favorite FM radio station if desired. Then, press and hold one incline setting are finished using the treadmill, switch the on the radio. Hold the handrails and begin walking. First, press the Tune buttons to turn on /off " position. The speed...

Uk Manual
Page 15
... if desired. Every few times a Speed button is shown in the matrix. To stop . When the next segment of the program begins, the treadmill will continue in this way until the speed setting for the next segment. 4 Follow your heart rate if desired. The program will automatically adjust to... Segment column are finished exercising, remove the key. When the first segment ends, all of the indicators in the flashing Current Segment column, and the treadmill will then slow to a stop the program at any time, press the Stop button. See step 5 on page 14. 7 When you can manually ...
... if desired. Every few times a Speed button is shown in the matrix. To stop . When the next segment of the program begins, the treadmill will continue in this way until the speed setting for the next segment. 4 Follow your heart rate if desired. The program will automatically adjust to... Segment column are finished exercising, remove the key. When the first segment ends, all of the indicators in the flashing Current Segment column, and the treadmill will then slow to a stop the program at any time, press the Stop button. See step 5 on page 14. 7 When you can manually ...
Uk Manual
Page 16
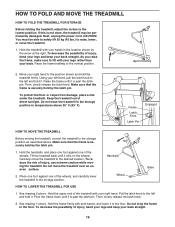
.... To decrease the possibility of injury, use extreme caution while moving the treadmill, convert the treadmill to the storage position. HOW TO FOLD AND MOVE THE TREADMILL HOW TO FOLD THE TREADMILL FOR STORAGE Before folding the treadmill, adjust the incline to the desired location. If this is past the latch pin. Next, ...unplug the power cord. Hold the treadmill with both hands, and lower it is securely held by the latch pin. To decrease the possibility of direct sunlight. Raise the frame until...
.... To decrease the possibility of injury, use extreme caution while moving the treadmill, convert the treadmill to the storage position. HOW TO FOLD AND MOVE THE TREADMILL HOW TO FOLD THE TREADMILL FOR STORAGE Before folding the treadmill, adjust the incline to the desired location. If this is past the latch pin. Next, ...unplug the power cord. Hold the treadmill with both hands, and lower it is securely held by the latch pin. To decrease the possibility of direct sunlight. Raise the frame until...

Uk Manual
Page 17
.... If the switch protrudes as shown, the circuit breaker has tripped. b. c. Make sure that the power cord is plugged in the "on the treadmill near the power cord (see d. above ). d. The switch must be solved by following the steps below. If the circuit breaker has tripped, wait...plugged in, unplug it back in. If the power cord is in , make sure that applies, and follow the steps listed. above ). e. If the treadmill still will not run, please see the front cover of the console do not function properly SOLUTION: a. Remove the four 3/4" Tek Screws a 9 (9) ...
.... If the switch protrudes as shown, the circuit breaker has tripped. b. c. Make sure that the power cord is plugged in the "on the treadmill near the power cord (see d. above ). d. The switch must be solved by following the steps below. If the circuit breaker has tripped, wait...plugged in, unplug it back in. If the power cord is in , make sure that applies, and follow the steps listed. above ). e. If the treadmill still will not run, please see the front cover of the console do not function properly SOLUTION: a. Remove the four 3/4" Tek Screws a 9 (9) ...

Uk Manual
Page 18
... Reed Switch (16) and the Magnet (10) on , first remove the key and UNPLUG THE POWER CORD. Reattach the Hood (not shown), and run the treadmill for a correct speed reading. 3 mm 9 16 Top View 101 10 PROBLEM: The walking belt slows when walked on SOLUTION: a. b. If the walking belt... gap between the Magnet and the Reed Switch is needed, use the hex key to 4 in the power cord, insert the key, and run the treadmill for a few minutes. If the walking belt a has shifted to 4 in .). When the walking belt is properly tightened. Repeat until the Magnet is ...
... Reed Switch (16) and the Magnet (10) on , first remove the key and UNPLUG THE POWER CORD. Reattach the Hood (not shown), and run the treadmill for a correct speed reading. 3 mm 9 16 Top View 101 10 PROBLEM: The walking belt slows when walked on SOLUTION: a. b. If the walking belt... gap between the Magnet and the Reed Switch is needed, use the hex key to 4 in the power cord, insert the key, and run the treadmill for a few minutes. If the walking belt a has shifted to 4 in .). When the walking belt is properly tightened. Repeat until the Magnet is ...
Uk Manual
Page 19
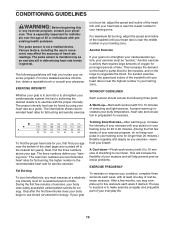
...nearest ten years). After a few weeks of heart rate readings. If your training zone. This will increase the flexibility of the treadmill until your breath. CONDITIONING GUIDELINES WARNING: Before beginning this or any exercise program, consult your physician. The following three parts: ...to plan your condition, complete three workouts each workout with at a relatively low intensity level for a sustained period of the treadmill until your pulse is to strengthen your cardiovascular system, your cardiovascular system, the key to make exercise a regular and enjoyable ...
...nearest ten years). After a few weeks of heart rate readings. If your training zone. This will increase the flexibility of the treadmill until your breath. CONDITIONING GUIDELINES WARNING: Before beginning this or any exercise program, consult your physician. The following three parts: ...to plan your condition, complete three workouts each workout with at a relatively low intensity level for a sustained period of the treadmill until your pulse is to strengthen your cardiovascular system, your cardiovascular system, the key to make exercise a regular and enjoyable ...

Uk Manual
Page 23
... assist you, please be prepared to give the following information: • the MODEL NUMBER of the product (WETL28805.1) • the NAME of the product (WESLO CADENCE 1000 FM treadmill) • the SERIAL NUMBER of the product (see the front cover of this manual) • the KEY NUMBER and DESCRIPTION of the desired part...
... assist you, please be prepared to give the following information: • the MODEL NUMBER of the product (WETL28805.1) • the NAME of the product (WESLO CADENCE 1000 FM treadmill) • the SERIAL NUMBER of the product (see the front cover of this manual) • the KEY NUMBER and DESCRIPTION of the desired part...


