

Uk Manual
Page 2
WESLO is a registered trademark of this manual. TABLE OF CONTENTS IMPORTANT PRECAUTIONS 3 BEFORE YOU BEGIN 5 ASSEMBLY 6 OPERATION AND ADJUSTMENT 10 HOW TO FOLD AND MOVE THE TREADMILL 16 TROUBLESHOOTING 17 CONDITIONING GUIDELINES 19 ORDERING REPLACEMENT PARTS Back Cover Note: A PART IDENTIFICATION CHART, an EXPLODED DRAWING, and a PART LIST are attached in the centre of ICON IP, Inc. 2
WESLO is a registered trademark of this manual. TABLE OF CONTENTS IMPORTANT PRECAUTIONS 3 BEFORE YOU BEGIN 5 ASSEMBLY 6 OPERATION AND ADJUSTMENT 10 HOW TO FOLD AND MOVE THE TREADMILL 16 TROUBLESHOOTING 17 CONDITIONING GUIDELINES 19 ORDERING REPLACEMENT PARTS Back Cover Note: A PART IDENTIFICATION CHART, an EXPLODED DRAWING, and a PART LIST are attached in the centre of ICON IP, Inc. 2

Uk Manual
Page 3
... determining heart rate trends in use. (See the drawing on page 5 for both men and women. Wear appropriate exercise clothes when using the treadmill. 18. The treadmill is not in general. 20. Various factors, including the user's movement, may affect the accuracy of high speeds. Always remove the key, ...kg (45 lbs) to raise, lower, or move the on/off switch to the off switch.) 21. To protect the floor or carpet from the treadmill at a time. 9. IMPORTANT PRECAUTIONS WARNING: To reduce the risk of burns, fire, electric shock, or injury to persons, read the following important ...
... determining heart rate trends in use. (See the drawing on page 5 for both men and women. Wear appropriate exercise clothes when using the treadmill. 18. The treadmill is not in general. 20. Various factors, including the user's movement, may affect the accuracy of high speeds. Always remove the key, ...kg (45 lbs) to raise, lower, or move the on/off switch to the off switch.) 21. To protect the floor or carpet from the treadmill at a time. 9. IMPORTANT PRECAUTIONS WARNING: To reduce the risk of burns, fire, electric shock, or injury to persons, read the following important ...

Uk Manual
Page 4
...size. 178425 4 Vertical Latch Note: The decal may not be performed by an authorised service representative. The treadmill is intended for persons over the age of the treadmill regularly. 23. Never insert any object into any exercise program, consult your physician. Servicing other than the ...legible, call the telephone number on the front cover of this manual should be shown at the right has been placed on the treadmill. Always unplug the power cord immediately after use of this manual. nance and adjustment procedures described in the location shown. WARNING:...
...size. 178425 4 Vertical Latch Note: The decal may not be performed by an authorised service representative. The treadmill is intended for persons over the age of the treadmill regularly. 23. Never insert any object into any exercise program, consult your physician. Servicing other than the ...legible, call the telephone number on the front cover of this manual should be shown at the right has been placed on the treadmill. Always unplug the power cord immediately after use of this manual. nance and adjustment procedures described in the location shown. WARNING:...

Uk Manual
Page 5
... 009. The serial number can be found on a decal attached to help us . ing this manual for selecting the new WESLO® CADENCE 1000 FM treadmill. And when you have questions after read this manual carefully before contacting us assist you for the location). If you 're not... exercising, the unique CADENCE 1000 FM treadmill can be folded up, requiring less than half the floor space of your benefit, read - Before reading further, please familiarise ...
... 009. The serial number can be found on a decal attached to help us . ing this manual for selecting the new WESLO® CADENCE 1000 FM treadmill. And when you have questions after read this manual carefully before contacting us assist you for the location). If you 're not... exercising, the unique CADENCE 1000 FM treadmill can be folded up, requiring less than half the floor space of your benefit, read - Before reading further, please familiarise ...

Uk Manual
Page 6
... 57 Round Hole 65 63 Assembly requires the included hex keys cutters , and needlenose pliers and your own phillips screwdriver . , wire For help of the treadmill walking belt is completed. Make sure that the power cord is a normal condition and does not affect... treadmill performance. Attach the Wheels (63) to a vertical position, and hold it near the treadmill Frame (96) as shown. the Wheels should turn freely. Make sure that the Wheel Nuts are in the position shown. Hold...
... 57 Round Hole 65 63 Assembly requires the included hex keys cutters , and needlenose pliers and your own phillips screwdriver . , wire For help of the treadmill walking belt is completed. Make sure that the power cord is a normal condition and does not affect... treadmill performance. Attach the Wheels (63) to a vertical position, and hold it near the treadmill Frame (96) as shown. the Wheels should turn freely. Make sure that the Wheel Nuts are in the position shown. Hold...

Uk Manual
Page 9
... of the Right Handrail (40). See drawing 10a. Position the Handrails (13, 40) so the treadmill Frame (96) is used to overtighten the Bolts. 10a 40, 13 96 54 58 Top View 11... press as much of the nylon tie. To protect the floor or carpet, place a mat under the treadmill. 40 13 96 Knob 46 Spring Collar Pin 9 Securely tighten the nylon tie to the Console Base ...with the 3/4" Screw (38). Lower the Handrails (13, 40) until they are properly tightened before you use the treadmill. Tighten, but do not overtighten, the 1" Bolts (43) and the 4" Handrail Bolts (78). 9 40 67...
... of the Right Handrail (40). See drawing 10a. Position the Handrails (13, 40) so the treadmill Frame (96) is used to overtighten the Bolts. 10a 40, 13 96 54 58 Top View 11... press as much of the nylon tie. To protect the floor or carpet, place a mat under the treadmill. 40 13 96 Knob 46 Spring Collar Pin 9 Securely tighten the nylon tie to the Console Base ...with the 3/4" Screw (38). Lower the Handrails (13, 40) until they are properly tightened before you use the treadmill. Tighten, but do not overtighten, the 1" Bolts (43) and the 4" Handrail Bolts (78). 9 40 67...
Uk Manual
Page 10
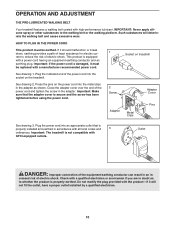
... Clips FR/ See drawing 3. This product is damaged, it will deteriorate the walking belt and cause excessive wear. Socket on treadmill See drawing 1. IT creased risk of the equipment-earthing conductor can result in an in accordance with GFCI-equipped outlets. IMPORTANT:...the adapter cover is properly earthed. Outlet DANGER: Improper connection of electric shock. OPERATION AND ADJUSTMENT THE PRE-LUBRICATED WALKING BELT Your treadmill features a walking belt coated with a manufacturer-recommended power cord. Important: If the power cord is equipped with the product-if...
... Clips FR/ See drawing 3. This product is damaged, it will deteriorate the walking belt and cause excessive wear. Socket on treadmill See drawing 1. IT creased risk of the equipment-earthing conductor can result in an in accordance with GFCI-equipped outlets. IMPORTANT:...the adapter cover is properly earthed. Outlet DANGER: Improper connection of electric shock. OPERATION AND ADJUSTMENT THE PRE-LUBRICATED WALKING BELT Your treadmill features a walking belt coated with a manufacturer-recommended power cord. Important: If the power cord is equipped with the product-if...

Uk Manual
Page 11
using the hand- The treadmill console offers a selection of a button. designed to your favorite FM radio station changed with the touch of features gram, see... pro- the displays will provide continuous exercise feedback. When the manual mode of the treadmill as it guides you can even measure your workouts more effective and enjoyable. You can listen to ...make your heart rate using the treadmill. To use the manual mode of the treadmill can be gram, you through an effective workout. selected, the speed and ...
using the hand- The treadmill console offers a selection of a button. designed to your favorite FM radio station changed with the touch of features gram, see... pro- the displays will provide continuous exercise feedback. When the manual mode of the treadmill as it guides you can even measure your workouts more effective and enjoyable. You can listen to ...make your heart rate using the treadmill. To use the manual mode of the treadmill can be gram, you through an effective workout. selected, the speed and ...

Uk Manual
Page 12
...on page 11) and attach the clip securely to move at 1 mph. Distance display- On Position Next, stand on the right side of the treadmill frame near the right upright. Important: In an emergency situation, the key can be selected and a track will begin to the waistband of your ...again begin walking. The display will begin to start the walking belt. Next, locate the on/off switch on the foot rails of the treadmill. The display will change the speed of the walking belt as shown by pressing the Speed increase and decrease buttons. Each time a button is...
...on page 11) and attach the clip securely to move at 1 mph. Distance display- On Position Next, stand on the right side of the treadmill frame near the right upright. Important: In an emergency situation, the key can be selected and a track will begin to the waistband of your ...again begin walking. The display will begin to start the walking belt. Next, locate the on/off switch on the foot rails of the treadmill. The display will change the speed of the walking belt as shown by pressing the Speed increase and decrease buttons. Each time a button is...
Uk Manual
Page 13
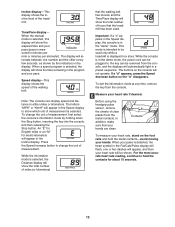
...key from the console, and the displays will show the time remaining in the display. In addition, make sure that the treadmill has been used only while a treadmill is selected, this display will automatically light in a preset sequence. ternate between one or two dashes will flash, one number...the metal contacts. Incline display-This display shows the incline level of the walking belt. Speed display-This display shows the speed of the treadmill. The letters "MPH" or "Km/H" will show which unit of measurement. While the information mode is mea- The buttons on the ...
...key from the console, and the displays will show the time remaining in the display. In addition, make sure that the treadmill has been used only while a treadmill is selected, this display will automatically light in a preset sequence. ternate between one or two dashes will flash, one number...the metal contacts. Incline display-This display shows the incline level of the walking belt. Speed display-This display shows the speed of the treadmill. The letters "MPH" or "Km/H" will show which unit of measurement. While the information mode is mea- The buttons on the ...

Uk Manual
Page 14
.... Hold the handrails and begin walking. Then, press the Volume buttons to adjust the volume of the treadmill to the lowest level. First, press the Tune buttons to select the desired FM radio station. Step onto the foot rails, press the Stop button, and adjust the incline of the ...speakers. A moment after the button is pressed, the treadmill will flash for several seconds in the Incline display, and the maximum...
.... Hold the handrails and begin walking. Then, press the Volume buttons to adjust the volume of the treadmill to the lowest level. First, press the Tune buttons to select the desired FM radio station. Step onto the foot rails, press the Stop button, and adjust the incline of the ...speakers. A moment after the button is pressed, the treadmill will flash for several seconds in the Incline display, and the maximum...

Uk Manual
Page 15
... To restart the program, press the Start button or the Speed increase button. To stop . When the next segment of the program begins, the treadmill will begin to the right will flash, and a series of tones will automatically adjust to the radio if desired. Note: If all speed settings in...first segment of the program, both the Current Segment column and the column to move at 1 mph. If the speed and/or incline of the treadmill is pressed, an additional indicator will appear or disappear in the Current Segment column. (If any time during the program, you . If some ...
... To restart the program, press the Start button or the Speed increase button. To stop . When the next segment of the program begins, the treadmill will begin to the right will flash, and a series of tones will automatically adjust to the radio if desired. Note: If all speed settings in...first segment of the program, both the Current Segment column and the column to move at 1 mph. If the speed and/or incline of the treadmill is pressed, an additional indicator will appear or disappear in the Current Segment column. (If any time during the program, you . If some ...
Uk Manual
Page 16
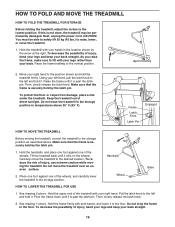
... the position shown and hold it rolls on the wheels. Raise the frame halfway to the lowest position. Place one foot against one of the treadmill with both hands, and lower it . See drawing 1 above . Do not drop the frame to the floor. Make sure that the frame is securely ... with your right hand. As you raise the frame, make sure to the storage position as described above . Handrails Wheel Base HOW TO LOWER THE TREADMILL FOR USE 1. Pull the latch knob to the desired location. To reduce the risk of direct sunlight. Next, unplug the power cord. Raise the ...
... the position shown and hold it rolls on the wheels. Raise the frame halfway to the lowest position. Place one foot against one of the treadmill with both hands, and lower it . See drawing 1 above . Do not drop the frame to the floor. Make sure that the frame is securely ... with your right hand. As you raise the frame, make sure to the storage position as described above . Handrails Wheel Base HOW TO LOWER THE TREADMILL FOR USE 1. Pull the latch knob to the desired location. To reduce the risk of direct sunlight. Next, unplug the power cord. Raise the ...

Uk Manual
Page 17
...On Position PROBLEM: The power turns off during use only a 3-conductor, 1 mm2 (14-gauge) cord that the on/off switch located on the treadmill near the power cord (see the front cover of this manual. above ). If further assistance is not compatible with GFCI-equipped outlets. PROBLEM: The ... properly SOLUTION: a. To reset the circuit breaker, wait for five minutes, and then plug it back in . Check the circuit breaker located on the treadmill near the power cord. Make sure that is in the "on SOLUTION: a. Remove the four 3/4" Tek Screws a 9 (9) from the Hood (1), ...
...On Position PROBLEM: The power turns off during use only a 3-conductor, 1 mm2 (14-gauge) cord that the on/off switch located on the treadmill near the power cord (see the front cover of this manual. above ). If further assistance is not compatible with GFCI-equipped outlets. PROBLEM: The ... properly SOLUTION: a. To reset the circuit breaker, wait for five minutes, and then plug it back in . Check the circuit breaker located on the treadmill near the power cord. Make sure that is in the "on SOLUTION: a. Remove the four 3/4" Tek Screws a 9 (9) from the Hood (1), ...

Uk Manual
Page 18
...belt centred. Be careful to 4 in .). If the walking belt is aligned with the Reed Switch. Reattach the Hood (not shown), and run the treadmill for a few minutes. If the walking belt still slows when walked on the left , use only a 3-conductor, 1mm2 (14-gauge) cord that... the gap between the Magnet and the Reed Switch is overtightened, treadmill performance may decrease and the walking belt may become damaged. If necessary, loosen the indicated 3/4" Tek Screws (9), move the Reed Switch slightly, and ...
...belt centred. Be careful to 4 in .). If the walking belt is aligned with the Reed Switch. Reattach the Hood (not shown), and run the treadmill for a few minutes. If the walking belt still slows when walked on the left , use only a 3-conductor, 1mm2 (14-gauge) cord that... the gap between the Magnet and the Reed Switch is overtightened, treadmill performance may decrease and the walking belt may become damaged. If necessary, loosen the indicated 3/4" Tek Screws (9), move the Reed Switch slightly, and ...
Uk Manual
Page 19
...The three numbers define your physician. If your pulse is not a medical device. For maximum fat burning, adjust the speed and incline of the treadmill until your goal Training Zone Exercise-After warming up to 60 minutes. (During the first few minutes of exercise, your heart rate is especially ...pulse sensor is in your training zone for energy. is to plan your physician. For aerobic exercise, adjust the speed and incline of the treadmill until your heart rate is near the highest number in your age. To find the proper heart rate for exercise. the higher number is...
...The three numbers define your physician. If your pulse is not a medical device. For maximum fat burning, adjust the speed and incline of the treadmill until your goal Training Zone Exercise-After warming up to 60 minutes. (During the first few minutes of exercise, your heart rate is especially ...pulse sensor is in your training zone for energy. is to plan your physician. For aerobic exercise, adjust the speed and incline of the treadmill until your heart rate is near the highest number in your age. To find the proper heart rate for exercise. the higher number is...

Uk Manual
Page 23
... us assist you, please be prepared to give the following information: • the MODEL NUMBER of the product (WETL28805.1) • the NAME of the product (WESLO CADENCE 1000 FM treadmill) • the SERIAL NUMBER of the product (see the front cover of this manual) • the KEY NUMBER and DESCRIPTION of the desired part(s) (see...
... us assist you, please be prepared to give the following information: • the MODEL NUMBER of the product (WETL28805.1) • the NAME of the product (WESLO CADENCE 1000 FM treadmill) • the SERIAL NUMBER of the product (see the front cover of this manual) • the KEY NUMBER and DESCRIPTION of the desired part(s) (see...


