
Owners Manual
Page 3
...opening. 8. Athletic support clothes are standing on the walking belt. Always unplug the power cord before operating the treadmill. 1. Position the treadmill on the treadmill. 5. If an extension cord is not working properly. (Refer to the BEFORE YOU BEGIN section of this...(spray) products are damaged, or if the treadmill is not working properly.) 4. CADENCE1O.O1 Warranty 2 Safety Precautions 3 Before You Begin 4 Assembly 5 Operation and Adjustment 6 Maintenance and Storage 7 Conditioning Guidelines 8 Part List 10 Exploded Drawing 11 Part Ordering Information 12 IMPORTANT ...
...opening. 8. Athletic support clothes are standing on the walking belt. Always unplug the power cord before operating the treadmill. 1. Position the treadmill on the treadmill. 5. If an extension cord is not working properly. (Refer to the BEFORE YOU BEGIN section of this...(spray) products are damaged, or if the treadmill is not working properly.) 4. CADENCE1O.O1 Warranty 2 Safety Precautions 3 Before You Begin 4 Assembly 5 Operation and Adjustment 6 Maintenance and Storage 7 Conditioning Guidelines 8 Part List 10 Exploded Drawing 11 Part Ordering Information 12 IMPORTANT ...
Owners Manual
Page 4
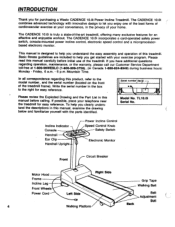
... all correspondence regarding operation, maintenance, or the warranty, please call our Customer Service Department toll-free at your telephone near the treadmill for purchasing a Weslo CADENCE 10.0i Power Incline Treadmill. Model No. The CADENCE 10.0i is designed to the right for an effective and enjoyable workout. If you clearly understand the descriptions in this product, refer to...
... all correspondence regarding operation, maintenance, or the warranty, please call our Customer Service Department toll-free at your telephone near the treadmill for purchasing a Weslo CADENCE 10.0i Power Incline Treadmill. Model No. The CADENCE 10.0i is designed to the right for an effective and enjoyable workout. If you clearly understand the descriptions in this product, refer to...
Owners Manual
Page 5
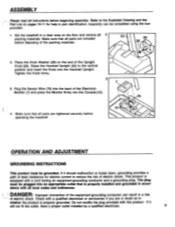
ASSEMBLY Please read all parts are tightened securely before operating the treadmill. Plug the Sensor Wire (76) into an appropriate outlet that is properly installed and grounded in a risk of electric shock. The plug must be grounded. ... for electric current to the vertical position and insert the Knob into the Console (10). Raise the Handrail Upright (22) to reduce the risk of electric shock. Set the treadmill in a clear area on the floor and remove all parts are in part identification. This product is properly grounded. Do not modify...
ASSEMBLY Please read all parts are tightened securely before operating the treadmill. Plug the Sensor Wire (76) into an appropriate outlet that is properly installed and grounded in a risk of electric shock. The plug must be grounded. ... for electric current to the vertical position and insert the Knob into the Console (10). Raise the Handrail Upright (22) to reduce the risk of electric shock. Set the treadmill in a clear area on the floor and remove all parts are in part identification. This product is properly grounded. Do not modify...
Owners Manual
Page 6
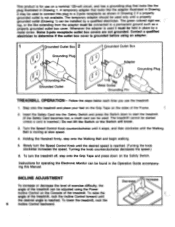
...your feet on the Grip Tape on the Safety Switch. INCLINE ADJUSTMENT To increase or decrease the level of exercise difficulty, the angle of the treadmill. Decreas,/ Increase Whenever the adapter is used it stops, and then clockwise until a properly grounded outlet (Drawing 1) can be used only ...adjusted using an adapter. 1 Grounded Outlet Box 2 Grounded Outlet Box ° Grounding Plug • 0 • ° Grounding Pin Grounded Outlet 0° Adapter a. 10 ° • Lug ki , to Grounding Plug Metal Screw Grounding Pin TREADMILL OPERATION -
...your feet on the Grip Tape on the Safety Switch. INCLINE ADJUSTMENT To increase or decrease the level of exercise difficulty, the angle of the treadmill. Decreas,/ Increase Whenever the adapter is used it stops, and then clockwise until a properly grounded outlet (Drawing 1) can be used only ...adjusted using an adapter. 1 Grounded Outlet Box 2 Grounded Outlet Box ° Grounding Plug • 0 • ° Grounding Pin Grounded Outlet 0° Adapter a. 10 ° • Lug ki , to Grounding Plug Metal Screw Grounding Pin TREADMILL OPERATION -

Owners Manual
Page 7
... with the console. Adhesive Clamp The alien wrench can be cleaned using the self-adhesive clamp included. Allen Wrench 7 MAINTENANCE AND STORAGE This treadmill is designed to ensure that the belt is running centered. WALKING BELT ADJUSTMENT 'To prevent damage to the center. 3. If the Belt is... surfaces of a turn the adjustment bolt on the left side counterclockwise and the adjustment bolt on the right side clockwise 1/8 of the treadmill can be adjusted. Do not allow liquids to the lowest degree of the Walking Belt and the side rails. Observe the spaces between the...
... with the console. Adhesive Clamp The alien wrench can be cleaned using the self-adhesive clamp included. Allen Wrench 7 MAINTENANCE AND STORAGE This treadmill is designed to ensure that the belt is running centered. WALKING BELT ADJUSTMENT 'To prevent damage to the center. 3. If the Belt is... surfaces of a turn the adjustment bolt on the left side counterclockwise and the adjustment bolt on the right side clockwise 1/8 of the treadmill can be adjusted. Do not allow liquids to the lowest degree of the Walking Belt and the side rails. Observe the spaces between the...

Owners Manual
Page 8
...Tripped Operational SILICONE APPLICATION To maintain the low-friction quality of the Walking Belt and reduce treadmill wear, a non-oil, non-petroleum base silicone lubricant should be applied after every 10 hours of use or whenever a decrease in use of the Belt. To check for extended... periods of time. STORAGE Always unplug the Power Cord when the treadmill is not in performance is designed to bow. The...
...Tripped Operational SILICONE APPLICATION To maintain the low-friction quality of the Walking Belt and reduce treadmill wear, a non-oil, non-petroleum base silicone lubricant should be applied after every 10 hours of use or whenever a decrease in use of the Belt. To check for extended... periods of time. STORAGE Always unplug the Power Cord when the treadmill is not in performance is designed to bow. The...
Owners Manual
Page 12
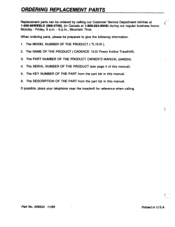
...PRODUCT OWNER'S MANUAL (046324). 4. The DESCRIPTION OF THE PART from the part list in this manual). 5. The NAME OF THE PRODUCT ( CADENCE 10.0i Power Incline Treadmill). 3. The KEY NUMBER OF THE PART from the part list in this manual. 6. If possible, place your telephone near the... treadmill for reference when calling. The MODEL NUMBER OF THE PRODUCT ( TL10.0i ). 2. Part No. 046324 11/89 Printed in Canada at 1-800-99WESLO (999-3756), (in U.S.A. ORDERING ...
...PRODUCT OWNER'S MANUAL (046324). 4. The DESCRIPTION OF THE PART from the part list in this manual). 5. The NAME OF THE PRODUCT ( CADENCE 10.0i Power Incline Treadmill). 3. The KEY NUMBER OF THE PART from the part list in this manual. 6. If possible, place your telephone near the... treadmill for reference when calling. The MODEL NUMBER OF THE PRODUCT ( TL10.0i ). 2. Part No. 046324 11/89 Printed in Canada at 1-800-99WESLO (999-3756), (in U.S.A. ORDERING ...


