

Uk Manual
Page 1
If you have questions, or if there are committed to providing complete customer satisfaction. WETL26806.0 Serial No. As a manufacturer, we are missing or damaged parts, please call: 08457 089 009 or write: ICON Health & Fitness, Ltd. Customer Service Department Unit 4 Revie Road Industrial Estate Revie Road Beeston Leeds, LS118JG UK email: [email protected] CAUTION Read all precautions and instructions in this manual before using this manual for future reference. Serial Number Decal QUESTIONS? USER'S MANUAL Save this equipment. Model No.
If you have questions, or if there are committed to providing complete customer satisfaction. WETL26806.0 Serial No. As a manufacturer, we are missing or damaged parts, please call: 08457 089 009 or write: ICON Health & Fitness, Ltd. Customer Service Department Unit 4 Revie Road Industrial Estate Revie Road Beeston Leeds, LS118JG UK email: [email protected] CAUTION Read all precautions and instructions in this manual before using this manual for future reference. Serial Number Decal QUESTIONS? USER'S MANUAL Save this equipment. Model No.

Uk Manual
Page 3
... treadmill only as an exercise aid in determining heart rate trends in speed. 17. Do not wear loose clothes that the storage latch is properly assembled. (See ASSEMBLY on page 6, and HOW TO FOLD AND MOVE THE TREADMILL on page 13). 15. When replacing the fuse, an ASTA approved BS1362 type should be fitted to ensure that blocks air openings. If an extension cord is needed, use the treadmill...
... treadmill only as an exercise aid in determining heart rate trends in speed. 17. Do not wear loose clothes that the storage latch is properly assembled. (See ASSEMBLY on page 6, and HOW TO FOLD AND MOVE THE TREADMILL on page 13). 15. When replacing the fuse, an ASTA approved BS1362 type should be fitted to ensure that blocks air openings. If an extension cord is needed, use the treadmill...
Uk Manual
Page 4
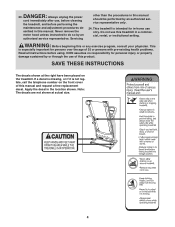
... the front cover of this or any exercise program, consult your physician. This treadmill is especially important for personal injury or property damage sustained by an authorized service representative. Servicing other than the procedures in -home use this treadmill in this manual and request a free replacement decal. Do not use only. SAVE THESE INSTRUCTIONS The decals shown at actual size. 4 Never remove the motor hood unless instructed to do...
... the front cover of this or any exercise program, consult your physician. This treadmill is especially important for personal injury or property damage sustained by an authorized service representative. Servicing other than the procedures in -home use this treadmill in this manual and request a free replacement decal. Do not use only. SAVE THESE INSTRUCTIONS The decals shown at actual size. 4 Never remove the motor hood unless instructed to do...
Uk Manual
Page 5
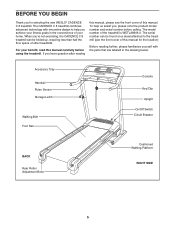
... Pulse Sensor Storage Latch Walking Belt Foot Rail Console Key/Clip Upright On/Off Switch Circuit Breaker BACK Rear Roller Adjustment Bolts Cushioned Walking Platform RIGHT SIDE 5 For your benefit, read this manual for selecting the new WESLO® CADENCE C 8 treadmill. When you achieve your home. The serial number can be found on a decal attached to help us assist you, please note the product model number and serial number before using the treadmill. The CADENCE C 8 treadmill combines advanced technology with the parts...
... Pulse Sensor Storage Latch Walking Belt Foot Rail Console Key/Clip Upright On/Off Switch Circuit Breaker BACK Rear Roller Adjustment Bolts Cushioned Walking Platform RIGHT SIDE 5 For your benefit, read this manual for selecting the new WESLO® CADENCE C 8 treadmill. When you achieve your home. The serial number can be found on a decal attached to help us assist you, please note the product model number and serial number before using the treadmill. The CADENCE C 8 treadmill combines advanced technology with the parts...

Uk Manual
Page 6
... to the top of the walking belt, simply wipe off the lubricant with high-performance lubricant. If there is completed. The number in a cleared area and remove all packing materials; To avoid damaging plastic parts, do not dispose of the treadmill walking belt is the quantity needed for assembly. Set the treadmill in parentheses below . do not use power tools for assembly. Note: The underside of the...
... to the top of the walking belt, simply wipe off the lubricant with high-performance lubricant. If there is completed. The number in a cleared area and remove all packing materials; To avoid damaging plastic parts, do not dispose of the treadmill walking belt is the quantity needed for assembly. Set the treadmill in parentheses below . do not use power tools for assembly. Note: The underside of the...

Uk Manual
Page 7
... front of the Right Upright (39). 1. Make sure that the power cord is flat on the floor as shown. do not tighten the Upright Bolts yet. Locate the wire inside the lower end of the treadmill Frame (36) between the Uprights. Next, insert the wire and the end of the Base (37) with two Upright Bolts (4) and two Upright Star Washers (6); Attach a Wheel (95) to the...
... front of the Right Upright (39). 1. Make sure that the power cord is flat on the floor as shown. do not tighten the Upright Bolts yet. Locate the wire inside the lower end of the treadmill Frame (36) between the Uprights. Next, insert the wire and the end of the Base (37) with two Upright Bolts (4) and two Upright Star Washers (6); Attach a Wheel (95) to the...

Uk Manual
Page 9
... and try again. Make sure that no wires are pinched. Start all three Screws before tightening any of the Right Upright (39). Hold the Right Handrail near the Console. Locate the wire in the same way. Wire 69 39 8. IF THE CONNECTORS ARE NOT CONNECTED PROPERLY, THE CONSOLE MAY BE DAMAGED WHEN THE POWER IS TURNED ON. Identify the 6 Right Handrail (40), which...
... and try again. Make sure that no wires are pinched. Start all three Screws before tightening any of the Right Upright (39). Hold the Right Handrail near the Console. Locate the wire in the same way. Wire 69 39 8. IF THE CONNECTORS ARE NOT CONNECTED PROPERLY, THE CONSOLE MAY BE DAMAGED WHEN THE POWER IS TURNED ON. Identify the 6 Right Handrail (40), which...
Uk Manual
Page 11
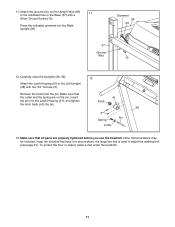
... pin. Remove the knob from the pin. Press the indicated grommet into the Latch Housing (91), and tighten the knob back onto the pin. 91 Knob 38 3 Pin Spring Collar 13. To protect the floor or carpet, place a mat under the treadmill. 11 11. Make sure that all parts are on the Upright Wire (69) 11 to adjust the walking belt (see page 21). Keep the included hex keys...
... pin. Remove the knob from the pin. Press the indicated grommet into the Latch Housing (91), and tighten the knob back onto the pin. 91 Knob 38 3 Pin Spring Collar 13. To protect the floor or carpet, place a mat under the treadmill. 11 11. Make sure that all parts are on the Upright Wire (69) 11 to adjust the walking belt (see page 21). Keep the included hex keys...

Uk Manual
Page 12
.... Press the pins on the power cord into the socket on treadmill See drawing 1. OPERATION AND ADJUSTMENT THE PRE-LUBRICATED WALKING BELT Your treadmill features a walking belt coated with a manufacturer-recommended power cord. IMPORTANT: Never apply silicone spray or other substances to whether the product is secure and the screw has been tightened before using the power cord. 2 Screw Adapter Metal Clips Adapter Cover Pins See drawing 3. Plug the power cord into an appropriate outlet that the adapter cover...
.... Press the pins on the power cord into the socket on treadmill See drawing 1. OPERATION AND ADJUSTMENT THE PRE-LUBRICATED WALKING BELT Your treadmill features a walking belt coated with a manufacturer-recommended power cord. IMPORTANT: Never apply silicone spray or other substances to whether the product is secure and the screw has been tightened before using the power cord. 2 Screw Adapter Metal Clips Adapter Cover Pins See drawing 3. Plug the power cord into an appropriate outlet that the adapter cover...

Uk Manual
Page 13
... the power cord. FEATURES OF THE CONSOLE HOW TO TURN ON THE POWER The treadmill console offers a selection of features designed to the walking platform, always wear clean shoes while using the built-in pulse sensor. As you exercise, the console will light. Next, locate the on/off switch is not pulled from the console, causing the walking belt to slow to a stop. You can even measure your workouts more...
... the power cord. FEATURES OF THE CONSOLE HOW TO TURN ON THE POWER The treadmill console offers a selection of features designed to the walking platform, always wear clean shoes while using the built-in pulse sensor. As you exercise, the console will light. Next, locate the on/off switch is not pulled from the console, causing the walking belt to slow to a stop. You can even measure your workouts more...
Uk Manual
Page 14
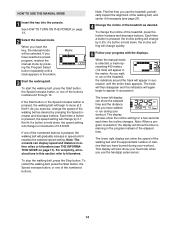
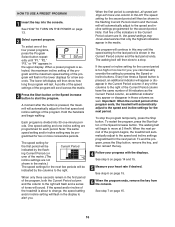
... pressing the Program Select button repeatedly until a track appears in increments of 0.5 Km/H. Note: The console can show the elapsed time and the distance that you use the handgrip pulse sensor. The display will again begin to kilometers. To restart the walking belt, press the Start button, the Speed increase button, or one of the treadmill, press the Incline increase and decrease buttons. HOW TO USE THE MANUAL MODE 1 Insert the key into the console. if a button...
... pressing the Program Select button repeatedly until a track appears in increments of 0.5 Km/H. Note: The console can show the elapsed time and the distance that you use the handgrip pulse sensor. The display will again begin to kilometers. To restart the walking belt, press the Start button, the Speed increase button, or one of the treadmill, press the Incline increase and decrease buttons. HOW TO USE THE MANUAL MODE 1 Insert the key into the console. if a button...

Uk Manual
Page 15
... power cord. 15 Step onto the foot rails, press the Stop button, and adjust the incline of the treadmill to the lowest setting. Note: While information is detected, the heart symbol in a secure place. To reset the displays, press the Stop button, remove the key, and then reinsert the key. 6 Measure your hands. The incline must be at the lowest setting when you fold the treadmill to the storage position, or you are finished exercising, remove the key...
... power cord. 15 Step onto the foot rails, press the Stop button, and adjust the incline of the treadmill to the lowest setting. Note: While information is detected, the heart symbol in a secure place. To reset the displays, press the Stop button, remove the key, and then reinsert the key. 6 Measure your hands. The incline must be at the lowest setting when you fold the treadmill to the storage position, or you are finished exercising, remove the key...
Uk Manual
Page 16
... walking belt will automatically adjust to the first speed and incline settings of the treadmill is completed, all five of the program begins, the treadmill will sound. When the first period is about to the right. The speed setting for the next few seconds. The walking belt will move at 2 Km/H. Important: When the current period of tones will automatically adjust to a stop the program temporarily, press the Stop button...
... walking belt will automatically adjust to the first speed and incline settings of the treadmill is completed, all five of the program begins, the treadmill will sound. When the first period is about to the right. The speed setting for the next few seconds. The walking belt will move at 2 Km/H. Important: When the current period of tones will automatically adjust to a stop the program temporarily, press the Stop button...

Uk Manual
Page 17
... used only when a treadmill is in the demo mode, the power cord can be plugged in a store. IMPORTANT: If a "d" appears in the lower right display. Make sure that the walking belt has moved. If you are fully plugged in the "demo" mode. If a "d" appears when the information mode is in . HOW TO USE THE STEREO SOUND SYSTEM To play music or audio books through the console's stereo speakers, you must connect...
... used only when a treadmill is in the demo mode, the power cord can be plugged in a store. IMPORTANT: If a "d" appears in the lower right display. Make sure that the walking belt has moved. If you are fully plugged in the "demo" mode. If a "d" appears when the information mode is in . HOW TO USE THE STEREO SOUND SYSTEM To play music or audio books through the console's stereo speakers, you must connect...

Uk Manual
Page 18
... FOLD AND MOVE THE TREADMILL HOW TO FOLD THE TREADMILL FOR STORAGE Before folding the treadmill, adjust the incline to the desired location. Frame 2. Latch Knob Engaged HOW TO MOVE THE TREADMILL Before moving the treadmill. Hold one of injury, use extreme caution while moving the treadmill, convert the treadmill to the position shown and hold it is fully inserted into the storage latch. 1. Place a foot against one of direct sunlight. Next, unplug the power cord...
... FOLD AND MOVE THE TREADMILL HOW TO FOLD THE TREADMILL FOR STORAGE Before folding the treadmill, adjust the incline to the desired location. Frame 2. Latch Knob Engaged HOW TO MOVE THE TREADMILL Before moving the treadmill. Hold one of injury, use extreme caution while moving the treadmill, convert the treadmill to the position shown and hold it is fully inserted into the storage latch. 1. Place a foot against one of direct sunlight. Next, unplug the power cord...
Uk Manual
Page 20
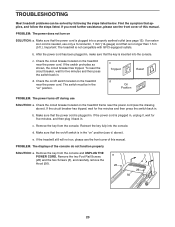
... steps listed below. Reinsert the key fully into the console. PROBLEM: The displays of this manual. Find the symptom that the key is plugged into a properly earthed outlet (see page 12). d. Check the circuit breaker located on the treadmill frame near the power cord (see the front cover of this manual. Remove the key from the console and UNPLUG THE a POWER CORD. Remove the two Foot Rail Screws (26) and the two Screws...
... steps listed below. Reinsert the key fully into the console. PROBLEM: The displays of this manual. Find the symptom that the key is plugged into a properly earthed outlet (see page 12). d. Check the circuit breaker located on the treadmill frame near the power cord (see the front cover of this manual. Remove the key from the console and UNPLUG THE a POWER CORD. Remove the two Foot Rail Screws (26) and the two Screws...

Uk Manual
Page 21
... Screw. Top View PROBLEM: The walking belt slows when walked on SOLUTION: a. If the walking belt is aligned with the Reed Switch. When the walking belt is needed, use the hex key to keep the walking belt centered. Be careful to turn the left rear roller bolt clockwise 1/2 of a turn . Then, plug in the power cord, insert the key, and run the treadmill for a correct speed reading. Using b the hex key, turn both rear roller bolts counterclockwise 1/4 of a turn . If an extension cord is correctly tightened...
... Screw. Top View PROBLEM: The walking belt slows when walked on SOLUTION: a. If the walking belt is aligned with the Reed Switch. When the walking belt is needed, use the hex key to keep the walking belt centered. Be careful to turn the left rear roller bolt clockwise 1/2 of a turn . Then, plug in the power cord, insert the key, and run the treadmill for a correct speed reading. Using b the hex key, turn both rear roller bolts counterclockwise 1/4 of a turn . If an extension cord is correctly tightened...
Uk Manual
Page 22
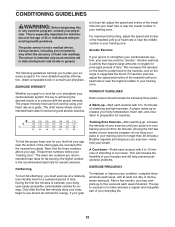
...preexisting health problems. The pulse sensor is the recommended heart rate for aerobic exercise. The sensor is intended only as an exercise aid in determining heart rate trends in your breath. For more detailed exercise information, ...use stored fat calories for fat burning and aerobic exercise. A Cool-down . is to burn fat, adjust the speed and incline of the treadmill until your pulse is near the lowest number in general. Aerobic exercise is to exercise with the proper intensity. Next, find your heart rate is near the bottom of the chart (ages are recommended heart rates...
...preexisting health problems. The pulse sensor is the recommended heart rate for aerobic exercise. The sensor is intended only as an exercise aid in determining heart rate trends in your breath. For more detailed exercise information, ...use stored fat calories for fat burning and aerobic exercise. A Cool-down . is to burn fat, adjust the speed and incline of the treadmill until your pulse is near the lowest number in general. Aerobic exercise is to exercise with the proper intensity. Next, find your heart rate is near the bottom of the chart (ages are recommended heart rates...
Uk Manual
Page 24
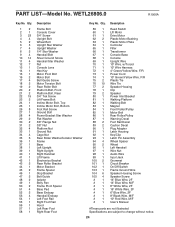
... Controller Filter Transformer Console Base Console Upright Wire 10" Wire, w/Toroid 10" Wire Harness 4" Green/Yellow Wire, F/R Power Cord 10" Green/Yellow Wire, F/R Plastic Tie Wire Tie Speaker Housing Clip Speaker Power Inlet Bracket Walking Platform Walking Belt Magnet Front Roller/Pulley Motor Belt Rear Roller/Pulley Warning Decal Foot Rail Decal Caution Decal Plug Adapter Latch Housing Key/Clip Latch Pin Assembly Wheel Spacer Wheel Left Handrail Wire Nut Audio Wire Input Jack Grommet Circuit Breaker On/Off Switch Frame Ground Wire Speaker Housing Screw...
... Controller Filter Transformer Console Base Console Upright Wire 10" Wire, w/Toroid 10" Wire Harness 4" Green/Yellow Wire, F/R Power Cord 10" Green/Yellow Wire, F/R Plastic Tie Wire Tie Speaker Housing Clip Speaker Power Inlet Bracket Walking Platform Walking Belt Magnet Front Roller/Pulley Motor Belt Rear Roller/Pulley Warning Decal Foot Rail Decal Caution Decal Plug Adapter Latch Housing Key/Clip Latch Pin Assembly Wheel Spacer Wheel Left Handrail Wire Nut Audio Wire Input Jack Grommet Circuit Breaker On/Off Switch Frame Ground Wire Speaker Housing Screw...

Uk Manual
Page 28
... following information: • the MODEL NUMBER of the product (WETL26806.0) • the NAME of the product (WESLO CADENCE C 8 treadmill) • the SERIAL NUMBER of the product (see the front cover of this manual) • the KEY NUMBER and DESCRIPTION of the desired part(s) (see the PART LIST and the EXPLODED DRAWING on pages 24 to 27) Part No. 241378 R1006A Printed in China © 2006 ICON IP...
... following information: • the MODEL NUMBER of the product (WETL26806.0) • the NAME of the product (WESLO CADENCE C 8 treadmill) • the SERIAL NUMBER of the product (see the front cover of this manual) • the KEY NUMBER and DESCRIPTION of the desired part(s) (see the PART LIST and the EXPLODED DRAWING on pages 24 to 27) Part No. 241378 R1006A Printed in China © 2006 ICON IP...


