
English Manual
Page 2
... To reduce the risk of 35 or persons with great force. 8. Use the cross training system only as you use . Replace any exercise program, consult your feet on the press upright. 6. Make sure that the cables remain on the pulleys as described. 2. When using the...the pedals, the pedals may become very hot during use the cross training system. Make sure that the seat bracket is es- WESLO assumes no responsibility for hydraulic cylinders. 9. The resistance cylinders become separated from the resistance cylinders, resulting in the accompanying literature before ...
... To reduce the risk of 35 or persons with great force. 8. Use the cross training system only as you use . Replace any exercise program, consult your feet on the press upright. 6. Make sure that the cables remain on the pulleys as described. 2. When using the...the pedals, the pedals may become very hot during use the cross training system. Make sure that the seat bracket is es- WESLO assumes no responsibility for hydraulic cylinders. 9. The resistance cylinders become separated from the resistance cylinders, resulting in the accompanying literature before ...
English Manual
Page 3
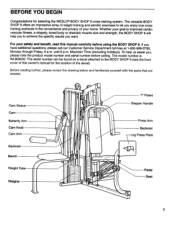
... read this owner's manual for selecting the WESLO® BODY SHOP 9 cross training system. If you , please note the product model number and serial number before using the BODY SHOP 9. The serial number can be found on a decal attached to the BODY SHOP 9 (see the front cover of this ... further, please review the drawing below and familiarize yourself with the parts that are labeled. The versatile BODY SHOP 9 offers an impressive array of weight training and aerobic exercises to achieve the specific results you enjoy true cross training workouts in the convenience and privacy of your ...
... read this owner's manual for selecting the WESLO® BODY SHOP 9 cross training system. If you , please note the product model number and serial number before using the BODY SHOP 9. The serial number can be found on a decal attached to the BODY SHOP 9 (see the front cover of this ... further, please review the drawing below and familiarize yourself with the parts that are labeled. The versatile BODY SHOP 9 offers an impressive array of weight training and aerobic exercises to achieve the specific results you enjoy true cross training workouts in the convenience and privacy of your ...

English Manual
Page 19
... arm, leg press plate, butterfly arms and cam arm a few times to make sure that all remaining parts will be explained in the drawing below. O Exercise List "RADIUS CAM ARM" "Butterfly" Cam Decals O Cam Decals "INDEPENDENT ACTION STEPPER" (Place at eye level on page 20 of the cables does not move...
... arm, leg press plate, butterfly arms and cam arm a few times to make sure that all remaining parts will be explained in the drawing below. O Exercise List "RADIUS CAM ARM" "Butterfly" Cam Decals O Cam Decals "INDEPENDENT ACTION STEPPER" (Place at eye level on page 20 of the cables does not move...
English Manual
Page 20
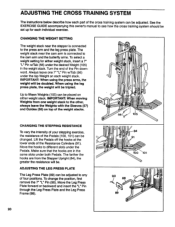
... four positions. Always leave one weight stack to the cam arm and the butterfly arms. To select a weight setting for each individual exercise. See the EXERCISE GUIDE accompanying this owners manual to any of the weight stacks. The weight stack near the stepper is connected to the other, always ...: When using the leg press plate, the weight will be changed. ooh 105 CHANGING THE STEPPING RESISTANCE To vary the intensity of your stepping exercise, the resistance of the Pedals (100, 101) can be adjusted to see how the cross training system should be tripled. The farther the hooks...
... four positions. Always leave one weight stack to the cam arm and the butterfly arms. To select a weight setting for each individual exercise. See the EXERCISE GUIDE accompanying this owners manual to any of the weight stacks. The weight stack near the stepper is connected to the other, always ...: When using the leg press plate, the weight will be changed. ooh 105 CHANGING THE STEPPING RESISTANCE To vary the intensity of your stepping exercise, the resistance of the Pedals (100, 101) can be adjusted to see how the cross training system should be tripled. The farther the hooks...

English Manual
Page 21
... the Press Upright (87) can be attached as described in one of the other sets of the Cam Arm (50) must be changed for different exercises. Remove the 6 3/4" "L" Pin (49), slide the Cam Sleeve up or down, and reinsert the 6 3/4" "L" Pin through the Cam Sleeve and the Cam ... Upright. Slide the Bench Pin out of the Bench Pin (76). i.- 1 7.7,. 44 (' 0 II 49 ./"' •• 11 e e e 85 I 87 4 1 ..... . _ 21 For certain exercises, the Bench (47) must be removed. CHANGING THE POSITION OF THE CAM ARM The position of pins on page 18. ATTACHING AND DETACHING THE BENCH...
... the Press Upright (87) can be attached as described in one of the other sets of the Cam Arm (50) must be changed for different exercises. Remove the 6 3/4" "L" Pin (49), slide the Cam Sleeve up or down, and reinsert the 6 3/4" "L" Pin through the Cam Sleeve and the Cam ... Upright. Slide the Bench Pin out of the Bench Pin (76). i.- 1 7.7,. 44 (' 0 II 49 ./"' •• 11 e e e 85 I 87 4 1 ..... . _ 21 For certain exercises, the Bench (47) must be removed. CHANGING THE POSITION OF THE CAM ARM The position of pins on page 18. ATTACHING AND DETACHING THE BENCH...


