
Instruction Manual
Page 1
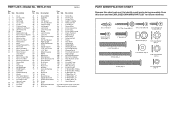
... KEY NUMBER and DESCRIPTION of this manual) Part No. 210453 R0105A Printed in this manual before using this equipment. USER'S MANUAL Class H Fitness Product Serial Number Decal QUESTIONS? ING in the centre of the desired part(s) (see the PART LIST and the EXPLODED DRAW- As a manufacturer, we are missing or damaged parts, please call: 08457 089 009 or write: ICON Health & Fitness, Ltd. office, or write: ICON Health & Fitness, Ltd. ORDERING REPLACEMENT PARTS...
... KEY NUMBER and DESCRIPTION of this manual) Part No. 210453 R0105A Printed in this manual before using this equipment. USER'S MANUAL Class H Fitness Product Serial Number Decal QUESTIONS? ING in the centre of the desired part(s) (see the PART LIST and the EXPLODED DRAW- As a manufacturer, we are missing or damaged parts, please call: 08457 089 009 or write: ICON Health & Fitness, Ltd. office, or write: ICON Health & Fitness, Ltd. ORDERING REPLACEMENT PARTS...
Instruction Manual
Page 2
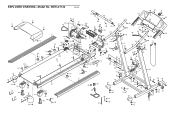
WESLO is a registered trademark of this manual. NOTES TABLE OF CONTENTS IMPORTANT PRECAUTIONS 3 BEFORE YOU BEGIN 5 ASSEMBLY 6 OPERATION AND ADJUSTMENT 9 HOW TO FOLD AND MOVE THE TREADMILL 13 TROUBLESHOOTING 15 CONDITIONING GUIDELINES 17 ORDERING REPLACEMENT PARTS Back Cover Note: An EXPLODED DRAWING and a PART LIST are attached in the centre of ICON IP, Inc. 2 19
WESLO is a registered trademark of this manual. NOTES TABLE OF CONTENTS IMPORTANT PRECAUTIONS 3 BEFORE YOU BEGIN 5 ASSEMBLY 6 OPERATION AND ADJUSTMENT 9 HOW TO FOLD AND MOVE THE TREADMILL 13 TROUBLESHOOTING 15 CONDITIONING GUIDELINES 17 ORDERING REPLACEMENT PARTS Back Cover Note: An EXPLODED DRAWING and a PART LIST are attached in the centre of ICON IP, Inc. 2 19

Instruction Manual
Page 3
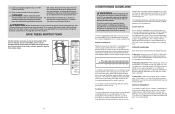
..., lower, or move the walking belt whilst the power is turned off position when the treadmill is not a medical device. When connecting the power cord (see page 9), plug the power cord into an earthed circuit. 18. The pulse sensor is not in general. 19. Never leave the treadmill unattended whilst it is properly assembled. (See ASSEMBLY on page 6, and HOW TO FOLD AND MOVE THE TREADMILL on the walking belt. When folding or moving the treadmill...
..., lower, or move the walking belt whilst the power is turned off position when the treadmill is not a medical device. When connecting the power cord (see page 9), plug the power cord into an earthed circuit. 18. The pulse sensor is not in general. 19. Never leave the treadmill unattended whilst it is properly assembled. (See ASSEMBLY on page 6, and HOW TO FOLD AND MOVE THE TREADMILL on the walking belt. When folding or moving the treadmill...
Instruction Manual
Page 4
... exercise, adjust the speed and incline of the chart (ages are recommended heart rates for in your pulse in general. To measure your physician. This will help you , first find your condition, complete three workouts each workout with 5 to cool down -Finish each week, with pre-existing health problems. Read all parts of stretching to 10 minutes of the treadmill regularly. 22. Never remove the motor hood...
... exercise, adjust the speed and incline of the chart (ages are recommended heart rates for in your pulse in general. To measure your physician. This will help you , first find your condition, complete three workouts each workout with 5 to cool down -Finish each week, with pre-existing health problems. Read all parts of stretching to 10 minutes of the treadmill regularly. 22. Never remove the motor hood...
Instruction Manual
Page 5
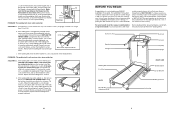
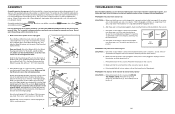
... not exercising, the unique CADENCE 75 treadmill can be able to lift each side of a turn . If an extension cord is needed, use the hex key to turn the left side of the Pulley (101). Remove the key and UNPLUG THE POWER CORD. Using b the hex key, turn both rear roller adjustment bolts counterclockwise, 1/4 of the walk- Repeat until the walking belt is off the walking platform. if the walk- If necessary, loosen the indicated Screw (9), move the Reed Switch slightly...
... not exercising, the unique CADENCE 75 treadmill can be able to lift each side of a turn . If an extension cord is needed, use the hex key to turn the left side of the Pulley (101). Remove the key and UNPLUG THE POWER CORD. Using b the hex key, turn both rear roller adjustment bolts counterclockwise, 1/4 of the walk- Repeat until the walking belt is off the walking platform. if the walk- If necessary, loosen the indicated Screw (9), move the Reed Switch slightly...
Instruction Manual
Page 6
... power turns off switch located on the treadmill near the power cord. b. Reinsert the key fully into the hole and out of the top of the Right Upright (see page 9). PROBLEM: The displays of the Right Upright. Do not dispose of the walking belt, simply wipe off switch is plugged in . This is needed , use SOLUTION: a. Attach the Wheels (63) to the Base (79) in . b. d. above ). Remove the key from the console...
... power turns off switch located on the treadmill near the power cord. b. Reinsert the key fully into the hole and out of the top of the Right Upright (see page 9). PROBLEM: The displays of the Right Upright. Do not dispose of the walking belt, simply wipe off switch is plugged in . This is needed , use SOLUTION: a. Attach the Wheels (63) to the Base (79) in . b. d. above ). Remove the key from the console...
Instruction Manual
Page 7
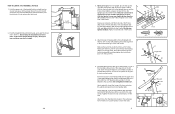
... latch knob to the left side of the treadmill with your right hand as shown. Open part bag B. the Spacer Screws are on the Latch Pin. Make sure that the Latch Pin Collar (49) and the Spring (50) are slightly thicker than the 3/4" Screws. Insert the bracket on the side shown. Insert the longer of the hole.) Remove any plas- Latch Knob 14 3. Insert a 4" Bolt...
... latch knob to the left side of the treadmill with your right hand as shown. Open part bag B. the Spacer Screws are on the Latch Pin. Make sure that the Latch Pin Collar (49) and the Spring (50) are slightly thicker than the 3/4" Screws. Insert the bracket on the side shown. Insert the longer of the hole.) Remove any plas- Latch Knob 14 3. Insert a 4" Bolt...
Instruction Manual
Page 8
... power cord. Using your left Handrail (not shown) with your legs rather than your right hand to the desired location. Raise the treadmill until it rolls freely on the end of a second person, lower the uprights and firmly tighten the bolts used in step 5. Slowly release the latch knob. Do not leave the treadmill in the storage position in the side of the Console Base (67). Frame Latch Knob Latch Pin...
... power cord. Using your left Handrail (not shown) with your legs rather than your right hand to the desired location. Raise the treadmill until it rolls freely on the end of a second person, lower the uprights and firmly tighten the bolts used in step 5. Slowly release the latch knob. Do not leave the treadmill in the storage position in the side of the Console Base (67). Frame Latch Knob Latch Pin...

Instruction Manual
Page 9
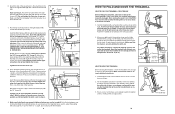
... resistance for a few seconds. Plug the indicated end of electric shock. See drawing 2. Plug the power cord into an appropriate outlet that the adapter cover is properly installed and earthed in - Arrow Step onto the foot rails, press the Stop button, and remove the key from sliding along the power cord. Incline Leg When you have a proper outlet installed by a qualified electrician. 12 9 OPERATION AND ADJUSTMENT THE PERFORMANT LUBETM WALKING BELT Your treadmill...
... resistance for a few seconds. Plug the indicated end of electric shock. See drawing 2. Plug the power cord into an appropriate outlet that the adapter cover is properly installed and earthed in - Arrow Step onto the foot rails, press the Stop button, and remove the key from sliding along the power cord. Incline Leg When you have a proper outlet installed by a qualified electrician. 12 9 OPERATION AND ADJUSTMENT THE PERFORMANT LUBETM WALKING BELT Your treadmill...
Instruction Manual
Page 10
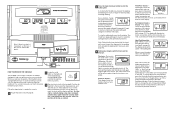
... treadmill is pressed, the speed setting will appear in the Heart Rate/ Speed display to operate the console. 1 Plug in the display. Find the clip attached to help you exercise, the speed of the clip as shown by the in pulse sensor. To restart the walking belt, press the Speed increase button. Time/Pace display- dicators in the center of the console represents a distance of features designed to the key (see page 9). 2 Locate the on/off switch...
... treadmill is pressed, the speed setting will appear in the Heart Rate/ Speed display to operate the console. 1 Plug in the display. Find the clip attached to help you exercise, the speed of the clip as shown by the in pulse sensor. To restart the walking belt, press the Speed increase button. Time/Pace display- dicators in the center of the console represents a distance of features designed to the key (see page 9). 2 Locate the on/off switch...
Instruction Manual
Page 11
... Upright Latch Knob Latch Pin Collar Spring Latch Pin Clip Latch Pin Latch Pin Assembly 4" Bolt 3/8" Star Washer Right Upright 5/16" Star Washer 3" Bolt Upright Spacer 1 1/4" Tek Screw 2 1/2" Bolt Wheel Housing Wheel Wheel Nut Wire Harness Silver Ground Screw Console Base Book Lens Console Plastic Tie Key/Clip Console Warning Decal Base Pad U-Nut Base Endcap Upright Grommet Frame Ground Wire Screw Base Ground Star Washer Belly Pan Key No. Bolt Frame Rear Roller Left Endcap Walking Belt Walking Platform Front Roller/Pulley Warning Decal Front Roller...
... Upright Latch Knob Latch Pin Collar Spring Latch Pin Clip Latch Pin Latch Pin Assembly 4" Bolt 3/8" Star Washer Right Upright 5/16" Star Washer 3" Bolt Upright Spacer 1 1/4" Tek Screw 2 1/2" Bolt Wheel Housing Wheel Wheel Nut Wire Harness Silver Ground Screw Console Base Book Lens Console Plastic Tie Key/Clip Console Warning Decal Base Pad U-Nut Base Endcap Upright Grommet Frame Ground Wire Screw Base Ground Star Washer Belly Pan Key No. Bolt Frame Rear Roller Left Endcap Walking Belt Walking Platform Front Roller/Pulley Warning Decal Front Roller...
Instruction Manual
Page 12
... 95 107 97 91 92 96 89 80 90 41 88 112 111 37 6 4 112 5 6 3 36 82 53* 50 51 54 55 57 58 79 75 37 59 64 63 104 74 73 60 94 27 80 76 55 54 64 62 61 78 80 65 83 73 73 63 60...
... 95 107 97 91 92 96 89 80 90 41 88 112 111 37 6 4 112 5 6 3 36 82 53* 50 51 54 55 57 58 79 75 37 59 64 63 104 74 73 60 94 27 80 76 55 54 64 62 61 78 80 65 83 73 73 63 60...


