
User Manual
Page 1
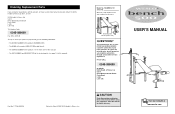
...Customer Service Department. Save this manual for reference. Write the serial number in the space above for future reference. Visit our website at www.weslo.com office, or write: ICON Health & Fitness Ltd. Ordering Replacement Parts If you encounter any problems with this product, or if you ...be prepared to give the following information: • The MODEL NUMBER of the product (WLEMBE32101) • The NAME of the product (WELSO® 500 weight bench) • The SERIAL NUMBER of the product (see the front cover of this manual) • The KEY NUMBER and DESCRIPTION of the desired ...
...Customer Service Department. Save this manual for reference. Write the serial number in the space above for future reference. Visit our website at www.weslo.com office, or write: ICON Health & Fitness Ltd. Ordering Replacement Parts If you encounter any problems with this product, or if you ...be prepared to give the following information: • The MODEL NUMBER of the product (WLEMBE32101) • The NAME of the product (WELSO® 500 weight bench) • The SERIAL NUMBER of the product (see the front cover of this manual) • The KEY NUMBER and DESCRIPTION of the desired ...

User Manual
Page 2
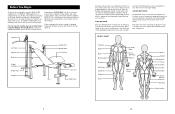
... 30 47 20 28 3 30 18 16 17 34 31 15 14 26 36 48 33 21 10 43 22 33 32 22 15 WESLO is missing or illegible, please call our Customer Service Department to order a free replacement decal. Keep hands and fingers clear of Contents Warning... Decal Placement 2 Important Precautions 3 Before You Begin 4 Part Identification Chart 5 Assembly 6 Using the Weight Bench 10 Exercise Guidelines 12 Part List 14 Exploded Drawing 15 Ordering Replacement Parts Back Cover Warning Decal Placement The decals shown below have been placed...
... 30 47 20 28 3 30 18 16 17 34 31 15 14 26 36 48 33 21 10 43 22 33 32 22 15 WESLO is missing or illegible, please call our Customer Service Department to order a free replacement decal. Keep hands and fingers clear of Contents Warning... Decal Placement 2 Important Precautions 3 Before You Begin 4 Part Identification Chart 5 Assembly 6 Using the Weight Bench 10 Exercise Guidelines 12 Part List 14 Exploded Drawing 15 Ordering Replacement Parts Back Cover Warning Decal Placement The decals shown below have been placed...

User Manual
Page 3
... or leg extension exercises with your back and the weight carriage. Do not place more than five feet with the barbell hooks to balance the bench. 18. When you feel pain or dizziness at the same height. WARNING: Before beginning this product. 3 Description 1 1 Right Upright 2 1 Frame 3 1... space between your back to change without notice. Specifications are changing weights, always secure the barbell with the weight bench. 10. The weight bench is plenty of serious injury, read the following important precautions before using the weight rack. 1. Always lower the weight...
... or leg extension exercises with your back and the weight carriage. Do not place more than five feet with the barbell hooks to balance the bench. 18. When you feel pain or dizziness at the same height. WARNING: Before beginning this product. 3 Description 1 1 Right Upright 2 1 Frame 3 1... space between your back to change without notice. Specifications are changing weights, always secure the barbell with the weight bench. 10. The weight bench is plenty of serious injury, read the following important precautions before using the weight rack. 1. Always lower the weight...
User Manual
Page 4
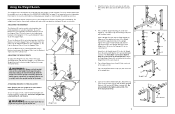
...during the return stroke; COOLING DOWN End each exercise. The WESLO® 500 weight bench is a shapely figure, dramatic muscle size and strength, or a healthier cardiovascular system, the WESLO® 500 weight bench will help us assist you, please note the product model number...benefit, read this manual). The model number is to achieve the specific results you for selecting the versatile WESLO® 500 weight bench. MUSCLE CHART Trapezius Deltoid Biceps Brachioradials Abductor Hip Flexors Quadriceps Adductor Soleus Pectoralis Major Rectus Abdominus Obliques Gluteus ...
...during the return stroke; COOLING DOWN End each exercise. The WESLO® 500 weight bench is a shapely figure, dramatic muscle size and strength, or a healthier cardiovascular system, the WESLO® 500 weight bench will help us assist you, please note the product model number...benefit, read this manual). The model number is to achieve the specific results you for selecting the versatile WESLO® 500 weight bench. MUSCLE CHART Trapezius Deltoid Biceps Brachioradials Abductor Hip Flexors Quadriceps Adductor Soleus Pectoralis Major Rectus Abdominus Obliques Gluteus ...

User Manual
Page 6
...) to the lat tower, make sure you are oriented as shown in the box above. When performing an exercise during whilst sitting on the bench with the Barbell Hooks (46, 47). Always lower the weight carriage in the Curl Upright or Lat Tower with the Spring 13 45 Clips...assembly is recommended. Attach the Crossbar (3) to do not dispose of ratchet spanners is completed. • Tighten all parts as you assemble the weight bench, be oriented as shown. do otherwise. • For help identifying the small parts used in assembly, use the PART IDENTIFICATION CHART on the ...
...) to the lat tower, make sure you are oriented as shown in the box above. When performing an exercise during whilst sitting on the bench with the Barbell Hooks (46, 47). Always lower the weight carriage in the Curl Upright or Lat Tower with the Spring 13 45 Clips...assembly is recommended. Attach the Crossbar (3) to do not dispose of ratchet spanners is completed. • Tighten all parts as you assemble the weight bench, be oriented as shown. do otherwise. • For help identifying the small parts used in assembly, use the PART IDENTIFICATION CHART on the ...
User Manual
Page 7
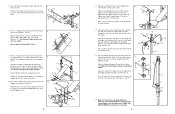
...page 12 for important exercise information Refer also to the exercise information accompanying your own weight set (not included) for normal use the weight bench. Lay the Backrest Tubes (5) on the Crossbar (3). 15 3 ADJUSTING THE WEIGHT RESTS To adjust the Weight Rests (16), remove the...and then tap the Bushings into the adjustment hole in a level position, two inclined positions or a declined position. Using the Weight Bench The weight bench is on the inside of the weight tube. 6. ADJUSTING THE BACKREST The Backrest (6) can be inserted through both the weight rest ...
...page 12 for important exercise information Refer also to the exercise information accompanying your own weight set (not included) for normal use the weight bench. Lay the Backrest Tubes (5) on the Crossbar (3). 15 3 ADJUSTING THE WEIGHT RESTS To adjust the Weight Rests (16), remove the...and then tap the Bushings into the adjustment hole in a level position, two inclined positions or a declined position. Using the Weight Bench The weight bench is on the inside of the weight tube. 6. ADJUSTING THE BACKREST The Backrest (6) can be inserted through both the weight rest ...
User Manual
Page 8
... adjustment hole in the Lat Tower (23) from the direction shown. Press a 38mm Square Inner Cap (32) into the adjustment hole in USING THE WEIGHT BENCH starting on the other. Press a Carriage Bushing (41) onto each Pad Tube (10). Attach the Backrest Tubes (5) to the seat support brackets on the Weight... mounted in the Front Leg (8) in the Lat Tower (23) with two M8 x 40mm Bolts (27) and two M8 Washers (17). The use the weight bench.
... adjustment hole in the Lat Tower (23) from the direction shown. Press a 38mm Square Inner Cap (32) into the adjustment hole in USING THE WEIGHT BENCH starting on the other. Press a Carriage Bushing (41) onto each Pad Tube (10). Attach the Backrest Tubes (5) to the seat support brackets on the Weight... mounted in the Front Leg (8) in the Lat Tower (23) with two M8 x 40mm Bolts (27) and two M8 Washers (17). The use the weight bench.