
English Manual
Page 1
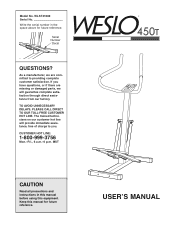
... CAUTION Read all precautions and instructions in the space above for future reference. Keep this equipment. TO AVOID UNNECESSARY DELAYS, PLEASE CALL DIRECT TO OUR TOLL-FREE CUSTOMER HOT LINE. CUSTOMER HOT LINE: 1-800-999-3756 Mon.ÐFri., 6 a.m.Ð6 p.m. Write the serial number in this manual before using this manual for future reference. Model No. As a manufacturer, we are...
... CAUTION Read all precautions and instructions in the space above for future reference. Keep this equipment. TO AVOID UNNECESSARY DELAYS, PLEASE CALL DIRECT TO OUR TOLL-FREE CUSTOMER HOT LINE. CUSTOMER HOT LINE: 1-800-999-3756 Mon.ÐFri., 6 a.m.Ð6 p.m. Write the serial number in this manual before using this manual for future reference. Model No. As a manufacturer, we are...
English Manual
Page 2
... the manual, please call our Customer Service Department toll-free at 1-800-999-3756, Monday through Friday, 6 a.m. TABLE OF CONTENTS BEFORE YOU BEGIN 2 IMPORTANT PRECAUTIONS 3 ASSEMBLY 4 HOW TO USE THE STEPPER 6 STORAGE AND TROUBLE-SHOOTING 7 CONDITIONING GUIDELINES 9 PART LIST 10 EXPLODED DRAWING 11 HOW TO ORDER REPLACEMENT PARTS Back Cover LIMITED WARRANTY Back Cover BEFORE YOU BEGIN Thank you for the location of the decal). 2 The model number is...
... the manual, please call our Customer Service Department toll-free at 1-800-999-3756, Monday through Friday, 6 a.m. TABLE OF CONTENTS BEFORE YOU BEGIN 2 IMPORTANT PRECAUTIONS 3 ASSEMBLY 4 HOW TO USE THE STEPPER 6 STORAGE AND TROUBLE-SHOOTING 7 CONDITIONING GUIDELINES 9 PART LIST 10 EXPLODED DRAWING 11 HOW TO ORDER REPLACEMENT PARTS Back Cover LIMITED WARRANTY Back Cover BEFORE YOU BEGIN Thank you for the location of the decal). 2 The model number is...
English Manual
Page 3
... away from the stepper at any worn parts immediately. 5. Inspect and tighten all instructions in this product may become caught on the stepper. The resistance cylinders may become hot after a period of this or any exercise program, consult your feet on the pedals when stepping, or the pedals may result in a commercial, rental, or institutional setting. 13. Do not use of use only. Always...
... away from the stepper at any worn parts immediately. 5. Inspect and tighten all instructions in this product may become caught on the stepper. The resistance cylinders may become hot after a period of this or any exercise program, consult your feet on the pedals when stepping, or the pedals may result in a commercial, rental, or institutional setting. 13. Do not use of use only. Always...
English Manual
Page 4
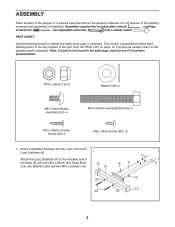
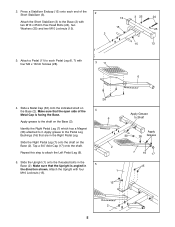
... found in the parts bag, check to the quantity used in a cleared area and remove the packing materials. PART CHART Use the drawings below to identify the small parts used in parenthesis below each end of the Long Stabilizer (8). 1 Attach the Long Stabilizer (8) to the key number of the part, from the PART LIST on page 10. Note: If a part is completed. Assembly requires the included...
... found in the parts bag, check to the quantity used in a cleared area and remove the packing materials. PART CHART Use the drawings below to identify the small parts used in parenthesis below each end of the Long Stabilizer (8). 1 Attach the Long Stabilizer (8) to the key number of the part, from the PART LIST on page 10. Note: If a part is completed. Assembly requires the included...
English Manual
Page 5
... (2). Make sure that the Upright is facing the Base. Apply grease to each end of the Metal Cap is angled in the direction shown. Slide the Right Pedal Leg (7) onto the shaft on the Base (2). Repeat this step to it. Slide the Upright (1) onto the threaded bolts in the Right Pedal Leg. Make sure that the open side of the Short...
... (2). Make sure that the Upright is facing the Base. Apply grease to each end of the Metal Cap is angled in the direction shown. Slide the Right Pedal Leg (7) onto the shaft on the Base (2). Repeat this step to it. Slide the Upright (1) onto the threaded bolts in the Right Pedal Leg. Make sure that the open side of the Short...
English Manual
Page 6
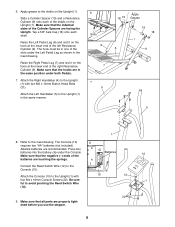
... the inset drawing. Raise the Left Pedal Leg (6) and rest it on the hook at the lower end of the shafts on the Upright (1). The Console (10) 8 requires two ÒAAÓ batteries (not included). Connect the Reed Switch Wire (12) to the Upright (1) with two M6 x 12mm Button Head Bolts (21). Slide a Cylinder Spacer (19) and a Resistance Cylinder (9) onto each shaft. Tap a 5/8Ó...
... the inset drawing. Raise the Left Pedal Leg (6) and rest it on the hook at the lower end of the shafts on the Upright (1). The Console (10) 8 requires two ÒAAÓ batteries (not included). Connect the Reed Switch Wire (12) to the Upright (1) with two M6 x 12mm Button Head Bolts (21). Slide a Cylinder Spacer (19) and a Resistance Cylinder (9) onto each shaft. Tap a 5/8Ó...
English Manual
Page 7
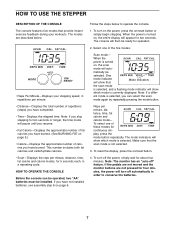
...; DistanceÑDisplays the total number of the five modes: Scan modeÑ When the power is turned on page 9.) ¥ CalorieÑDisplays the approximate number of these modes for 5 seconds each, in order to operate the console. 1. HOW TO OPERATE THE CONSOLE Before the console can select the scan mode again by repeatedly pressing the mode button. Make sure that provide instant exercise feedback during your stepping speed...
...; DistanceÑDisplays the total number of the five modes: Scan modeÑ When the power is turned on page 9.) ¥ CalorieÑDisplays the approximate number of these modes for 5 seconds each, in order to operate the console. 1. HOW TO OPERATE THE CONSOLE Before the console can select the scan mode again by repeatedly pressing the mode button. Make sure that provide instant exercise feedback during your stepping speed...
English Manual
Page 8
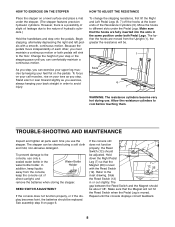
... become very hot during use. Stand erect or lean forward slightly as you step. Make sure that the hooks are moved from the console, keep liquids away from the Upright (1), the greater the resistance will not hit the Reed Switch when the Pedal Leg is level with a smooth, continuous motion. TROUBLE-SHOOTING AND MAINTENANCE Inspect and tighten all parts each other, you can comfortably...
... become very hot during use. Stand erect or lean forward slightly as you step. Make sure that the hooks are moved from the console, keep liquids away from the Upright (1), the greater the resistance will not hit the Reed Switch when the Pedal Leg is level with a smooth, continuous motion. TROUBLE-SHOOTING AND MAINTENANCE Inspect and tighten all parts each other, you can comfortably...
English Manual
Page 9
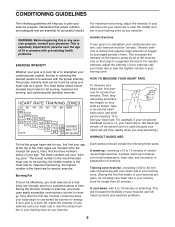
... results is the recommended heart rate for prolonged periods of the chart (ages are your Òtraining zone.Ó The lowest number is to exercise with pre-existing health problems. EXERCISE INTENSITY Whether your goal is to burn fat or to the nearest ten years). WARNING: Before beginning this or any exercise program, consult your cardiovascular system, the key to find your...
... results is the recommended heart rate for prolonged periods of the chart (ages are your Òtraining zone.Ó The lowest number is to exercise with pre-existing health problems. EXERCISE INTENSITY Whether your goal is to burn fat or to the nearest ten years). WARNING: Before beginning this or any exercise program, consult your cardiovascular system, the key to find your...
English Manual
Page 10
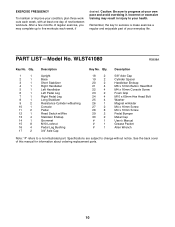
... to your health. See the back cover of your everyday life. PART LISTÑModel No. Qty. 1 1 2 1 3 1 4 1 5 1 6 1 7 1 8 1 9 2 10 1 11 2 12 1 13 4 14 1 15 8 16 4 17 2 Description Upright Base Short Stabilizer Right Handlebar Left Handlebar Left Pedal Leg Right Pedal Leg Long Stabilizer Resistance Cylinder w/Bushing Console Pedal Reed Switch w/Wire Stabilizer Endcap Grommet M10 Locknut Pedal Leg Bushing 3/4Ó Axle Cap Key No. After a few months of regular exercise, you...
... to your health. See the back cover of your everyday life. PART LISTÑModel No. Qty. 1 1 2 1 3 1 4 1 5 1 6 1 7 1 8 1 9 2 10 1 11 2 12 1 13 4 14 1 15 8 16 4 17 2 Description Upright Base Short Stabilizer Right Handlebar Left Handlebar Left Pedal Leg Right Pedal Leg Long Stabilizer Resistance Cylinder w/Bushing Console Pedal Reed Switch w/Wire Stabilizer Endcap Grommet M10 Locknut Pedal Leg Bushing 3/4Ó Axle Cap Key No. After a few months of regular exercise, you...
English Manual
Page 11
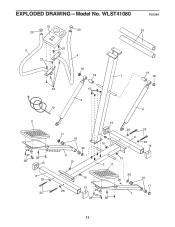
WLST41080 R0998A 10 20 23 20 5 21 21 4 18 19 19 1 18 22 15 9 12 9 11 29 27 28 28 13 8 25 24 17 16 30 6 15 13 14 15 25 3 24 25 13 15 2 11 30 15 16 26 13 25 29 27 28 28 17 7 11 EXPLODED DRAWINGÑModel No.
WLST41080 R0998A 10 20 23 20 5 21 21 4 18 19 19 1 18 22 15 9 12 9 11 29 27 28 28 13 8 25 24 17 16 30 6 15 13 14 15 25 3 24 25 13 15 2 11 30 15 16 26 13 25 29 27 28 28 17 7 11 EXPLODED DRAWINGÑModel No.

English Manual
Page 12
... (WESLO¨ 450T stepper). ¥ The SERIAL NUMBER of the product (see the front cover of this manual). This warranty gives you . This warranty does not extend to state. ICON HEALTH & FITNESS, INC., 1500 S. 1000 W., LOGAN, UT 84321-9813 Part No. 149205 R0998A Printed in its scope and duration to the terms set forth above limitation may also have other warranty beyond that specifically set forth herein. LIMITED WARRANTY ICON Health & Fitness, Inc. (ICON...
... (WESLO¨ 450T stepper). ¥ The SERIAL NUMBER of the product (see the front cover of this manual). This warranty gives you . This warranty does not extend to state. ICON HEALTH & FITNESS, INC., 1500 S. 1000 W., LOGAN, UT 84321-9813 Part No. 149205 R0998A Printed in its scope and duration to the terms set forth above limitation may also have other warranty beyond that specifically set forth herein. LIMITED WARRANTY ICON Health & Fitness, Inc. (ICON...


