
English Manual
Page 1
..., PLEASE CALL DIRECT TO OUR TOLL-FREE CUSTOMER HOT LINE. MST CAUTION Read all safety precautions and instructions in this manual carefully before using this manual for future reference. , - - / ur U.S. Pat. 4,918,266 U.S. Model No. Pat. WL401523 Serial No. If you have questions, or find there are missing or damaged parts, we are committed to you. The trained technicians on...
..., PLEASE CALL DIRECT TO OUR TOLL-FREE CUSTOMER HOT LINE. MST CAUTION Read all safety precautions and instructions in this manual carefully before using this manual for future reference. , - - / ur U.S. Pat. 4,918,266 U.S. Model No. Pat. WL401523 Serial No. If you have questions, or find there are missing or damaged parts, we are committed to you. The trained technicians on...

English Manual
Page 2
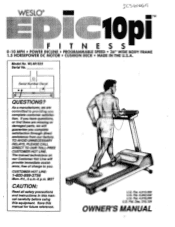
... • POWER INCLINE • PROGRAMMABLE SPEED • 26" WIDE BODY FRAME 1.5 HORSEPOWER DC MOTOR • CUSHION DECK • MADE IN THE U.S.A. WESLO assumes no responsibility for persons over the age of this or any exercise program, consult your physician. TABLE OF CONTENTS Important Safety Precautions Before You Begin Assembly Operation and Adjustment Trouble-Shooting and Maintenance Conditioning Guidelines Part List Exploded Drawing Ordering Replacement Parts Warranty 3 4 5 6 10...
... • POWER INCLINE • PROGRAMMABLE SPEED • 26" WIDE BODY FRAME 1.5 HORSEPOWER DC MOTOR • CUSHION DECK • MADE IN THE U.S.A. WESLO assumes no responsibility for persons over the age of this or any exercise program, consult your physician. TABLE OF CONTENTS Important Safety Precautions Before You Begin Assembly Operation and Adjustment Trouble-Shooting and Maintenance Conditioning Guidelines Part List Exploded Drawing Ordering Replacement Parts Warranty 3 4 5 6 10...
English Manual
Page 3
... the treadmill If the power cord or plug is damaged, or if the treadmill is not working properly.) 4. Never use the treadmill with a three-wire conductor. 3. Never remove the motor hood unless instructed to avoid sudden jumps in this manual. No other than the procedures in this manual), plug the power cord directly into any air opening . 11. Never move the walking belt while the power is intended only as described in sandals. Turn the power...
... the treadmill If the power cord or plug is damaged, or if the treadmill is not working properly.) 4. Never use the treadmill with a three-wire conductor. 3. Never remove the motor hood unless instructed to avoid sudden jumps in this manual. No other than the procedures in this manual), plug the power cord directly into any air opening . 11. Never move the walking belt while the power is intended only as described in sandals. Turn the power...
English Manual
Page 4
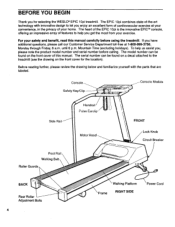
... our Customer Service Department toll-free at your convenience, in the privacy of features to let you enjoy an excellent form of this manual carefully before calling. Console Safety Key/Clip Console Module Side Rail Foot Rail Walking Belt Roller Guards Handrail Pulse Earclip Motor Hood FRONT Lock Knob Circuit Breaker BACK Rear Roller Adjustment Bolts 4 Walking Platform Frame RIGHT SIDE Power Cord until 6 p.m. The heart of the EPIC 10pi is the innovative EPIC'"' console, offering...
... our Customer Service Department toll-free at your convenience, in the privacy of features to let you enjoy an excellent form of this manual carefully before calling. Console Safety Key/Clip Console Module Side Rail Foot Rail Walking Belt Roller Guards Handrail Pulse Earclip Motor Hood FRONT Lock Knob Circuit Breaker BACK Rear Roller Adjustment Bolts 4 Walking Platform Frame RIGHT SIDE Power Cord until 6 p.m. The heart of the EPIC 10pi is the innovative EPIC'"' console, offering...
English Manual
Page 5
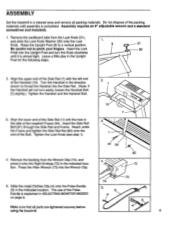
... is completed. Leave a little play in the indicated location. The use of the Bolt. ASSEMBLY Set the treadmill in SELECTING MONITOR MODES 4 on page 9. 5 Make sure that all packing materials. Tighten the Lock Knob (see step 1). 10 7 81 54 4. Insert the Lock 30 Knob into the Wrench Clip. 82 72 0 73 74 5. Raise the Upright Post (9) to a vertical position. 9 31 Be careful not...
... is completed. Leave a little play in the indicated location. The use of the Bolt. ASSEMBLY Set the treadmill in SELECTING MONITOR MODES 4 on page 9. 5 Make sure that all packing materials. Tighten the Lock Knob (see step 1). 10 7 81 54 4. Insert the Lock 30 Knob into the Wrench Clip. 82 72 0 73 74 5. Raise the Upright Post (9) to a vertical position. 9 31 Be careful not...

English Manual
Page 6
... the product-if it is grounded before using an adapter. 1 Grounded Outlet Box 2 0,1J Grounding Plug O 9 1J Grounded Outlet Box Adapter Grounding Pin Grounding Plug Grounding Pin Grounded Outlet Lug Metal Screw MAINTENANCE-FREE WALKING PLATFORM This treadmill features a walking platform coated with a cord having an equipment-grounding conductor and a grounding plug. This product is equipped with a special hydrocarbon slip agent. The green colored rigid ear...
... the product-if it is grounded before using an adapter. 1 Grounded Outlet Box 2 0,1J Grounding Plug O 9 1J Grounded Outlet Box Adapter Grounding Pin Grounding Plug Grounding Pin Grounded Outlet Lug Metal Screw MAINTENANCE-FREE WALKING PLATFORM This treadmill features a walking platform coated with a cord having an equipment-grounding conductor and a grounding plug. This product is equipped with a special hydrocarbon slip agent. The green colored rigid ear...

English Manual
Page 7
... console, instantly turning off the power. The buttons can even control the treadmill automatically according to -read LED display, convenient push-button speed and incline controls and a multiple-mode exercise monitor. DIAGRAM OF THE CONSOLE MID MAf- A M. 2.• ■ 'V 0 I e-- Always wear the clip when operating the treadmill; The minimum speed setting is pressed, the speed will change the speed quickly. 7 I D..i„,, c_.•,,i;- WARNING: Do not stand on the walking belt when turning the power on the display. Epic...
... console, instantly turning off the power. The buttons can even control the treadmill automatically according to -read LED display, convenient push-button speed and incline controls and a multiple-mode exercise monitor. DIAGRAM OF THE CONSOLE MID MAf- A M. 2.• ■ 'V 0 I e-- Always wear the clip when operating the treadmill; The minimum speed setting is pressed, the speed will change the speed quickly. 7 I D..i„,, c_.•,,i;- WARNING: Do not stand on the walking belt when turning the power on the display. Epic...
English Manual
Page 8
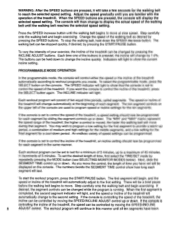
... treadmill, press the SELECT button again. The ten segment controls on the console. To set will be controlled by pressing the INCLINE ADJUST buttons. When the first segment is moved, the faster the walking belt will move the control, the length of the treadmill, the incline can be programmed. To select the programmable mode, press the SELECT button on the upper left of the console are used to control the incline of the treadmill. WARNING: After the SPEED buttons...
... treadmill, press the SELECT button again. The ten segment controls on the console. To set will be controlled by pressing the INCLINE ADJUST buttons. When the first segment is moved, the faster the walking belt will move the control, the length of the treadmill, the incline can be programmed. To select the programmable mode, press the SELECT button on the upper left of the console are used to control the incline of the treadmill. WARNING: After the SPEED buttons...
English Manual
Page 9
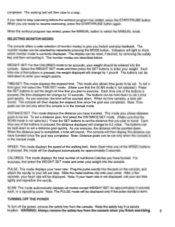
... selected.) Press the SET buttons to set the distance that you finish exercising. 9 CALORIES: This mode displays the total number of monitor modes to stop . For accuracy, first select the WEIGHT SET mode and enter your heart rate. Note: The PULSE mode will then slow to resume exercising, press the START/PAUSE button again. TURNING OFF THE POWER To turn off the power, remove the safety key from the console when you plan to enter your weight should be set . The walking belt will...
... selected.) Press the SET buttons to set the distance that you finish exercising. 9 CALORIES: This mode displays the total number of monitor modes to stop . For accuracy, first select the WEIGHT SET mode and enter your heart rate. Note: The PULSE mode will then slow to resume exercising, press the START/PAUSE button again. TURNING OFF THE POWER To turn off the power, remove the safety key from the console when you plan to enter your weight should be set . The walking belt will...

English Manual
Page 10
... REPLACEMENT PARTS on a tour of some of the console can be removed, and other modules can be expandable, offering you plan to exercise and choose a workout intensity level. TROUBLE-SHOOTING AND MAINTENANCE Most treadmill problems can be stored in America, while the module controls the treadmill automatically to help you achieve the specific results you through 10 Friday, 6 a.m. Treadmill motors contain magnets which can be connected...
... REPLACEMENT PARTS on a tour of some of the console can be removed, and other modules can be expandable, offering you plan to exercise and choose a workout intensity level. TROUBLE-SHOOTING AND MAINTENANCE Most treadmill problems can be stored in America, while the module controls the treadmill automatically to help you achieve the specific results you through 10 Friday, 6 a.m. Treadmill motors contain magnets which can be connected...
English Manual
Page 11
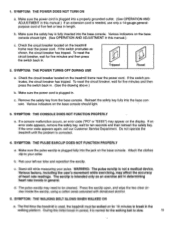
..., remove the safety key, wait for the walking belt to break in period, it is not a medical device. b. The earclip is plugged in this manual.) c. SYMPTOM: THE WALKING BELT SLOWS WHEN WALKED ON a. If the switch protrudes as an exercise aid In determining heart rate trends in length. SYMPTOM: THE CONSOLE DOES NOT FUNCTION PROPERLY a. Check the circuit breaker located on the treadmill frame near the power cord...
..., remove the safety key, wait for the walking belt to break in period, it is not a medical device. b. The earclip is plugged in this manual.) c. SYMPTOM: THE WALKING BELT SLOWS WHEN WALKED ON a. If the switch protrudes as an exercise aid In determining heart rate trends in length. SYMPTOM: THE CONSOLE DOES NOT FUNCTION PROPERLY a. Check the circuit breaker located on the treadmill frame near the power cord...
English Manual
Page 12
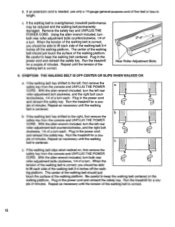
... console and UNPLUG THE POWER a. Plug in the power cord and reinsert the safety key. b. The center of the walking belt 3-4 inches off the walking platform. Run the treadmill for a couple of minutes. Repeat as necessary until the walking belt is overtightened, treadmill performance may be able to keep the walking belt centered. With the allen wrench included, turn both rear roller adjustment bolts counterclockwise, 1/4 of a turn each side of the walking belt...
... console and UNPLUG THE POWER a. Plug in the power cord and reinsert the safety key. b. The center of the walking belt 3-4 inches off the walking platform. Run the treadmill for a couple of minutes. Repeat as necessary until the walking belt is overtightened, treadmill performance may be able to keep the walking belt centered. With the allen wrench included, turn both rear roller adjustment bolts counterclockwise, 1/4 of a turn each side of the walking belt...

English Manual
Page 13
... body temperature. After a few months of regular exercise, you to decrease soreness and other postexercise problems. To maintain or improve your condition, complete three workouts each week, with at a level between workouts. This will help to plan your exercise program. After a few months of regular exercise, your heart rate can measure your heart rate using your heart rate as a guide. If your heart rate is known as your training...
... body temperature. After a few months of regular exercise, you to decrease soreness and other postexercise problems. To maintain or improve your condition, complete three workouts each week, with at a level between workouts. This will help to plan your exercise program. After a few months of regular exercise, your heart rate can measure your heart rate using your heart rate as a guide. If your heart rate is known as your training...
English Manual
Page 14
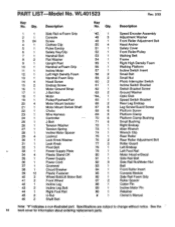
... Switch Incline Switch Bracket Switch Bracket Screw Ground Washer Optic Disk Speed Switch Bracket Rear Leg Endcap Leg Screw/Guard Screw Platform Screw Platform Clamp Platform Clamp Bushing Small Bushing Right Endcap Allen Wrench Wrench Clip Rear Roller Rear Roller Adjustment Bolt Roller Guard Left Endcap Left Foot Rail Motor Hood w/Decal Side Rail Bolt Side Rail Nut/Motor Nut Belt Front Roller Insert Console Module Side Rail Foam Grip Roller Spacer Cotter Pin Incline Motor Pin Retainer Owner's Manual Note: "#" indicates a non-illustrated part...
... Switch Incline Switch Bracket Switch Bracket Screw Ground Washer Optic Disk Speed Switch Bracket Rear Leg Endcap Leg Screw/Guard Screw Platform Screw Platform Clamp Platform Clamp Bushing Small Bushing Right Endcap Allen Wrench Wrench Clip Rear Roller Rear Roller Adjustment Bolt Roller Guard Left Endcap Left Foot Rail Motor Hood w/Decal Side Rail Bolt Side Rail Nut/Motor Nut Belt Front Roller Insert Console Module Side Rail Foam Grip Roller Spacer Cotter Pin Incline Motor Pin Retainer Owner's Manual Note: "#" indicates a non-illustrated part...
English Manual
Page 15
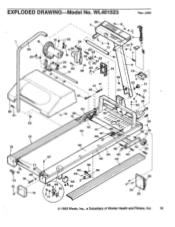
it. 112 16 20 -4d.-. 59 58 /L. 62 1 606 13 10 82 89 21 64 88 /1--3 1 241 14'. 29 27 17 !'- 26 23 25 . . EXPLODED DRAWING Model No. I I• I 83 14 84 50 12 49 52 53 51 47 90 4_ 5 6 577 3 7 9 22 Not 3-0. 30 31 32 3 8,* ' 3 36 t-63 7 38 29 9 41 78 56 75 1 - 74 73 76 77 87 48 15 72 67 I/ 68 • 3 14' 71 69 70 g( 58 60 59 66 3 67 42 46 54 45 43 55 44 > ; `tu 35 3 34 © 1993 Weslo, Inc., a Subsidiary of Weider Health and Fitness, Inc. 15 WL401523 Rev. 2/93 85 80 \ 81 19 86 82 2 79 18 82 29 3-
it. 112 16 20 -4d.-. 59 58 /L. 62 1 606 13 10 82 89 21 64 88 /1--3 1 241 14'. 29 27 17 !'- 26 23 25 . . EXPLODED DRAWING Model No. I I• I 83 14 84 50 12 49 52 53 51 47 90 4_ 5 6 577 3 7 9 22 Not 3-0. 30 31 32 3 8,* ' 3 36 t-63 7 38 29 9 41 78 56 75 1 - 74 73 76 77 87 48 15 72 67 I/ 68 • 3 14' 71 69 70 g( 58 60 59 66 3 67 42 46 54 45 43 55 44 > ; `tu 35 3 34 © 1993 Weslo, Inc., a Subsidiary of Weider Health and Fitness, Inc. 15 WL401523 Rev. 2/93 85 80 \ 81 19 86 82 2 79 18 82 29 3-
English Manual
Page 16
... of the product (WL401523). 2. No other rights which warranty claim is authorized by a WESLO authorized service center or for products used for commercial or rental purposes. ACCORDINGLY, THE ABOVE LIMITATION MAY NOT APPLY TO YOU. The MODEL NUMBER of the product (WESLO® EPIC 10pi treadmill). 3. The SERIAL NUMBER of the product (see the front cover of purchase. All products for a period of ninety...
... of the product (WL401523). 2. No other rights which warranty claim is authorized by a WESLO authorized service center or for products used for commercial or rental purposes. ACCORDINGLY, THE ABOVE LIMITATION MAY NOT APPLY TO YOU. The MODEL NUMBER of the product (WESLO® EPIC 10pi treadmill). 3. The SERIAL NUMBER of the product (see the front cover of purchase. All products for a period of ninety...


