

Instruction Manual
Page 1
...Or WRITE: ICON Fitness Lifestyle Ltd. Part No. 154608 R0599A Printed in this manual before using this equipment. If possible, place the treadmill near your telephone for future reference. USER'S MANUAL Model No. As a manufacturer, we will guarantee you complete satisfaction through our Customer ...the following information when writing or calling: ¥ The MODEL NUMBER OF THE PRODUCT (WETL28090). ¥ The NAME OF THE PRODUCT (WESLO CADENCE¨ 1020 treadmill). ¥ The SERIAL NUMBER OF THE PRODUCT (see the front cover of this manual). ¥ The KEY NUMBER OF THE PART(S)...
...Or WRITE: ICON Fitness Lifestyle Ltd. Part No. 154608 R0599A Printed in this manual before using this equipment. If possible, place the treadmill near your telephone for future reference. USER'S MANUAL Model No. As a manufacturer, we will guarantee you complete satisfaction through our Customer ...the following information when writing or calling: ¥ The MODEL NUMBER OF THE PRODUCT (WETL28090). ¥ The NAME OF THE PRODUCT (WESLO CADENCE¨ 1020 treadmill). ¥ The SERIAL NUMBER OF THE PRODUCT (see the front cover of this manual). ¥ The KEY NUMBER OF THE PART(S)...

Instruction Manual
Page 2
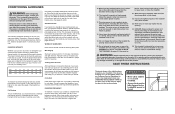
...to the fuse carrier. Stretches: Quadriceps and hip muscles. 5. Repeat 3 times. Remove the PART LIST and EXPLODED DRAWING before operating the treadmill. 1. Do not wear loose clothing that could become caught in this manual. Stretches: Hamstrings, lower back and groin. 3 3. Bend...outward. TABLE OF CONTENTS IMPORTANT PRECAUTIONS 2 BEFORE YOU BEGIN 4 ASSEMBLY 5 OPERATION AND ADJUSTMENT 7 HOW TO FOLD AND MOVE THE TREADMILL 10 MAINTENANCE AND TROUBLE-SHOOTING 12 CONDITIONING GUIDELINES 14 ORDERING REPLACEMENT PARTS Back Cover Note: A PART LIST and an EXPLODED DRAWING are...
...to the fuse carrier. Stretches: Quadriceps and hip muscles. 5. Repeat 3 times. Remove the PART LIST and EXPLODED DRAWING before operating the treadmill. 1. Do not wear loose clothing that could become caught in this manual. Stretches: Hamstrings, lower back and groin. 3 3. Bend...outward. TABLE OF CONTENTS IMPORTANT PRECAUTIONS 2 BEFORE YOU BEGIN 4 ASSEMBLY 5 OPERATION AND ADJUSTMENT 7 HOW TO FOLD AND MOVE THE TREADMILL 10 MAINTENANCE AND TROUBLE-SHOOTING 12 CONDITIONING GUIDELINES 14 ORDERING REPLACEMENT PARTS Back Cover Note: A PART LIST and an EXPLODED DRAWING are...
Instruction Manual
Page 3
...health problems. Read all parts of this manual should include the following guidelines will help you must be found by placing objects under the treadmill. Next, find the two numbers below (ages are your Òtraining zone.Ó Each workout should be Òaerobic.Ó ...your cardiovascular system, the key to plan your exercise program. Various factors, including the user's movement, may affect the accuracy of the treadmill by using your heart rate as needed. Do not change the incline of heart rate readings. Servicing other than 20 minutes.) Breathe regularly...
...health problems. Read all parts of this manual should include the following guidelines will help you must be found by placing objects under the treadmill. Next, find the two numbers below (ages are your Òtraining zone.Ó Each workout should be Òaerobic.Ó ...your cardiovascular system, the key to plan your exercise program. Various factors, including the user's movement, may affect the accuracy of the treadmill by using your heart rate as needed. Do not change the incline of heart rate readings. Servicing other than 20 minutes.) Breathe regularly...
Instruction Manual
Page 4
... roller adjust- The serial number can be able to lift each side of your benefit, read this manual for selecting the WESLO CADENCE¨ 1020 treadmill. If the walking belt has shifted to overtighten the walking belt. ment bolt clockwise, and the right bolt counterclock- Plug ... Be careful to 7 cm off -centre or slips when walked on , please call our Customer Service Department at 0345089009. The CADENCE 1020 treadmill combines advanced technology with the parts that is properly tightened. To help us assist you should be permanently damaged. Speed Control Water Bottle ...
... roller adjust- The serial number can be able to lift each side of your benefit, read this manual for selecting the WESLO CADENCE¨ 1020 treadmill. If the walking belt has shifted to overtighten the walking belt. ment bolt clockwise, and the right bolt counterclock- Plug ... Be careful to 7 cm off -centre or slips when walked on , please call our Customer Service Department at 0345089009. The CADENCE 1020 treadmill combines advanced technology with the parts that is properly tightened. To help us assist you should be permanently damaged. Speed Control Water Bottle ...

Instruction Manual
Page 5
... cord is fully inserted into the console. Remove the key from the hood. Most problems are overtightened, the Latch (67) will not run the treadmill for a correct speed reading. 3 mm 89 13 Top View 90 88 12 ASSEMBLY Assembly requires two people. b. If necessary, loosen the Screw ... the Magnet (88) on page 6. Remove the cardboard and tape from the console and UNPLUG THE POWER CORD. MAINTENANCE AND TROUBLE-SHOOTING Most treadmill problems can be solved by the Wire Harness (53). Turn the Pulley until assembly is in . Make sure that applies, and follow the ...
... cord is fully inserted into the console. Remove the key from the hood. Most problems are overtightened, the Latch (67) will not run the treadmill for a correct speed reading. 3 mm 89 13 Top View 90 88 12 ASSEMBLY Assembly requires two people. b. If necessary, loosen the Screw ... the Magnet (88) on page 6. Remove the cardboard and tape from the console and UNPLUG THE POWER CORD. MAINTENANCE AND TROUBLE-SHOOTING Most treadmill problems can be solved by the Wire Harness (53). Turn the Pulley until assembly is in . Make sure that applies, and follow the ...

Instruction Manual
Page 6
...locks into the Console; alkaline batteries are tight, but do not overtighten them. Note: Some parts may be left thumb, slide open . Hold the treadmill firmly with the four Handrail Screws (5). if you use the lower two holes. Tighten the four Handrail Knobs (1) used in each Handrail (4, 32)....Insert a Handrail Plug (70) into the upper end of the Handrail, and pull the excess from damage, place a mat under the treadmill. 6 HOW TO LOWER THE TREADMILL FOR USE 1. Route the Wire Harness (53) as shown. Insert the excess Wire Harness (53) into the right Upright (38). Be...
...locks into the Console; alkaline batteries are tight, but do not overtighten them. Note: Some parts may be left thumb, slide open . Hold the treadmill firmly with the four Handrail Screws (5). if you use the lower two holes. Tighten the four Handrail Knobs (1) used in each Handrail (4, 32)....Insert a Handrail Plug (70) into the upper end of the Handrail, and pull the excess from damage, place a mat under the treadmill. 6 HOW TO LOWER THE TREADMILL FOR USE 1. Route the Wire Harness (53) as shown. Insert the excess Wire Harness (53) into the right Upright (38). Be...
Instruction Manual
Page 7
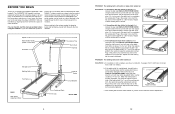
...properly installed and earthed in an increased risk of least resistance for about halfway to the position shown at the right, and hold the treadmill firmly. Use only a power cord type H05VV-F with your right hand to the vertical position. 2. Re-attach the console to whether...in accordance with a cord having an equipment-earthing conductor and a earthing plug. Locate the small switch on the front wheels. Raise the treadmill about five seconds and then reinsert it is resting in the locations shown at east 1mm2, with a country recognised plug and an appliance coupler...
...properly installed and earthed in an increased risk of least resistance for about halfway to the position shown at the right, and hold the treadmill firmly. Use only a power cord type H05VV-F with your right hand to the vertical position. 2. Re-attach the console to whether...in accordance with a cord having an equipment-earthing conductor and a earthing plug. Locate the small switch on the front wheels. Raise the treadmill about five seconds and then reinsert it is resting in the locations shown at east 1mm2, with a country recognised plug and an appliance coupler...

Instruction Manual
Page 8
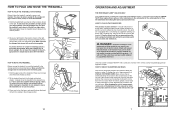
...at this level. Press down . Carefully step onto the walking belt and begin exercising. SPEED displayÑ This display shows the speed of the treadmill as shown, and that both 46 1 70 1 70 Handrails are not pressed for four minutes, the power will be restarted. ed by .... ¥ Always wear the clip (see assembly step 5 on . ¥ To reduce the possibility of two different heights. mate numbers of the treadmill. Slide the clip onto your thumb at the same height. Insert a Handrail Plug (70) into the power switch. Note: Inserting the key will stop...
...at this level. Press down . Carefully step onto the walking belt and begin exercising. SPEED displayÑ This display shows the speed of the treadmill as shown, and that both 46 1 70 1 70 Handrails are not pressed for four minutes, the power will be restarted. ed by .... ¥ Always wear the clip (see assembly step 5 on . ¥ To reduce the possibility of two different heights. mate numbers of the treadmill. Slide the clip onto your thumb at the same height. Insert a Handrail Plug (70) into the power switch. Note: Inserting the key will stop...


