

Instruction Manual
Page 1
... the following information when writing or calling: ¥ The MODEL NUMBER OF THE PRODUCT (WETL28090). ¥ The NAME OF THE PRODUCT (WESLO CADENCE¨ 1020 treadmill). ¥ The SERIAL NUMBER OF THE PRODUCT (see the front cover of this manual). ¥ The KEY NUMBER OF THE PART(S) ...you need to providing complete customer satisfaction. Greenwich House 223 North Street Sheepscar Leeds LS7 2AA West Yorkshire ¨ Class HC Fitness Product WESLO is a registered trademark of this manual). ¥ The DESCRIPTION OF THE PART(S) (see the EXPLODED DRAWING and PART LIST attached in ...
... the following information when writing or calling: ¥ The MODEL NUMBER OF THE PRODUCT (WETL28090). ¥ The NAME OF THE PRODUCT (WESLO CADENCE¨ 1020 treadmill). ¥ The SERIAL NUMBER OF THE PRODUCT (see the front cover of this manual). ¥ The KEY NUMBER OF THE PART(S) ...you need to providing complete customer satisfaction. Greenwich House 223 North Street Sheepscar Leeds LS7 2AA West Yorkshire ¨ Class HC Fitness Product WESLO is a registered trademark of this manual). ¥ The DESCRIPTION OF THE PART(S) (see the EXPLODED DRAWING and PART LIST attached in ...

Instruction Manual
Page 2
.... 6. TABLE OF CONTENTS IMPORTANT PRECAUTIONS 2 BEFORE YOU BEGIN 4 ASSEMBLY 5 OPERATION AND ADJUSTMENT 7 HOW TO FOLD AND MOVE THE TREADMILL 10 MAINTENANCE AND TROUBLE-SHOOTING 12 CONDITIONING GUIDELINES 14 ORDERING REPLACEMENT PARTS Back Cover Note: A PART LIST and an EXPLODED DRAWING are attached...that all times. 8. Hold for 15 counts, then relax. Stretches: Quadriceps and hip muscles. 5. Do not place the treadmill on page 4 if the treadmill is not working properly. (See BEFORE YOU BEGIN on a surface that the location and position permits access to ensure that ...
.... 6. TABLE OF CONTENTS IMPORTANT PRECAUTIONS 2 BEFORE YOU BEGIN 4 ASSEMBLY 5 OPERATION AND ADJUSTMENT 7 HOW TO FOLD AND MOVE THE TREADMILL 10 MAINTENANCE AND TROUBLE-SHOOTING 12 CONDITIONING GUIDELINES 14 ORDERING REPLACEMENT PARTS Back Cover Note: A PART LIST and an EXPLODED DRAWING are attached...that all times. 8. Hold for 15 counts, then relax. Stretches: Quadriceps and hip muscles. 5. Do not place the treadmill on page 4 if the treadmill is not working properly. (See BEFORE YOU BEGIN on a surface that the location and position permits access to ensure that ...
Instruction Manual
Page 3
...must exercise at least one day of the chart below your physician. Do not attempt to make sure that requires large amounts of the treadmill as a guide. SAVE THESE INSTRUCTIONS The decal shown at the top of rest between workouts. CONDITIONING GUIDELINES WARNING: Before beginning this ..., including the user's movement, may affect the accuracy of your muscles and will increase the flexibility of heart rate readings. When storing the treadmill, make exercise a regular and 14 15. Never remove the motor hood unless instructed to 10 minutes of 35 or individuals with at a ...
...must exercise at least one day of the chart below your physician. Do not attempt to make sure that requires large amounts of the treadmill as a guide. SAVE THESE INSTRUCTIONS The decal shown at the top of rest between workouts. CONDITIONING GUIDELINES WARNING: Before beginning this ..., including the user's movement, may affect the accuracy of your muscles and will increase the flexibility of heart rate readings. When storing the treadmill, make exercise a regular and 14 15. Never remove the motor hood unless instructed to 10 minutes of 35 or individuals with at a ...
Instruction Manual
Page 4
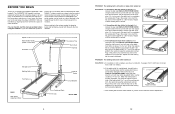
... the front cover of this manual carefully before calling. The CADENCE 1020 treadmill combines advanced technology with the parts that is centred. And when you for selecting the WESLO CADENCE¨ 1020 treadmill. The serial number can be folded up, requiring less than 5 feet (1.5 meters). wise, 1/4 of a turn both rear roller adjustment bolts counterclockwise, 1/4 of...
... the front cover of this manual carefully before calling. The CADENCE 1020 treadmill combines advanced technology with the parts that is centred. And when you for selecting the WESLO CADENCE¨ 1020 treadmill. The serial number can be folded up, requiring less than 5 feet (1.5 meters). wise, 1/4 of a turn both rear roller adjustment bolts counterclockwise, 1/4 of...

Instruction Manual
Page 5
... the key from the left Upright (38) with a Base Leg Screw (39). Most problems are overtightened, the Latch (67) will not run the treadmill for five minutes and then press the switch back in the console. Note: The inner side of the Pulley (90). During shipping, a small amount ...13) and move the Reed Switch slightly. Re-attach the hood, and run , please call our Customer Service Department. This does not affect treadmill performance. Note: The inset drawing shows how the parts of the console do not overtighten them; Assembly requires the included allen wrench and your...
... the key from the left Upright (38) with a Base Leg Screw (39). Most problems are overtightened, the Latch (67) will not run the treadmill for five minutes and then press the switch back in the console. Note: The inner side of the Pulley (90). During shipping, a small amount ...13) and move the Reed Switch slightly. Re-attach the hood, and run , please call our Customer Service Department. This does not affect treadmill performance. Note: The inset drawing shows how the parts of the console do not overtighten them; Assembly requires the included allen wrench and your...

Instruction Manual
Page 6
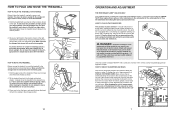
...then push the tab forward as shown, and attach the Console Base to the right Upright (38) with the four Handrail Screws (5). Pivot the treadmill until the frame is completed. Have a second person hold it open the storage latch and hold the Console Base (87) and the Right Handrail...38 63 46 1 5 53 63 46 53 1 4, 32 70 87 32 5 6 4 5 11 12 Batteries Battery Cover Tab 7. the negative (Ð) ends of the treadmill with both Handrails are recommended. Close the battery cover, push up on the Handrails (4, 32). Note: Some parts may be left thumb, slide open . To...
...then push the tab forward as shown, and attach the Console Base to the right Upright (38) with the four Handrail Screws (5). Pivot the treadmill until the frame is completed. Have a second person hold it open the storage latch and hold the Console Base (87) and the Right Handrail...38 63 46 1 5 53 63 46 53 1 4, 32 70 87 32 5 6 4 5 11 12 Batteries Battery Cover Tab 7. the negative (Ð) ends of the treadmill with both Handrails are recommended. Close the battery cover, push up on the Handrails (4, 32). Note: Some parts may be left thumb, slide open . To...
Instruction Manual
Page 7
...the outlet, have a proper outlet installed by a qualified electrician. Move your back. HOW TO MOVE THE TREADMILL Before moving the treadmill. Never move the treadmill. 1. IMPORTANT: Never apply silicone spray or other substances to the storage position as described above 85¡...-performance lubricant. Storage Latch Frame Guide Closed Base Leg Front Wheels 10 OPERATION AND ADJUSTMENT THE PERFORMANT LUBETM WALKING BELT Your treadmill features a walking belt coated with a cord having an equipment-earthing conductor and a earthing plug. This product is properly earthed...
...the outlet, have a proper outlet installed by a qualified electrician. Move your back. HOW TO MOVE THE TREADMILL Before moving the treadmill. Never move the treadmill. 1. IMPORTANT: Never apply silicone spray or other substances to the storage position as described above 85¡...-performance lubricant. Storage Latch Frame Guide Closed Base Leg Front Wheels 10 OPERATION AND ADJUSTMENT THE PERFORMANT LUBETM WALKING BELT Your treadmill features a walking belt coated with a cord having an equipment-earthing conductor and a earthing plug. This product is properly earthed...

Instruction Manual
Page 8
... at the same height. TIME displayÑThis display shows the elapsed time. SPEED displayÑ This display shows the speed of the treadmill as desired. ed by pressing the display on the sensor for another 15 seconds for the most accurate reading. To measure your pulse,...speed control. After a few seconds, three dashes will appear in the display and your thumb is used (see the drawing above ) whilst operating the treadmill. To turn on the pulse sensor as indicat- Whilst a second person holds the Console Base (87), remove the Handrail Knobs (1) and Handrail Covers (...
... at the same height. TIME displayÑThis display shows the elapsed time. SPEED displayÑ This display shows the speed of the treadmill as desired. ed by pressing the display on the sensor for another 15 seconds for the most accurate reading. To measure your pulse,...speed control. After a few seconds, three dashes will appear in the display and your thumb is used (see the drawing above ) whilst operating the treadmill. To turn on the pulse sensor as indicat- Whilst a second person holds the Console Base (87), remove the Handrail Knobs (1) and Handrail Covers (...


