

English Manual
Page 2
... PROGRAMS HOW TO USE THE FAT BURN PROGRAM AND THE AEROBIC PROGRAM HOW TO USE THE FITNESS TEST PROGRAM HOW TO FOLD AND MOVE THE TREADMILL TROUBLE-SHOOTING CONDITIONING GUIDELINES ORDERING REPLACEMENT PARTS 2 3 5 6 8 9 11 13 15 16 18 20 22 Back Cover Note: An EXPLODED DRAWING and a PART ... and material, under this product ₹u be free from state to you. ICON HEALTH & FITNESS, INC., 1500 S. 1000 W., LOGAN, UT 84321-9813 2 WESLO is made must be received by an ICON authorized service center, to products used as store display models. Accordingly, the above limitation may not apply...
... PROGRAMS HOW TO USE THE FAT BURN PROGRAM AND THE AEROBIC PROGRAM HOW TO USE THE FITNESS TEST PROGRAM HOW TO FOLD AND MOVE THE TREADMILL TROUBLE-SHOOTING CONDITIONING GUIDELINES ORDERING REPLACEMENT PARTS 2 3 5 6 8 9 11 13 15 16 18 20 22 Back Cover Note: An EXPLODED DRAWING and a PART ... and material, under this product ₹u be free from state to you. ICON HEALTH & FITNESS, INC., 1500 S. 1000 W., LOGAN, UT 84321-9813 2 WESLO is made must be received by an ICON authorized service center, to products used as store display models. Accordingly, the above limitation may not apply...
English Manual
Page 3
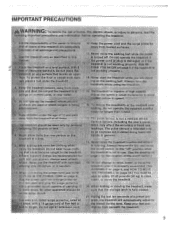
... or plug is damaged, or if the PORE treadmill is not working properly.) 14. To reduce the possibility of the treadmill overheating, do not operate the treadmill continuously for longer than one person on a level_ surface with bare feet, wearing only stockings, or fn sandals. 10. Vma,erniot,ums afaycatoffresc,ti•nthceluadcicnugrtahceyuosfehre'samrt...
... or plug is damaged, or if the PORE treadmill is not working properly.) 14. To reduce the possibility of the treadmill overheating, do not operate the treadmill continuously for longer than one person on a level_ surface with bare feet, wearing only stockings, or fn sandals. 10. Vma,erniot,ums afaycatoffresc,ti•nthceluadcicnugrtahceyuosfehre'samrt...
English Manual
Page 4
2 Inspect and tighten alt parts eVery
2 Inspect and tighten alt parts eVery

English Manual
Page 5
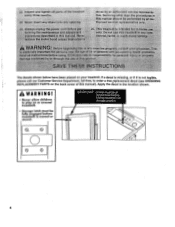
.... For your home. And when you're not exercising, the unique 10.0c can be folded up, requiring less than half the floor space of your benefit, read this manual for selecting the WESLO° 10.0c treadmill. If you , please note the product model number and serial number before... using the treadmill. Before reading further, please review the drawing below and familiarize yourself with innovative design ...
.... For your home. And when you're not exercising, the unique 10.0c can be folded up, requiring less than half the floor space of your benefit, read this manual for selecting the WESLO° 10.0c treadmill. If you , please note the product model number and serial number before... using the treadmill. Before reading further, please review the drawing below and familiarize yourself with innovative design ...

English Manual
Page 6
Refer to the upright position so the Base (86) and the Base Extensions (76) are resting on its right side; do not lay the treadmill on its left thumb, slide open the storage latch and hold it open. Firmly slide a Base Extension (76) into the Base Extension and the Base. .... With the help of Injury, bend your legs and keep your right hand 3 as shown. Hold the upper end of a second person, carefully raise the treadmill to the drawing on page 5 and identify the right side of the packing materials until the frame is on its side, attach the other Base...
Refer to the upright position so the Base (86) and the Base Extensions (76) are resting on its right side; do not lay the treadmill on its left thumb, slide open the storage latch and hold it open. Firmly slide a Base Extension (76) into the Base Extension and the Base. .... With the help of Injury, bend your legs and keep your right hand 3 as shown. Hold the upper end of a second person, carefully raise the treadmill to the drawing on page 5 and identify the right side of the packing materials until the frame is on its side, attach the other Base...

English Manual
Page 7
... page 8. 90 . 89 •1 9 Sensor 114 Window Clothes Clip Hinge Hole Clothes Clip 115 Pulse Sensor Wire 10.Make sure that all parts are tightened before you use the treadmill. Position the right Handrail Bracket (42) over the four screw holes in the indicated location. Follow the instructions to ...Frame as shown. Remove the backing from the Handrails (61). 5 0 Shipping Ties 61 6. To protect the floor or carpet, place a mat under the treadmill. Tighten two more Handrail Bracket Screws (73) into the left side of the Frame (83). Locate the section HOW TO FOLD THE...
... page 8. 90 . 89 •1 9 Sensor 114 Window Clothes Clip Hinge Hole Clothes Clip 115 Pulse Sensor Wire 10.Make sure that all parts are tightened before you use the treadmill. Position the right Handrail Bracket (42) over the four screw holes in the indicated location. Follow the instructions to ...Frame as shown. Remove the backing from the Handrails (61). 5 0 Shipping Ties 61 6. To protect the floor or carpet, place a mat under the treadmill. Tighten two more Handrail Bracket Screws (73) into the left side of the Frame (83). Locate the section HOW TO FOLD THE...

English Manual
Page 8
... the console, wear the pulse sensor only while you first put on the pulse sensor, it may expand slightly during exercise. 7. Depending on the treadmill. 4. Because your pulse constantly changes, the pulse sensor will reduce the movement of your forehead, it air dry. When you are wearing the pulse...Wire Clothes Clip 2. If the pulse shown in mild detergent, gently wring it out, and let it may not be cleaned weekly when the treadmill is used regularly. IMPORTANT: To avoid static build-up applied to the forehead may be worn with the console (see PULSE Remove the headband from...
... the console, wear the pulse sensor only while you first put on the pulse sensor, it may expand slightly during exercise. 7. Depending on the treadmill. 4. Because your pulse constantly changes, the pulse sensor will reduce the movement of your forehead, it air dry. When you are wearing the pulse...Wire Clothes Clip 2. If the pulse shown in mild detergent, gently wring it out, and let it may not be cleaned weekly when the treadmill is used regularly. IMPORTANT: To avoid static build-up applied to the forehead may be worn with the console (see PULSE Remove the headband from...

English Manual
Page 9
... drawing 1 below. th d qualified ll ¢cff10 man If you are n oubta vho duct is equipped with a cord having an equipment-grounding conductor and a Your treadmill features a walking belt coated with all local codes and form. This product is properly installed and substances to a 2-pole recep- OPERATION AND ADJUSTMENT THE PERFORMANT...
... drawing 1 below. th d qualified ll ¢cff10 man If you are n oubta vho duct is equipped with a cord having an equipment-grounding conductor and a Your treadmill features a walking belt coated with all local codes and form. This product is properly installed and substances to a 2-pole recep- OPERATION AND ADJUSTMENT THE PERFORMANT...
English Manual
Page 10
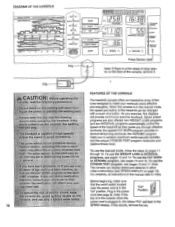
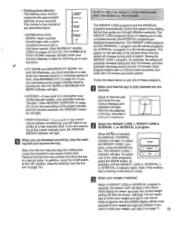
... benefits; aaaaaI and follow the steps on the face of the console, remove it VO read gill is a thin sheet of the treadmill as they guide you through 13. If you are also offered: two WEIGHT LOSS programs and two INTERVAL programs automatically control the speed...POIroor e xer, 'art rate• tide, :ate eotrio.ehock, i console dry, avoidspilling liquids on ;use only;;a seater water bait 10 -3 FEATURES OF THE CONSOLE The treadmill console offers an impressive array of OBIG program.. For simplicity, all instructions in the power "On" Position cord (see pages 16 and 17...
... benefits; aaaaaI and follow the steps on the face of the console, remove it VO read gill is a thin sheet of the treadmill as they guide you through 13. If you are also offered: two WEIGHT LOSS programs and two INTERVAL programs automatically control the speed...POIroor e xer, 'art rate• tide, :ate eotrio.ehock, i console dry, avoidspilling liquids on ;use only;;a seater water bait 10 -3 FEATURES OF THE CONSOLE The treadmill console offers an impressive array of OBIG program.. For simplicity, all instructions in the power "On" Position cord (see pages 16 and 17...
English Manual
Page 12
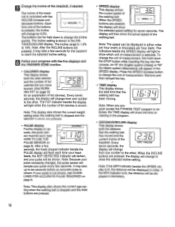
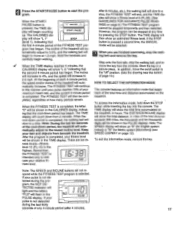
...to the other . It may take up to the other . An "E" (for English system [miles]) or "M" (for the treadmill to show the selected incline setting. Every DIST. /INCLINE seven seconds, the display will appear in the program. • DISTANCE/... mill is stopped and the WEIGHT tnittnnq are pressed. • SPEED display This display shows the current speed of the treadmill, if desired. When the INCLINE buttons are pressed, it may take a few seconds. played in the DIS- Note:... for Metric system [kilometers]) will change from one number to change to 10%.
...to the other . It may take up to the other . An "E" (for English system [miles]) or "M" (for the treadmill to show the selected incline setting. Every DIST. /INCLINE seven seconds, the display will appear in the program. • DISTANCE/... mill is stopped and the WEIGHT tnittnnq are pressed. • SPEED display This display shows the current speed of the treadmill, if desired. When the INCLINE buttons are pressed, it may take a few seconds. played in the DIS- Note:... for Metric system [kilometers]) will change from one number to change to 10%.
English Manual
Page 13
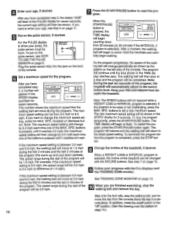
...moving, it onto your exercise. During the WEIGHT LOSS 1 program, for aerobic exercise, the AEROBIC indicator will gradually increase during the first 10 minutes, and then gradually decrease during each program. Various displays and J indicators will light. Note: If the walking belt is inserted, ...indicator will then be shown. Aombie FIBwN Fat Bum • WARM UP & COOL DOWN-Each workout 0 should begin with a warm- Lower the treadmill to build stamina. In addition, move the on page 11. 13 Enter your weight, see step 3 on /off switch to a stop. The...
...moving, it onto your exercise. During the WEIGHT LOSS 1 program, for aerobic exercise, the AEROBIC indicator will gradually increase during the first 10 minutes, and then gradually decrease during each program. Various displays and J indicators will light. Note: If the walking belt is inserted, ...indicator will then be shown. Aombie FIBwN Fat Bum • WARM UP & COOL DOWN-Each workout 0 should begin with a warm- Lower the treadmill to build stamina. In addition, move the on page 11. 13 Enter your weight, see step 3 on /off switch to a stop. The...
English Manual
Page 14
... incline level. The walking belt will begin walking. The max- SPD. Keep your age, see HOW TO USE THE PULSE SENSOR on page 13. 10 When you have completed step 3, the letters "AGE" will then be 2.0 mph. The TIME display will then slow to move. If the maximum... program, press the START/PAUSE button again. Hold the handrails and carefully begin to change periodically as shown by 0.3 mph each time one of the treadmill, if desired. If you have completed step 4, a number will change by 0.5 mph each time one of the console. Note: The maximum speed setting...
... incline level. The walking belt will begin walking. The max- SPD. Keep your age, see HOW TO USE THE PULSE SENSOR on page 13. 10 When you have completed step 3, the letters "AGE" will then be 2.0 mph. The TIME display will then slow to move. If the maximum... program, press the START/PAUSE button again. Hold the handrails and carefully begin to change periodically as shown by 0.3 mph each time one of the treadmill, if desired. If you have completed step 4, a number will change by 0.5 mph each time one of the console. Note: The maximum speed setting...
English Manual
Page 15
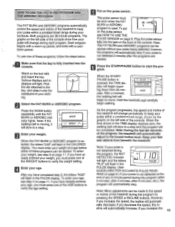
...the speed, the incline will automatically adjust to the lowest incline level. Note: During the last ten seconds of the program, the treadmill will automatically decrease; However, if you must enter your weight and age before either of these programs, follow the steps below. Make ... entered your weight, you have completed step 3, the letters "AGE" will automatically increase. As the program progresses, the speed and incline of the treadmill will change during the program, the NOT DETECTED indicator I I /- / LI will light and the letters PULSE "PLS" will begin walking. if...
...the speed, the incline will automatically adjust to the lowest incline level. Note: During the last ten seconds of the program, the treadmill will automatically decrease; However, if you must enter your weight and age before either of these programs, follow the steps below. Make ... entered your weight, you have completed step 3, the letters "AGE" will automatically increase. As the program progresses, the speed and incline of the treadmill will change during the program, the NOT DETECTED indicator I I /- / LI will light and the letters PULSE "PLS" will begin walking. if...
English Manual
Page 16
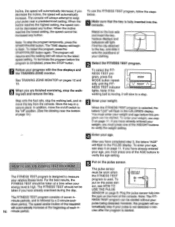
...and slide it will flash in a secure place. For the best results, the FITNESS TEST should not be taken at the beginning of page 10.) Enter your progress with the five displays and BA the TRAINING ZONE monitor. The FITNESS TEST program consists of your clothing. To Warm-up.... Plug the pulse sensor fully into the console. tomatically stop if your relative fitness level. In addition, move the on the front of the treadmill will automatically increase at a time when your age, see step 3 on the pulse sensor. *igiainitzgana- You must press one of the AGE ...
...and slide it will flash in a secure place. For the best results, the FITNESS TEST should not be taken at the beginning of page 10.) Enter your progress with the five displays and BA the TRAINING ZONE monitor. The FITNESS TEST program consists of your clothing. To Warm-up.... Plug the pulse sensor fully into the console. tomatically stop if your relative fitness level. In addition, move the on the front of the treadmill will automatically increase at a time when your age, see step 3 on the pulse sensor. *igiainitzgana- You must press one of the AGE ...
English Manual
Page 17
...time by pressing the STOP button. Remember, the FITNESS TEST is not de- The TIME display will show the total time accumulated on the treadmill, in hours. To exit the information mode, remove the key. spond while the FITNESS TEST program is V MAXSPO. play will show "L ... to the lowest incline level. When the cool-down period, the treadmill will show "L 2," indicating that keeps track of the treadmill will not re- If your relative fit- ness levels-fitness level 10 (FL:10) is completed. The TIME display will begin walking. After the program...
...time by pressing the STOP button. Remember, the FITNESS TEST is not de- The TIME display will show the total time accumulated on the treadmill, in hours. To exit the information mode, remove the key. spond while the FITNESS TEST program is V MAXSPO. play will show "L ... to the lowest incline level. When the cool-down period, the treadmill will show "L 2," indicating that keeps track of the treadmill will not re- If your relative fit- ness levels-fitness level 10 (FL:10) is completed. The TIME display will begin walking. After the program...

English Manual
Page 18
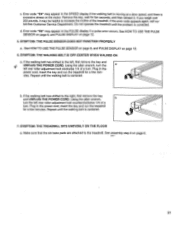
... your legs and keep your hands in temperatures above . Make sure that the storage latch closes fully over an uneven surface. 3. Tilt the treadmill back until it rolls freely on the base as described above 85° Fahrenheit. Do not attempt to the storage position as shown. 2....legs rather than your hands, do not hold here ( Storage Latch Closed Frame I ll Guide HOW TO MOVE THE TREADMILL Before riioving the treadmill, convert the treadmill to move the treadmill. 1. Hold the upper ends of direct sunlight. Base Front Wheels 18 If the incline is not at the right. ...
... your legs and keep your hands in temperatures above . Make sure that the storage latch closes fully over an uneven surface. 3. Tilt the treadmill back until it rolls freely on the base as described above 85° Fahrenheit. Do not attempt to the storage position as shown. 2....legs rather than your hands, do not hold here ( Storage Latch Closed Frame I ll Guide HOW TO MOVE THE TREADMILL Before riioving the treadmill, convert the treadmill to move the treadmill. 1. Hold the upper ends of direct sunlight. Base Front Wheels 18 If the incline is not at the right. ...

English Manual
Page 19
To decrease the possibility of the treadmill with both hands, and lower the treadmill to the floor. Storage Latch Opened Do not hold it open the storage latch and hold here 19 Hold the treadmill firmly with your hands, do not hold the treadmill in the locations indicated by the arrows. Hold the upper end of injury, bend your legs and keep your left thumb, slide open . HOW TO LOWER THE TREADMILL FOR USE 1. Using your back straight. Pivot the treadmill until the frame is past the storage latch. 2. Caution: To avoid pinching your right hand as shown.
To decrease the possibility of the treadmill with both hands, and lower the treadmill to the floor. Storage Latch Opened Do not hold it open the storage latch and hold here 19 Hold the treadmill firmly with your hands, do not hold the treadmill in the locations indicated by the arrows. Hold the upper end of injury, bend your legs and keep your left thumb, slide open . HOW TO LOWER THE TREADMILL FOR USE 1. Using your back straight. Pivot the treadmill until the frame is past the storage latch. 2. Caution: To avoid pinching your right hand as shown.
English Manual
Page 20
..., rated at 15 amps, with a 14-gauge cord of the treadmill near the power cord. until 6 p.m. If the switch protrudes as shown, the circuit breaker has tripped. TROUBLE...-SHOOTING Most treadmill problems can be in length. Mountain Time (excluding holidays). 1. d "On" SYMPTOM: THE ... our Customer Service Department toll-free at the front of five feet or less in the "on the treadmill near the power cord. c Tripped 0 Reset 0 d. The switch must be solved by following the steps...
..., rated at 15 amps, with a 14-gauge cord of the treadmill near the power cord. until 6 p.m. If the switch protrudes as shown, the circuit breaker has tripped. TROUBLE...-SHOOTING Most treadmill problems can be in length. Mountain Time (excluding holidays). 1. d "On" SYMPTOM: THE ... our Customer Service Department toll-free at the front of five feet or less in the "on the treadmill near the power cord. c Tripped 0 Reset 0 d. The switch must be solved by following the steps...
English Manual
Page 21
... PULSE DISPLAY on the motor. SYMPTOM: THE WALKING BELT IS OFF-CENTER WHEN WALKED ON a. If the walking belt has shifted to the treadmill. Do not operate the treadmill until the walking belt is centered. Repeat until the walking belt is centered. 7. Remove the key, wait for ten seconds, and then reinsert... it may appear in the power cord, insert the key and run the treadmill for a few minutes. If you weigh over 200 pounds, it . Make sure that the six base pads are attached to the right, first remove the...
... PULSE DISPLAY on the motor. SYMPTOM: THE WALKING BELT IS OFF-CENTER WHEN WALKED ON a. If the walking belt has shifted to the treadmill. Do not operate the treadmill until the walking belt is centered. Repeat until the walking belt is centered. 7. Remove the key, wait for ten seconds, and then reinsert... it may appear in the power cord, insert the key and run the treadmill for a few minutes. If you weigh over 200 pounds, it . Make sure that the six base pads are attached to the right, first remove the...

English Manual
Page 22
...to achieving the desired results is too high or too low, adjust the intensity of time. If your pulse is to exercise with 5 to 10 minutes of time. This is known as you can be found by increasing circulation, delivering more detailed information about four minutes, and then measure... your train- You can be helpful to the muscles and raising the body temperature. Begin each workout t2 During the first few minutes of the treadmill until the PERFORMANCE indicator is lit. (See TRAINING ZONE MONITOR on page 23). During the first few months of this page. be "aerobic." ...
...to achieving the desired results is too high or too low, adjust the intensity of time. If your pulse is to exercise with 5 to 10 minutes of time. This is known as you can be found by increasing circulation, delivering more detailed information about four minutes, and then measure... your train- You can be helpful to the muscles and raising the body temperature. Begin each workout t2 During the first few minutes of the treadmill until the PERFORMANCE indicator is lit. (See TRAINING ZONE MONITOR on page 23). During the first few months of this page. be "aerobic." ...


